
Popular categories
Looking for a yarn?


Comments / Questions (42)
![]() Patricia wrote:
Patricia wrote:
Merci infiniment pour ces explications très détaillées pour ce modèle. Je l'ai réalisé avec des restes de laine et je l'ai tricoté avec des aiguilles numéro 6. Je suis très contente d'avoir réussi. C'est la première fois que j'ai fais des boutonnières et des poches. Et comme j'appréhende de coudre l'ouvrage... ici les deux devant étant en une seule pièce avec le dos jusqu'au dessous des bras. Bon tricot à vous tous !!!
01.02.2026 - 21:07
![]() Rosemarie Olivebring wrote:
Rosemarie Olivebring wrote:
Jag förstår inte När arb mäter 55-57-59-61-63-65 cm sätts m i början på varje v i varje sida på en tråd restgarn till sned axel så här: 5-6-6-7-9-10 m 1 gång (m stickas innan de sätts på restgarnstråden så att du slippar klippa av tråden), 6-7-7-8-9-10 m 1 gång och till sist de resterande 11-11-13-13-13-14 m.
17.07.2024 - 12:10DROPS Design answered:
Hej Rosemarie. Du stickar 5 maskor (minsta storlek) i början av varvet, sätter de på en tråd och fortsätter sticka varvet ut. Gör samma sak på andra sidan. Nästa gång stickar du 6 maskor som du sedan sätter på tråd innan du stickar varvet ut och gör samma sak på andra sidan. Sista gången stickar du 11 maskor som du sedan sätter på tråd, stickar varvet ut och gör samma sak på andra sidan. Mvh DROPS Design
17.07.2024 - 13:09
![]() Nidhi wrote:
Nidhi wrote:
I am unable to understand shaping of shoulders in the back piece. The Instructions are not clear regarding slipping stitches on stitch holder. The total no. Of stitches does not add up to 81 stitches . Could you kindly explain the method more clearly
11.09.2022 - 09:30DROPS Design answered:
Dear Nidhi, to shape the diagonal shoulders, starting from the side/armhole, work the first 9 sts and slip them on a thread, work as before to the end of the row, turn. Work the first 9 sts and slip them on a thread, work as before to the end of the row, turn. You will repeat these 2 rows slipping the first 9 sts from the side on a thread after working them, and at the same time remember to shape the neck: cast off the middle 17sts for neck + 1 stitch at the beg of next row from neck. You should have: 9+9+13 (thread/shoulder) + 1+17+1 (sts cast off for neck) + 13+9+9 (thread/shoulder) = 81 sts. Happy knitting!
12.09.2022 - 10:10
![]() Beatrice wrote:
Beatrice wrote:
Bonjour Pourriez vous m'aider car je n'arrive pas à comprendre cela: "À 59 cm de hauteur totale glisser en attente sur un arrêt de mailles les 7 m côté milieu devant pour l'encolure et rabattre pour l'encolure en début de rang tous les rangs à partir du milieu devant"
02.03.2022 - 13:25DROPS Design answered:
Bonjour Béatrice, tricotez ainsi (devant droit): en commençant sur l'endroit (côté encolure), tricotez les 7 premières mailles et glissez-les en attente sur un fil/arrêt de mailles; terminez le rang, tournez et tricotez le rang sur l'envers. Tournez. Rabattez maintenant en début de rang sur l'endroit: 1 x 3 m, 1 x 2 m et 2 x 1 m (taille XXL). Pour le devant gauche, vous glisserez les 7 premières mailles sur l'envers rabattrez pour l'encolure en début de rang sur l'envers. Bon tricot!
02.03.2022 - 17:36
![]() Sylvie Guertault wrote:
Sylvie Guertault wrote:
Bonjour, quelqu un peut il m'expliquer à partir du moment où on divise l'ouvrage à 32cm, je ne comprends pas quand "monter 8 m pour les manches". J'ai donc 99m au départ de la séparation.... Merci pour votre aide.
07.04.2021 - 10:51DROPS Design answered:
Bonjour Mme Guertault, lors de la division, vous avez 45 m pour le dos, vous montez (cf vidéo) 8 m à la fin des 2 rangs suivants (= 8 m de chaque côté) = 61 m au total. Continuez en jersey avec 1 m lis de chaque côté. Bon tricot!
07.04.2021 - 13:47
![]() Liliana wrote:
Liliana wrote:
Buongiorno vorrei realizzare questo modello con i ferri dritti tradizionali e non circolari come posso realizzare gli aumenti per le maniche ? Grazie mille e attendo vostra risposta Saluti Liliana
27.03.2021 - 09:38DROPS Design answered:
Buonasera Liliana, questo modello è un cardigan ed è lavorato in piano, quindi può utilizzare i ferri dritti. Buon lavoro!
27.03.2021 - 18:42
![]() Beverley Perrow wrote:
Beverley Perrow wrote:
I have been looking for a patter of this style but in dk. Do you have one on the free list
01.03.2021 - 02:42DROPS Design answered:
Dear Mrs Perrow, please use our search engine on our home page, adding the required technique/keyword to help you finding the pattern you are looking for. Happy knitting!
01.03.2021 - 10:04
![]() Eveline Meijer wrote:
Eveline Meijer wrote:
Bij het achterpand staat dat je de schoudersteken op een hulpdraad moet zetten , dan wordt er over de overige 11 steken niets meer gezegd wat je daar mee moet doen. Dat is mij vraag
26.09.2019 - 10:30DROPS Design answered:
Dag Eveline,
Je zet de schoudersteken in 3 stapen op de hulpnaald, als laatste de overgebleven 11 steken. Op deze manier krijg je een mooie ronding in de schouder.
27.09.2019 - 15:38
![]() Eluza Kiyama wrote:
Eluza Kiyama wrote:
Quantos pontos coloco na agulha para fazer um bolso do lado de fora de um casaco cardigan tamanho médio?
02.09.2018 - 21:19DROPS Design answered:
Na receita, deve montar 23 pontos para todos os tamanhos. Se quiser um bolso mais largo, acrescente 2 pontos. Se quiser um bolso mais pequeno, tire 2 pontos. Bom Tricô!
03.09.2018 - 16:13Eluza Kiyama wrote:
Quantos pontos coloco na agulha para fazer um bolso do lado de fora de um casaco cardigan tamanho médio?
02.09.2018 - 21:18DROPS Design answered:
Bom dia! Coloca 23 pontos na agulha para fazer o bolso do lado de fora. Bom Tricô!
12.09.2018 - 11:59
|
|
DROPS 123-25 |
|
|
|
|
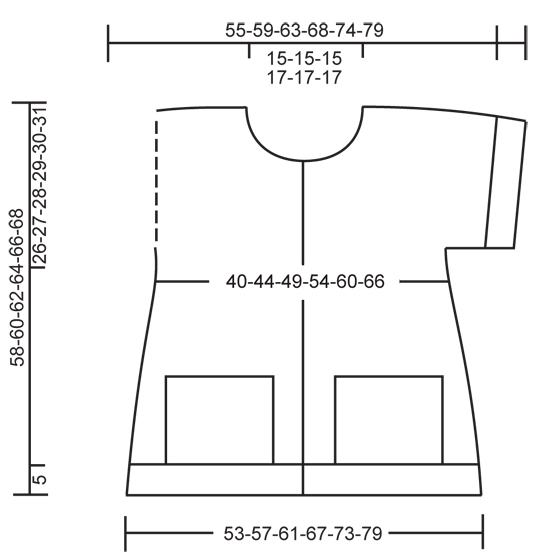
Knitted DROPS jacket with short sleeves and pockets in ”Snow”. Size S - XXXL.
DROPS 123-25 |
|
|
GARTER ST (back and forth on circular needle): K all rows. DECREASING TIP-1 (applies to body piece): Make all dec from RS. Beg 3 sts before marker and dec as follows: K2 tog, K2 (marker sits between these 2 sts), slip 1 st as if to K, K1, psso. BUTTONHOLES: Make buttonholes on right front band. 1 buttonhole = cast off third st from mid front and cast on 1 new st on next row. Make buttonholes when piece measures: SIZE S: 13, 21, 29, 37 and 45 cm SIZE M: 15, 23, 31, 39 and 47 cm SIZE L: 15, 23, 32, 40 and 49 cm SIZE XL: 15, 22, 30, 37, 45 and 52 cm SIZE XXL: 15, 23, 30, 38, 45 and 53 cm SIZE XXXL: 15, 23, 31, 39, 47 and 55 cm NOTE: Make last buttonhole on neckline. -------------------------------------------------------- JACKET: Worked back and forth on circular needle from mid front. BODY PIECE: Cast on 127-135-145-157-171-183 sts (includes 5 front band sts each side towards front edge) on circular needle size 7 mm with Snow. P 1 row from WS and continue in rib as follows from RS: 5 front band sts in GARTER ST - see above, * K1, P1 *, repeat from *-* until 6 sts remain and finish with K1 and 5 front band sts in GARTER ST. When rib measures 5 cm change to circular needle size 8 mm. Work next row as follows from RS: 5 front band sts in garter st as before, 3-3-5-5-7-7 stocking sts, slip the next 23-23-23-25-25-27 sts on a stitch holder (for pocket), AT THE SAME TIME pick up 1 new st on the back of each of the 23-23-23-25-25-27 sts on stitch holder, work stocking st on the next 65-73-79-87-97-105 sts, slip the next 23-23-23-25-25-27 sts on a stitch holder (for pocket), AT THE SAME TIME pick up 1 new st on the back of each of the 23-23-23-25-25-27 sts on stitch holder, work 3-3-5-5-7-7 stocking sts and finish with 5 front band sts in garter st as before = 127-135-145-157-171-183 sts. Now insert 2 markers 34-36-39-42-45-48 sts in from each side (= 59-63-67-73-81-87 sts between markers on back piece). Continue in stocking st and front bands in garter st. REMEMBER THE KNITTING TENSION! When piece measures 8 cm dec 1 st each side of both markers – See DECREASING TIP (= 4 dec sts) and repeat the dec on every 3.5-3.5-4-4-4-4 cm a total of 7 times = 99-107-117-129-143-155 sts. REMEMBER BUTTONHOLES ON RIGHT FRONT BAND – see above. When piece measures 32-33-34-35-36-37 cm divide for sleeves and complete front and back pieces separately. BACK PIECE: READ ALL OF THIS SECTION BEFORE CONTINUING! = 45-49-53-59-67-73 sts. Now cast on 8-8-8-8-7-7 new sts at the end of the next 2 rows for sleeves = 61-65-69-75-81-87 sts. Continue in stocking st and 1 edge st in garter st each side. When piece measures 55-57-59-61-63-65 cm slip sts at the beg of every row each side on a stitch holder for shaped shoulder as follows: 5-6-6-7-9-10 sts 1 time (work sts before slipping them on stitch holder to avoid cutting the thread), 6-7-7-8-9-10 sts 1 time and then the remaining 11-11-13-13-13-14 sts – NOTE: when working the first st after having slipped sts on stitch holder, slip this st and tighten thread to avoid hole in transition. AT THE SAME TIME when piece measures 56-58-60-62-64-66 cm cast off the middle 15-15-15-17-17-17 sts for neck and complete each shoulder separately. Cast off 1 st on neckline on next row. When all sts have been slipped on stitch holder piece measures approx 58-60-62-64-66-68 cm from bottom edge and up to shoulder, where longest. RIGHT FRONT PIECE: = 27-29-32-35-38-41 sts. Now cast on 8-8-8-8-7-7 new sts at the end of row towards the side for sleeve = 35-37-40-43-45-48 sts. Continue in stocking st, 5 front band sts in garter st as before and 1 edge st in garter st towards the side. When piece measures 51-53-55-57-59-61 cm slip the 6-6-7-7-7-7 sts towards mid front on a stitch holder for neck and cast off to shape the neckline at the beg of every row from mid front: 3 sts 1 time, 2 sts 1 time and 1 st 2-2-2-3-2-2 times. AT THE SAME TIME when piece measures 55-57-59-61-63-65 cm slip sts at the beg of every row from the side on a stitch holder for shaped shoulder as described for back piece. When all sts have been slipped on stitch holder piece measures approx 58-60-62-64-66-68 cm from bottom edge and up to shoulder, where longest. LEFT FRONT PIECE: Like right front piece, but mirrored. ASSEMBLY: Slip the 22-24-26-28-31-34 sts from stitch holder on one shoulder on circular needle size 8 mm and work back and forth as follows: K 1 row from RS – NOTE: To avoid a hole in each transition pick up a st in transition and work this tog with first st on left needle. On next row cast off loosely with K sts from RS. Repeat in the same way along the 3 other shoulders. Sew shoulder seams inside cast off row – make sure seam isn’t too tight. Sew under arm seams and side seams inside 1 edge st. NECKLINE: Pick up from RS approx 53 to 63 sts round neck (includes sts from stitch holders at front) on circular needle size 7 mm with Snow (divisible by 2 + 1). Work rib as follows (Row 1 = WS): 5 front band sts in garter st, * P1, K1 *, repeat from *-* until 6 sts remain and finish with P1 and 5 front band sts in garter st (from RS rib beg and end with K1 inside front band each side). When neckline measures 2 cm make 1 buttonhole in line with the others on right front band. Cast off with K over K and P over P when neckline measures 5 cm. SLEEVE EDGE: Pick up 1 st in each st round sleeve edge on small circular needle size 7 mm with Snow. Work rib in the round, K1/ P1, AT THE SAME TIME adjust no of sts to 64-66-68-70-72-74 sts on round 1. Cast off with K over K and P over P when sleeve edge measures 5 cm. POCKET: Slip the 23-23-23-25-25-27 sts from stitch holder on one front piece on needle size 8 mm and work rib as follows (from RS): 1 garter st, * K1, P1 *, repeat from *-* until 2 sts remain and finish with K1 and 1 edge st in garter st. When pocket measures approx 15-15-16-16-17-17 cm (or desired length) cast off with K over K and P over P. Make a similar pocket on the other front piece and sew the pockets to each side. |
|
 |
|
Have you finished this pattern?Tag your pictures with #dropspattern or submit them to the #dropsfan gallery. Do you need help with this pattern?You'll find 22 tutorial videos, a Comments/Questions area and more by visiting the pattern on garnstudio.com. © 1982-2026 DROPS Design A/S. We reserve all rights. This document, including all its sub-sections, has copyrights. Read more about what you can do with our patterns at the bottom of each pattern on our site. |


With over 40 years in knitting and crochet design, DROPS Design offers one of the most extensive collections of free patterns on the internet - translated to 17 languages. As of today we count 324 catalogues and 12290 patterns translated into English (UK/cm). 12290
We work hard to bring you the best knitting and crochet have to offer, inspiration and advice as well as great quality yarns at incredible prices! Would you like to use our patterns for other than personal use? You can read what you are allowed to do in the Copyright text at the bottom of all our patterns. Happy crafting!
Post a comment to pattern DROPS 123-25
We would love to hear what you have to say about this pattern!
If you want to leave a question, please make sure you select the correct category in the form below, to speed up the answering process. Required fields are marked *.