
Popular categories
Looking for a yarn?


Comments / Questions (16)
![]() Angela wrote:
Angela wrote:
Quanti gomitoli servono per completare questa borsa?
18.05.2024 - 23:40DROPS Design answered:
Buonasera Angela, i materiali si trovano sulla destra della foto: sono necessari 11 gomitoli di DROPS Snow. Buon lavoro!
20.05.2024 - 23:25
![]() Judith wrote:
Judith wrote:
Fijne tas, komt mooi uit het viltproces. Voor de noppen heb ik restjes Eskimo in allerlei kleuren gebruikt. Fleurig geworden!
09.02.2019 - 17:17
![]() Beatrice wrote:
Beatrice wrote:
J'ai terminé le sac en rose fushia...Super modèle comme je l'imaginais !!! Je vais pouvoir y glisser mes cours en forma A4. Merci pour votre site et toutes les explications. Je vous suis fidèle depuis vos débuts .
14.10.2018 - 12:08
![]() Patrizia wrote:
Patrizia wrote:
Buongiorno ho realizzato questo modello, messo in lavatrice come da vostre istruzioni ma non si è infeltrito. Cosa posso fare? Grazie
07.02.2018 - 12:06DROPS Design answered:
Buongiorno Patrizia. Provi a ripetere la procedura per infeltrire. Buon lavoro!
07.02.2018 - 14:24
![]() Britta wrote:
Britta wrote:
Ich habe die Tasche in dunkelblau gearbeitet, allerdings ohne die Noppen auf dem Träger (dann braucht man einen Knäuel weniger). Sie ist richtig stabil, das Filzen hat die nach dem Stricken doch recht lockeren Noppen wunderbar zu kleinen festen Kugeln werden lassen. Den Träger kann man über einige cm auf der Tasche festnähen, das hält das ganze gut in Form. Wunderschön!
16.10.2014 - 14:24
![]() Voutaz wrote:
Voutaz wrote:
Merci pour ce modelle, j'ai fais une surprice a mon amie elle a trouver pratique et beaux
10.08.2011 - 13:26
![]() Marion wrote:
Marion wrote:
Auch mir gefällt die Tasche suuuper. Ich werde sie auf jeden Fall nacharbeiten. Ich überlege nur noch, welche Farbe.
05.11.2009 - 16:40
![]() Selina wrote:
Selina wrote:
I love this. I can see lots of different coloured bobbles on a grey/black background.
31.08.2009 - 08:35
![]() Westwind2 wrote:
Westwind2 wrote:
What a great saddle bag for everyday. How do we get the pattern?
06.07.2009 - 22:06
![]() Elisabeth wrote:
Elisabeth wrote:
Rigtig anvenlig taske lækkert garn
29.06.2009 - 22:06
|
|||||||
Milk and Honey#milkandhoneybag |
|||||||
|
|
|||||||
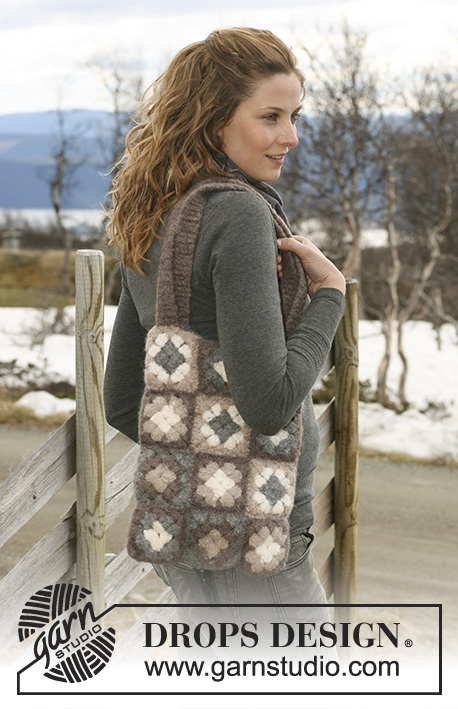
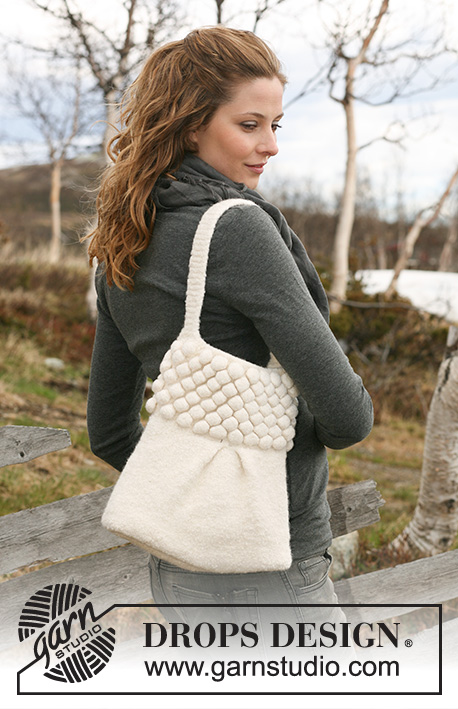
Felted DROPS bag in ”Snow” with bobbles on flap and shoulder strap.
DROPS 117-5 |
|||||||
|
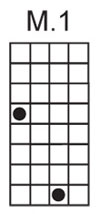
GARTER ST (back and forth on needle): K all rows. PATTERN: See diagram M.1 – diagram is seen from RS. BAG: Worked in 1 piece, beg with the flap. FLAP: Worked back and forth on needle. Cast on 38 sts on needle size 8 mm with Snow. K 3 rows (first row = WS), then 4 rows stocking st with the middle 8 sts + 2 sts each side in GARTER ST – see above! AT THE SAME TIME on row 2 from cast on row inc 1 st each side by K2 in the outermost st each side. Repeat the inc on every other row a total of 3 times = 44 sts Work inc sts in stocking st. Continue as follows when inc are complete: 2 garter sts, M.1 on 16 sts, garter st on the middle 8 sts, M.1 on 16 sts (beg with second st from right in diagram) and 2 garter sts. Continue like this until piece measures 28 cm. BAG: Work sts onto circular needle size 8 mm and cast on 56 sts at the end of row = a total of 100 sts. NOW MEASURE PIECE FROM HERE! P 1 round on circular needle and continue in stocking st. When piece measures 40 cm work next round as follows: * K2, K2 tog *, repeat from *-* = 75 sts. P 1 round, and cast off. Sew bag tog in outer loops of sts at bottom. SHOULDER STRAP: Worked back and forth on needle. Cast on 8 sts on needle size 8 mm with Snow. Continue as follows: Row 1 to 3: K all sts. Row 4: K2, 1 bobble (see explanation below), K5. Row 5 to 7: K all sts. Row 8: K5, 1 bobble, K2. Row 9 to 11: K all sts. Repeat row 4 to 11 until piece measures 100 cm. Cast off. Sew shoulder strap to each side of bag with the bobbles on the outside. FELTING: The piece can be felted either in the washing machine or the tumble dryer – read description below. Remember: Subsequent washes are as for a normal wool garment. IN WASHING MACHINE: Washing machines will vary when felting. If the piece is not felted enough, it can be felted again. If it is felted too much, it can be stretched to the correct size while still wet. DO THE FOLLOWING: Lay the piece in the washing machine, using a programme of approx. 40 minutes (not a wool programme). Wash at 40 degrees without pre-wash, detergent is optional. After washing, shape the piece while it is still wet. IN TUMBLE DRYER: Felting in a tumble dryer gives good control over the degree of felting. The tumble dryer can be opened during drying to check the size of the piece. If it is not felted enough it can be thoroughly wetted and felted again. If it is felted too much it can be stretched to the correct size while still wet. DO THE FOLLOWING: Lay the piece in water so it becomes completely wet, then place it in the tumble dryer and begin the drying process. Dry to the desired size, checking regularly. |
|||||||
Diagram explanations |
|||||||
|
|||||||
 |
|||||||
Have you finished this pattern?Tag your pictures with #dropspattern #milkandhoneybag or submit them to the #dropsfan gallery. Do you need help with this pattern?You'll find 16 tutorial videos, a Comments/Questions area and more by visiting the pattern on garnstudio.com. © 1982-2026 DROPS Design A/S. We reserve all rights. This document, including all its sub-sections, has copyrights. Read more about what you can do with our patterns at the bottom of each pattern on our site. |
|||||||


With over 40 years in knitting and crochet design, DROPS Design offers one of the most extensive collections of free patterns on the internet - translated to 17 languages. As of today we count 324 catalogues and 12290 patterns translated into English (UK/cm). 12290
We work hard to bring you the best knitting and crochet have to offer, inspiration and advice as well as great quality yarns at incredible prices! Would you like to use our patterns for other than personal use? You can read what you are allowed to do in the Copyright text at the bottom of all our patterns. Happy crafting!
Post a comment to pattern DROPS 117-5
We would love to hear what you have to say about this pattern!
If you want to leave a question, please make sure you select the correct category in the form below, to speed up the answering process. Required fields are marked *.