
Leder du efter et garn?


Kommentarer / Spørgsmål (35)
![]() Sharon Hunt-Edwards skrev:
Sharon Hunt-Edwards skrev:
Hello Am working on the neck of this sweater and I have taken it out one and restarted it but am still not sure 🤔 I understand the instructions. The 17 sts for the front I have bound off am I supposed to pick up sts in these sts? Also says to sew edge to edge from right side. Does this the bottom of the collar?
08.12.2023 - 21:35DROPS Design svarede:
Dear Sharon, you pick up the stitches around the neck, but not at the bottom of the neckline, where you have cast off the 17 stitches. When you finished knitting the edge/corral, it will have an edge, that you should sew to the bottom of the neckline, to the cast off stitches. I hope this helps. Happy Knitting!
10.12.2023 - 21:15
![]() Sharon Hunt skrev:
Sharon Hunt skrev:
Collar: Starting at the left side of the 17 bound-off sts at center front, pick up approx. 127-163 sts (divisible by 3 + 1) on smaller circular needles around the neck, …. Dos the 125-163 included the stitches cast off for back avd from. I did not bind off these stitches because i thought the would be picked up later. Read a reply to a question which said to put the front sts on a string so I did same for the back??? S
28.11.2023 - 01:01DROPS Design svarede:
Hi Sharon, Yes, the stitch count includes knitting up (or including the stitches on the stitch holder) mid-back of neck. Happy knitting!
28.11.2023 - 06:44
![]() Sharon Hunt skrev:
Sharon Hunt skrev:
Hi the armhole on the above sweater is not long enough it is shorter than on the schematic. The armhole on the sweater I like is 28 cm. Do I just knit longer after neck and shoulder shaping. Sharon
25.11.2023 - 13:39DROPS Design svarede:
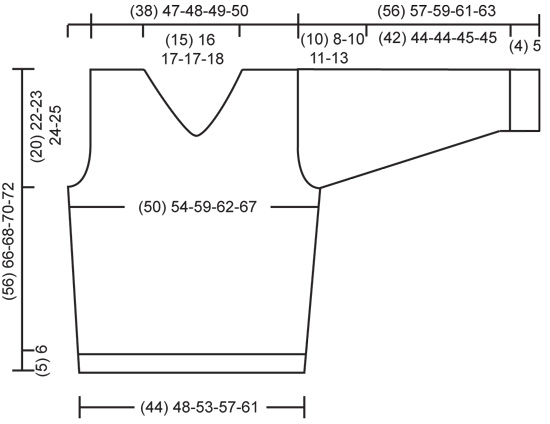
Dear Sharon, the armhole on the schematic starts when the piece measures approx. 36 cm from the bottom of the piece (for the shortest size). After that, it should be an armhole of approx. 20cm for the smallest size. Please check the measurements in the schematic below; if you wish to make a longer armhole you will need to bind off for the armhole earlier in the piece. You can't continue working after the neck and shoulder shaping, since you will displace the shaping. That is why it's more difficult to adjust the measurements when you are working from the bottom up. Also take into account that the model is usually wearing an M size. Happy knitting!
26.11.2023 - 22:17
![]() Sharon Hunt skrev:
Sharon Hunt skrev:
Hi the armhole on the above sweater is not long enough it is shorter than on the schematic. The armhole on the sweater I like is 28 cm. Do I just knit longer after neck and shoulder shaping. Sharon
25.11.2023 - 13:20DROPS Design svarede:
Dear Sharon, the armhole on the schematic starts when the piece measures approx. 36 cm from the bottom of the piece (for the shortest size). After that, it should be an armhole of approx. 20cm for the smallest size. Please check the measurements in the schematic below; if you wish to make a longer armhole you will need to bind off for the armhole earlier in the piece. You can't continue working after the neck and shoulder shaping, since you will displace the shaping. That is why it's more difficult to adjust the measurements when you are working from the bottom up. Also take into account that the model is usually wearing an M size. Happy knitting!
26.11.2023 - 22:17
![]() Sharon Hunt skrev:
Sharon Hunt skrev:
Hi drops, i need help her. Am making size large , pullover. I have knitted up to the armhole and I have 109 sts and I have not cast off for the neck. When do I start casting off for the neck.
22.11.2023 - 20:07DROPS Design svarede:
Dear Mrs Hunt, in size L you start binding off for neck when piece measures 44 cm and you start to cast off for armhole when piece measures 44 cm, this means you first divide piece for neck in this size, then cast off for neck at the beg of every row from the side/armhole + decrease for neck. Happy knitting!
23.11.2023 - 08:32
![]() Sharon Hunt - Edwards skrev:
Sharon Hunt - Edwards skrev:
Hi am making size 46- the size that has a cast on of 113 sts. An I not supposed to cast off for the shoulders at the same time as I cast off 17 sts for the front? How many sts should i have for the shoulders. My count is not the same on both sides of the middle. Thanks
22.11.2023 - 10:31DROPS Design svarede:
Dear Mrs Hunt-Edwards, in size L you cast off for armhole on each side 3 sts 1 time + 2 sts 2 times + 1 stitch 5 times, at the same time, cast off the middle 17 sts for neck then decrease for neck 1 stitch 9 ganger = 125 sts (before armhole) - 24 sts (armhole, ie 12 sts on each side) = 101 sts - 17 sts for neck = 42 sts for each front piece - 9 sts decreased for neck = 33 sts remain for shoulder. Cast off when piece measures 68 cm. Happy knitting!
23.11.2023 - 08:23
![]() Sharon Hunt skrev:
Sharon Hunt skrev:
Hei drops! Making the pullover, instruction says: Neck opening: At the same time when the piece measures 36-44-44-46-46 cm bind off the center 17 sts separately. I have already cast off 3 sts on each side. I cast off 2 sts about to cast off 17 middle sts. How many should I have between these 17 sts . Right side is facing me and I have allready cast off the first 3 sts on RS and WS. I have casted off 2 sts . So the RS is facing with 2 sts cast off. Thanks for a quick reply.
22.11.2023 - 07:28DROPS Design svarede:
Dear Mrs Hunt, not sure even from your previous questions which size you are working, but casting off for armhole on each side (then only towards armhole after dividing for neck) and dividing + decreasing for neck will give you 24-33-33-34-34 sts left for shoulder. Happy knitting!
22.11.2023 - 09:15
![]() Sharon Hunt skrev:
Sharon Hunt skrev:
Hi Drops will be travelling and need to know the answer to this question. I would like yo knit this sleeve top down by picking up for the sleeve cap and following the pattern as written. Is this an impossible task. I know I could knit bottom up but want to avoid seeing. Thanks for responding. Sharon
17.11.2023 - 08:30DROPS Design svarede:
Dear Mrs Hunt, you can probably adapt the pattern to work the sleeve top down, but we are unfortunately not able to adjust every pattern to every single request, do not hesitate to contact your yarn store for any further assistance. Thanks for your comprehension. Happy knitting!
17.11.2023 - 08:50
![]() Sharon Hunt skrev:
Sharon Hunt skrev:
Hi, am aking the pullover size 46,5 snd it states: Pullover): When the piece measures 36-44-45-46-47 cm bind off for armhole at each side every other row: 3 sts 1 time, 2 sts 3-1-2-4-5 times and 1 st 5-3-5-4-6 times. Question was how to decrease 3 sts? Thanks for responding Sharon
16.11.2023 - 17:48DROPS Design svarede:
Dear Mrs Hunt, you won't have to decrease here but to cast off the stitches at the beginning of each row on each side, ie at the beginning of a row from RS and as the beginning of a row from WS. Happy knitting!
17.11.2023 - 08:47
![]() Sharon Hunt- Edwards skrev:
Sharon Hunt- Edwards skrev:
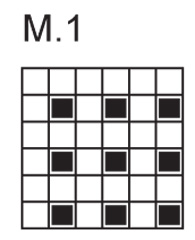
Hi! Started this sweater and decided to make it in the round. When I started M1 over 47 sts I ended with a purl st after the first row. Since am doing this in the round and not back and forth am wondering if I should start from the left instead og the right on the chart. Thanks for your help.
16.11.2023 - 07:34DROPS Design svarede:
Dear Mrs Hunt-Edwards, it looks fine as you say, the diagram worked over 47 sts will start and end with a Purl stitch on 1st row (so that pattern is symmetrical), when working in the round, just work the stitches as they should be seen from RS, ie P1, K1 on first round and K all sts on every other round. Happy knitting!
16.11.2023 - 10:28
|
|||||||
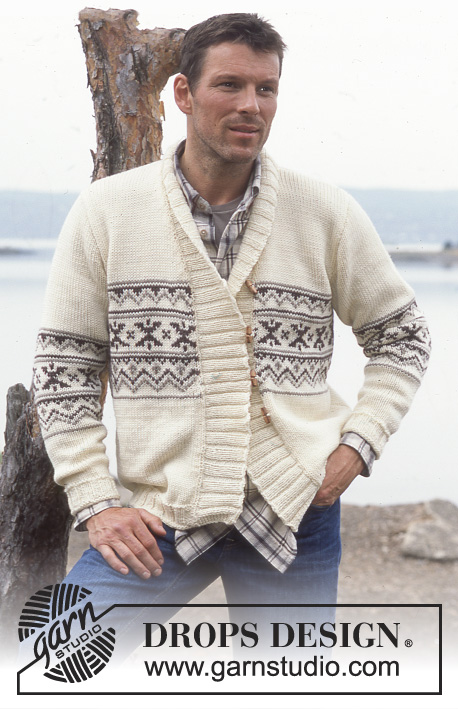
Granite Ridge |
|||||||
|
|
|||||||
Strikket sweater eller slipover / vest til herre i DROPS Karisma
DROPS 85-16 |
|||||||
|
Strikkefasthed: P.nr er vejledende! 21 m x 28 p på p 4 og glatstrik = 10 x 10 cm. Rib: * 1 r, 2 vr *, gentag fra *-*. Mønster: Se diag M.1. Diag viser mønst set fra retsiden. Retstrik (frem og tilb): 1.p: Ret, 2.p: Ret. Indtagningstips (gælder ærmegab på vest): Der tages ind indenfor 7 m som strikkes således fra kanten (set fra retsiden): 1 m retstrik, 1 r, 2 vr, 1 r og 2 vr. Alle indtagninger sker fra retsiden.Tag ind således efter 7 kantm: Tag 1 m løs af p som om den skulle strikkes ret, 1 r, løft den løse m over. Tag ind således før 7 kantm: 2 r sm. Sweater/vest: Forstk: Tallene i ( ) gælder den mindste str. Slå (95) 104-113-122-131 m op (inkl 1 kantm i hver side) på p 3 med Karisma. Strik 3 p vrang (1.p = vrangen), derefter strikkes der Rib med 1 kantm i hver side - se forkl over. Når arb måler (5) 6 cm - afpas således at næste p strikkes fra retsiden - strikkes der 2 p retstrik - samtidig på 1.p justeres m-ant til (95) 103-113-121-131 m. Skift til p 4 og fortsæt således: 1 kantm, (25) 28-32-36-40 m glatstrik, M.1 over de næste 43-45-47-47-49 m, (25) 28-32-36-40 m glatstrik og 1 kantm. Husk på strikkefastheden! Når arb måler 10 cm tages der 1 m ud i hver side på hver (4.) 5. cm totalt 6 gange = (107) 115-125-133-143 m. Læs hele næste afsnit før det strikkes!Ærmegab: Sweater: Når arb måler (36) 44-45-46-47 cm lukkes der af til ærmegab i hver side på hver 2.p: 3 m (1) 1 gang, 2 m (3) 1-2-4-5 gange og 1 m (5) 3-5-4-6 gange. Vest: Når arb måler (34) 42-43-44-45 cm strikkes der således over de yderste 13 m mod siden (set fra retsiden): 1 m retstrik, * 1 r, 2 vr *, gentag fra *-* totalt 4 gange (de øvrige m strikkes som før). Når arb måler (36) 44-45-46-47 cm lukkes de yderste 6 m i siden af til ærmegab. Luk derefter 1 m af til ærmegab i siden på hver 2.p - se Indtagningstips: (8) 2-6-9-13 gange. Halsslids: Samtidig når arb måler (36) 44-44-46-46 cm lukkes de midterste 17 m af til halsslids og hver side strikkes færdig for sig. 1.side: = (31) 41-42-43-44 m. Strik videre som før med glatstrik og M.1 over de (13) 14-15-15-16 m mod midt foran. Når arb måler (45) 53-55-56-57 cm lukkes der 1 m af mod halsen på hver 4.p: (7) 8-9-9-10 gange. Efter alle aflukninger til ærmegab og hals er der (24) 33-33-34-34 m tilbage på skulderen. Fortsæt med glatstrik og mønst som før (og 7 m Rib mod ærmegabet på vesten). Luk af når arb måler (56) 66-68-70-72 cm. 2.side: Strikkes som 1.side men modsat. Rygstk: Slå op og strik som forstk men M.1 strikkes ikke på rygstk og der lukkes ikke til halsslids bagpå. Luk af til ærmegab som på forstk = (79) 99-101-103-105 m og strik videre til arb måler (54) 64-66-68-70 cm. Nu lukkes de midterste (27) 29-31-31-33 m af til hals. Videre lukkes der på hver side af halsen på hver 2.p: 1 m 2 gange = (24) 33-33-34-34 m tilbage på hver skulder. Luk af når arb måler (56) 66-68-70-72 cm. Ærme (gælder sweater): Slå (47) 50-50-53-53 m op (inkl 1 kantm i hver side) på p 3 med Karisma. Strik 3 p vrang (1.p = vrangen), derefter strikkes der Rib med 1 kantm i hver side - se forkl over. Når arb måler (4) 5 cm - afpas således at næste p strikkes fra retsiden - strikkes der 2 p retstrik. Skift til p 4 og fortsæt med glatstrik. Når arb måler (9) 13-9-9-13 cm tages der 1 m ud i hver side på hver (2,5.) 2.-2.-2.-1,5. cm totalt (15) 17-20-20-23 gange = (77) 84-90-93-99 m. Når ærmet måler (46) 49-49-50-50 cm lukkes der af til ærmekuppel i hver side på hver 2.p: 4 m (1) 1 gang, 3 m (2) 3 gange, 2 m (1) 1-2-2-2 gange og 1 m (7) 2-4-5-8 gange, videre lukkes der 2 m i hver side til arb måler (55) 56-58-60-62 cm, derefter lukkes der 3 m 1 gang i hver side. Luk de resterende m af, arb måler ca (56) 57-59-61-63 cm. Montering: Sy skuldersømmene. Hals: Start med at strikke m op på venstre side af de 17 første m som blev lukket af til hals (set når arb ligger fladt foran dig). Strik ca 127 til 163 m op (delbart med 3 + 1) på rundp 3 rundt i halsen og stop til højre for de 17 aflukkede m midt foran (der skal ikke strikkes op over disse 17 m). Strik frem og tilbage således: Strik 1 p ret fra vrangen samtidig med at der slåes 1 ny m op i hver side (= kantm til at sy i) = 129 til 165 m. Fortsæt således (set fra retsiden): 1 kantm, 1 r, * 2 vr, 1 r *, gentag fra *-* og slut af med 1 kantm. Sæt 1 mærketråd i den (23.) 23.-26.-26.-29. m ind fra hver side (= 1 ret-m set fra retsiden). Når halskanten måler 3,5 cm tages de 2 vr ud på hver side af m med mærketråd i hver side til 3 vr = 133 til 169 m. Strik 2 p retstrik over alle m og luk af. Sy halskanten sammen midt foran op til mærketråden - sy kant i kant fra retsiden med små sting således at retstrikkanten ses fra retsiden. Sy halskanten pænt fast der hvor de 17 m blev lukket af foran. Sweater: Sy ærmerne i. Sy ærme- og sidesøm i et indenfor 1 kantm. Vest: Sy sidesømmene indenfor 1 kantm. |
|||||||
Diagram forklaring |
|||||||
|
|||||||
 |
|||||||
 |
|||||||
Har du lavet denne opskrift?Så tagger du dine billeder med #dropspattern eller send dem til #dropsfan galleriet. Behøver du hjælp med opskriften?Du finder 19 instruktionsvideoer, kommentarer/spørgsmål og mere i opskriften på www.garnstudio.com © 1982-2026 DROPS Design A/S. Alle rettigheder er reserveret. Dette dokument med tilhørende underdokumenter har copyright. Læs mere om hvad du kan gøre med vore opskrifter, nedert i alle vore opskrifter på hjemmesiden. |
|||||||


Med over 40 år i strikke- og hæklebranchen tilbyder DROPS Design en af de mest omfattende kollektioner med gratis opskrifter på internettet - oversat til 17 sprog. Dags dato har vi 324 kataloger og 12290 opskrifter på Dansk.
Vi arbejder hårdt for at kunne tilbyde Dig det bedste man kan få af strik og hækling, inspiration og gode råd men også kvalitetsgarn til fantastiske priser! Vil du bruge vore opskrifter til andet end for privat brug? Du kan læse om hvilke regler som gælder under teksten Copyright nederst på siden i alle vore opskrifter. God fornøjelse!
Kommentere opskrift DROPS 85-16
Vi vil gerne høre din mening om denne model!
Hvis du ønsker at stille et spørgsmål, så husk at vælge rigtig kategori i menuen under - det vil give dig hurtigere svar. Obligatoriske felter er markeret med *.