
Leder du efter et garn?


Kommentarer / Spørgsmål (12)
![]() Clare skrev:
Clare skrev:
Hi, can you please let me know if this pattern can be updated to include larger sizes ? Like up to XXXL
21.01.2024 - 19:26
![]() Lynne Randall Caloggero skrev:
Lynne Randall Caloggero skrev:
I haven't begun to knit the project yet, but as I read through the instructions I'm wondering why it's necessary to shift M.1 half a pattern repeat to the right on every other row?
01.07.2020 - 15:30DROPS Design svarede:
Dear Mrs Randall Caloggero, you will displace the diagrams so that the flowers are note the one over each other but one flower will come over 2 from previous diagram. Happy knitting!
01.07.2020 - 15:43
![]() Debra skrev:
Debra skrev:
Hi, I have another question about the directions. I am working on the sleeve and am almost finished. I have cast off 10 sts mid underarm, ready to work back and forth on the needles. It says to decrease 6 sts 3 times on every other row. Where do I place these decreases- at the beginning, middle, end of row or equally spaced out across the row? Please clarify for me. Thanks for all your help so far.
20.06.2020 - 01:38DROPS Design svarede:
Dear Debra, after you have cast off 10 sts on mid under arm, you continue back and forth casting off (you don't decrease, pattern will be updated) 6 sts at the begining of every row on each side a total of 3 times (= 6 sts at the beg of next 6 rows). Happy knitting!
22.06.2020 - 07:37
![]() Debra skrev:
Debra skrev:
I am working on the sleeve and am questioning the instructions. Do I work M1 just once and then change to M2 as soon as it's completed or do I continue with M1 repeated several times until I have 122 sts and then switch to M2 once all 122 sts are made?
17.06.2020 - 19:41DROPS Design svarede:
Dear Debra, diagram M.1 is worked only one time in height (but around all stitches in the round - make sure to center a diagram mid on top of sleeve), then you work M.2 (both in width and height) to the end of sleeve. Happy knitting!
18.06.2020 - 09:37
![]() Debra skrev:
Debra skrev:
Thanks for your answer but I am still unsure about the meaning of decreasing 2 sts 2 times and 1 st 2 times. Is that all in one row and consecutively cast off. Why doesn't it just say cast off 6 stitches? Maybe I'm not understanding and making it more complicated than it is. Please help clear this up for me.
05.06.2020 - 18:08DROPS Design svarede:
Dear Debra, you don't cast off 6 sts 1 time to make the neck line somewhat rounded. You have to cast off the sts for neckline at the beg of row from neck towards armhole, then work row to the end, turn and work next row and repeat this 2 rows until all sts are cast off (you repeat these 2 rows 2 times casting off 2 sts at the beg of row then repeat 2 times castinf off 1 st at the beg of row). Happy knitting!
08.06.2020 - 07:35
![]() Debra skrev:
Debra skrev:
Can you give me more explicit details on how to shape the front neckline? I don't know what you mean by decrease 2 sts 2 times , 1 st 2 times. Are these all in the same row?How many stitches will I be decreasing in total? I assume I will be using the knit 2 together technique to do these decreases.
05.06.2020 - 02:08DROPS Design svarede:
Dear Debra, you first cast off the middle 41 sts for neck and finish each shoulder separately, at the beginning of every row from neck towards armhole (from RS on one shoulder, from WS on the other shoulder), you will cast off (will looks nicer than decrease): 2 sts 2 times and 1 stitch 2 times = you have cast off a total of 6 sts towards neck. Happy knitting!
05.06.2020 - 07:41
![]() Debra skrev:
Debra skrev:
Ughhh, I have already knitted one complete diagram as before the edits. Do you know if I can continue on pearling as the original pattern and just turn the garment inside out when finished so the knit side shows? Or is there a way to retread the stitches on the needle ? Or do I have to rip it all out and begin again? Please tell me what you think.
25.05.2020 - 23:14DROPS Design svarede:
Dear Debra, you could turn your work inside outside so that the knit side will be now towards outside (= from RS) and the purl side inside (from WS) - just do this at at the beg of the round - you might also continue working with purled sts outside and then just turn inside outside when dividing piece for armholes; Happy knitting!
26.05.2020 - 08:47
![]() Debra skrev:
Debra skrev:
Hi, Can you please give me some details as to how to shift the diagram half a pattern repeat to the right. Would I begin the rows on stitch 13 ? Thanks for your help.
24.05.2020 - 16:07DROPS Design svarede:
Dear Debra, when working the 2nd M.1 in height, you can start the round with the 13rd stitch and then repeat M.1 and finish round with the 12th stitch. On 3rd repeat, start again as before and continue like this. Happy knitting!
25.05.2020 - 09:53
![]() Debra skrev:
Debra skrev:
This pattern diagram is starting with a pearl row and the rose is done in knit stitch. Will this mean the right side of the sweater has the pearl side facing out? in the sweater photo, it looks like the main body is stocking stitch with the knitted side showing and the rose in pearls. Can you please help? Did I do something wrong to have the right side out showing pearl stitch?
23.05.2020 - 19:36DROPS Design svarede:
Dear Debra, diagram text has been reversed - it has been edited now, thanks for your feedback - a white square should be a K stitch and a small black square a P - Happy knitting!
25.05.2020 - 09:06
![]() Debra Briere skrev:
Debra Briere skrev:
I am confused with the instructions for the moss stitch pattern. It says to repeat second row but I am thinking it should say repeat these 2 rows of K1P1 over P1K1. Can you please clarify this for me?
22.05.2020 - 05:35DROPS Design svarede:
Hi Debra, Row 2 says to knit over purl and purl over knit, which is then repeated in the following rows - so all rows consist of knit over the previous row's purl and purl over the previous row's knit. I hope this helps and happy knitting!
22.05.2020 - 07:49
|
||||||||||
DROPS 29-22 |
||||||||||
|
|
||||||||||
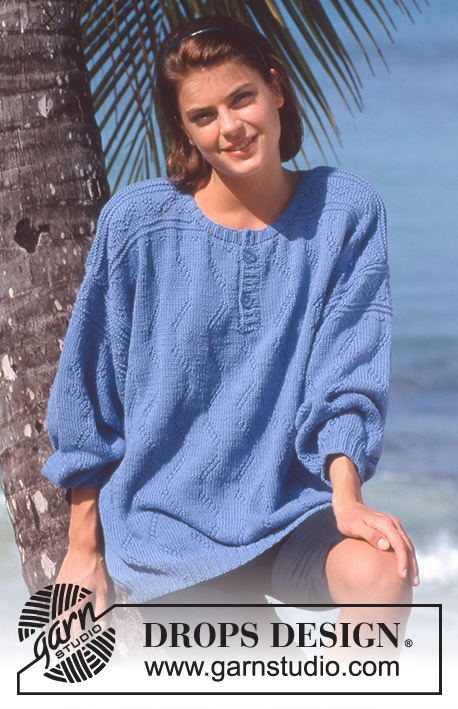
DROPS bluse i Muskat Soft med Strukturblomster
DROPS 29-22 |
||||||||||
|
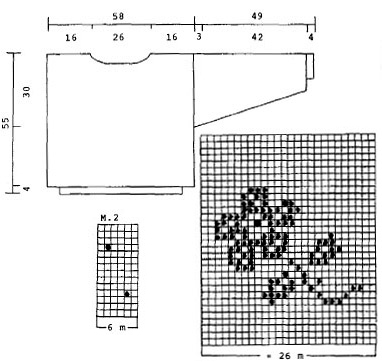
Ryg- og forstykke: Hvis der ønskes en lang model - se forkl over. Slå 188 m op på rundp 2,5 med koral og strik 4 cm perlestrik. Skift til rundp 4 samtidigt med der tages 46 m ud jævnt fordelt på 1.p = 234 m. Strik M.1 op ad men på hver anden række i højden forskydes M.1 en halv gang - således blomstene kommer forskudt over hinanden. Husk på strikkefastheden. Når arb måler 25 cm deles det i to og for- og rygstk strikkes færdige for sig – sørg for at boblen strikkes fra retten. Forstk: = 117 m. Når arb måler 50 cm lukkes de midterste 41 m af til hals, videre lukkes der af mod halsen på hver 2.p således: 2 m 2 gange, 1 m 2 gange. Luk af når arb måler 55 cm. Rygstk: = 117 m. Når arb måler 53 cm lukkes de midterste 49 m af til hals, videre lukkes der 2 m af mod halsen på næste p. Luk af når arb måler 55 cm. Ærme: Slå 46 m op på strømpep 2,5 med koral og strik 4 cm perlestrik. Skift til rundp 4 samtidigt med der tages 14 m ud jævnt fordelt på 1.p = 60 m. Strik M.1 (placer en rapport midt på ærmet) - samtidigt tages der ud midt under ærmet på hver side af midtm således: 1 m 31 gange på hver 3.p = 122 m. De udtagede m strikkes ind i mønsteret efterhånden. Efter M.1 strikkes færdigt med M.2. Når arb måler 46 cm lukkes der 10 m af midt under ærmet, videre lukkes der af til ærmekuppel således: 6 m 3 gange på hver 2.p i hver side. Luk af når arb måler 49 cm. Montering: Sy skuldersømmen. Saml 102 m op rundt i halsen på strømpep 2,5 med koral og strik 4 omg perlestrik, luk af. Hækl en række på nål nr 3 rundt i halsen således: 1 fastm, * 3 luftm, 1 stangm i første luftm, spring over 2 m og hækl en fastm *. Sy ærmerne til ryg- og forstk i yderste m således sømmen ikke bliver tyk. |
||||||||||
Diagram forklaring |
||||||||||
|
||||||||||
 |
||||||||||
Har du lavet denne opskrift?Så tagger du dine billeder med #dropspattern eller send dem til #dropsfan galleriet. Behøver du hjælp med opskriften?Du finder 26 instruktionsvideoer, kommentarer/spørgsmål og mere i opskriften på www.garnstudio.com © 1982-2026 DROPS Design A/S. Alle rettigheder er reserveret. Dette dokument med tilhørende underdokumenter har copyright. Læs mere om hvad du kan gøre med vore opskrifter, nedert i alle vore opskrifter på hjemmesiden. |
||||||||||


Med over 40 år i strikke- og hæklebranchen tilbyder DROPS Design en af de mest omfattende kollektioner med gratis opskrifter på internettet - oversat til 17 sprog. Dags dato har vi 324 kataloger og 12290 opskrifter på Dansk.
Vi arbejder hårdt for at kunne tilbyde Dig det bedste man kan få af strik og hækling, inspiration og gode råd men også kvalitetsgarn til fantastiske priser! Vil du bruge vore opskrifter til andet end for privat brug? Du kan læse om hvilke regler som gælder under teksten Copyright nederst på siden i alle vore opskrifter. God fornøjelse!
Kommentere opskrift DROPS 29-22
Vi vil gerne høre din mening om denne model!
Hvis du ønsker at stille et spørgsmål, så husk at vælge rigtig kategori i menuen under - det vil give dig hurtigere svar. Obligatoriske felter er markeret med *.