
Categorias populares
Procura um fio?


Comentários / Perguntas (127)
![]() Michaela Haubrich escreveu:
Michaela Haubrich escreveu:
Ich habe den Pullover für 4-5 Jahre genau nach Anleitung gestrickt und der Garnbdarf in der Hauptfarbe war 250g und nicht 200g wie in der Anleitung
06.11.2025 - 19:34
![]() Patricia escreveu:
Patricia escreveu:
Bonjour Je ne comprends pas ce que je dois faire avec les 8 mailles montées sous le bras. Je dois les laisser en attente avec celles prévues pour la manche ??? Merci de m’aider
02.11.2025 - 15:19DROPS Design respondeu:
Bonjour Patricia, les 8 mailles montées sous les manches remplacent les manches, ce sont les mailles des côtés; retrouvez dans cette leçon des photos montrant les étapes de la division (pour un raglan, mais la division se fera de la même façon), à partir de la photo 10. Bon tricot!
03.11.2025 - 08:04
![]() Jan escreveu:
Jan escreveu:
Hi, I'm totally confused and on the point of giving up...I have restarted the pattern at least 5 times and cannot get it to work!! I'm doing the pattern for age 7/8 and really struggling with YO increases, on row 3 of A1 the YO is every other pattern of 3 which essentially means that on the next row you have repeats of alternating 3 and 4 stitches, how does that work on a 3 pattern repeat on the following row...or am I just not reading the pattern right? Many thanks, Jan
30.10.2025 - 11:54DROPS Design respondeu:
Hi, Jan, there are no increases on row 3 or 4 in the pattern for size 7/8, the next increase after the first row is on row 5. This increase means that for row 6, you alternate between 1 and 2 stitches in off white between the stitches in mustard. Happy knitting!
30.10.2025 - 12:18
![]() Merel escreveu:
Merel escreveu:
Hallo, wat is de reden dat we bij de minderingen bij de mouw de 1e mindering 2 steken samen breien (voor de markeerdraad) en de 2e mindering 1 steek afhalen 2e steek breien en de afgehaalde steek over de gebreide steek heen halen ( na de markeerdraad). Waarom twee verschillende minderingen?
16.10.2025 - 19:30DROPS Design respondeu:
Dag Merel,
De reden daarvoor is dat deze verschillende manieren van minderen er anders uitzien, waardoor de steken anders 'liggen'.
12.11.2025 - 16:03
![]() Daria escreveu:
Daria escreveu:
Hello Did my increases by doing YO but it leaves a hole even though I twisted them in the next round. Any idea why? And can I just do different increase?
06.10.2025 - 06:48DROPS Design respondeu:
Hi Daria, it may be a little hole even if the yarn over is worked twisted, particularly when the yarn over is too loose. Of course you can choose a different type of increase, you will find them HERE. Happy knitting!
06.10.2025 - 07:41
![]() Louisebonnette escreveu:
Louisebonnette escreveu:
Que veut dire 32-7 merci
24.09.2025 - 01:23DROPS Design respondeu:
Bonjour Louisebonnette, il semble qu'il s'agit du numéro de ce modèle: Catalogue DROPS Children 32, modèle 7. Bon tricot!
24.09.2025 - 17:06
![]() Karin Saskia escreveu:
Karin Saskia escreveu:
Dank u voor het antwoord , maar als ik de eerste rij van diagram A 1 12 /18 volg kom ik niet op 88 steken uit, maar veel meer.
27.08.2025 - 10:37DROPS Design respondeu:
Dag Karin,
Als je de kleinste maat volgt begin je met A.1 als je 66 steken op de naald hebt. A.1 is 6 steken breed en dit herhaal je 11 keer. Na de eerste naald van A.1 heb je, als je de omslagen meetelt 88 steken op de naald omdat je in totaal 22 steken meerdert.
27.08.2025 - 20:51
![]() Karin Saskia escreveu:
Karin Saskia escreveu:
Ik maak de trui in de kleinste maat; als ik de eerste toer van de diagram lees zou ik het als volgt moeten breien ; 1 recht, 1 omslag, 5 recht, 1 omslag, 1 recht , 1 omslag, ,5 recht etc. Klopt dit?
25.08.2025 - 22:23DROPS Design respondeu:
Dag Karin,
Ja, dat klopt!
27.08.2025 - 10:27
![]() Caroline escreveu:
Caroline escreveu:
Hej! Jag stickar 12/28 mån och har problem med mönstret. Det uppstår på 6e raden. På rad 5 har en ökning gjorts så att det växelvis är tre vita och fyra vita maskor mellan den röda nedersta maskan i korset. Det tas ingen hänsyn till i rad 6 så korsen blir inte kors. Hur gör jagbflr att göra rätt här?
20.08.2025 - 22:42DROPS Design respondeu:
Hei Caroline. Når du skal strikke 6. rad av A.1 blir det 1 og 2 hvite masker mellom hvert korst, så det blir ikke 100% jevnt, men når man får på seg plagget vil dette jevne seg ut. mvh DROPS Design
15.09.2025 - 13:16
![]() Karin Saskia escreveu:
Karin Saskia escreveu:
Ik maak de kleinste maat van deze trui; en hen een vraag over de pas. Bij de vijfde naald meerderen klopt bij mij het patroon niet meer. Wat gaat er nu fout?
28.07.2025 - 10:32DROPS Design respondeu:
Dag Karin,
Ik weet niet precies waar je bent, maar als je de hals klaar is (met eventuele verhoging aan de achterkant) , heb je 66 steken op de naald en dan begin je met het telpatroon. Het telpatroon is 6 steken in de breedte, dus je herhaalt het telpatroon 11 keer op de naald. De meerderingen zijn aangegeven in het telpatroon in de vorm van omslagen aan het begin van de naald. De eerste meerdering is pas op de 6e naald. Na die naald van meerderingen bestaat 1 patroonherhaling uit 7 steken in de breedte.
28.07.2025 - 21:43
|
||||||||||
Little Missy#littlemissysweater |
||||||||||
 |
 |
|||||||||
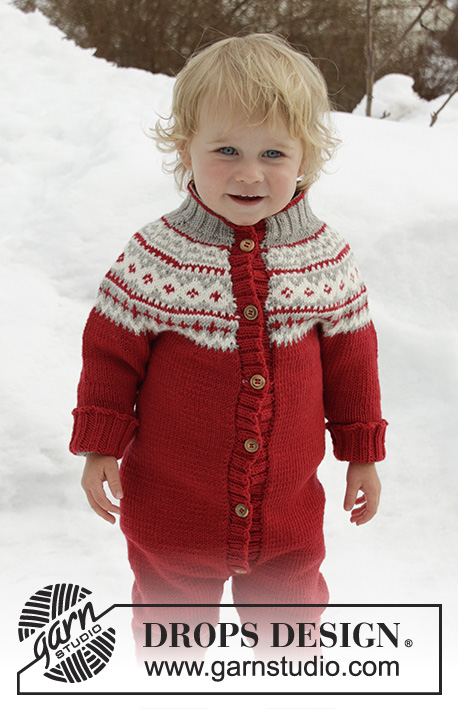
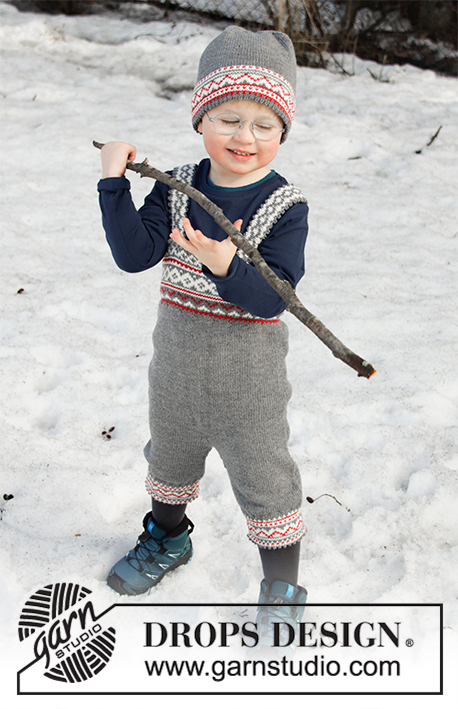
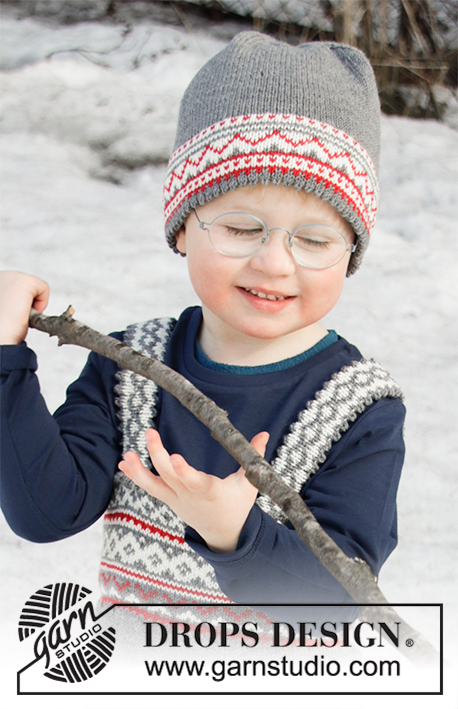
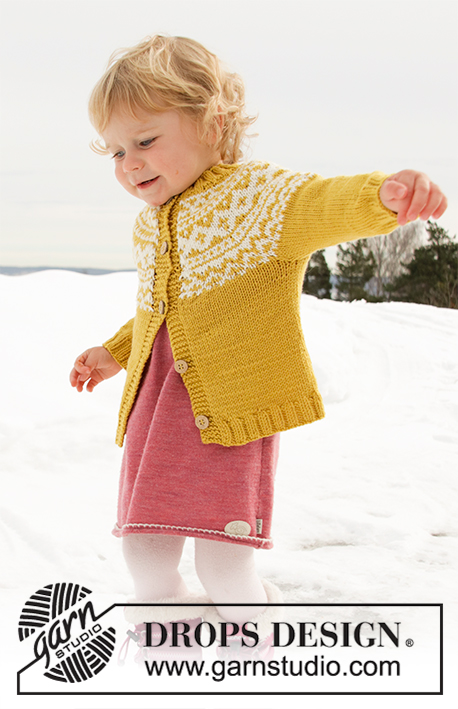
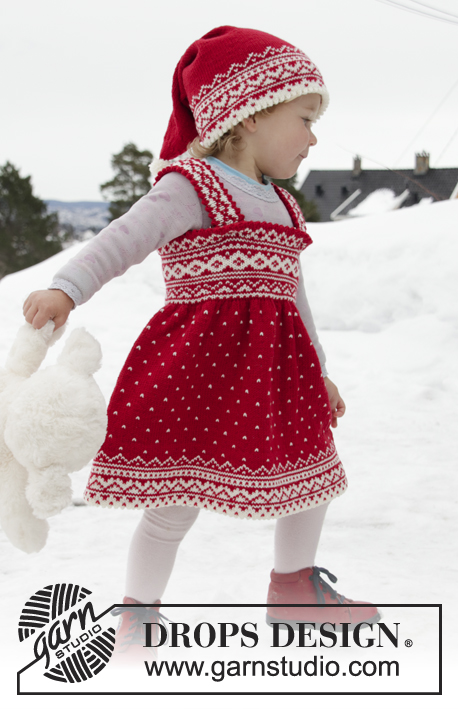
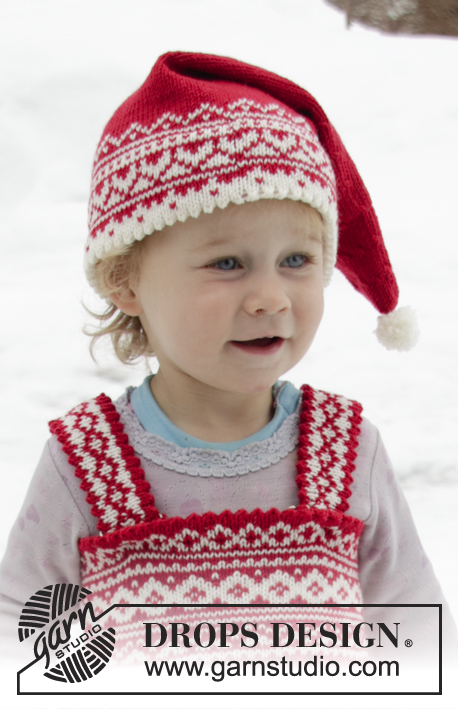
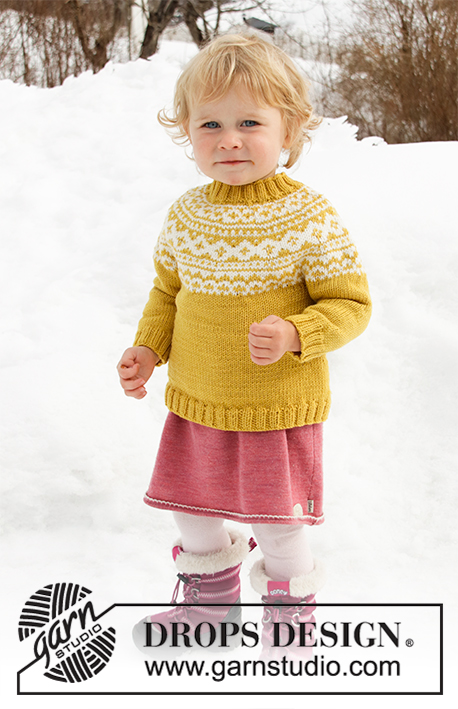
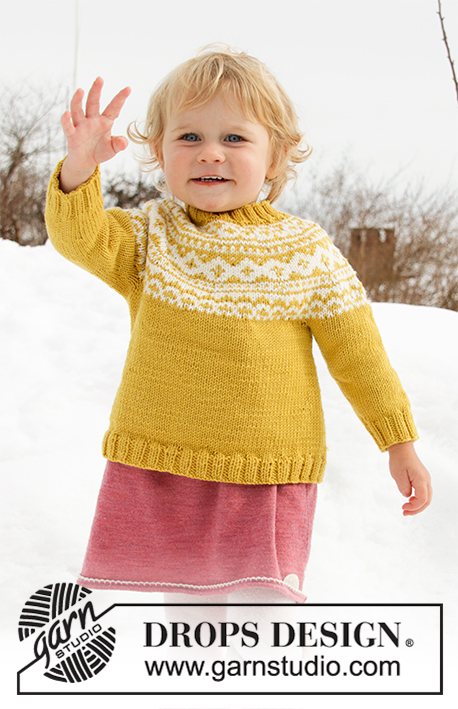
Pulôver tricotado de cima para baixo para bebé e criança em DROPS Merino Extra Fine, com encaixe arredondado em jacquard norueguês. Tamanhos 12 meses - 12 anos.
DROPS Children 32-7 |
||||||||||
|
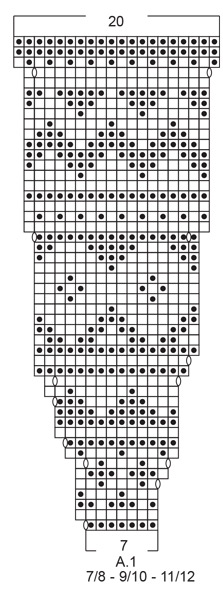
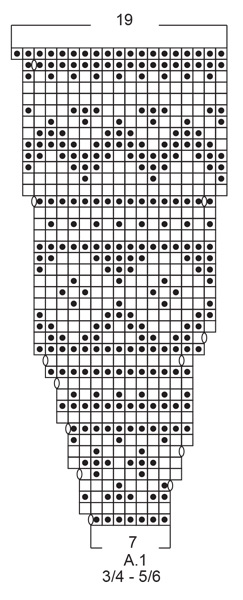
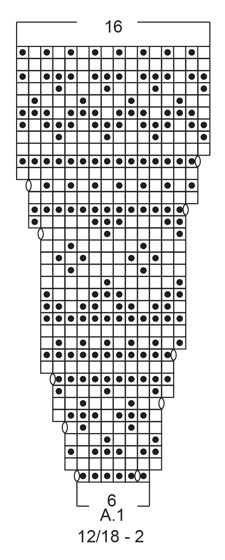
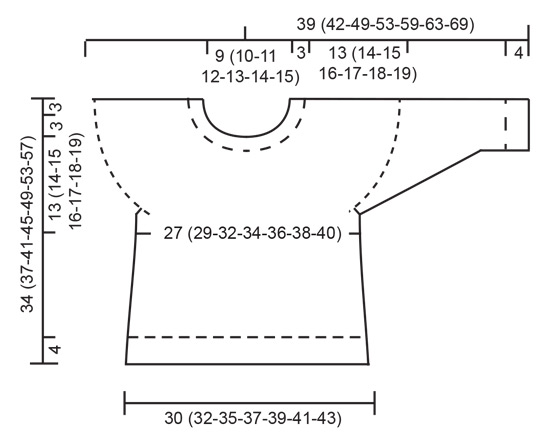
------------------------------------------------------- TÉCNICAS USADAS: ------------------------------------------------------- PONTO FANTASIA: Ver diagrama A.1. Ver diagrama indicado para cada tamanho. O jacquard tricota-se totalmente em ponto meia. DIMINUIÇÕES/AUMENTOS: Para calcular quando diminuir/aumentar a intervalos regulares, contar o número total de malhas (por ex. 72 malhas) e dividi-lo pelo número de diminuições/de aumentos a fazer (por ex. 6) = 12. Neste exemplo, vai-se diminuir tricotando juntamente cada 11.ª e 12.ª malha, ou aumentar depois de cada 12.ª malha fazendo 1 laçada (tricotar as laçadas torcidas na carreira seguinte para evitar buracos). AUMENTOS (lados costas/frente): Aumentar 1 malha de cada lado do fio marcador da seguinte maneira: Começando 2 malhas antes do fio marcador, fazer 1 laçada, tricotar 4 malhas meia (o fio marcador fica a meio destas 4 malhas), fazer 1 laçada (= aumenta-se 2 malhas). Aumentar desta maneira a cada um dos 2 fios marcadores (aumenta-se 4 malhas). Na carreira seguinte, tricotar as laçadas torcidas para evitar buracos. DIMINUIÇÕES (meio sob as mangas): Diminuir 1 malha de cada lado do fio marcador da seguinte maneira: Começando 3 malhas antes do fio marcador, tricotar 2 malhas juntamente em meia, 2 malhas meia (o fio marcador fica entre estas 2 malhas), deslizar 1 malha em meia, 1 malha meia e passar a malha deslizada por cima da malha tricotada (= diminui-se 2 malhas). ELEVAÇÃO (decote costas): Saltar esta secção se não quiser fazer uma elevação. Colocar 1 marcador no princípio da carreira (= meio das costaa).. Tricotar 6 malhas, virar, puxar o fio e tricotar 12 malhas liga, virar, puxar o fio e continuar, tricotando 8 (8-8-10-10-10-10) malhas a mais do que na carreira anterior, sempre que se vira, num total de 8 vezes (= 4 vezes ao todo de cada lado. Depois da última volta, tricotar em meia até meio das costas. ------------------------------------------------------- A PEÇA COMEÇA AQUI: ------------------------------------------------------- PULÔVER – SUMÁRIO DA PEÇA: Tricota-se de cima para baixo, em redondo, começando pelo encaixe, separar então as mangas e as costas/a frente. As carreiras comecem a meio das costas. Terminar as costas/a frente em redondo na agulha circular. As mangas tricotam-se em redondo com as agulhas de pontas duplas. GOLA: Montar 72 (76-80-84-88-96-100) malhas com as agulhas de pontas duplas/a pequena agulha circular 3 mm em mostarda (nos 2 primeiros tamanhos, montar as malhas com as agulhas de pontas duplas e continuar com a agulha circular quando houver malhas suficientes, nas outros tamanhos, pode-se montar e tricotar com a pequena agulha circular). Tricotar 1 volta meia depois em canelado (= 2 malhas meia / 2 malhas liga). Continuar em canelado desta maneira durante 3 cm. ENCAIXE: Continuar com as agulhas de pontas duplas/a agulha circular 4 mm. Tricotar 1 volta meia diminuindo 6 (4-3-0-4-5-9) malhas a intervalos regulares – ver DIMINUIÇÕES/AUMENTOS = 66 (72-77-84-84-91-91) malhas. Pode-se tricotar uma elevação para que o decote das costas fique um pouco mais alto. Também se pode não tricotar esta elevação – o decote da frente e das costas serão, então, iguais - ver ELEVAÇÃO - ou continuar. Tricotar A.1 – NOTA: Ver diagrama indicado para cada tamanho (= 11 (12-11-12-12-13-13) motivos de 6 (6-7-7-7-7-7) malhas). Continuar aumentando como indicado no diagrama. MANTER A MESMA TENSÃO DA INDICADA PARA A AMOSTRA! Quando A.1 tiver sido tricotado 1 vez em altura, temos 176 (192-209-228-240-260-260) malhas. Continuar em mostarda, em ponto meia. Na carreira seguinte, aumentar 7 (7-10-7-3-0-11) malhas a intervalos regulares = 183 (199-219-235-243-260-271) malhas. Quando a peça medir 13 (14-15-16-17-18-19) cm a meio da frente (medir sem a gola), separar a peça da seguinte maneira: Tricotar 25 (27-30-32-34-36-38) malhas, colocar as 42 (46-50-54-54-58-60) malhas seguintes em espera num fio para a manga (sem tricotá-las), montar 8 malhas, tricotar 49 (53-59-63-67-72-75) malhas, colocar as 42 (46-50-54-54-58-60) malhas seguintes em espera num fio para a manga (sem tricotá-las), montar 8 malhas e tricotar as 25 (27-30-32-34-36-38) últimas malhas como antes = 115 (123-135-143-151-160-167) malhas. COSTAS & FRENTE: Colocar 1 fio marcador a meio das 8 malhas montadas sob cada manga (= 57 (61-67-71-75-80-83) malhas entre os fios marcadores para a frente). MEDIR A PEÇA A PARTIR DAQUI!! Quando a peça medir 3 cm a partir da separação das costas/frente e das mangas, aumentar de cada lado dos 2 fios marcadores – ver AUMENTOS. Repetir estes aumentos quando a peça medir 6 e 9 cm a partir da separação das costas/frente e das mangas = 127 (135-147-155-163-172-179) malhas. Quando a peça medir 11 (13-16-19-22-25-28) cm a partir da separação das costas/frente e das mangas, aumentar 9 (9-9-9-9-8-9) malhas na carreira seguinte = 136 (144-156-164-172-180-188) malhas. Continuar com a agulha circular 3 mm em canelado (= 2 malhas meia / 2 malhas liga) durante 4 cm. Arrematar as malhas como elas se apresentam. O pulôver mede cerca de 34 (37-41-45-49-53-57) cm de altura total a partir do ombro. MANGAS: Retomar as malhas em espera de um lado da peça para as agulhas de pontas duplas 4 mm e levantar 1 malha em cada uma das 8 malhas montadas sob a manga = 50 (54-58-62-62-66-68) malhas. Colocar 1 fio marcador a meio das 8 malhas (= meio sob a manga). MEDIR A PEÇA A PARTIR DAQUI! Tricotar em mostarda, em redondo, em ponto meia. Quando a manga medir 1 cm a partir da separação da manga e das costas/frente, diminuir 2 malhas a meio sob a manga – ver DIMINUIÇÕES. Diminuir desta maneira 6 (6-8-8-8-8-9) vezes ao todo a cada 1½ (2-2-2½-3-3½-3½) cm = 38 (42-42-46-46-50-50) malhas. Quando a manga medir 14 (16-21-24-28-31-35) cm a partir da separação das costas/frente, diminuir 2 malhas a intervalos regulares = 36 (40-40-44-44-48-48) malhas. Continuar com as agulhas de pontas duplas 3 mm e tricotar em canelado (= 2 malhas meia / 2 malhas liga) em redondo durante 4 cm ou até ao comprimento desejado. Arrematar as malhas como elas se apresentam. A manga mede cerca de.18 (20-25-28-32-35-39) cm a partir da separação das costas/frente. Tricotar a outra manga da mesma maneira. |
||||||||||
Explicações do diagrama |
||||||||||
|
||||||||||
 |
||||||||||
 |
||||||||||
 |
||||||||||
 |
||||||||||
Terminou este projecto?Então, identifique as suas fotos com as tags #dropspattern #littlemissysweater ou mostre-as na galeria #dropsfan. Precisa de ajuda para este modelo?Encontrará 29 turotiais em vídeo, uma rubrica Comentários/Perguntas e muito mais ao visitar a página do modelo em www.garnstudio.com © 1982-2026 DROPS Design A/S. Todos os direitos reservados. Este documento, incluuindo as suas su-secções, tem copyrights. Saia mais o que pode fazer com os nossos modelos no fim de cada uma das páginas do nosso site. |
||||||||||


Com mais de 40 anos no design de modelos de tricô e de croché, a DROPS Design oferece uma das mais vastas colecções demodelos gratuitos na Internet - traduzidos em 17 línguas. Neste dia de hoje, temos 324 catálogos e 12290 modelos - dos quais 12271 estão traduzidos em português.
Trabalhamos com muito empenho para lhe proporcionar o melhor que o tricô e o croché têm para oferecer, para lhe fornecer inspiração e conselhos bem como fios da mais elevada qualidade a preços incríveis! Gostaria de usar os nossos modelos para outros fins que não uso pessoal? Pode ler o que lhe é permitido fazer no Copyright texto que se encontra na parte de baixo de todos os nossos modelos. Bom tricô! Bom croché!
Deixe um comentário acerca do modelo DROPS Children 32-7
Gostaríamos muito de saber o que tem a dizer-nos acerca deste modelo!
Se deixar uma pergunta acerca do modelo, certifique-se de que escolhe a categoria adequada no formulário abaixo para acelerar o processo relativo à resposta. Os campos obrigatórios estão assinalados com um *.