
Categorias populares
Procura um fio?


Comentários / Perguntas (163)
![]() Doris escreveu:
Doris escreveu:
Vielen Dank für die schnelle Antwort! Es beruhigt mich sehr, dass es nicht nur mir so geht, sondern generell schwierig ist. Doris
18.11.2022 - 07:56
![]() Doris escreveu:
Doris escreveu:
Hallo, gibt es einen Trick, wie man das Verdrehen des Bündchens beim Zusammenschließen zu einer Runde verhindern kann? ich habe es mehrmals versucht, irgendetwas mache ich falsch. Vielen Dank! Doris
15.11.2022 - 16:09DROPS Design respondeu:
Liebe Doris, leider kenne ich selber keinen Trick, bei der 1. Runde muss man immer sehr vorsichtig sein, damit die Runde am Ende dieser 1. Runde verdreht wird. Vielleicht hat aber Ihr Wollladen irgendeinen Tipp. Viel Spaß beim stricken!
16.11.2022 - 09:07
![]() Salla escreveu:
Salla escreveu:
Hi. I would love to use this pattern but I would like to do this sweatshirt for a male person. Is this suitable for male also or only women? Is it hard to modify this pattern to fit male since its designed for female? Thank you!
12.09.2022 - 21:56DROPS Design respondeu:
Dear Salla, you will find under our FAQ here how to convert a women's size jacket into a men's size one. Happy knitting!
13.09.2022 - 09:45
![]() Dea escreveu:
Dea escreveu:
Ciao, ci sono dei refusi dove dice: " dal momenti che....per evirare..." .
03.04.2022 - 14:25DROPS Design respondeu:
Buonasera Dea, grazie per la segnalazione, abbiamo corretto il testo. Buon lavoro!
03.04.2022 - 22:06
![]() Colleen escreveu:
Colleen escreveu:
I want to start Sheep Happens sweater 194-2 but am having a problem reading the diagram to choose my size.. All pattern directions are in centimeters but the diagram numbers look like inches to me. (Unless the bottom measurement is 9” wide for the adult large which is unlikely!) Please confirm whether or not diagram is in inches. Thank you.
28.02.2022 - 16:07
![]() Alex escreveu:
Alex escreveu:
Bonjour, est-il possible de tricoter ce pull avec la laine Puna ? Si oui les quantités de laines changent-elles ? Merci !
13.01.2022 - 00:06DROPS Design respondeu:
Bonjour Alex, Puna et Merino Extra Fine appartiennent toutes deux au groupe de fils C, vous pouvez ainsi utiliser notre convertisseur pour laisser calculer les nouvelles quantités nécessaires. Bon tricot!
13.01.2022 - 08:43
![]() Elisabeth Eide Tharaldsen escreveu:
Elisabeth Eide Tharaldsen escreveu:
Hei. Hvorfor er ermlemngden 40 cm i str S, og kortest i størst størrelse? Det føles veldig unaturlig å ØKE rett før vrangborden nede på genseren, skal det felles?
09.01.2022 - 18:00DROPS Design respondeu:
Hei Elisabeth. Man har ikke lengre ermer selv om man bruker str XXXL. I de største størrelsene er overvidden større og da blir ermlengden på plagg kortere. Tidligere var motebildet slik at vrangborden skulle være smal og maskeantallet på vrangborden skulle være mindre enn bolen. Nå ønsker man en jevnere overgang mellom vrangbord og bol, slik at da øker man masker før vrangbord og bytter til mindre pinnestr. (om man strikker nedenifra og opp feller man masker). mvh DROPS Design
14.01.2022 - 14:48
![]() Brit Sønnøve escreveu:
Brit Sønnøve escreveu:
Jeg har strikka i str 7/8, men virker som str 4. Hvilken str skal jeg strikke i for å få den stor nok? Str guiden stemmer ikke i drt hele tatt!
19.11.2021 - 10:53DROPS Design respondeu:
Hej Britt, for at få størrelsen som står i måleskitsen, er det vigtigt at du holder strikkefastheden som står i opskriften, altså 21 masker på 10 cm i bredden og 28 pinde på 10 cm i højden. Strikker du i DROPS Merino Extra Fine eller DROPS Lima?
19.11.2021 - 13:47
![]() Martine escreveu:
Martine escreveu:
Er dette unisex? Tenker å lage denne til herre
08.11.2021 - 20:46DROPS Design respondeu:
Hej Martine. Om du hittar en storlek som passar så kan du göra denna till även till herr. Se på måttskissen längst ner för att hitta den storlek du ska göra. Mvh DROPS Design
09.11.2021 - 09:04
![]() Nina Solveig Matzow escreveu:
Nina Solveig Matzow escreveu:
Jeg er i gang med å strikke genser Sheep Happens i str. XXL. Jeg har ikke den lyse grå hovedfargen. Hvor, Hvordan og Hvor mange nøster skal jeg bestille ? Vennligst, Nina M.
22.09.2021 - 10:45DROPS Design respondeu:
Hej Nina, til størrelse XXL skal du bruge 13 nøgler DROPS Merino Extra Fine i hovedfarven uanset hvilken farve du vælger :)
22.09.2021 - 15:54
|
||||||||||||||||
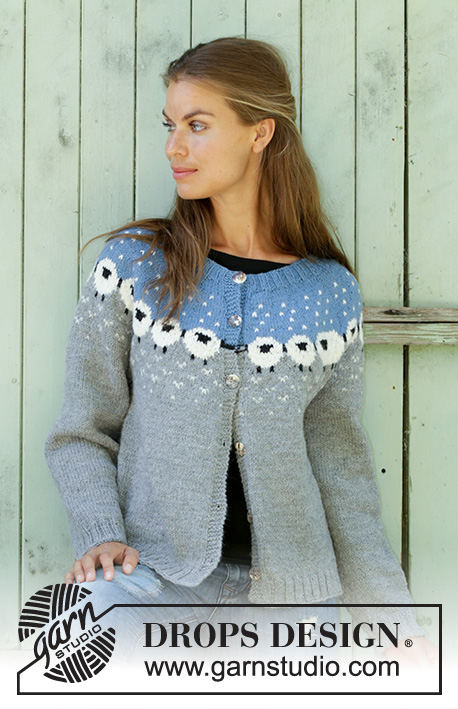
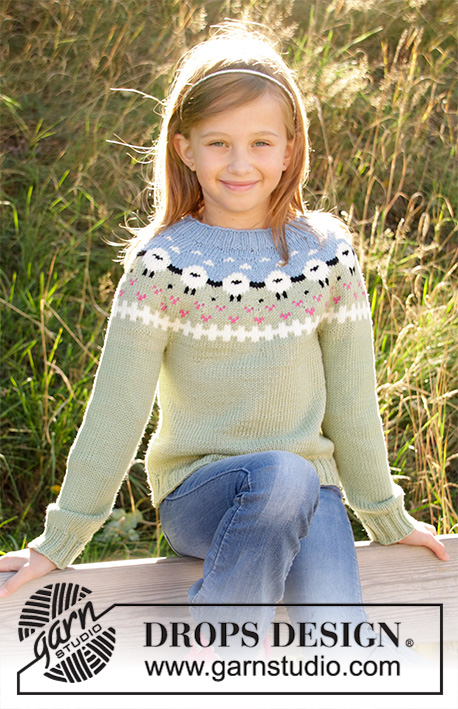
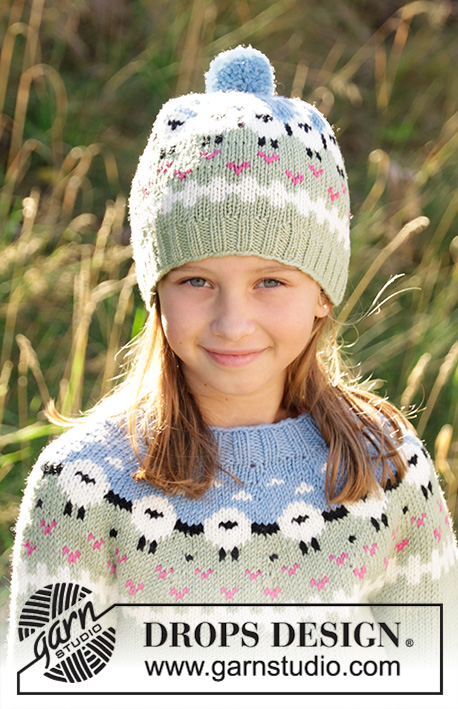
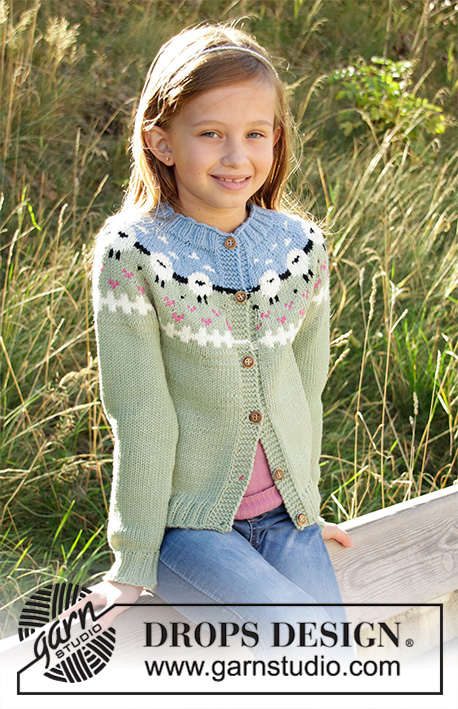
Sheep Happens!#sheephappenssweater |
||||||||||||||||
|
|
||||||||||||||||
Pulôver tricotado de cima para baixo em DROPS Merino Extra Fine ou Lima, com encaixe arredondado e jacquard norueguês com ovelhas. Do S ao XXXL.
DROPS 194-2 |
||||||||||||||||
|
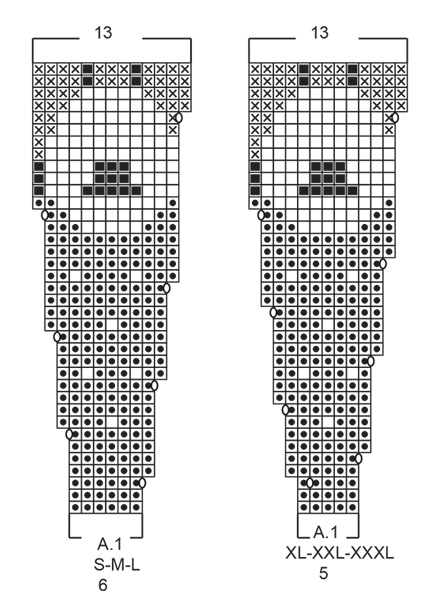
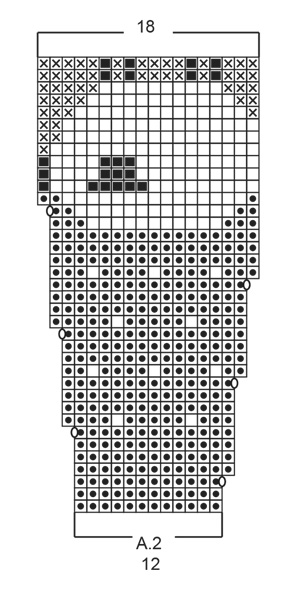
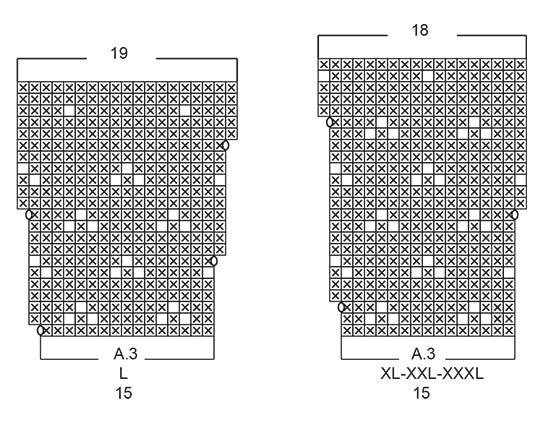
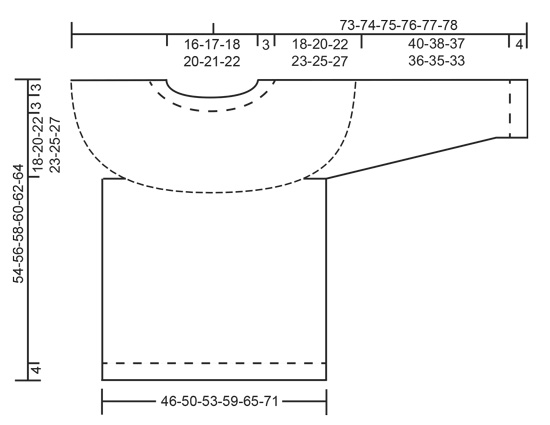
------------------------------------------------------- TÉCNICAS USADAS: ------------------------------------------------------- PONTO FANTASIA: Ver os diagramas A.1 a A.3. Ver diagrama indicado para cada tamanho. Os diagramas tricotam-se em ponto meia. Como as mudanças de cores estão longe, umas das outras, os fios devem ser cruzados depois de cerca de cada 7.ª malha, para evitar fios demasiado compridos pelo avesso. AUMENTOS (a intervalos regulares): Para calcular quando aumentar a intervalos regulares, contar o número total de malhas (por ex. 90 malhas) e dividi-lo pelo número de aumentos a fazer (por ex. 31) = 2.9. Neste exemplo, fazer 1 laçada depois de cerca decada 3.ª malha. Na carreira seguinte, tricotar as laçadas torcidas para evitar buracos. DIMINUIÇÕES (mangas): Diminuir 1 malha de cada lado do fio marcador da seguinte maneira: Tricotar até restarem 3 malhas antes do fio marcador, 2 malhas tricotadas juntamente em meia, 2 malhas meia (o fio marcador fica entre estas 2 malhas), deslizar 1 malha em meia, 1 malha meia, passar a malha deslizada por cima da malha tricotada (= diminui-se 2 malhas). ------------------------------------------------------- A PEÇA COMEÇA AQUI: ------------------------------------------------------- PULÔVER – SUMÁRIO DA PEÇA: O encaixe tricota-se em redondo na agulha circular, de cima para baixo. Dividir o encaixe para as costas/a frente e as mangas e continuar as costas/a frente em redondo. As mangas tricotam-se em redondo com as agulhas de pontas duplas. ENCAIXE: Montar 92-96-100-104-112-120 malhas com a agulha circular 3 mm em azul claro. Tricotar 1 volta meia. Continuar então em canelado (= 2 malhas meia / 2 malhas liga) durante 3 cm. Mudar para a agulha circular 4 mm. Tricotar 1 volta meia aumentando 28-24-32-30-32-34 malhas a intervalos regulares – ver AUMENTOS = 120-120-132-134-144-154 malhas. Tricotar então da seguinte maneira (a carreira começa a meio das costas): A.1 (= 6-6-6-5-5-5 malhas) por cima das 12-12-12-10-10-10 primeiras malhas (= 2 vezes ao todo), A.2 (= 12 malhas), A.1 por cima das 42-42-48-50-55-60 malhas seguintes (= 7-7-8-10-11-12 vezes ao todo), A.2 por cima das 12 malhas seguintes, A.1 por cima das 42-42-48-50-55-60 últimas malhas (= 7-7-8-10-11-12 vezes ao todo). MANTER A MESMA TENSÃO DA INDICADA PARA A AMOSTRA! Quando A.1 e A.2 tiverem sido tricotados 1 vez em altura, temos 244-244-270-322-348-374 malhas. A peça mede cerca de 16 cm (com o canelado). Tricotar 1 volta meia em cinza claro aumentando 11-11-15-8-12-1 malhas a intervalos regulares = 255-255-285-330-360-375 malhas. Tricotar, então, A.3 (= 15 malhas) em todas as malhas (= 17-17-19-22-24-25 vezes em largura ao todo). Depois de A.3, temos 306-340-361-396-432-450 malhas. Terminar , então, em cinza claro. Tricotar em ponto meia até a peça medir 21-23-25-26-28-30 cm (com o canelado). Dividir então a peça para as costas/a frente e as mangas da seguinte maneira: Tricotar 44-48-50-56-62-67 malhas em ponto meia (= metade das costas), colocar as 64-72-79-84-90-90 malhas seguintes em espera num fio para a manga e montar 8-8-10-10-10-14 malhas sob a manga, tricotar 89-99-102-115-127-135 malhas em ponto meia (= frente), colocar as 64-72-79-84-90-90 malhas seguintes em espera num fio para a manga e montar 8-8-10-10-10-14 malhas sob a manga, e terminar com 45-49-51-57-63-68 malhas em ponto meia (= metade das costas) = 194-212-223-248-272-298 malhas. COSTAS & FRENTE: Continuar em ponto meia. Quando a peça medir 26-26-26-27-27-27 cm a partir da separação das costas/frente e das mangas, aumentar 26-32-33-32-40-42 malhas a intervalos regulares na carreira seguinte = 220-244-256-280-312-340 malhas. Continuar com a agulha circular 3 mm em canelado (= 2 malhas meia / 2 malhas liga) em todas as malhas (tricotar as laçadas torcidas para evitar buracos). Arrematar em meia quando o canelado medir 4 cm (ou seja, a peça mede cerca de 30-30-30-31-31-31 cm a partir da separação das costas/frente e das mangas). O pulôver mede ao todo 54-56-58-60-62-64 cm de altura total a partir de l'ombro. MANGAS: Retomar as 64-72-79-84-90-90 malhas em espera num dos lados da peça para as agulhas de pontas duplas 4 mm e levantar 1 malha em cada uma das 8-8-10-10-10-14 malhas montadas sob a manga = 72-80-89-94-100-104 malhas. Colocar 1 fio marcador a meio das 8-8-10-10-10-14 malhas (= meio sob a manga). Tricotar em redondo, em ponto meia, em cinza claro. Quando a peça medir 1 cm a partir da separação da manga, diminuir 2 malhas ao meio sob a manga – ver DIMINUIÇÕES. Diminuir desta maneira 11-15-18-19-22-23 vezes ao todo a cada 3-2-1½-1½-1½-1 cm = 50-50-53-56-56-58 malhas. Quando a manga medir 40-38-37-36-35-33 cm a partir da separação, aumentar 2-2-3-0-4-2 a intervalos regulares = 52-52-56-56-60-60 malhas. Continuar com as agulhas de pontas duplas 3 mm em canelado (= 2 malhas meia / 2 malhas liga). Arrematar em meia quando a peça medir 44-42-41-40-39-37 cm a partir da separação (cerca de 4 cm de canelado). Tricotar a outra manga da mesma maneira. . |
||||||||||||||||
Explicações do diagrama |
||||||||||||||||
|
||||||||||||||||
 |
||||||||||||||||
 |
||||||||||||||||
 |
||||||||||||||||
 |
||||||||||||||||
 |
||||||||||||||||
Terminou este projecto?Então, identifique as suas fotos com as tags #dropspattern #sheephappenssweater ou mostre-as na galeria #dropsfan. Precisa de ajuda para este modelo?Encontrará 25 turotiais em vídeo, uma rubrica Comentários/Perguntas e muito mais ao visitar a página do modelo em www.garnstudio.com © 1982-2026 DROPS Design A/S. Todos os direitos reservados. Este documento, incluuindo as suas su-secções, tem copyrights. Saia mais o que pode fazer com os nossos modelos no fim de cada uma das páginas do nosso site. |
||||||||||||||||


Com mais de 40 anos no design de modelos de tricô e de croché, a DROPS Design oferece uma das mais vastas colecções demodelos gratuitos na Internet - traduzidos em 17 línguas. Neste dia de hoje, temos 324 catálogos e 12290 modelos - dos quais 12271 estão traduzidos em português.
Trabalhamos com muito empenho para lhe proporcionar o melhor que o tricô e o croché têm para oferecer, para lhe fornecer inspiração e conselhos bem como fios da mais elevada qualidade a preços incríveis! Gostaria de usar os nossos modelos para outros fins que não uso pessoal? Pode ler o que lhe é permitido fazer no Copyright texto que se encontra na parte de baixo de todos os nossos modelos. Bom tricô! Bom croché!
Deixe um comentário acerca do modelo DROPS 194-2
Gostaríamos muito de saber o que tem a dizer-nos acerca deste modelo!
Se deixar uma pergunta acerca do modelo, certifique-se de que escolhe a categoria adequada no formulário abaixo para acelerar o processo relativo à resposta. Os campos obrigatórios estão assinalados com um *.