
Popular categories
Looking for a yarn?


Comments / Questions (46)
![]() Lydia wrote:
Lydia wrote:
Bonjour, j'ai commencé ce modèle, magnifique ! J'ai toutefois une petite question : j'en suis aux 16cm et vais commencer à faire les 13 premières diminutions. Dois je tricoter 2 mailles ensemble à l'endroit pour ça ? Que je vais répartir sur le rang 1 du diagramme ? Merci pour votre aide, Cdlt, Lydia
26.01.2016 - 23:22DROPS Design answered:
Bonjour Lydia, à 16 cm - diminuez 13 m au 1er tour de A.1, et 13 m au 3ème tour de A.1 (= les 2 rangs endroit suivants) - pour diminuer, tricotez 2 m ens à l'end régulièrement réparties (voir ici pour répartir des diminutions). Bon tricot!
27.01.2016 - 10:15
![]() Lydia wrote:
Lydia wrote:
Merci beaucoup pour vos éclaircissements. Je viens de recevoir ma laine pour ce modèle, je vais suivre vos instructions. Meilleurs vœux pour 2016 Cdlt, Lydia
03.01.2016 - 09:09
![]() Lydia wrote:
Lydia wrote:
Bonjour, j'aimerai avoir une précision sur le début des rangs 9 et 11 : ces 2 rangs débutent-ils sur un jeté ? Parcequ'il est indiqué que le jeté doit être fait entre 2 mailles mais d'après le shéma le rang démarre avec le jeté Merci pour tous ces magnifiques modèles, un vrai bonheur !
18.12.2015 - 22:18DROPS Design answered:
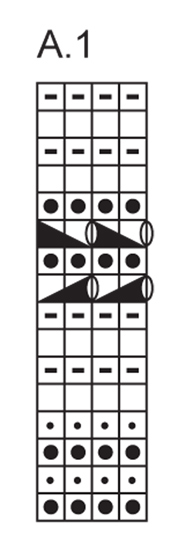
Bonjour Lydia, et merci. Le diagramme montre la partie des mailles à répéter tout le tour (on tricote ici en rond), au 9ème et 11ème tour, faites le 1er jeté après la dernière m du tour, puis 2 m ens à l'end, et répétez *1 jeté, 2 m ens à l'end (tour 9) OU glisser 1 m à l'end, 1 m end, passer la m glissée par-dessus la m tricotée(tour 11)* tout le tour. Bon tricot!
21.12.2015 - 10:11
![]() Loretta wrote:
Loretta wrote:
Ho appena terminato questo scaldacollo, ed il risultato è strepitoso, sembra un pizzo ed è morbidissimo.
24.09.2015 - 23:49
![]() Lelletta wrote:
Lelletta wrote:
Grazie mille!!!
15.07.2015 - 13:02
![]() Lelletta wrote:
Lelletta wrote:
Buonasera1 Sono di nuovo io...vorrei eseguire questo capo con altri colori e più precisamente con il rosa antico del brushed alpaca silk (12) e l'erika (34) del baby merino, ma non riesco a capire se l'accostamento risulta gradevole. Voi cosa ne pensate? Eventualmente mi potreste suggerire voi, tenendo conto però che l'erika lo vorrei mantenere? Sempre grazie e scusate il disturbo!!
15.07.2015 - 00:00DROPS Design answered:
Buongiorno Lelletta, un bell'abbinamento con quei toni è Baby Merino prugna (41) e Brushed Alpaca Silk erika (8). Se vuole usare Baby Merino erika potrebbe provare con Brushed Alpaca Silk lilla (9), ma sarebbe meglio vederli insieme. Buon lavoro!
15.07.2015 - 11:46
![]() Lelletta wrote:
Lelletta wrote:
Mi piace moltissimo questo scaldacollo ma non riesco a capire se i cm 96/61che corrispondono alla mia taglia sono sufficienti! mi potete spiegare come devo "misurarmi" per essere sicura che siano i giusti centimetri? Scusate la domanda forse sciocca ma sono davvero in difficoltà. Vi ringrazio anticipatamente
12.07.2015 - 19:26DROPS Design answered:
Buonasera Lelletta, questo è un modello a tronco di cono, la circonferenza in alto è quella che appoggia sul collo, mentre quella in basso è quella che cade sulle braccia, per potrebbe misurare la circonferenza del busto più le braccia appoggiate al tronco per vedere quale taglia le va meglio. Buon lavoro!
12.07.2015 - 21:14Mary wrote:
Hi! I can't decide the size. I usually wear medium, but circumference 96cm at the bottom seems small .What's the size in the picture?
23.01.2015 - 23:57DROPS Design answered:
Dear Mary, first size is shown in the picture - compare the measurements to a similar garment you have and like the shape to find out the matching size. Happy knitting!
24.01.2015 - 10:02Joyce Schwed wrote:
I can not follow pattern drops 154-25. I will order yarn once i understand pattern. It has two types of yarn. I do not have any idea where row one is on the diagram.
24.11.2014 - 23:17DROPS Design answered:
Dear Mrs Schwed, read more about diagrams here: you start in the bottom corner on the right side and work every round reading from the right towards the left - repeat the 4 sts in width over all sts and the 16 sts in height. Happy knitting!
25.11.2014 - 10:46
![]() Suzie wrote:
Suzie wrote:
I love this design, but am a little confused; do I use one strand each of the two yarn types and cast on and off with three strands? Sorry, the pattern just confused me a little.
08.07.2014 - 22:38DROPS Design answered:
Dear Suzie, you cast on sts (and casst off at the end) with 2 strands Alpaca Silk but work whole piece with only 1 strand Alpaca Silk with stripes in Baby Merino (1 strand Baby Merino) as shown in the diagram. Happy knitting!
09.07.2014 - 08:40
|
||||||||||||||||||||||
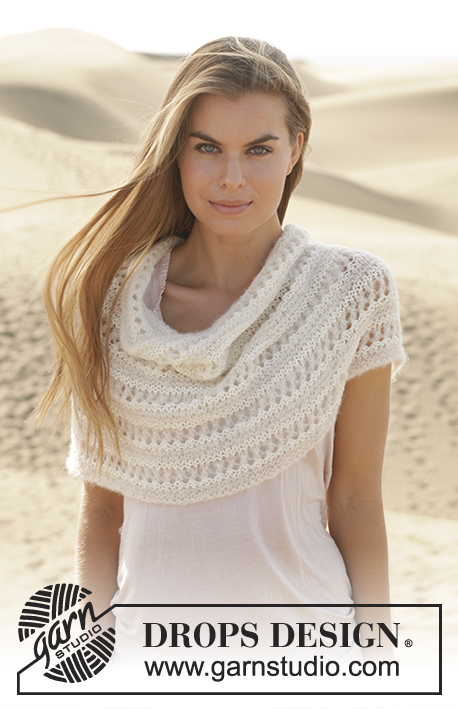
Let's Fall In Love#letsfallinloveneckwarmer |
||||||||||||||||||||||
 |
 |
|||||||||||||||||||||
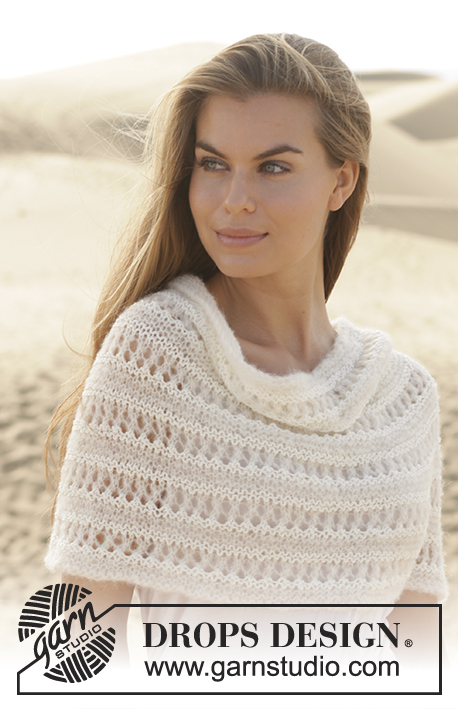
Knitted DROPS neck warmer in garter st with lace pattern in "Brushed Alpaca Silk" and "BabyMerino". Size S-XXXL.
DROPS 154-25 |
||||||||||||||||||||||
|
PATTERN: See diagram A.1. MEASURING TIP: Measure when piece is flat, it is important not to stretch the piece when measuring. ---------------------------------------------------------- NECK WARMER: Worked in the round on circular needle. Cast on 144-164-188 sts on circular needle size 6 mm with 2 strands Brushed Alpaca Silk. Then work with 1 strand. Now work PATTERN - see explanation above. REMEMBER THE KNITTING TENSION! When piece measures approx. 16-16-22 cm – READ MEASURING TIP - and adjust to start next round on 1st row in A.1 – dec as follows: * 13-16-19 sts evenly on each of the next two rounds with K sts (i.e. on 1st and 3rd row in A.1) * = 118-132-150 sts remain. Continue with pattern as before, and repeat from *-* next time 1st and 3rd row in A.1 are worked = 92-100-112 st remain. Continue until piece measures 36-36-42 cm. Loosely cast off with 2 strands Brushed Alpaca Silk. |
||||||||||||||||||||||
Diagram explanations |
||||||||||||||||||||||
|
||||||||||||||||||||||
 |
||||||||||||||||||||||
Have you finished this pattern?Tag your pictures with #dropspattern #letsfallinloveneckwarmer or submit them to the #dropsfan gallery. Do you need help with this pattern?You'll find 12 tutorial videos, a Comments/Questions area and more by visiting the pattern on garnstudio.com. © 1982-2026 DROPS Design A/S. We reserve all rights. This document, including all its sub-sections, has copyrights. Read more about what you can do with our patterns at the bottom of each pattern on our site. |
||||||||||||||||||||||


With over 40 years in knitting and crochet design, DROPS Design offers one of the most extensive collections of free patterns on the internet - translated to 17 languages. As of today we count 324 catalogues and 12290 patterns translated into English (UK/cm). 12290
We work hard to bring you the best knitting and crochet have to offer, inspiration and advice as well as great quality yarns at incredible prices! Would you like to use our patterns for other than personal use? You can read what you are allowed to do in the Copyright text at the bottom of all our patterns. Happy crafting!
Post a comment to pattern DROPS 154-25
We would love to hear what you have to say about this pattern!
If you want to leave a question, please make sure you select the correct category in the form below, to speed up the answering process. Required fields are marked *.