
Popular categories
Looking for a yarn?


Comments / Questions (63)
![]() Sylvie wrote:
Sylvie wrote:
Bonjour. Merci pour votre réponse. J'ai une autre petite question : dois je continuer a faire les augmentations de chaque côté en tricotant la 1ere m deux fois . Merci pour votre réponse
02.12.2025 - 15:55DROPS Design answered:
Bonjour Sylvie, à 18 cm depuis le dernier marqueur, vous commencez à diminuer de chaque côté: vous tricotez les 2 premières mailles ensemble à l'endroit et les 2 dernières mailles ensemble à l'endroit (vous n'augmentez plus) = vous diminuez donc 3 fois au total: 1 x au début + 1 x au milieu + 1 x à la fin du rang; après avoir rabattu les mailles centrales, diminuez 1 maille au début de chaque rang (= sur l'endroit et sur l'envers) pour terminer l'épaule. Bon tricot!
02.12.2025 - 17:42
![]() Sylvie wrote:
Sylvie wrote:
Bonjour. Je fais la taille S. Il est noté qu'à 18 cm mesuré a partir du dernier marqueur il faut mesurer droit le long droit du côté . Je ne comprends pas de quel côté je dois mesurer ? Est ce que je dois continuer a diminuer les mailles du milieu ? Merci pour votre aide.
01.12.2025 - 18:09DROPS Design answered:
Bonjour Sylvie, vous devez mesurer à partir du marqueur que vous avez mis avant de monter les mailles des épaules. Vous devez continuer à diminuer au milieu dos jusqu'à la fin. Les 18 cm en taille S correspondent aux 18 cm de la hauteur d'emmanchure dans le schéma (pour vous aider à mieux vous représenter l'ouvrage). Bon tricot!
02.12.2025 - 09:28
![]() Sylvie wrote:
Sylvie wrote:
Bonjour J'ai commencé comme il est écrit (taille S) et je me retrouve avec 2 triangles. Quand j'assemble les 2 pieces du dos j'ai toujours 2 triangles alors que le modèle montre que le bas du pull est droit. Est ce normal et si non comment faire car j'ai suivi les explications a la lettre. Merci pour votre aide
23.11.2025 - 08:52DROPS Design answered:
Bonjour Sylvie, vous commencez effectivement par les coins du bas (cf flèches dans le schéma), puis, lorsque vous réunissez les 2 triangles, vous allez tricoter toutes les mailles et, en même temps, vous allez augmenter 1 maille au début et à la fin du rang et diminuer 2 mailles au milieu du rang = le nombre de mailles reste le même mais l'ouvrage prend forme progressivement. Bon tricot!
24.11.2025 - 09:37
![]() Helga wrote:
Helga wrote:
Ich suche eine Anleitung , ähnlich wie 177-6, aber mit Fledermausärmeln, gibt es so eine Anleitung? Liebe Grüße Helga
20.08.2025 - 21:44DROPS Design answered:
Liebe Helga, hier finden Sie unsere Anleitung mit Tag "Fledermausärmel". Hoffentlich kann das Ihnen helfen. Viel Spaß beim Stricken!
22.08.2025 - 17:03
![]() Christina wrote:
Christina wrote:
Da habe ich mich wohl unklar ausgedrückt: ein Teil ist das, in dem man mittig abnimmt, das ist kein Problem. Das problematische Teil ist das, in dem man vor und nach der Markierung in der Mitte eine Masche doppelt strickt. Wenn ich am Anfang und Ende der Reihe zur Schulter abnehme und in der Mitte wieder zwei zunehme, bleibt doch die Maschenzahl gleich und es werden niemals 34 Maschen. Wie also komme ich in dem Teil weiter?
03.10.2023 - 17:38DROPS Design answered:
Liebe Christina, es sind (1. Größe) 94 Maschen davor auf der Nadel, dann nehmen Sie 2 Maschen in jeder 2. Reihe (also 4 Mal = 8 Maschen) ab und gleichzeitig nehmen Sie 6 Maschen 4 Mal auf beiden Seiten = 94+24+24-8=134 Maschen. Dann nehmen Sie beidseitig zu, damit die Maschenanzahl immer gleich bleibt. Dann nehmen Sie beidseitig (und immer noch in der Mitte) ab bis 38 Maschen übrig sind. Viel Spaß beim stricken!
05.10.2023 - 09:30
![]() Christina wrote:
Christina wrote:
Ich war noch nicht fertig: hinter der Markierung zwei zusammen stricken. In der Anleitung steht: vergessen Sie nicht, in der Mitte weiterhin abzunehmen. Wenn ich von zunehmen auf abnehmen umsteige, gibt es eine Beule. Wenn ich weiterhin zunehme, muss ich woanders abnehmen. Ich hab mein Strickstück jetzt schon zweimal aufgeribbelt und komme trotzdem nicht klar. Bitte helfen Sie mir. Danke.
01.10.2023 - 20:07DROPS Design answered:
Liebe Christina, es wird dann genauso wie zuvor gestrickt, die Abnahmen beidseitig von der Mrakierung in der Mitte genauso stricken, bis Sie die 34-142-152-164-172-184 Maschen haben. Dann nehmen Sie genauso wie geschrieben ab ((am Anfang jeder Hin-Reihe, und immer noch in der Mitte) Viel Spaß beim stricken!
02.10.2023 - 11:58
![]() Christin wrote:
Christin wrote:
Erst einmal vielen Dank für die vielen tollen kostenlosen (!!) Anleitungen, meine Tochter liebt ihre von mir gestrickten Pullis. Jetzt wollte ich Mal für mich stricken und bin prompt gescheitert: nach der Zunahme für die Ärmel muss man ja eine bestimmte Höhe ersticken, während der man das Muster beibehalten muss. Beim einen Teil ist es in der Mitte zunehmen (re und li der Mitte zweimal die selbe Masche), beim anderen Teil ist es in der Mitte abnehmen (vor der Markierung eine abheben, eine
01.10.2023 - 20:03
![]() Carole Brabant wrote:
Carole Brabant wrote:
Bonjour, Dans explications DOS, que voulez-vous dire par : en tricotant 2 fois 2 fois la première maille tous les rangs - je dois tricoter 2m dans la 1ère m du début de chaque rang- pourquoi 2 fois 2 fois? Merci
21.11.2022 - 14:49DROPS Design answered:
Bonjour Mme Brabant, il s'agissait juste d'une faute de frappe, désolée, vous devez juste tricoter 2 fois la même maille, alternativement dans le brin avant et le brin arrière (on augmente 1 maille ainsi). Correction faite, merci pour votre retour et bon tricot!
21.11.2022 - 16:22
![]() Paola Lauwers wrote:
Paola Lauwers wrote:
Hallo, als je 4 maal 6 steken opzet voor de mouwen plus de mindering middenachter dan heb je in maat S maar 126 steken ipv 134 steken zoals het patroon voorschrijft.klopt dit? groetjes Paola
22.04.2020 - 22:03DROPS Design answered:
Dag Paola,
Je hebt 94 steken op de naald. Je meerdert in totaal 48 steken (aan beide kanten 24) voor de mouwen. Hierdoor kom je op een totaal van (94+48=) 142 steken, maar omdat je over die 4 naalden dat je aan het meerderen was voor de mouwen, ook in totaal 8 steken hebt geminderd midden achter, kom je op een totaal van 138 steken.
25.04.2020 - 21:00
![]() Johanneke wrote:
Johanneke wrote:
Na het meerderen voor de schouders, brei je dan de dubbele steek in de steek aan het eind vd naald? Of voor de laatst geplaatste markeerde, zoals ervoor?
06.07.2019 - 22:16DROPS Design answered:
Dag Johanneke,
Na het opzetten van steken voor de schouders brei je de dubbele steek inderdaad aan het eind van de naald.
08.07.2019 - 10:10
|
||||
Haze Tunica#hazetunica |
||||
|
|
||||
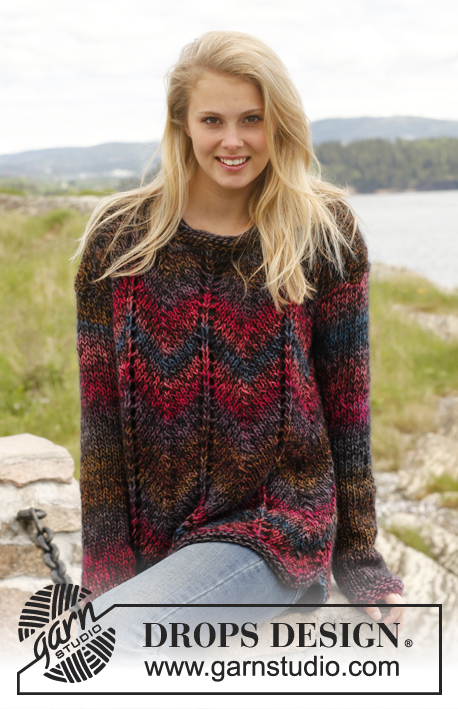
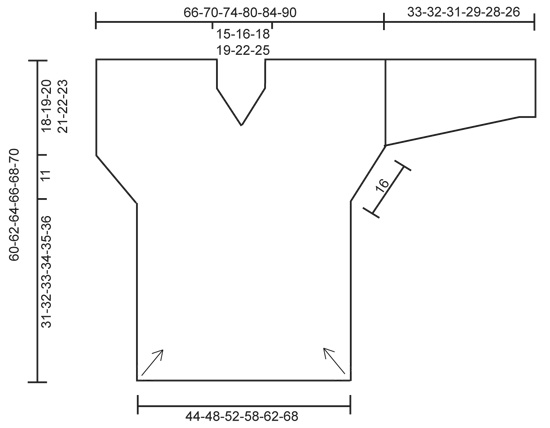
Knitted DROPS jumper in garter st in ”Big Delight”. Worked diagonally. Size: S - XXXL.
DROPS 150-23 |
||||
|
GARTER ST (back and forth on needle): K all rows. 1 ridge = 2 rows K. ---------------------------------------------------------- JUMPER: Arrows on chart show the knitting direction. The entire jumper is worked in GARTER ST - see explanation above. REMEMBER THE KNITTING TENSION - Incorrect knitting tension will affect the shape of the garment! BACK PIECE: Worked back and forth on circular needle to make room for all the sts. Cast on 3-3-4-4-4-4 sts on circular needle size 7 mm with Big Delight. Work in GARTER ST - see explanation above (1st row = RS). AT THE SAME TIME inc 1 st at beg of every row by working 2 sts in first st on all rows until there are 47-51-56-62-66-72 sts on needle. Put piece aside and knit another part the same way. Place the two parts tog on same circular needle size 7 mm = 94-102-112-124-132-144 sts. Insert a marker between the two parts. Then work as follows from RS: Work 2 sts in first st, work until 2 sts remain before marker, K 2 tog, marker, slip 1 st as if to K, K 1, psso, work until 1 st remains, work 2 sts in last st. Continue like this with inc and dec on every row from RS (no of sts will thus not vary) until piece measures 31-32-33-34-35-36 cm - measured straight up along the side of piece (not in knitting direction) - see chart. Insert 1 marker in the side. Now cast on new sts at the end of every row (i.e. towards the sides) for shoulder as follows: Cast on 6 new sts towards the side 4 times in total (= 24 sts inc in each side). Insert another marker in the side. NOTE: Remember to continue dec mid back as before the entire way until finished measurements = 134-142-152-164-172-184 sts on needle. After last inc for shoulder, continue inc towards the sides as before (i.e. work 2 sts in first and last st on every row from RS). When piece measures 18-19-20-21-22-23 cm from the last marker (measured straight up along the side), dec for shoulder as follows: Work the first 2 sts on row tog and the last 2 sts on row tog on all rows from RS until 38-42-44-48-52-56 sts remain on needle (i.e. dec both in the middle and in each side). Slip the first 13 sts on a stitch holder (work them first), cast off the next 12-16-18-22-26-30 sts = 13 sts remain on row. Continue in garter st over these sts, AT THE SAME TIME dec 1 st at beg of every row. Continue until 1 st remains, cut the yarn and pull it through the last st. Slip sts on stitch holder back on needle, work the same way over these 13 sts. FRONT PIECE: Cast on and work as back piece. SLEEVE: Worked back and forth on needle. Cast on 36-38-40-42-44-46 sts on circular needle size 7 mm with Big Delight. Work in garter st. When piece measures 6 cm, inc 1 st in each side, repeat inc every 6-4½-4-4-3-3 cm 4-5-5-5-6-6 more times (= 5-6-6-6-7-7 inc in total) = 46-50-52-54-58-60 sts. Cast off all sts when piece measures 33-32-31-29-28-26 cm (shorter measurements in the larger sizes because of wider shoulders). ASSEMBLY: Sew the shoulder seams. Sew in sleeves. Sew underarm seam and side seam in front loop of outermost st to avoid a chunky seam. |
||||
Diagram explanations |
||||
|
||||
 |
||||
Have you finished this pattern?Tag your pictures with #dropspattern #hazetunica or submit them to the #dropsfan gallery. Do you need help with this pattern?You'll find 13 tutorial videos, a Comments/Questions area and more by visiting the pattern on garnstudio.com. © 1982-2026 DROPS Design A/S. We reserve all rights. This document, including all its sub-sections, has copyrights. Read more about what you can do with our patterns at the bottom of each pattern on our site. |
||||


With over 40 years in knitting and crochet design, DROPS Design offers one of the most extensive collections of free patterns on the internet - translated to 17 languages. As of today we count 324 catalogues and 12290 patterns translated into English (UK/cm). 12290
We work hard to bring you the best knitting and crochet have to offer, inspiration and advice as well as great quality yarns at incredible prices! Would you like to use our patterns for other than personal use? You can read what you are allowed to do in the Copyright text at the bottom of all our patterns. Happy crafting!
Post a comment to pattern DROPS 150-23
We would love to hear what you have to say about this pattern!
If you want to leave a question, please make sure you select the correct category in the form below, to speed up the answering process. Required fields are marked *.