-------------------------------------------------------
Alternative Yarn – See how to change yarns here
Yarn Groups A to F – Use the same pattern and change the yarn here
Yarn usage using an alternative yarn – Use our yarn converter here
-------------------------------------------------------
= knitting direction |
Each of our patterns has specific tutorial videos to help you.
These step-by-step tutorials might also help you:
Why is the knitting/crochet tension so important?
Knitting tension is what determines the final measurements of your work, and is usually measured per 10 x 10 cm. It is provided like so: number of stitches in width x number of rows in height - eg: 19 stitches x 26 rows = 10 x 10 cm.
The knitting tension is very individual; some people knit/crochet loosely while others work tightly. You adjust the knitting tension with the needle size, which is why the suggested needle size is only meant as a guide! You need to adjust this (up or down) to ensure that YOUR knitting tension matches the knitting tension provided in the pattern. If you work with a different knitting tension than provided you will have a different yarn consumption, and your work will have different measurements than what the pattern suggests.
The knitting tension also determines which yarns can replace each other. As long as you achieve the same knitting tension you can replace one yarn with another.
See DROPS lesson: How to measure your tension/gauge
See DROPS video: How to make a gauge tension swatch
How do I know how many balls of yarn I need?
The required amount of yarn is provided in grams, eg: 450 g. To calculate how many balls you’ll need you first need to know how many grams are in 1 ball (25g, 50g or 100g). This information is available if you click on the individual yarn quality on our pages. Divide the amount required with the amount of each ball. For example, if each ball is 50g (the most common amount), the calculation will be as follows: 450 / 50 = 9 balls.
Can I use a different yarn than what the pattern suggests?
The important thing when changing from one yarn to another is that the knitting/crochet tension remains the same. This is so that the measurements of the finished piece will be the same as on the sketch provided. It is easier to achieve the same knitting tension using yarns from the same yarn group. It is also possible to work with multiple strands of a thinner yarn to achieve the knitting tension of a thicker one. Please try our yarn converter. We recommend you to always work a test swatch.
Please NOTE: when changing yarn the garment might have a different look and feel to the garment in the photo, due to individual properties and qualities of each yarn.
See DROPS lesson: Can I use a different yarn than the one mentioned in the pattern?
What are the yarn groups?
All our yarns are categorised into yarn groups (from A to F) according to thickness and knitting tension – group A contains the thinnest yarns and group F the thickest. This makes it easier for you to find alternative yarns to our patterns, should you wish to switch yarn. All yarns within the same group have a similar knitting tension and can easily replace each other. However, different yarn qualities have different structures and properties which will give the finished work a unique look and feel.
How do I use the yarn calculator?
At the top of all our patterns you’ll find a link to our yarn calculator, which is a helpful tool should you wish to use a different yarn than suggested. By filling in the yarn quality you wish to replace, the amount (in your size) and number of strands, the calculator will present good alternative yarns with the same knitting tension. Additionally it will tell you how much you’ll require in the new qualities and whether you’ll need to work with multiple strands. Most skeins are 50g (some are 25g or 100g).
If the pattern is worked with multiple colours, every colour will have to be calculated separately. Similarly, if the pattern is worked with several strands of different yarns (for example 1 strand Alpaca and 1 strand Kid-Silk) you will have to find alternatives for each, individually.
Why do you show discontinued yarns in the patterns?
Since different yarns have different qualities and textures we have chosen to keep the original yarn in our patterns. However, you can easily find options among our available qualities by using our yarn calculator, or simply pick a yarn from the same yarn group.
It is possible that some retailers still have discontinued yarns in stock, or that someone has a few skeins at home that they would like to find patterns for.
The yarn calculator will provide both alternative yarn as well as required amount in the new quality.
What size should I knit?
If you think it's hard to decide what size to make, it can be a good idea to measure a garment you own already and like the size of. Then you can pick the size by comparing those measures with the ones available in the pattern's size chart.
You'll find the size chart at the bottom of the pattern.
See DROPS lesson: How to read size chart
Why do I get the wrong knitting tension with the suggested needle size?
The needle size provided in the pattern serves only as a guide, the important thing is to follow the knitting tension. And since knitting tension is very individual, you will have to adjust the needle size to ensure that YOUR tension is the same as in the pattern – maybe you’ll have to adjust 1, or even 2 needle sizes, up or down to achieve the correct tension. For this, we recommend that you work test swatches.
Should you work with a different knitting tension than the one provided, the measurements of the finished garment might deviate from the measurement sketch.
See DROPS lesson: How to measure your tension/gauge
See DROPS video: How to make a tension/gauge swatch
Why is the pattern worked top-down?
Working a garment top-down provides more flexibility and room for personal adjustment. For example it is easier to try the garment on while working, as well as making adjustments to length of yoke and shoulder caps.
The instructions are carefully explaining every step, in the correct order. Diagrams are adjusted to the knitting direction and are worked as usual.
How do I work according to a knitting diagram?
The diagram depicts all rows/rounds, and every stitch seen from the right side. It is read from bottom to top, from right to left. 1 square = 1 stitch.
When working back and forth, every other row is worked from the right side and every other row is worked from the wrong side. When working from the wrong side, the diagram will have to be worked reversed: from left to right, knit stitches are purled, purl stitches are knit etc.
When working in the round every round is worked from the right side and the diagram are worked from right to left on all rounds.
See DROPS lesson: How to read knitting diagrams
How do I work according to a crochet diagram?
The diagram depicts all rows/rounds, and every stitch seen from the right side. It is worked from bottom to top, from right to left.
When working back and forth every other row is worked from the right side: from right to left and every other row is worked from the wrong side: from left to right.
When working in the round, every row in the diagram are worked from the right side, from right to left.
When working a circular diagram you start in the middle and work your way outwards, counter clockwise, row by row.
The rows usually start with a given number of chain stitches (equivalent to the height of the following stitch), this will either be depicted in the diagram or explained in the pattern.
See DROPS lesson: How to read crochet diagrams
How do I work several diagrams simultaneously on the same row/round?
Instructions for working several diagrams after each other on the same row/round, will often be written like so: “work A.1, A.2, A.3 a total of 0-0-2-3-4 times". This means you work A.1 once, then A.2 is worked once, and A.3 is repeated (in width) the number of times provided for your size – in this case like so: S = 0 times, M = 0 times, L=2 times, XL= 3 times and XXL = 4 times.
The diagrams are worked as usual: begin with the first row in A.1, then work the first row in A.2 etc.
See DROPS lesson: How to read knitting diagrams
See DROPS lesson: How to read crochet diagrams
Why are the sleeves shorter in larger sizes?
The total width of the garment (from wrist-to-wrist) will be larger in the larger sizes, despite the actual sleeves being shorter. The larger sizes have longer sleeve caps and wider shoulders, so there will be a good fit in all sizes.
Where on the garment is the length measured?
The measurement sketch/schematic drawing provides information regarding the full length of the garment. If it’s a jumper or a jacket the length is measured from the highest point on the shoulder closest to the neckline, and straight down to the bottom of the garment. It is NOT measured from the tip of shoulder. Similarly, the length of yoke is measured from the highest point on the shoulder and down to where yoke is split into body and sleeves.
On a jacket measures are never taken along bands, unless specifically stated. Always measure inside band stitches when measuring the length.
See DROPS lesson: How to read a schematic drawing
What is a repeat?
Diagrams are often repeated on the round or in height. 1 repeat is the diagram the way it appears in the pattern. If it says to work 5 repeats of A.1 in the round, then you work A.1 a total of 5 times after/next to each other in the round. If it says to work 2 repeats of A.1 vertically/in height you work the entire diagram once, then begin again at the start and work the entire diagram one more time.
Why does the piece start with more chain stitches than it’s worked with?
Chain stitches are slightly narrower than other stitches and to avoid working the cast-on edge too tight, we simply chain more stitches to begin with. The stitch count will be adjusted on the following row to fit the pattern and measurement sketch.
Why increase before the rib edge when the piece is worked top-down?
The rib edge is more elastic and will contract slightly compared to, for example, stocking stitch. By increasing before the rib edge, you avoid a visible difference in width between the rib edge and the rest of the body.
Why increase in the cast-off edge?
It’s very easy to cast off too tightly, and by making yarn overs while casting off (and simultaneously casting these off) you avoid a too tight cast off edge.
See DROPS video: How to bind off with yarn overs (yo)
How do I increase/decrease on every 3rd and 4th row/round alternately?
To achieve an even increase (or decrease) you can increase on, for example: every 3rd and 4th row alternately, like so: work 2 rows and increase on the 3rd row, work 3 rows and increase on the 4th. Repeat this until the increase is complete.
See DROPS lesson: Increase or decrease 1 st on every 3rd and 4th row alternately
How can I work a jacket in the round instead of back and forth?
Should you prefer to work in the round instead of back and forth, you may of course adjust the pattern. You’ll need to add steeks mid-front (usually 5 stitches), and follow the instructions. When you would normally turn and work from the wrong side, simply work across the steek and continue in the round. At the end you’ll cut the piece open, pick up stitches to work bands, and cover the cut edges.
See DROPS video: How to knit steeks and cut open
Can I work a jumper back and forth instead of in the round?
Should you prefer to work back and forth instead of in the round, you may of course adjust the pattern so you work the pieces separately and then assemble them at the end. Divide the stitches for the body in 2, add 1 edge stitch in each side (for sewing) and work the front and back pieces separately.
See DROPS lesson: Can I adapt a pattern for circular needles into straight needles?
Why is the pattern slightly different than what I see in the photo?
Pattern repeats can vary slightly in the different sizes, in order to get the correct proportions. If you’re not working the exact same size as the garment in the photo, yours might deviate slightly. This has been carefully developed and adjusted so that the complete impression of the garment is the same in all sizes.
Make sure to follow instructions and diagrams for your size!
How do I make a women’s size garment into a men’s size one?
If you have found a pattern you like which is available in women’s size it’s not very difficult to convert it to men’s size. The biggest difference will be the length of sleeves and body. Start working on the women size that you think would fit across the chest. The additional length will be worked right before you cast off for the armhole/sleeve cap. If the pattern is worked top-down you can add the length right after the armhole or before the first decrease on sleeve.
Regarding additional yarn amount, this will depend on how much length you add, but it is better with a skein too many than too few.
How do I prevent a hairy garment from shedding?
All yarns will have excess fibres (from production) that might come off as lint or shedding. Brushed yarns (ie hairier yarns) have more of these loose, excess fibres, causing more shedding.
Shedding also depends on what is worn under or over the garment, and whether this pulls at the yarn fibres. It’s therefore not possible to guarantee that there will be no shedding
Below are some tips on how to get the best result when working with hairier yarns:
1. When the garment is finished (before you wash it) shake it vigorously so the looser hairs come off. NOTE: do NOT use a lint roller, brush or any method that pulls at the yarn.
2. Place the garment in a plastic bag and put it in your freezer - the temperature will cause the fibres to become less attached to each other, and excess fibres will come off easier.
3. Leave in the freezer for a few hours before taking it out and shaking it again.
4. Wash the garment according to the instructions on the yarn label.
Why does my garment pill?
Pilling is a natural process that happens to even the most exclusive of fibers. It's a natural sign of wear and tear that is hard to avoid, and that is most visible in high friction areas of your garment like a sweater's arms and cuffs.
You can make your garment look as new by removing the pilling, using a fabric comb or a pill/lint remover.
Haze Tunica |
||||
|
||||
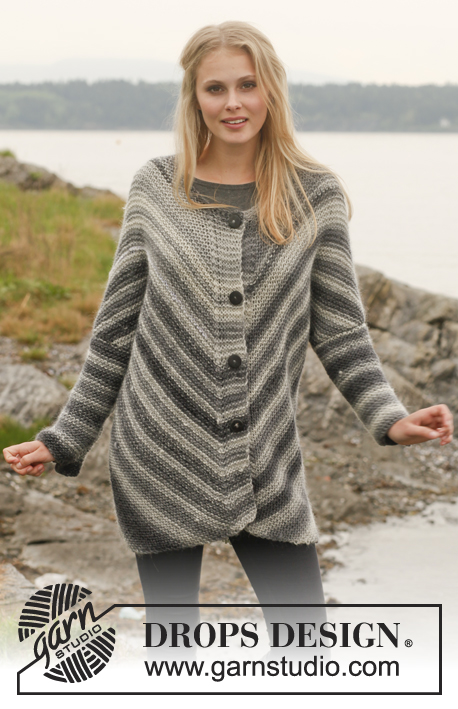
Knitted DROPS jumper in garter st in ”Big Delight”. Worked diagonally. Size: S - XXXL.
DROPS 150-23 |
||||
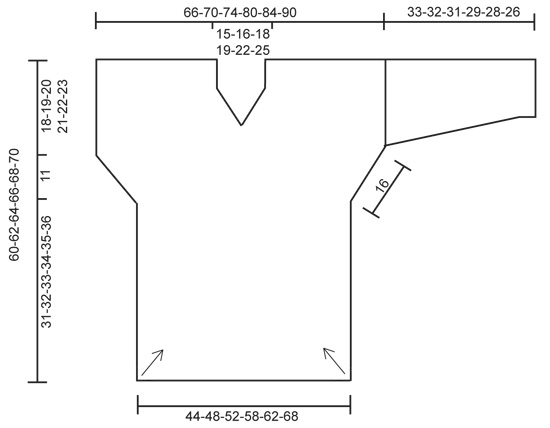
GARTER ST (back and forth on needle): K all rows. 1 ridge = 2 rows K. ---------------------------------------------------------- JUMPER: Arrows on chart show the knitting direction. The entire jumper is worked in GARTER ST - see explanation above. REMEMBER THE KNITTING TENSION - Incorrect knitting tension will affect the shape of the garment! BACK PIECE: Worked back and forth on circular needle to make room for all the sts. Cast on 3-3-4-4-4-4 sts on circular needle size 7 mm with Big Delight. Work in GARTER ST - see explanation above (1st row = RS). AT THE SAME TIME inc 1 st at beg of every row by working 2 sts in first st on all rows until there are 47-51-56-62-66-72 sts on needle. Put piece aside and knit another part the same way. Place the two parts tog on same circular needle size 7 mm = 94-102-112-124-132-144 sts. Insert a marker between the two parts. Then work as follows from RS: Work 2 sts in first st, work until 2 sts remain before marker, K 2 tog, marker, slip 1 st as if to K, K 1, psso, work until 1 st remains, work 2 sts in last st. Continue like this with inc and dec on every row from RS (no of sts will thus not vary) until piece measures 31-32-33-34-35-36 cm - measured straight up along the side of piece (not in knitting direction) - see chart. Insert 1 marker in the side. Now cast on new sts at the end of every row (i.e. towards the sides) for shoulder as follows: Cast on 6 new sts towards the side 4 times in total (= 24 sts inc in each side). Insert another marker in the side. NOTE: Remember to continue dec mid back as before the entire way until finished measurements = 134-142-152-164-172-184 sts on needle. After last inc for shoulder, continue inc towards the sides as before (i.e. work 2 sts in first and last st on every row from RS). When piece measures 18-19-20-21-22-23 cm from the last marker (measured straight up along the side), dec for shoulder as follows: Work the first 2 sts on row tog and the last 2 sts on row tog on all rows from RS until 38-42-44-48-52-56 sts remain on needle (i.e. dec both in the middle and in each side). Slip the first 13 sts on a stitch holder (work them first), cast off the next 12-16-18-22-26-30 sts = 13 sts remain on row. Continue in garter st over these sts, AT THE SAME TIME dec 1 st at beg of every row. Continue until 1 st remains, cut the yarn and pull it through the last st. Slip sts on stitch holder back on needle, work the same way over these 13 sts. FRONT PIECE: Cast on and work as back piece. SLEEVE: Worked back and forth on needle. Cast on 36-38-40-42-44-46 sts on circular needle size 7 mm with Big Delight. Work in garter st. When piece measures 6 cm, inc 1 st in each side, repeat inc every 6-4½-4-4-3-3 cm 4-5-5-5-6-6 more times (= 5-6-6-6-7-7 inc in total) = 46-50-52-54-58-60 sts. Cast off all sts when piece measures 33-32-31-29-28-26 cm (shorter measurements in the larger sizes because of wider shoulders). ASSEMBLY: Sew the shoulder seams. Sew in sleeves. Sew underarm seam and side seam in front loop of outermost st to avoid a chunky seam. |
||||
Diagram explanations |
||||
|
||||
Have you made this or any other of our designs? Tag your pictures in social media with #dropsdesign so we can see them! Do you need help with this pattern?You'll find tutorial videos, a Comments/Questions area and more by visiting the pattern on garnstudio.com. © 1982-2024 DROPS Design A/S. We reserve all rights. This document, including all its sub-sections, has copyrights. Read more about what you can do with our patterns at the bottom of each pattern on our site. |
With over 40 years in knitting and crochet design, DROPS Design offers one of the most extensive collections of free patterns on the internet - translated to 17 languages. As of today we count 304 catalogues and 11422 patterns - 11422 of which are translated into English (UK/cm).
We work hard to bring you the best knitting and crochet have to offer, inspiration and advice as well as great quality yarns at incredible prices! Would you like to use our patterns for other than personal use? You can read what you are allowed to do in the Copyright text at the bottom of all our patterns. Happy crafting!
Comments / Questions (59)
Svenja wrote:
Hallo, mir ist ein kleiner Rechenfehler aufgefallen. Rückenteil: (=auf jeder Seite 24 M auf genommen)Schulter zunahme. = 134-142-152-164-172-184M aber ausgehend von 94-102-112-124-132-144 M müßten es dann nicht 142-150-160-172-180-192 M sein? Gruß Svenja
25.08.2014 - 09:37DROPS Design answered:
Liebe Svenja, nein, das ist kein Rechenfehler, denn Sie nehmen ja außerdem an der hinteren Mitte in den 4 R, in denen Sie die Zunahmen für die Ärmel machen (insgesamt 48 M = 4x 2x 6 M), weiterhin je 2 M ab, es sind also insgesamt 8 M, die Sie abnehmen, bleiben unterm Strich noch 40 zugenommene M, dann kommen Sie auf die angegebene Maschenzahl.
01.09.2014 - 13:07Ariana wrote:
Ich habe einen kleinen Fehler in der deutschen Anleitung gefunden: Im letzten Absatz zum Rückenteil heißt es im ersten Satz: "..., die nächsten 12-16-18-22-26-30 M stricken = 13 M auf der Nadel." Statt "stricken" müsste hier "abketten" stehen. Habe das auch in der englischen Anleitung überprüft, da steht es korrekt: "cast off". Viele Grüße Ariana
10.08.2014 - 13:39DROPS Design answered:
Vielen Dank für den Hinweis, das wird nun korrigiert! Viel Spaß beim Weiterstricken!
12.08.2014 - 09:42Katrine Molberg wrote:
Jeg har lige et spørgsmål mere :) Jeg har fået sat de to dele sammen og strikket første pind. Der står nu i opskriften: "Fortsæt således med udtagninger og indtagninger på hver p fra retsiden (m-antallet vil dermed holdes konstant)" Betyder det at der nu kun skal laves ind- og udtagninger på retsiden og at der bare strikkes en hel retpind uden nogen ind- og udtagninger på alle vrangpinde. Eller blot at der startes på retsiden? På forhånd tak - Katrine
30.06.2014 - 16:59DROPS Design answered:
Hej Katrine. Ja, du skal kun lave ind- og udtagningerne paa retsiden. Vrangpindene strikker du ret uden at foretage dig noget. God fornöjelse.
02.07.2014 - 10:24Katrine Molberg wrote:
Jeg forastår ikke helt målene. På modellen på bikledet ligner det en tunika eller kjole der går til midt på lårene men selv i den største størrelse går den, i følge målene på tegningen, kun mig til lige under hofterne. Er det en fejl? Jeg synes heller ikke ærmerne og halsen på tegningen passer med billedet. På forhånd tak:)
07.06.2014 - 15:50DROPS Design answered:
Hei Katrine. Maalene er korrekte. En laengde paa 60-70 cm er en lang tröje. Pröv eventuel at sammenligne med en egen tunika eller tröje som du har. Aermer og hals er ogsaa korrekte, det er saa ikke helt saa tydeligt at se paa billedet. God fornöjelse med den.
10.06.2014 - 16:28Muriel Piazza wrote:
Modèle très amusant à tricoter. Mais il faut modifier les dimensions des manches pour obtenir le résultat de la photo. Pour le modèle S, il faut monter 30 mailles au lieu de 36 et faire toutes les augmentations sur les 10 derniers centimètres.
17.03.2014 - 12:17DROPS Design answered:
Bonjour Mme Piazza, aviez-vous bien le bon échantillon de 13 m x 26 rangs au point mousse = 10 x 10 cm ? mais si vous souhaitiez le bas des manches plus serré, vous avez bien fait. Bon tricot!
17.03.2014 - 18:52Kirsten Garde wrote:
Har et stort problem. Har slået op på ryggen og samlet de to dele. Jeg skal nu strikke til arbejdet måler 33 cm op langs siden. Hvis jeg lægger det op og måler er der 33 cm efter ca. Skal de 33 cm måles efter at delene er sat sammen?
19.02.2014 - 10:33DROPS Design answered:
Hej Kirsten. Du skal maale fra starten af - fra underkanten af delene og op langs siden (maal ikke i strikkeretningen).
19.02.2014 - 14:14TAL wrote:
Hello again, i think i am doing something wrong )-: becoues the shape does not looks as of the model.if i make the small- 31 cm should it be also in the middle of the garment (where is the decreasing is done)? thanks
29.01.2014 - 20:01DROPS Design answered:
Dear Tal, measure the 31 cm straight up along the sides of piece (see measurement chart). Happy knitting!
30.01.2014 - 10:12TAL wrote:
Hello, could you please explane when it is written to inc in the beg of every row does it means in the beg of the rs row or also in the beg of wr row?
24.01.2014 - 07:56DROPS Design answered:
Dear Tal, you are correct when you inc at the beg of every row, you will inc at the beg of row from RS and from WS. Happy knitting!
24.01.2014 - 09:20Chrislibrarian wrote:
Eureka! I just had a lightbulb moment and finally understood what you meant by "flat" and it's fine :) can't believe I missed that! Thanks for your patience :D Merry Christmas!
19.12.2013 - 11:45DROPS Design answered:
No worries, glad to read everything is now fine. Thank you ! Happy knitting !
19.12.2013 - 13:54Chrislibrarian wrote:
Sorry to post twice, I forgot to change the country :( Thanks for getting back to me. I've done this 3 times now and laid it flat to measure, but the increase in length over 8 rows isn't 11cms. My tension is fine though. I would need to increase only 3sts over 16 rows to get anywhere near 11cms in length from the first increase. So I'm still confused. If I start knitting "straight" (on the diagonal) after the last increase marker, the jumper will be 7cms shorter than it should be.
19.12.2013 - 11:34DROPS Design answered:
See below - while casting on sts each side, do not forget to dec in the middle as before to keep V shape. Happy knitting!
19.12.2013 - 13:53