
Popular categories
Looking for a yarn?


Comments / Questions (32)
![]() Bousquet Yvelise wrote:
Bousquet Yvelise wrote:
Bonjour . Je tricote la manche de ce pull et je fais la taille 11/12 ans . Je dois monter 48 m et augmenter 10 fois 1 m de chaque côté du marqueur = 10×2m=20 m. Donc 48m +20m =68m . Pourquoi le patron indique 70m ? Merci de me repondre
14.12.2025 - 19:47DROPS Design answered:
Bonjour Mme Bousquet, on augmente 1 fois à 10 cm de hauteur totale puis encore 10 fois tous les 3 cm, soit 11 fois au total, ainsi vous aurez bien: 48 + (2x11) = 70 mailles. Bon tricot!
15.12.2025 - 15:19
![]() Jacqueline wrote:
Jacqueline wrote:
Hallo. Gelten Ihre Massangaben jeweils ab Anschlag oder ab Bündchenende (z.B. Rumpfteil 3/4 Jahre: Nach 27 cm die nächste Runde.....).
09.12.2025 - 13:30DROPS Design answered:
Liebe Jacqueline, die Massangaben werden ab der Anschlagskante gemessen (gesamte Höhe/Länge). Viel Spaß beim Stricken!
09.12.2025 - 17:18
![]() Linda Linnell wrote:
Linda Linnell wrote:
Can you expain please the instructions for decrease at top of sleeve. Your instructions say "When piece measures 29-33-36-40-44 cm, cast off 6 sts mid under sleeve (i.e. 3 sts on each side of marker) and work back and forth on needle until finished measurements. " What is meant by "until finished measurements." please?
14.11.2025 - 17:27DROPS Design answered:
Hi Linda, When you have cast off the 6 stitches, you continue back and forth for the sleeve cap, so the sleeve fits nicely into the armhole when sewn in. As you work back and forth you cast off stitches on both sides so the sleeve cap is symmetrical. The finished measurements are 35-39-43-47-52 cm. Regards, Drops Team.
18.11.2025 - 07:10
![]() Malgorzata wrote:
Malgorzata wrote:
Dlaczego nie ma instrukcji jak wszyc rekaw
25.02.2025 - 07:20DROPS Design answered:
Witaj Małgosiu, technika będzie taka sama jak TUTAJ. Pozdrawiamy!
25.02.2025 - 08:18
![]() Malgorzata wrote:
Malgorzata wrote:
Robie rozmiar na5/6 lat ile oczek w rekawie powinno zostac po zamknieciu ostatnich 3 oczek z obu stron bo tego nie podaliscie
24.02.2025 - 18:51DROPS Design answered:
Witaj Małgorzato, to zależy, ponieważ wcześniej zamykasz 2 o. z każdej strony, tyle razy aż dł. rękawa wynosi 34-38-42-46-51 cm (patrz przerabiany rozmiar). Tak więc liczba oczek na końcu może różnić się w zależności od liczby oczek w próbce na wysokość. Pozdrawiamy!
25.02.2025 - 08:02
![]() Christina wrote:
Christina wrote:
Hej, vad kan jag använda för garn till denna tröja( Captian Jack) som det inte är ull i? Mvh Christina
07.11.2023 - 18:58DROPS Design answered:
Hej Christina, du kan bruge DROPS Muskat eller DROPS Cotton Light, prøv vores garnkalkulator :)
09.11.2023 - 15:38
![]() Tina wrote:
Tina wrote:
Hej. Jeg har set at man kan starte med at strikke oppefra og ned. Men jeres guide er kun med raglan ærmer. Hvordan gør man, når det ikke er med raglan. f.eks. Captain Jack trøjen. Det ville være fedt, hvis der blev lavet en guide til den. Tak for de gode tips.
18.02.2023 - 02:35DROPS Design answered:
Hej Tina, hvis du vælger børn - bluser - oppefra og ned, så får du alle de bluser som er strikket oppefra og ned. Du kan altid strikke selve mønsteret ifølge det her diagram, hvis det er det du er ude efter :)
23.02.2023 - 15:03
![]() Marian wrote:
Marian wrote:
Jeg har strikket denne trøje i str 7/8 år med et garnforbrug i følge opskriften på 400 g - jeg brugte Drops Sky, som også tilhører garngruppe B. Trøjen endte med at veje 157 g, den er fin i størrelsen, men jeg står tilbage med garn til godt og vel en trøje mere - hvad er forklaringen på dette?
09.11.2022 - 19:16DROPS Design answered:
Hej Marian, Hvis du prøver vores garn-omregner så kan du se at 400 gr DROPS Lima (som det står i opskriften) modsvarer ca 211 g DROPS Sky :)
11.11.2022 - 15:03
![]() Britt wrote:
Britt wrote:
Kan tröja stickad i Limagarnet tvättas itvättmaskinens ullprogram 30 grader?
28.08.2022 - 16:44DROPS Design answered:
Hei Britt. DROPS Lima skal håndvask, maks 30°C. Om du ønsker å vaske i maskin med ullprogram kan vi ikke garantere resultatet. Har du noe Lima garn til overs, kan du alltids strikke en prøvelapp som du kan vaske å teste det ut på din maskin. mvh DROPS Design
29.08.2022 - 12:52
![]() Francine R Brenneke wrote:
Francine R Brenneke wrote:
How do i finish shoulders on front piece?
07.11.2021 - 18:35DROPS Design answered:
Dear Francine, just cast off the stitches as normal. Happy Stitching!
07.11.2021 - 21:18
|
|||||||
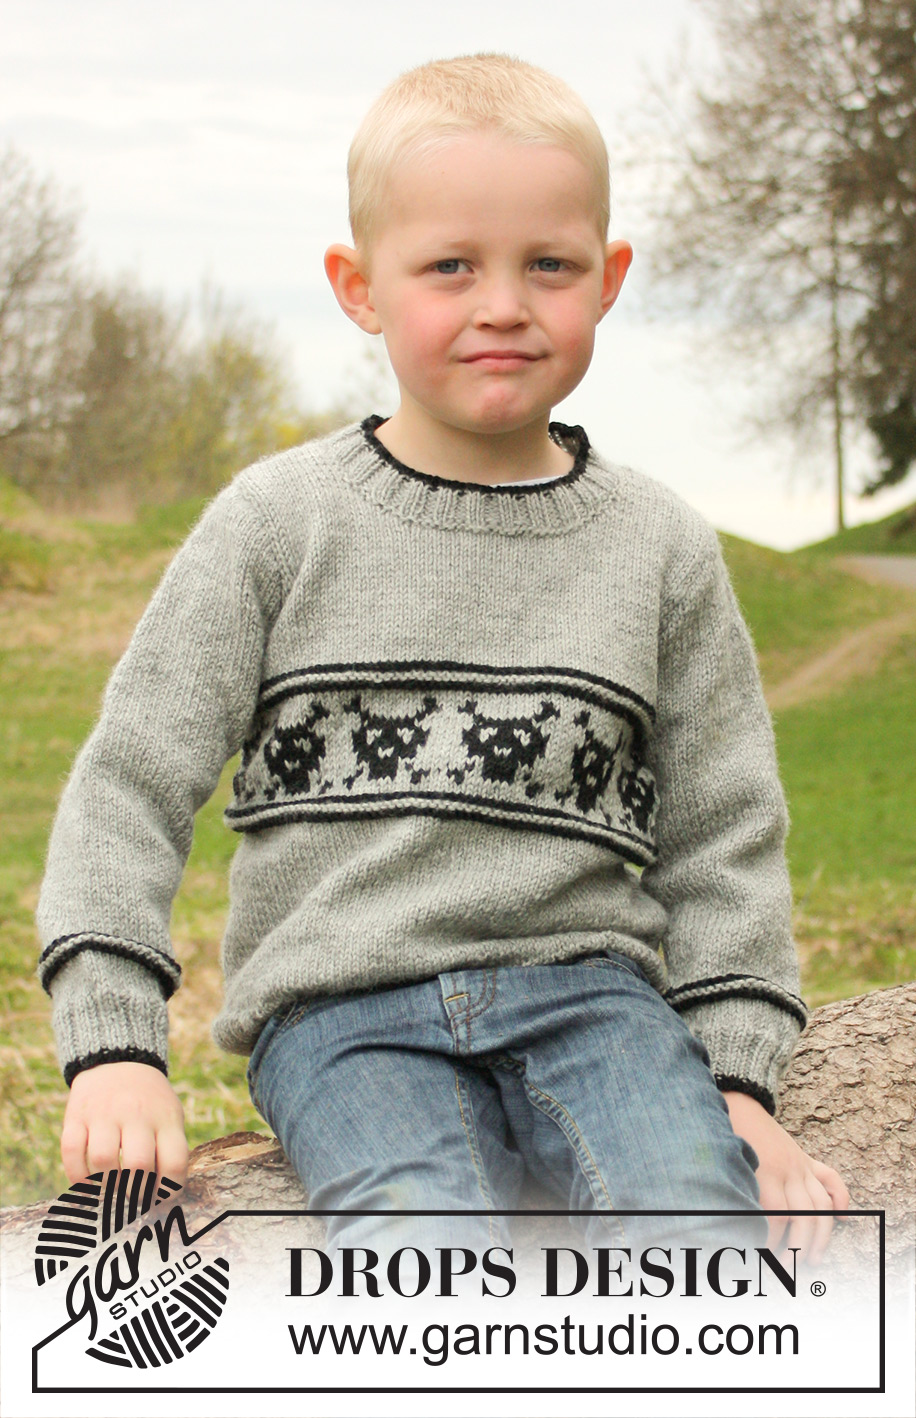
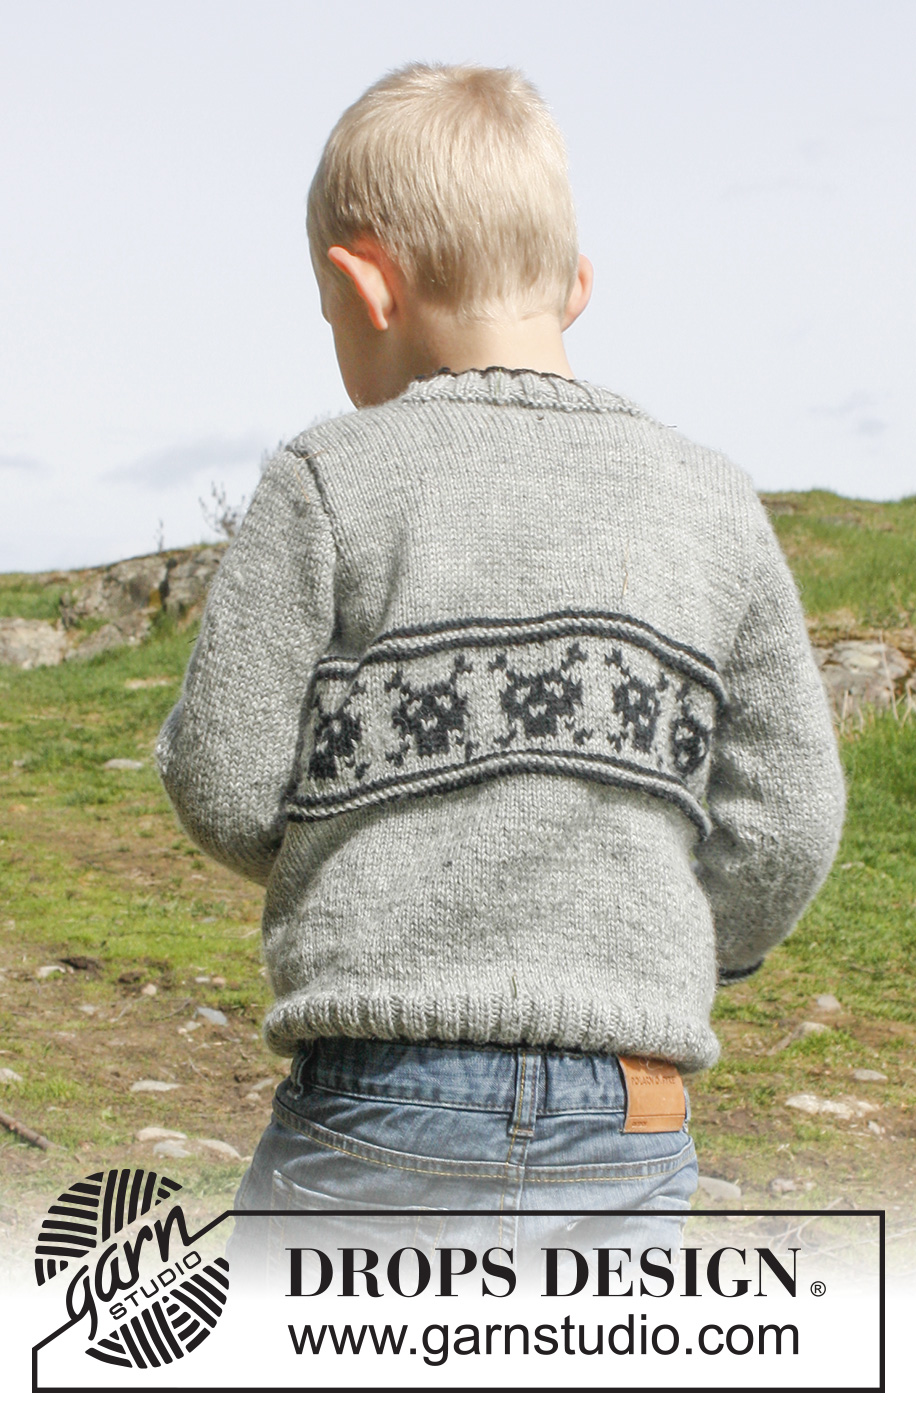
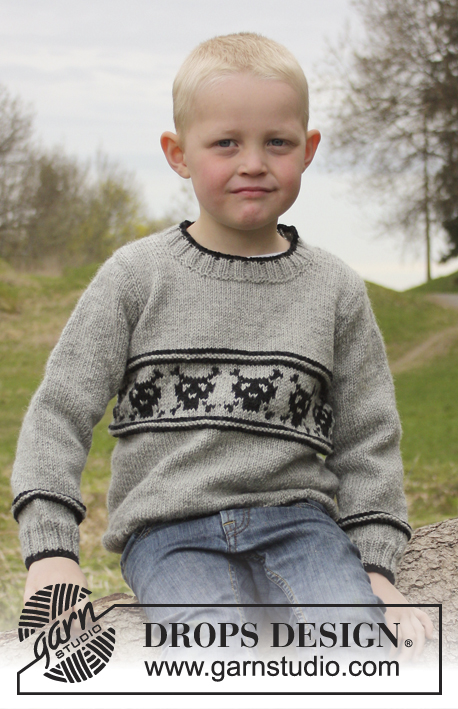
Captain Jack#captainjacksweater |
|||||||
 |
 |
||||||
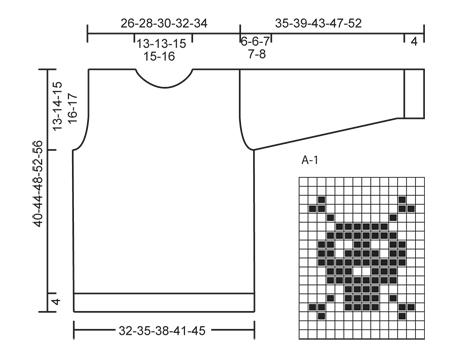
Knitted jumper with skulls in DROPS Lima. Size children 3 to 12 years.
DROPS Children 23-26 |
|||||||
|
GARTER ST (in the round on circular needle/double pointed needles): * K 1 round and P 1 round *, repeat from *-*. PATTERN: See diagram A-1 - diagram is worked in stocking st. ------------------------------------------------------- BODY: Worked in the round on circular needle. Cast on 152-168-184-200-216 sts on circular needle size 3 mm with black (round starts in the side). Work 1 round rib= K 2/P 2, switch to grey and continue rib until piece measures 4 cm. Switch to circular needle size 3.5 mm and continue in stocking st – AT THE SAME TIME on 1st round dec 12-14-16-18-20 sts evenly = 140-154-168-182-196 sts. When piece measures 14-17-19-22-24 cm, work 2 rounds in GARTER ST - see explanation above - in black, 2 rounds in garter st in grey and 2 rounds in garter st in black. Continue with diagram A-1 (= 10-11-12-13-14 repetitions on the round). When A-1 has been worked, work 2 rounds in garter st in black, 2 rounds in garter st in grey and 2 rounds in garter st in black again. Continue in stocking st and grey until finished measurements. When piece measures 27-30-33-36-39 cm, work next round as follows: Cast off 6 sts for armhole, work 64-71-78-85-92 sts (= back piece), cast off 6 sts for armhole and work the rest of row (= 64-71-78-85-92 sts on front piece). Finish each part separately. FRONT PIECE: = 64-71-78-85-92 sts. Continue in stocking st while at the same time cast off for armholes at beg of every row in each side: 2 sts 0-1-2-2-3 times and 1 st 3-3-3-5-5 times = 58-61-64-67-70 sts. When piece measures 34-38-42-45-49 cm, slip the middle 16-17-20-21-22 sts on a stitch holder for neck and finish each shoulder separately. Then cast off on every row from neck: 2 sts 2 times and 1 st 2 times = 15-16-16-17-18 sts remain on shoulder. Cast off when piece measures 40-44-48-52-56 cm. BACK PIECE: = 64-71-78-85-92 sts. Cast off for armholes as on front piece and continue until piece measures 38-42-46-50-54 cm. Now cast off the middle 26-27-30-31-32 sts for neck and finish each shoulder separately. At the same time cast off 1 st on next row from neck = 15-16-16-17-18 sts remain on shoulder. Cast off when piece measures 40-44-48-52-56 cm. SLEEVE: Worked in the round on double pointed needles. Cast on 40-44-44-48-48 sts on double pointed needles size 3 mm with black. Insert a marker at beg of round = mid under sleeve. Work 1 round rib = K 2/P 2, switch to grey and continue rib until piece measures 4 cm. Switch to double pointed needles size 3.5 mm and continue in stocking st. When piece measures 6 cm, work 2 rounds in garter st with black, 2 rounds in garter st in grey and 2 rounds in garter st in black, continue in grey and stocking st until finished measurements. At the same time when piece measures 8-8-9-10-10 cm, inc 1 st on each side of marker mid under sleeve. Repeat inc every 3-3½-3-3½-3 cm 6-6-8-8-10 more times = 54-58-62-66-70 sts. When piece measures 29-33-36-40-44 cm, cast off 6 sts mid under sleeve (i.e. 3 sts on each side of marker) and work back and forth on needle until finished measurements. Then cast off at beg of every row in each side: 2 sts 2 times and 1 st 3-3-4-4-6 times, then cast off 2 sts in each side until piece measures 34-38-42-46-51 cm, finally cast off 3 sts 1 time in each side. Cast off the remaining sts, piece measures approx. 35-39-43-47-52 cm. ASSEMBLY: Sew shoulder seams and sew in sleeves. NECK EDGE: Knit up approx. 75 to 85 sts around the neck (incl sts on stitch holder at the front) on circular needle size 3 mm with grey. P 1 round and K 1 round while at the same time on K round inc evenly to 88-92-96-100-100 sts. Continue in rib = K 2/P 2 for 6 rounds. Switch to black, work 1 round rib, then cast off with K over K and P over P. |
|||||||
Diagram explanations |
|||||||
|
|||||||
 |
|||||||
Have you finished this pattern?Tag your pictures with #dropspattern #captainjacksweater or submit them to the #dropsfan gallery. Do you need help with this pattern?You'll find 15 tutorial videos, a Comments/Questions area and more by visiting the pattern on garnstudio.com. © 1982-2026 DROPS Design A/S. We reserve all rights. This document, including all its sub-sections, has copyrights. Read more about what you can do with our patterns at the bottom of each pattern on our site. |
|||||||


With over 40 years in knitting and crochet design, DROPS Design offers one of the most extensive collections of free patterns on the internet - translated to 17 languages. As of today we count 324 catalogues and 12290 patterns translated into English (UK/cm). 12290
We work hard to bring you the best knitting and crochet have to offer, inspiration and advice as well as great quality yarns at incredible prices! Would you like to use our patterns for other than personal use? You can read what you are allowed to do in the Copyright text at the bottom of all our patterns. Happy crafting!
Post a comment to pattern DROPS Children 23-26
We would love to hear what you have to say about this pattern!
If you want to leave a question, please make sure you select the correct category in the form below, to speed up the answering process. Required fields are marked *.