
Popular categories
Looking for a yarn?


Comments / Questions (76)
![]() Valerie wrote:
Valerie wrote:
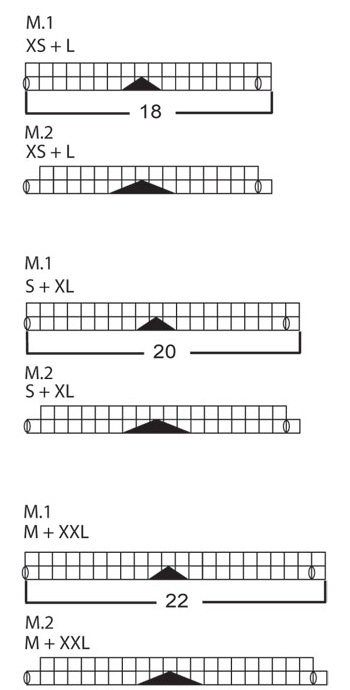
After 2 decreases every other M.1 diagram 2, it states continue pattern as before. Does that mean all M.1 each section or m.2, m1, m2 etc.
12.11.2013 - 23:15DROPS Design answered:
Dear Valerie, you dec as shown in diag M2 and then follow M1 as before, but with less sts each side of the middle dec (black triangle). Happy knitting!
13.11.2013 - 16:37
![]() Carla Aukes wrote:
Carla Aukes wrote:
Mij lijkt dit een leukpatroon om vast voor de komende zomer te maken. Ik snap alleen de term m1 en m2 niet.
21.09.2013 - 22:24DROPS Design answered:
Hoi Carla. M.1 en M.2 zijn de telpatronen. Kijk onderaan het patroon.
24.09.2013 - 10:40Jolene Hollingsworth wrote:
6 pages have been received and there is no mention of the stitches to use for the lace or zig-zag. I need the instructions please.
20.09.2013 - 02:54DROPS Design answered:
Dear Mrs Hollingsworth, to work the zig-zag pattern, please follow diagrams at the very bottom of the page, according to written pattern. Happy knitting!
20.09.2013 - 09:31
![]() Marilyn wrote:
Marilyn wrote:
I have guage bt am concerned about the wudth of the bottem of the piece. How loose should it be? I am making sixe xs and the person I am knitting for has 34" hips.
06.08.2013 - 01:37DROPS Design answered:
Dear Marilyn, you will find the measurement chart at the bottom of the pattern, all measurements are in cm and should help you to adjust yourself. Happy knitting!
06.08.2013 - 10:46
![]() Tora wrote:
Tora wrote:
XL=331 stiches!
26.07.2013 - 08:55
![]() Penny Porter wrote:
Penny Porter wrote:
I believe there is an error in the directions for XL. 299 cast on stitches does not make 16 repeats of the 20 stitch M1 pattern. It should be a multiple of 20 plus 1 st plus 10 for edges. Please advise.
26.07.2013 - 04:59DROPS Design answered:
Dear Mrs Porter, in size XL, you cast on 331 sts and work as follows : 5 sts front band + 20 sts of M.1 size XL x 16 times + 1 st st + 5 sts front band = 331 sts. Happy knitting!
26.07.2013 - 09:38
![]() Annika wrote:
Annika wrote:
Hei! Hvordan måler jeg lengden på strikketøyet? Det blir jo en sikk-sakk-kant nederst. Måler jeg fra de ytterste spissene?
13.07.2013 - 10:30
![]() Johanna wrote:
Johanna wrote:
Hej! För lös uppläggning med rundsticka tar man liten kort rak sticka som plockas ut efterhand! Du som har garnaffär borde veta detta!
09.08.2012 - 19:21
![]() Litet Nystan wrote:
Litet Nystan wrote:
Varför behövs 2 st rundstickor 4 mm? Jag kan inte se i beskrivningstexten hur de ska användas samtidigt...
09.08.2012 - 12:02DROPS Design answered:
För att få en elastisk kant så lägger man upp över 2 st rundst 4. När man lagt upp alla m så drar man ut den ena rundst och maskorna blir lösa. Har man inte en extra av samma storlek så kan man använda en 3.5 eller 5 mm, eller bara se till att lägga upp väldigt löst.
25.08.2012 - 01:45
![]() Nancy Peebles wrote:
Nancy Peebles wrote:
Is this pattern done all in garter stitch or do you pearl wrong side pattern does not specify? Thanks
08.03.2012 - 18:58DROPS Design answered:
The bottom part is worked in a stockinette pattern where you follow the charts below the text. The yoke part is worked in garter st, i.e K on every row.
09.03.2012 - 18:12
|
|||||||||||||
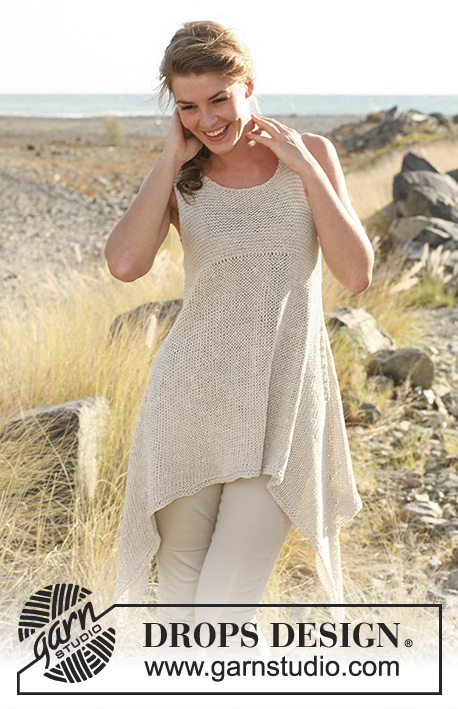
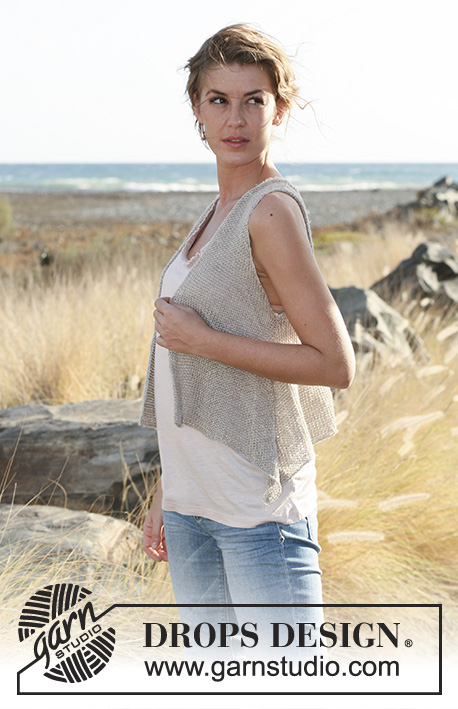
Falling Feathers Vest#fallingfeathersvest |
|||||||||||||
 |
 |
||||||||||||
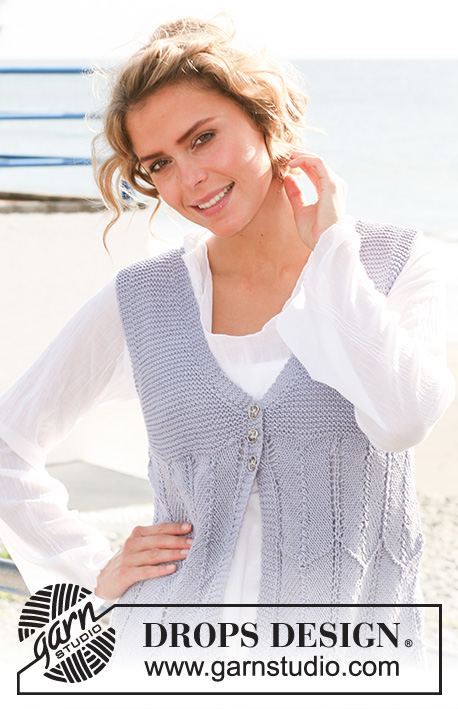
Knitted DROPS vest with zigzag pattern in "Muskat". Size: XS - XXL.
DROPS 129-14 |
|||||||||||||
|
GARTER ST (back and forth on needle): K all rows. DECREASE TIP: Dec for neck and armholes inside 5 P sts. All dec are done from RS. Dec after 5 sts as follows: Slip 1 st as if to K, K 1, psso. Dec before 5 sts as follows: K 2 tog BUTTON HOLES: Cast off for button holes on right front band. 1 button hole = cast off the 3rd band st, on next row cast on 1 new st over the cast off st. Cast off for button holes when piece measures: SIZE XS: 31, 34 and 37 cm SIZE S: 32, 35 and 38 cm SIZE M: 33, 36 and 39 cm SIZE L: 34, 37 and 40 cm SIZE XL: 33, 37 and 41 cm SIZE XXL: 34, 38 and 42 cm --------------------------------------------------------- BODY: Worked back and forth on circular needle from mid front. Cast on 227-251-275-299-331-363 sts (incl 5 band sts in each side towards mid front) on 2 circular needles size 4 mm with Muskat (to avoid a tight cast on edge). Pull out one of the circular needles. P the 5 band sts on every row until finished measurements. Work 2 rows in GARTER ST - see explanation above - with 5 band sts in each side. Continue as follows (beg from RS): 5 band sts, M.1 (see diagram for size) 12-12-12-16-16-16 times over the next 216-240-264-288-320-352 sts, 1 st in stocking st, 5 band sts. NOTE! REMEMBER THE KNITTING TENSION! When piece measures approx. 9 cm, dec 2 sts in every other M.1 (see explanation in M.2) = 215-239-263-283-315-347 sts. Then continue with pattern as before. NOTE! When piece measures approx. 10 cm and 22 cm, K 1 row from WS over all sts (work band sts as before). AT THE SAME TIME when piece measures 18 cm, dec 2 sts in the remaining M.1 = 203-227-251-267-299-331 sts. Then continue with pattern as before until piece measures 27 cm. Now dec 2 sts in every M.1 (as shown on M.2) = 179-203-227-235-267-299 sts. Then continue with pattern as before until piece measures 36 cm. Now dec 2 sts in every M.1 again (as shown on M.2) = 155-179-203-203-235-267 sts. On next row from RS, K all sts while AT THE SAME TIME adjusting the no of sts to 162-178-194-206-234-258. Switch to circular needle size 3.5 mm. K 1 row from WS (work the 5 band sts in each side as before). On next row divide piece as follows: Work 43-47-51-54-61-67 sts and slip these sts on a stitch holder (= right front piece), work 76-84-92-98-112-124 sts (= back piece), slip the remaining 43-47-51-54-61-67 sts on a stitch holder (= left front piece), now measure piece from here and finish each part separately. BACK PIECE: = 76-84-92-98-112-124 sts. Work in Garter st back and forth until piece measures 4-5-6-7-8-9 cm from where it was divided. Now on every row P 8-8-9-10-10-11 sts in each side. When piece measures 5-6-7-8-9-10 cm from where piece was divided, cast off 3-3-4-5-5-6 sts at the beg of the next 2 rows for armholes, continue with 5 P sts in each side. Then continue in garter st while AT THE SAME TIME continuing to dec for armhole inside the 5 P sts in each side – Read DECREASE TIP. Dec 1 st in each side on every row from RS a total of 3-6-8-9-15-19 times = 64-66-68-70-72-74 sts. Then continue until piece measures 19-21-23-25-27-29 cm from where piece was divided. Now P the middle 32-34-36-38-40-42 sts on every row (work the other sts as before). Continue to work like this until piece measures 21-23-25-27-29-31 cm. Now cast off the middle 22-24-26-28-30-32 sts for neck = 21 sts remain for shoulder. Finish each shoulder separately. Then continue in Garter st and 5 P sts in each side until piece measures 23-25-27-29-31-33 cm from where the piece was divided. Cast off. The whole piece measures approx. 59-61-63-65-67-69 cm. RIGHT FRONT PIECE: = 43-47-51-54-61-67 sts. Work in Garter st back and forth with 5 band sts towards mid front. NOTE! Remember to cast off for BUTTON HOLES - see explanation above. When piece measures 2-3-4-5-6-7 cm from where piece was divided (cast offs for button holes are now done), work 2 rows back and forth only over the 5 band sts. Then on next row, beg to dec for neck – Read DECREASE TIP! Dec 1 st on every other row 7 times, then on every 4th row 4-5-6-7-8-9 times and then on every 6th row 5 times. AT THE SAME TIME when piece measures 4-5-6-7-8-9 cm from where piece was divided, P over 8-8-9-10-10-11 sts in the side on every row. When piece measures 5-6-7-8-9-10 cm from where piece was divided, cast off and dec for armhole as on back piece. When all dec and cast offs for armhole and neck are done, 21 sts remain on needle. Then continue until piece measures 23-25-27-29-31-33 cm from where piece was divided. Cast off. The whole piece measures approx. 59-61-63-65-67-69 cm. LEFT FRONT PIECE: Work as right front piece but reversed. ASSEMBLY: Sew the shoulder seams. Sew side seams in front loop of outermost st. Sew on buttons. |
|||||||||||||
Diagram explanations |
|||||||||||||
|
|||||||||||||
 |
|||||||||||||
 |
|||||||||||||
Have you finished this pattern?Tag your pictures with #dropspattern #fallingfeathersvest or submit them to the #dropsfan gallery. Do you need help with this pattern?You'll find 16 tutorial videos, a Comments/Questions area and more by visiting the pattern on garnstudio.com. © 1982-2026 DROPS Design A/S. We reserve all rights. This document, including all its sub-sections, has copyrights. Read more about what you can do with our patterns at the bottom of each pattern on our site. |
|||||||||||||


With over 40 years in knitting and crochet design, DROPS Design offers one of the most extensive collections of free patterns on the internet - translated to 17 languages. As of today we count 324 catalogues and 12290 patterns translated into English (UK/cm). 12290
We work hard to bring you the best knitting and crochet have to offer, inspiration and advice as well as great quality yarns at incredible prices! Would you like to use our patterns for other than personal use? You can read what you are allowed to do in the Copyright text at the bottom of all our patterns. Happy crafting!
Post a comment to pattern DROPS 129-14
We would love to hear what you have to say about this pattern!
If you want to leave a question, please make sure you select the correct category in the form below, to speed up the answering process. Required fields are marked *.