DROPS Muskat uni colour 100% Cotton |
2.80 $ /50g |
Order |
Clicking the ORDER button will redirect you to Wool Warehouse Direct Ltd website
The yarn cost is calculated from the pattern’s smallest size and the yarn’s cheapest product type. Looking for an even better price? You might find it on the DROPS Deals!
-------------------------------------------------------
Alternative Yarn – See how to change yarns here
Yarn Groups A to F – Use the same pattern and change the yarn here
Yarn usage using an alternative yarn – Use our yarn converter here
-------------------------------------------------------
DROPS Muskat uni colour 100% Cotton 2.80 $ /50g Order |
Clicking the ORDER button will redirect you to Wool Warehouse Direct Ltd website
The yarn cost is calculated from the pattern’s smallest size and the yarn’s cheapest product type. Looking for an even better price? You might find it on the DROPS Deals!
All measurements in charts are in cm.
= K from RS, P from WS | |
= 1 YO between 2 sts | |
= slip 1 st as if to K, K 2 tog, psso | |
= slip 2 sts as if to K, K 3 tog, pass the 2 slipped sts over |
Each of our patterns has specific tutorial videos to help you.
These step-by-step tutorials might also help you:
Why is the knitting/crochet tension so important?
Knitting tension is what determines the final measurements of your work, and is usually measured per 10 x 10 cm. It is provided like so: number of stitches in width x number of rows in height - eg: 19 stitches x 26 rows = 10 x 10 cm.
The knitting tension is very individual; some people knit/crochet loosely while others work tightly. You adjust the knitting tension with the needle size, which is why the suggested needle size only serve as a guide! You need to adjust this (up or down) to ensure that YOUR knitting tension matches the knitting tension provided in the pattern. If you work with a different knitting tension than provided you will have a different yarn consumption, and your work will have different measurements than what the pattern suggests.
The knitting tension also determines which yarns can replace each other. As long as you achieve the same knitting tension you can replace one yarn with another.
See DROPS lesson: How to measure your tension/gauge
See DROPS video: How to make a gauge tension swatch
How do I know how many balls of yarn I need?
The required amount of yarn is provided in grams, eg: 450 g. To calculate how many balls you’ll need you first need to know how many grams are in 1 ball (25g, 50g or 100g). This information is available if you click on the individual yarn quality on our pages. Divide the amount required with the amount of each ball. For example, if each ball is 50g (the most common amount), the calculation will be as follows: 450 / 50 = 9 balls.
Can I use a different yarn than what the pattern suggests?
The important thing when changing from one yarn to another is that the knitting/crochet tension remains the same. This is so that the measurements of the finished piece will be the same as on the sketch provided. It is easier to achieve the same knitting tension using yarns from the same yarn group. It is also possible to work with multiple strands of a thinner yarn to achieve the knitting tension of a thicker one. Please try our yarn converter. We recommend you to always work a test swatch.
Please NOTE: when changing yarn the garment might have a different look and feel to the garment in the photo, due to individual properties and qualities of each yarn.
See DROPS lesson: Can I use a different yarn than the one mentioned in the pattern?
What are the yarn groups?
All our yarns are categorised into yarn groups (from A to F) according to thickness and knitting tension – group A contains the thinnest yarns and group F the thickest. This makes it easier for you to find alternative yarns to our patterns, should you wish to switch yarn. All yarns within the same group have a similar knitting tension and can easily replace each other. However, different yarn qualities have different structures and properties which will give the finished work a unique look and feel.
How do I use the yarn converter?
At the top of all our patterns you’ll find a link to our yarn converter, which is a helpful tool should you wish to use a different yarn than suggested. By filling in the yarn quality you wish to replace, the amount (in your size) and number of strands, the converter will present good alternative yarns with the same knitting tension. Additionally it will tell you how much you’ll require in the new qualities and whether you’ll need to work with multiple strands. Most skeins are 50g (some are 25g or 100g).
If the pattern is worked with multiple colours, every colour will have to be converted separately. Similarly, if the pattern is worked with several strands of different yarns (for example 1 strand Alpaca and 1 strand Kid-Silk) you will have to find alternatives for each, individually.
Why do you show discontinued yarns in the patterns?
Since different yarns have different qualities and textures we have chosen to keep the original yarn in our patterns. However, you can easily find options among our available qualities by using our yarn converter, or simply pick a yarn from the same yarn group.
It is possible that some retailers still have discontinued yarns in stock, or that someone has a few skeins at home that they would like to find patterns for.
The yarn converter will provide both alternative yarn as well as required amount in the new quality.
What size should I knit?
If you think it's hard to decide what size to make, it can be a good idea to measure a garment you own already and like the size of. Then you can pick the size by comparing those measures with the ones available in the pattern's size chart.
You'll find the size chart at the bottom of the pattern.
See DROPS lesson: How to read size chart
Why do I get the wrong knitting tension with the suggested needle size?
The needle size provided in the pattern serves only as a guide, the important thing is to follow the knitting tension. And since knitting tension is very individual, you will have to adjust the needle size to ensure that YOUR tension is the same as in the pattern – maybe you’ll have to adjust 1, or even 2 needle sizes, up or down to achieve the correct tension. For this, we recommend that you work test swatches.
Should you work with a different knitting tension than the one provided, the measurements of the finished garment might deviate from the measurement sketch.
See DROPS lesson: How to measure your tension/gauge
See DROPS video: How to make a gauge tension swatch
Why is the pattern worked top-down?
Working a garment top-down provides more flexibility and room for personal adjustment. For example it is easier to try the garment on while working, as well as making adjustments to length of yoke and shoulder caps.
The instructions are carefully explaining every step, in the correct order. Diagrams are adjusted to the knitting direction and are worked as usual.
How do I work according to a knitting diagram?
The diagram depicts all rows/rounds, and every stitch seen from the right side. It is read from bottom to top, from right to left. 1 square = 1 stitch.
When working back and forth, every other row is worked from the right side and every other row is worked from the wrong side. When working from the wrong side, the diagram will have to be worked reversed: from left to right, knit stitches are purled, purl stitches are knit etc.
When working in the round every round is worked from the right side and the diagram are worked from right to left on all rounds.
See DROPS lesson: How to read knitting diagrams
How do I work according to a crochet diagram?
The diagram depicts all rows/rounds, and every stitch seen from the right side. It is worked from bottom to top, from right to left.
When working back and forth every other row is worked from the right side: from right to left and every other row is worked from the wrong side: from left to right.
When working in the round, every row in the diagram are worked from the right side, from right to left.
When working a circular diagram you start in the middle and work your way outwards, counter clockwise, row by row.
The rows usually start with a given number of chain stitches (equivalent to the height of the following stitch), this will either be depicted in the diagram or explained in the pattern.
See DROPS lesson: How to read crochet diagrams
How do I work several diagrams simultaneously on the same row/round?
Instructions for working several diagrams after each other on the same row/round, will often be written like so: “work A.1, A.2, A.3 a total of 0-0-2-3-4 times". This means you work A.1 once, then A.2 is worked once, and A.3 is repeated (in width) the number of times provided for your size – in this case like so: S = 0 times, M = 0 times, L=2 times, XL= 3 times and XXL = 4 times.
The diagrams are worked as usual: begin with the first row in A.1, then work the first row in A.2 etc.
See DROPS lesson: How to read knitting diagrams
See DROPS lesson: How to read crochet diagrams
Why are the sleeves shorter in larger sizes?
The total width of the garment (from wrist-to-wrist) will be larger in the larger sizes, despite the actual sleeves being shorter. The larger sizes have longer sleeve caps and wider shoulders, so there will be a good fit in all sizes.
Where on the garment is the length measured?
The measurement sketch/schematic drawing provides information regarding the full length of the garment. If it’s a jumper or a jacket the length is measured from the highest point on the shoulder (usually closest to the neckline), and straight down to the bottom of the garment. It is NOT measured from the tip of shoulder. Similarly, the length of yoke is measured from the highest point on the shoulder and down to where yoke is split into body and sleeves.
See DROPS lesson: How to read a schematic drawing
What is a repeat?
Diagrams are often repeated on the round or in height. 1 repeat is the diagram the way it appears in the pattern. If it says to work 5 repeats of A.1 in the round, then you work A.1 a total of 5 times after/next to each other in the round. If it says to work 2 repeats of A.1 vertically/in height you work the entire diagram once, then begin again at the start and work the entire diagram one more time.
Why does the piece start with more chain stitches than it’s worked with?
Chain stitches are slightly narrower than other stitches and to avoid working the cast-on edge too tight, we simply chain more stitches to begin with. The stitch count will be adjusted on the following row to fit the pattern and measurement sketch.
Why increase before the rib edge when the piece is worked top-down?
The rib edge is more elastic and will contract slightly compared to, for example, stocking stitch. By increasing before the rib edge, you avoid a visible difference in width between the rib edge and the rest of the body.
Why increase in the cast-off edge?
It’s very easy to cast off too tightly, and by making yarn overs while casting off (and simultaneously casting these off) you avoid a too tight cast off edge.
See DROPS video: How to bind off with yarn overs (yo)
How do I increase/decrease on every 3rd and 4th row/round alternately?
To achieve an even increase (or decrease) you can increase on, for example: every 3rd and 4th row alternately, like so: work 2 rows and increase on the 3rd row, work 3 rows and increase on the 4th. Repeat this until the increase is complete.
See DROPS lesson: Increase or decrease 1 st on every 3rd and 4th row alternately
How can I work a jacket in the round instead of back and forth?
Should you prefer to work in the round instead of back and forth, you may of course adjust the pattern. You’ll need to add steeks mid-front (usually 5 stitches), and follow the instructions. When you would normally turn and work from the wrong side, simply work across the steek and continue in the round. At the end you’ll cut the piece open, pick up stitches to work bands, and cover the cut edges.
See DROPS video: How to knit steeks and cut open
Can I work a jumper back and forth instead of in the round?
Should you prefer to work back and forth instead of in the round, you may of course adjust the pattern so you work the pieces separately and then assemble them at the end. Divide the stitches for the body in 2, add 1 edge stitch in each side (for sewing) and work the front and back pieces separately.
See DROPS lesson: Can I adapt a pattern for circular needles into straight needles?
Why is the pattern slightly different than what I see in the photo?
Pattern repeats can vary slightly in the different sizes, in order to get the correct proportions. If you’re not working the exact same size as the garment in the photo, yours might deviate slightly. This has been carefully developed and adjusted so that the complete impression of the garment is the same in all sizes.
Make sure to follow instructions and diagrams for your size!
How do I make a women’s size garment into a men’s size one?
If you have found a pattern you like which is available in women’s size it’s not very difficult to convert it to men’s size. The biggest difference will be the length of sleeves and body. Start working on the women size that you think would fit across the chest. The additional length will be worked right before you cast off for the armhole/sleeve cap. If the pattern is worked top-down you can add the length right after the armhole or before the first decrease on sleeve.
Regarding additional yarn amount, this will depend on how much length you add, but it is better with a skein too many than too few.
How do I prevent a hairy garment from shedding?
All yarns will have excess fibres (from production) that might come off as lint or shedding. Brushed yarns (ie hairier yarns) have more of these loose, excess fibres, causing more shedding.
Shedding also depends on what is worn under or over the garment, and whether this pulls at the yarn fibres. It’s therefore not possible to guarantee that there will be no shedding
Below are some tips on how to get the best result when working with hairier yarns:
1. When the garment is finished (before you wash it) shake it vigorously so the looser hairs come off. NOTE: do NOT use a lint roller, brush or any method that pulls at the yarn.
2. Place the garment in a plastic bag and put it in your freezer - the temperature will cause the fibres to become less attached to each other, and excess fibres will come off easier.
3. Leave in the freezer for a few hours before taking it out and shaking it again.
4. Wash the garment according to the instructions on the yarn label.
Why does my garment pill?
Pilling is a natural process that happens to even the most exclusive of fibers. It's a natural sign of wear and tear that is hard to avoid, and that is most visible in high friction areas of your garment like a sweater's arms and cuffs.
You can make your garment look as new by removing the pilling, using a fabric comb or a pill/lint remover.
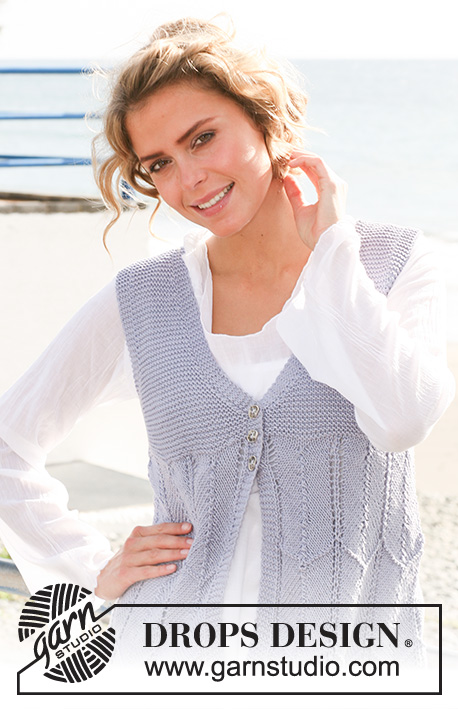
Falling Feathers Vest |
|||||||||||||
|
|
||||||||||||
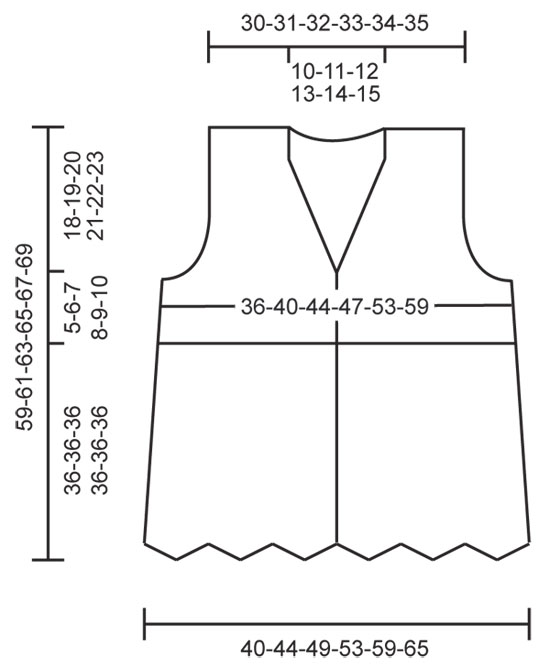
Knitted DROPS vest with zigzag pattern in "Muskat". Size: XS - XXL.
DROPS 129-14 |
|||||||||||||
GARTER ST (back and forth on needle): K all rows. DECREASE TIP: Dec for neck and armholes inside 5 P sts. All dec are done from RS. Dec after 5 sts as follows: Slip 1 st as if to K, K 1, psso. Dec before 5 sts as follows: K 2 tog BUTTON HOLES: Bind off for button holes on right front band. 1 button hole = bind off the 3rd band st, on next row cast on 1 new st over the bind off st. bind off for button holes when piece measures: SIZE XS: 31, 34, 37 cm / 12½",13½",14½" SIZE S: 32, 35, 38 cm / 12½",13¾",15" SIZE M: 33, 36, 39 cm / 13¼",14¼",15¼" SIZE L: 34, 37, 40 cm / 13½",14½",15½" SIZE XL: 33, 37, 41 cm / 13¼",14½",16" SIZE XXL: 34, 38, 42 cm / 13½",15",16½" --------------------------------------------------------- BODY: Worked back and forth on circular needle from mid front. Cast on 227-251-275-299-331-363 sts (includes 5 band sts in each side towards mid front) on 2 circular needles size 4 mm / US 6 with Muskat (to avoid a tight cast on edge). Pull out one of the circular needles. P the 5 band sts on every row until finished measurements. Work 2 rows in GARTER ST - see explanation above - with 5 band sts in each side. Continue as follows (beg from RS): P5 band sts, M.1 (see diagram for size) 12-12-12-16-16-16 times over the next 216-240-264-288-320-352 sts, 1 st in stockinette st, P5 band sts. NOTE! REMEMBER THE GAUGE! When piece measures approx. 9 cm / 3½", dec 2 sts in every other M.1 (see explanation in M.2) = 215-239-263-283-315-347 sts. Then continue with pattern as before. NOTE! When piece measures approx. 10 cm / 4" and 22 cm / 8¾", K 1 row from WS over all sts (work band sts as before). AT THE SAME TIME when piece measures 18 cm / 7", dec 2 sts in the remaining M.1 = 203-227-251-267-299-331 sts. Then continue with pattern as before until piece measures 27 cm / 10⅝". Now dec 2 sts in every M.1 (as shown on M.2) = 179-203-227-235-267-299 sts. Then continue with pattern as before until piece measures 36 cm / 14¼". Now dec 2 sts in every M.1 again (as shown on M.2) = 155-179-203-203-235-267 sts. On next row from RS, K all sts while AT THE SAME TIME adjusting the no of sts to 162-178-194-206-234-258. Switch to circular needle size 3.5 mm / US 4. K 1 row from WS (work the 5 band sts in each side as before). On next row divide piece as follows: Work 43-47-51-54-61-67 sts and slip these sts on a stitch holder (= right front piece), work 76-84-92-98-112-124 sts (= back piece), slip the remaining 43-47-51-54-61-67 sts on a stitch holder (= left front piece), now measure piece from here and finish each part separately. BACK PIECE: = 76-84-92-98-112-124 sts. Work in Garter st back and forth until piece measures 4-5-6-7-8-9 cm / 1½"-2"-2⅜"-2¾"-3⅛"-3½" from where it was divided. Now on every row P 8-8-9-10-10-11 sts in each side. When piece measures 5-6-7-8-9-10 cm / 2"-2⅜"-2¾"-3⅛"-3½"-4" from where piece was divided, bind off 3-3-4-5-5-6 sts at the beg of the next 2 rows for armholes, continue with 5 P sts in each side. Then continue in garter st while AT THE SAME TIME continuing to dec for armhole inside the 5 P sts in each side – Read DECREASE TIP. Dec 1 st in each side on every row from RS a total of 3-6-8-9-15-19 times = 64-66-68-70-72-74 sts. Then continue until piece measures 19-21-23-25-27-29 cm / 7½"-8¼"-9"-9¾"-10⅝"-11⅜" from where piece was divided. Now P the middle 32-34-36-38-40-42 sts on every row (work the other sts as before). Continue to work like this until piece measures 21-23-25-27-29-31 cm / 8¼"-9"-9¾"-10⅝"-11⅜"-12¼". Now bind off the middle 22-24-26-28-30-32 sts for neck = 21 sts remain for shoulder. Finish each shoulder separately. Then continue in Garter st and 5 P sts in each side until piece measures 23-25-27-29-31-33 cm / 9"-9¾"-10⅝"-11⅜"-12¼"-13" from where the piece was divided. Bind off. The whole piece measures approx. 59-61-63-65-67-69 cm / 23¼"-24"-24¾"-25½"-26⅜"-27⅛". RIGHT FRONT PIECE: = 43-47-51-54-61-67 sts. Work in Garter st back and forth with 5 band sts towards mid front. NOTE! Remember to bind off for BUTTON HOLES - see explanation above. When piece measures 2-3-4-5-6-7 cm / ¾"-1⅛"-1½"-2"-2⅜"-2¾" from where piece was divided (bind offs for button holes are now done), work 2 rows back and forth only over the 5 band sts. Then on next row, beg to dec for neck – Read DECREASE TIP! Dec 1 st on every other row 7 times, then on every 4th row 4-5-6-7-8-9 times and then on every 6th row 5 times. AT THE SAME TIME when piece measures 4-5-6-7-8-9 cm / 1½"-2"-2⅜"-2¾"-3⅛"-3½" from where piece was divided, P over 8-8-9-10-10-11 sts in the side on every row. When piece measures 5-6-7-8-9-10 cm / 2"-2⅜"-2¾"-3⅛"-3½"-4" from where piece was divided, bind off and dec for armhole as on back piece. When all dec and bind offs for armhole and neck are done, 21 sts remain on needle. Then continue until piece measures 23-25-27-29-31-33 cm / 9"-9¾"-10⅝"-11⅜"-12¼"-13" from where piece was divided. Bind off. The whole piece measures approx. 59-61-63-65-67-69 cm / 23¼"-24"-24¾"-25½"-26⅜"-27⅛". LEFT FRONT PIECE: Work as right front piece but reversed. ASSEMBLY: Sew the shoulder seams. Sew side seams in front loop of outermost st. Sew on buttons. |
|||||||||||||
Diagram explanations |
|||||||||||||
|
|||||||||||||
Have you made this or any other of our designs? Tag your pictures in social media with #dropsdesign so we can see them! Do you need help with this pattern?You'll find tutorial videos, a Comments/Questions area and more by visiting the pattern on garnstudio.com. © 1982-2024 DROPS Design A/S. We reserve all rights. This document, including all its sub-sections, has copyrights. Read more about what you can do with our patterns at the bottom of each pattern on our site. |
With over 40 years in knitting and crochet design, DROPS Design offers one of the most extensive collections of free patterns on the internet - translated to 17 languages. As of today we count 304 catalogs and 11422 patterns - 11417 of which are translated into English (US/in).
We work hard to bring you the best knitting and crochet have to offer, inspiration and advice as well as great quality yarns at incredible prices! Would you like to use our patterns for other than personal use? You can read what you are allowed to do in the Copyright text at the bottom of all our patterns. Happy crafting!
Comments / Questions (72)
Jutta Frau Leis wrote:
Vielen Dank aber das war nicht meine Frage. Müsste man nicht erst über Vorder- und Rückteil die 4,5,6,7,8,9 cm Krausrippe stricken und dann erst teilen? In der Anleitung wird nach einer Reihe Krausrippe geteilt undann für Vorder-und Ruckenteile getrennt 9 cm Krausrippe gestrickt, das verstehe ich nicht, da müsste ich die Teile doch zusammen nähen....
19.01.2022 - 13:32DROPS Design answered:
Liebe Frau Leis, also die ersten 4-5-6-7-8-9 cm werden krausrechts gestrickt und diese Seiten werden dann zusammengenäht bis die 8-8-9-10-10-11 M links gestrickt werden, dh die Arbeit wird verteilt in 3 Teilen aber es gibt aber eine kleine Naht beidseitig (= 4-5-6-7-8-9 cm). Habe ich dieses Mal korrekt verstanden?
19.01.2022 - 17:06Jutta Frau Leis wrote:
Sehr geehte Damen und Herren, ich verstehe nicht warum nach der teilung in Vorderteil und Rückenteil noch (5-6-7-8-9-10 cm (von dort wo die Arbeit geteilt wurde) am Anfang der nächsten 2 Runden je 3-3-4-5-5-6 M. für das Armloch abk. ) 5-6-7-8-9-10 cm kraus rechts gestrickt wird und erst danach für die Armlöcher abgekettet wird, dadurch entsteht doch unter den Armen ein Schlitz der zugenäht werden müsste. Verstehe ich hier etwas falsch?
18.01.2022 - 08:14DROPS Design answered:
Liebe Frau Leis, nach der Verteilung stricken Sie zuerst kraus rechts bis die Arbeit 4-5-6-7-8-9 cm misst, dann stricken Sie immer noch krausrechts aber die 8-8-9-10-10-11 Maschen auf beiden Seiten werden links bei jeder Reihe gestrickt (die anderen Maschen stricken Sie rechts bei jeder Reihe). So hat man so einen kleinen Unterschied in den Krausrippen als Blende und Randmaschen. Viel Spaß beim stricken!
18.01.2022 - 10:38Pia Anderberg wrote:
Har bara börjat sticka, men LÄST igenom hela mönstret. Blir lite undrande över att man i framkanterna, 2 cm högst upp på bakst och i sidan på framstyckena ska sticka aviga maskor på alla varv..... Blir inte det rätstickning fast med aviga maskor? Vänligen
28.06.2021 - 14:25DROPS Design answered:
Hej Pia. Ja det stämmer att det kommer se ut som rätstickning, men det blir då en liten skillnad jämfört med övrig rätstickning eftersom det görs "tvärtom". Mvh DROPS Design
29.06.2021 - 12:25Rosalyn wrote:
Does the size measurement include the ease? Or do I have to add it to my actual measurement. Ie. 40 inches size , should I go up a size for ease?
08.06.2021 - 18:05DROPS Design answered:
Dear Rosalyn, you can see the measurements (in cms) of the finished item on teh shcematic drawing at the bottom of the page. We suggest you take a piece that fits you and compare it to these numbers. Happy stitching!
08.06.2021 - 22:32Gunilla Steen wrote:
Stickar modellen i garnet Line (21maskor mot Muskats 20). Får rätt masktäthet men måttet nertill ska vara 106cm och det blir 175!!! Vad gör jag för fel? Med vänlig hälsning Gunilla Steen
14.04.2021 - 15:23DROPS Design answered:
Hej Gunilla, for at få målene til denne opskrift skal du have 21 masker glatstrik og 28 pinde på 10x10 cm. Siksakmønsteret skal du have 27 m i bredden og 31 pinde i højden = 10x10 cm :)
14.04.2021 - 15:41Rosemarie wrote:
Bei diesem Modell wird einmal 3 zusammengestrickt dann einmal 5 Maschen . Wo sehe ich das am Modell. In der Beschreibung finde ich nichts. Danke
22.11.2020 - 14:33DROPS Design answered:
Liebe Rosemarie, wenn Sie M.1 stricken, werden 2 Maschen abgenommen und 2 Umschläge gestrickt = die Maschenanzahl bleibt gleich - wenn Sie aber M.2 stricken dann nehmen Sie 2 Maschen ab = 4 Maschen abgenommen und 2 Umschläge - wenn die Anleitung erklärt z.B.: in jedem zweiten Rapport M1 2 M. abn. stricken Sie jede 2. Rapport M.1 wie im M.2 gezeigt. Viel Spaß beim stricken!
23.11.2020 - 09:32Barbara Seewald wrote:
I should have asked if the US 4 needle is used for the garter stitches in the band as well as the upper portion of the vest. I think I made the wrong assumption and it is not. Please confirm. Thank you.
05.09.2020 - 21:15DROPS Design answered:
Dear Mrs Seewald, the needle suze 3,5 mm / US 4 will be used only at the end of the body, just before division - see below; Happy knitting!
07.09.2020 - 08:25Barbara Seewald wrote:
How exactly do you use the two different circular needles, one for the body, one for the band. Do you just leave the band needle hanging until you get to the other side?
05.09.2020 - 20:24DROPS Design answered:
Dear Mrs Seewald, stitches are cast on with larger needle (= 4 mm) and you will work with the larger needle until you start to work garter stitch over all stitches (= when you adjust sts to 162 - 258 sts (see size), ie at the end of the body, just before division, then continue with smaller needle (= 3,5 mm) for the garter stitch, and not anymore with the larger one. The front band sts will be worked with the same needle as the one you are working the other stitches. Happy knitting!
07.09.2020 - 08:24Patricia McDonald wrote:
I have 320 stitches+1 and the pattern says when piece measures 9 cm dec 2 sts every other M1 (I have 16 of them) so my new stitch count should decrease by 8 stitches yet you show that I should have 315 stitches left which is only a decrease of 5. How come?
02.06.2020 - 21:50DROPS Design answered:
Dear Mrs McDonald, decreasing 2 sts in every other M.1 will give you: 5 sts garter st + 8 repeats of M.1 with 20 sts (160 sts) + 8 repeats of M.1 with 18 sts (144 sts) + 1 st + 5 sts garter st = 5+160+144+1+5=315 sts. Happy knitting!
03.06.2020 - 06:57Paulette Balasko-Parker wrote:
How many yards of yarn is needed for size XXL ?
25.05.2020 - 19:19DROPS Design answered:
Dear Paulette, you will need 400 gramms (8 balls) of Muskat yarn to knit this, One ball of Muskat yarn is 50 gramms and about 100 meters. Happy Knitting!
26.05.2020 - 01:40