
Popular categories
Looking for a yarn?


Comments / Questions (76)
![]() Birgit wrote:
Birgit wrote:
"Die Blendenmaschen werden bis zur fertigen Reihe li. gestrickt" - ? Wie werden die 5 Blendenmaschen nun gestrickt, auch immer im Rippenmuster d. h. immer rechts? Warum bis zur fertigen Reihe?
24.08.2018 - 14:49DROPS Design answered:
Liebe Birgit, die Anleitung ist leider etwas umständlich ausgedrückt. Es soll bedeuten, dass Sie die Blenden-Maschen in jede Reihe links stricken, also kraus links. "bis zur fertigen Reihe" soll heißen "bis zum fertigen Maß", die Blenden werden also von Anfang bis Ende links gestrickt. Dies erfolgt, damit sie sich vom kraus rechten Teil der Jacke optisch absetzen. Viel Spaß beim Weiterstricken!
26.08.2018 - 10:28
![]() Marjo Huijsmans wrote:
Marjo Huijsmans wrote:
Of snap ik m al en rekenen jullie eerst de biessteken niet mee? En 2 minderen is twee meer minderen dan wanneer M1 wordt gebreid? De vraag stellen is hem beantwoorden?
20.08.2018 - 11:50DROPS Design answered:
Dag Marjo, Dat is inderdaad 2 meer minderen dan in M.1 (hoewel je in M.1 per saldo niet mindert omdat je ook 2 omslagen maakt in M.1)
23.08.2018 - 18:21
![]() Marjo Huijsmans wrote:
Marjo Huijsmans wrote:
En als ik dan (maat M) dus 6 x geminderd heb, hoe ben ik dan, volgens het patroon, van 264 naar 263 steken gegaan?
20.08.2018 - 11:29DROPS Design answered:
De 264 steken die genoemd wordt in de laatste zin bij alinea 'LIJF' is exclusief 10 voorbiessteken plus 1 steek in tricotsteek. De steken die in de eerste regel van de volgende alinea genoemd worden zijn alle steken op de naald.
23.08.2018 - 18:26
![]() Marjo Huijsmans wrote:
Marjo Huijsmans wrote:
Minder bij 9 cm 2 st in de helft van enz. Maar in M2 minder je toch 4 st, geen 2? En de 5 biessteken zijn niet averechte tricot maar ribbelsteek?
20.08.2018 - 11:12DROPS Design answered:
Dag Marjo, Ja, je mindert in M.2 4 steken: 3 steken samen breien = 1 2 steken geminderd, daarna haal je de 2 afgehaalde steken nog eens over = nogmaals 2 steken geminderd. De biessteken brei je inderdaad in ribbelsteek (in dit geval elke naald averecht)
23.08.2018 - 18:16
![]() Judi wrote:
Judi wrote:
Is it possible to make the pattern even smaller by decreasing the number of stitches by 24 for the cast on body shape? I tried it with the smallest cast on sts of 227 and it was about 5" larger than the pattern even when using the right needle for the gauge. I would of course have to decrease appropriately for all the rest of the pattern.
08.07.2018 - 14:29DROPS Design answered:
Hi Judy, If the knitting tension is looser than the pattern says, it is easier to go down a needle size than adjust the numbers of stitches to make the garment smaller. Happy knitting
09.07.2018 - 07:56
![]() Robin Caracciolo wrote:
Robin Caracciolo wrote:
On Page 2 of pattern it reads “ AT THE SAME TIME when piece measures 17cm/7 “, dec 2 sts in the remaining M.1= 299 (xl). I don’t understand . Does this mean decrease using M.2 chart in every M.1? The word remaining is confusing me. Thanks for help!!
30.05.2018 - 04:14DROPS Design answered:
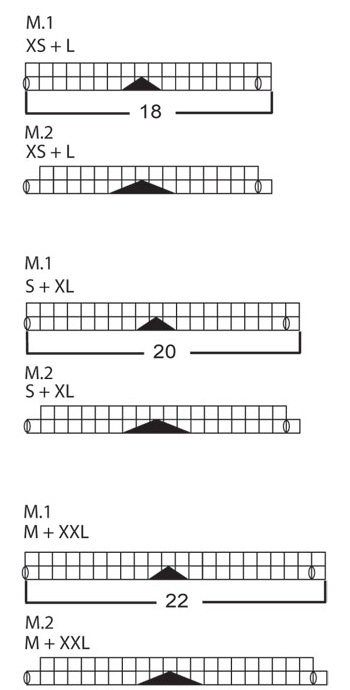
Dear Mrs Caracciolo, when piece masures approx. 9 cm / 3½", you dec 2 sts in every other M.1 (as shown in M.2), when piece measures 18 cm dec 2 sts in every other M.1 (= the repeats where you didn't decrease after 9 cm/3½"). You will have now the same number of sts in each repeat. Happy knitting!
30.05.2018 - 09:02
![]() Jaione Uraga wrote:
Jaione Uraga wrote:
Hola, tengo otras dos dudas para resolver: la primera es que cuando dice"cuando la labor mida aprox 9cm, disminuir 2 puntos en cada segundo M1" qué quiere decir, cada dos M1 disminuir dos puntos?. Otra cosa, para medir la labor, es a partir de la cenefa o del vértice de la V? Gracias por adelantado
18.04.2018 - 19:15DROPS Design answered:
Hola Jaione. A 9 cm del largo total trabajamos cada 2ª repetición de M.1 según el diagrama M.2 ( dentro del diagrama están incluidas las disminuciones de los 2 puntos). Todas las medidas se hacen desde la fila de montaje, excepto cuando se indica MEDIR LA LABOR DESDE AQUI, ( la labor se mide desde ese punto concreto).
22.04.2018 - 18:02
![]() Jaione Uraga wrote:
Jaione Uraga wrote:
Hola, me gustaría saber por qué al.montar los puntos al inicio de la labor es necesario trabajar con dos agujas circulares. Espero vuestra respuesta. Muchas gracias.
13.04.2018 - 20:37DROPS Design answered:
Hola Jaione, se puede montar con 2 agujas circulares o con unas agujas de mayor tamaño para que el borde de montaje no quede tenso y la prenda tenga mejor caída.
14.04.2018 - 13:04Ann Lonholdt wrote:
Ang. drops 129-14. Ryg. ..........9cm tages der 2 m ind.......347m.Videre fortsættes der med mønster som tidligere. Question. Hvordan kan man fortsætte mønster som tidligere når man har mistet 12 m? Med venlig hilsen, Ann Lønholdt
02.02.2018 - 16:06DROPS Design answered:
Hej Ann, når du tager ind i diagrammen, vil du have 1 maske mindre i hver side af diagrammet, det vil sige at du har 2 masker mindre mellem hver gang du strikker indtagningerne. Sørg for at indtagningerne altid er over hinanden. God fornøjelse!
09.07.2018 - 09:03
![]() Ann Woodall wrote:
Ann Woodall wrote:
Arbejdet bliver pænest, hvis man strikker første og sidste maske på ALLE pinde ret. I øvrigt skulle jeg bruge 3 nøgler mere, end der står i opskriften.
10.01.2018 - 16:47
|
|||||||||||||
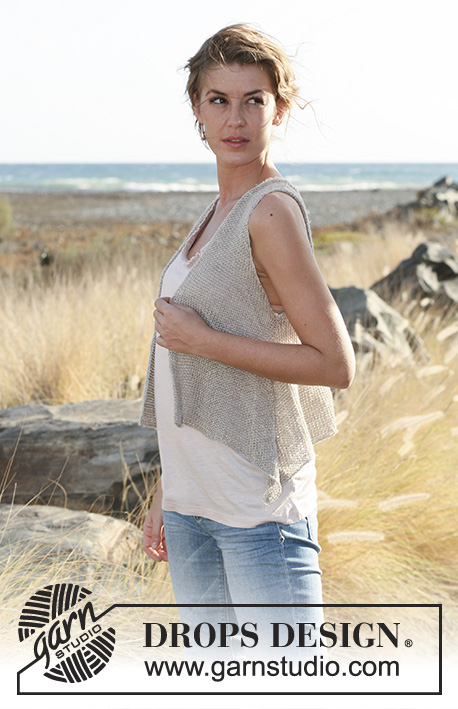
Falling Feathers Vest#fallingfeathersvest |
|||||||||||||
 |
 |
||||||||||||
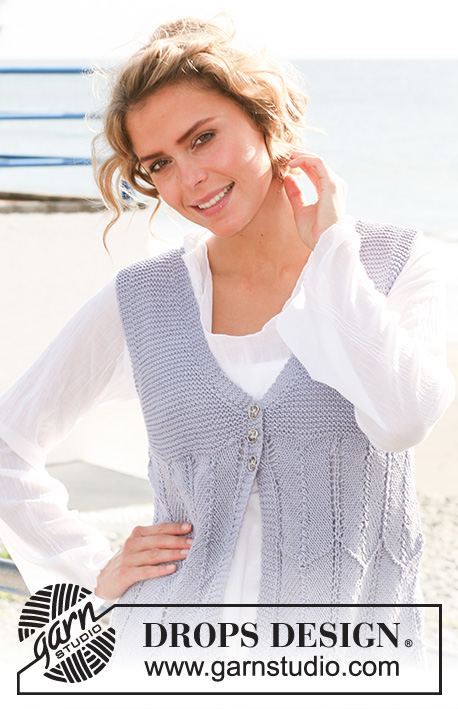
Knitted DROPS vest with zigzag pattern in "Muskat". Size: XS - XXL.
DROPS 129-14 |
|||||||||||||
|
GARTER ST (back and forth on needle): K all rows. DECREASE TIP: Dec for neck and armholes inside 5 P sts. All dec are done from RS. Dec after 5 sts as follows: Slip 1 st as if to K, K 1, psso. Dec before 5 sts as follows: K 2 tog BUTTON HOLES: Cast off for button holes on right front band. 1 button hole = cast off the 3rd band st, on next row cast on 1 new st over the cast off st. Cast off for button holes when piece measures: SIZE XS: 31, 34 and 37 cm SIZE S: 32, 35 and 38 cm SIZE M: 33, 36 and 39 cm SIZE L: 34, 37 and 40 cm SIZE XL: 33, 37 and 41 cm SIZE XXL: 34, 38 and 42 cm --------------------------------------------------------- BODY: Worked back and forth on circular needle from mid front. Cast on 227-251-275-299-331-363 sts (incl 5 band sts in each side towards mid front) on 2 circular needles size 4 mm with Muskat (to avoid a tight cast on edge). Pull out one of the circular needles. P the 5 band sts on every row until finished measurements. Work 2 rows in GARTER ST - see explanation above - with 5 band sts in each side. Continue as follows (beg from RS): 5 band sts, M.1 (see diagram for size) 12-12-12-16-16-16 times over the next 216-240-264-288-320-352 sts, 1 st in stocking st, 5 band sts. NOTE! REMEMBER THE KNITTING TENSION! When piece measures approx. 9 cm, dec 2 sts in every other M.1 (see explanation in M.2) = 215-239-263-283-315-347 sts. Then continue with pattern as before. NOTE! When piece measures approx. 10 cm and 22 cm, K 1 row from WS over all sts (work band sts as before). AT THE SAME TIME when piece measures 18 cm, dec 2 sts in the remaining M.1 = 203-227-251-267-299-331 sts. Then continue with pattern as before until piece measures 27 cm. Now dec 2 sts in every M.1 (as shown on M.2) = 179-203-227-235-267-299 sts. Then continue with pattern as before until piece measures 36 cm. Now dec 2 sts in every M.1 again (as shown on M.2) = 155-179-203-203-235-267 sts. On next row from RS, K all sts while AT THE SAME TIME adjusting the no of sts to 162-178-194-206-234-258. Switch to circular needle size 3.5 mm. K 1 row from WS (work the 5 band sts in each side as before). On next row divide piece as follows: Work 43-47-51-54-61-67 sts and slip these sts on a stitch holder (= right front piece), work 76-84-92-98-112-124 sts (= back piece), slip the remaining 43-47-51-54-61-67 sts on a stitch holder (= left front piece), now measure piece from here and finish each part separately. BACK PIECE: = 76-84-92-98-112-124 sts. Work in Garter st back and forth until piece measures 4-5-6-7-8-9 cm from where it was divided. Now on every row P 8-8-9-10-10-11 sts in each side. When piece measures 5-6-7-8-9-10 cm from where piece was divided, cast off 3-3-4-5-5-6 sts at the beg of the next 2 rows for armholes, continue with 5 P sts in each side. Then continue in garter st while AT THE SAME TIME continuing to dec for armhole inside the 5 P sts in each side – Read DECREASE TIP. Dec 1 st in each side on every row from RS a total of 3-6-8-9-15-19 times = 64-66-68-70-72-74 sts. Then continue until piece measures 19-21-23-25-27-29 cm from where piece was divided. Now P the middle 32-34-36-38-40-42 sts on every row (work the other sts as before). Continue to work like this until piece measures 21-23-25-27-29-31 cm. Now cast off the middle 22-24-26-28-30-32 sts for neck = 21 sts remain for shoulder. Finish each shoulder separately. Then continue in Garter st and 5 P sts in each side until piece measures 23-25-27-29-31-33 cm from where the piece was divided. Cast off. The whole piece measures approx. 59-61-63-65-67-69 cm. RIGHT FRONT PIECE: = 43-47-51-54-61-67 sts. Work in Garter st back and forth with 5 band sts towards mid front. NOTE! Remember to cast off for BUTTON HOLES - see explanation above. When piece measures 2-3-4-5-6-7 cm from where piece was divided (cast offs for button holes are now done), work 2 rows back and forth only over the 5 band sts. Then on next row, beg to dec for neck – Read DECREASE TIP! Dec 1 st on every other row 7 times, then on every 4th row 4-5-6-7-8-9 times and then on every 6th row 5 times. AT THE SAME TIME when piece measures 4-5-6-7-8-9 cm from where piece was divided, P over 8-8-9-10-10-11 sts in the side on every row. When piece measures 5-6-7-8-9-10 cm from where piece was divided, cast off and dec for armhole as on back piece. When all dec and cast offs for armhole and neck are done, 21 sts remain on needle. Then continue until piece measures 23-25-27-29-31-33 cm from where piece was divided. Cast off. The whole piece measures approx. 59-61-63-65-67-69 cm. LEFT FRONT PIECE: Work as right front piece but reversed. ASSEMBLY: Sew the shoulder seams. Sew side seams in front loop of outermost st. Sew on buttons. |
|||||||||||||
Diagram explanations |
|||||||||||||
|
|||||||||||||
 |
|||||||||||||
 |
|||||||||||||
Have you finished this pattern?Tag your pictures with #dropspattern #fallingfeathersvest or submit them to the #dropsfan gallery. Do you need help with this pattern?You'll find 16 tutorial videos, a Comments/Questions area and more by visiting the pattern on garnstudio.com. © 1982-2026 DROPS Design A/S. We reserve all rights. This document, including all its sub-sections, has copyrights. Read more about what you can do with our patterns at the bottom of each pattern on our site. |
|||||||||||||


With over 40 years in knitting and crochet design, DROPS Design offers one of the most extensive collections of free patterns on the internet - translated to 17 languages. As of today we count 324 catalogues and 12290 patterns translated into English (UK/cm). 12290
We work hard to bring you the best knitting and crochet have to offer, inspiration and advice as well as great quality yarns at incredible prices! Would you like to use our patterns for other than personal use? You can read what you are allowed to do in the Copyright text at the bottom of all our patterns. Happy crafting!
Post a comment to pattern DROPS 129-14
We would love to hear what you have to say about this pattern!
If you want to leave a question, please make sure you select the correct category in the form below, to speed up the answering process. Required fields are marked *.