
Popular categories
Looking for a yarn?


Comments / Questions (41)
![]() Charlotte Jensen wrote:
Charlotte Jensen wrote:
Er nu færdig med opskriften, og vil sige at det er meget knebent med det oplyste garnforbrug! Et nøgle mere er påkrævet, hvis man ikke - som jeg - måtte strikke det sidste af kraven med stumper.
22.09.2012 - 11:07
![]() Charlotte Jensen wrote:
Charlotte Jensen wrote:
Til Astrid: Du skal kun tage 1 maske ind ved 18 cm. én gang og igen ved 44 cm.
01.09.2012 - 09:17
![]() Astrid wrote:
Astrid wrote:
Hei! Som en ung strikker sliter jeg litt med å forstå det krypterte strikkespråket, og nå tror jeg at jeg har gjort en grusom feil.Jeg strikket starten riktig (tror jeg)Så økte jeg med 3 masker helt til jeg fikk 18 cm. Etter det fellte jeg en maske på hver ende til det ble 44 cm. Det er her jeg tror jeg har gjort en del feil.Kan noen hjelpe meg å oversette oppskriften til forståelig norsk?
19.08.2012 - 00:16DROPS Design answered:
Hei! Det høres ut som noe har gått galt underveis her. Det skal kun økes 3 m jevnt fordelt 1 gang. Og det skal felles 1 m i hver side når arb måler 18 cm og 1 m i hver side igjen når arb måler 44 cm. Om du fortsatt ikke får det til anbefaler jeg deg å ta kontakt med din lokale forhandler for mer hjelp med prosjektet ditt. Lykke til:)
27.09.2012 - 11:43
![]() Charlotte Jensen wrote:
Charlotte Jensen wrote:
Jeg kunne tænke mig trøjen med meget større knapper - hvordan laver jeg større knaphuller? Pft Charlotte
06.06.2012 - 21:45DROPS Design answered:
Du kan eventuelt lukke nogle flere masker af og sætte dem op igen i næste p
25.12.2012 - 18:00Marie wrote:
Bonjour avez vous les explications avec aiguilles traditionnelles? merci marie
27.05.2012 - 12:48DROPS Design answered:
Bonjour Marie, le manteau se tricote en allers retours sur aiguille circulaire pour avoir suffisamment de place pour y loger toutes les mailles. Bon tricot !
29.05.2012 - 09:25
![]() Beate wrote:
Beate wrote:
Ich verstehe folgenden Satz beim Vorderteil nicht: "Weiter am Anfang jeder R. von der Rückseite gegen den Hals abk.: 2 M. 2 Mal". Kette ich da also am Anfang vom Ärmel ab, oder am Ende der Reihe beim Hals? Und ich verstehe leider auch nicht, wie man dann den Hals anfängt! Kann mir jemand helfen?
18.02.2012 - 00:41DROPS Design answered:
Beim linken Vorderteil ist der Anfange der R. von der Rückseite gegen den Hals nicht gegen den Ärmel.
21.02.2012 - 16:36
![]() Drops Design France wrote:
Drops Design France wrote:
Bonjour Fara, ce modèle se tricote sur aiguille circulaire mais en allers retours, pour avoir suffisamment de place pour y loger toutes les mailles.
02.09.2011 - 10:56Fara wrote:
Merci chouette modele pourriez m envoyer explication avec aiguille normale merci
02.09.2011 - 09:54
![]() Michaela wrote:
Michaela wrote:
Absolut perfekt... schlichter, klassischer Kurzmantel... den will ich :-)
29.07.2010 - 23:03
![]() DROPS Design NL wrote:
DROPS Design NL wrote:
Hoi. Dit model wordt gepubliceerd. Wij zijn nog bezig met de vertaling. Binnenkort is het patroon beschikbaar. Succes en veel plezier. Gr. Tine
13.07.2010 - 10:40
|
|
DROPS 125-31 |
|
|
|
|
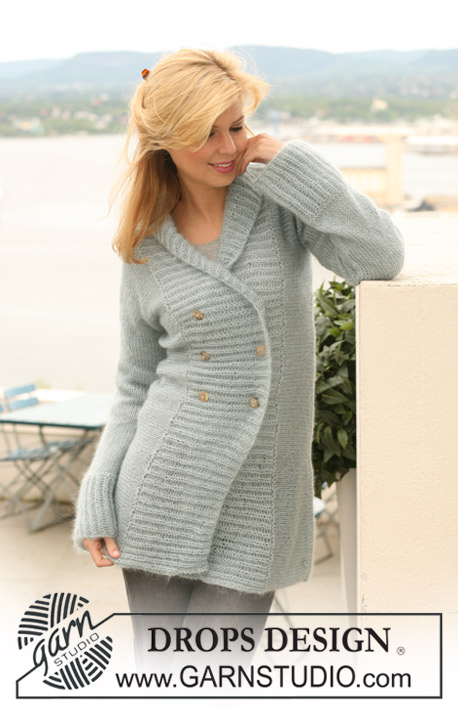
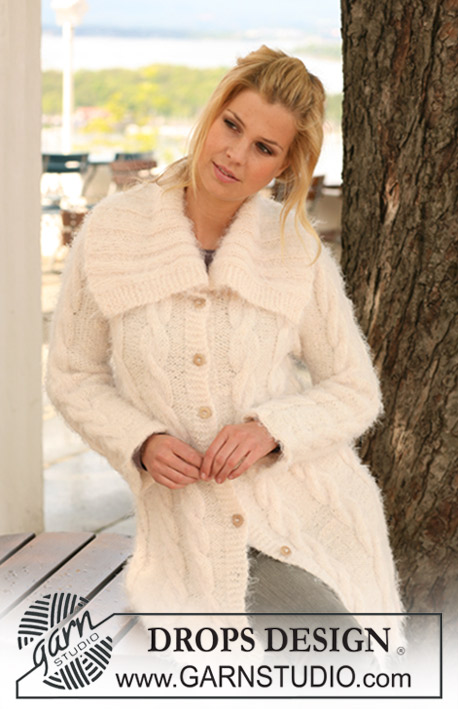
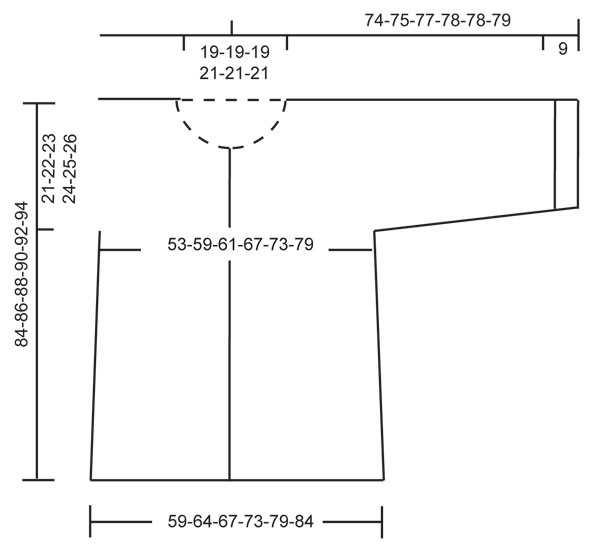
Knitted DROPS jacket in ”Polaris”. Size S - XXXL.
DROPS 125-31 |
|
|
NEW BALL OF YARN TIP: When changing to a new ball of Polaris separate the old and the new thread into strands. Place the strands over one another, moisten them and twist them tog. INCREASING TIP: Inc 1 st by making 1 YO. On next row K YO into back of loop to avoid a hole. DECREASING TIP: Dec 1 st by K2 tog. GARTER ST (back and forth on needle): K all rows. MEASUREMENT TIP: Because of the weight of the yarn make all measurements while the garment is hanging, otherwise it will be too long when worn. BUTTONHOLES: Make buttonholes on right front band. 1 buttonhole = work 3rd and 4th st tog and make 1 YO. Make buttonholes when piece measures: Size S: 30, 41, 52, 63 and 74 cm. Size M: 30, 39, 48, 57, 66 and 76 cm. Size L: 30, 39, 48, 58, 68 and 78 cm. Size XL: 30, 40, 50, 60, 70 and 80 cm. Size XXL: 30, 40, 50, 60, 71 and 82 cm. Size XXXL: 30, 40, 51, 62, 73, and 84 cm. -------------------------------------------------------- BACK PIECE: Worked back and forth on circular needle. Cast on 38-42-44-48-52-56 sts on circular needle size 15 mm with Polaris. K 1 row from WS, K 1 row from RS and K 1 row from WS. Then K 1 row from RS, AT THE SAME TIME inc 3 sts evenly – See INCREASING TIP = 41-45-47-51-55-59 sts. P 1 row from WS and continue in stocking st on all sts. See NEW BALL OF YARN TIP! When piece measures 18 cm – See MEASUREMENT TIP! - dec 1 st each side – See DECREASING TIP! Repeat the dec when piece measures 44 cm = 37-41-43-47-51-55 sts. Continue until piece measures 63-64-65-66-67-68 cm. Insert a marker and now measure piece from here. Now cast on 8 new sts for sleeves each side at the end of every row a total of 2 times, then 11-10-10-9-7-6 sts 1 time each side = 91-93-95-97-97-99 sts. Continue in stocking st on all sts until piece measures 19-20-21-22-23-24 cm from marker. Now K 1 row from RS, AT THE SAME TIME cast off the middle 13-13-13-15-15-15 sts for neck = 39-40-41-41-41-42 sts left on each shoulder/sleeve. Continue in GARTER ST – see above - and complete each side separately. After 4 rows garter st cast off. Repeat on the other shoulder/sleeve. Piece measures a total of approx 84-86-88-90-92-94 cm. LEFT FRONT PIECE: Cast on 25-27-28-30-32-34 sts (includes 6 front band sts towards mid front) on circular needle size 15 mm with Polaris. K 1 row from WS, K 1 row from RS and K 1 row from WS with the 6 front band sts towards mid front in garter st until finished measurements. K 1 row from RS, AT THE SAME TIME inc 2 sts evenly = 27-29-30-32-34-36 sts (do not inc on front band). P 1 row from WS and continue in stocking st (front band in garter st as before). When piece measures 31 cm dec 1 st at the side. Repeat the dec when piece measures 57 cm = 25-27-28-30-32-34 sts. Continue until piece measures 63-64-65-66-67-68 cm. Insert a marker, and now measure piece from here. Now cast on new sts for sleeve at the side as described for back piece = 52-53-54-55-55-56 sts. Continue back and forth on all sts. When piece measures 13-14-15-16-17-18 cm from marker slip 9-9-9-10-10-10 sts towards mid front on a stitch holder. Cast off to shape the neckline at the beg of every row from WS: 2 sts 2 times = 39-40-41-41-41-42 sts on shoulder/sleeve. AT THE SAME TIME when piece measures 19-20-21-22-23-24 cm from marker work 4 rows garter st on all sts and cast off. RIGHT FRONT PIECE: Like left front piece but mirrored. Make BUTTONHOLES on right front band – see above. ASSEMBLY: Sew shoulder seams. Sew in outer loops of sts on cast off rows. SLEEVE EDGES: Worked back and forth on needle. Pick up approx 20 to 28 sts from RS (divisible by 2) round sleeve on needle size 15 mm. K 1 row from WS and continue in rib, K1/P1, with 1 edge st in garter st each side. Continue until rib measures approx 9 cm. Cast off with K over K and P over P. Repeat round the other sleeve. ASSEMBLY: Sew under arm and side seams. Sew in outer loops of sts to avoid a chunky seam (NOTE! when sewing sleeve edge tog sew inside 1 edge st each side). NECK: Pick up 47-47-53-53-59-59 sts (includes sts on stitch holders) round neck. K 1 row from WS and continue as follows from RS: 6 front band sts as before, * P1, K1 *, repeat from *-* and finish with P1 and 6 front band sts. Continue like this until neck measures approx 8 cm. Now inc 1 st in the middle 7 K-sections (= mid back) as seen from RS – See INCREASING TIP! K inc sts = 54-54-60-60-66-66 sts. Continue with K over K and P over P until neck measures 32-32-32-34-34-34 cm. Now cast off loosely with K over K and P over P. POCKETS: Cast on 13 sts on needle size 15 mm with Polaris. K 1 row from WS, K 1 row from RS and K 1 row from WS. Continue in stocking st with 1 garter st each side until pocket measures 13 cm. Now continue in rib as follows (from RS): 1 garter st, * K1, P1 *, repeat from *-* and finish with K1 and 1 garter st. After 5 rows rib cast off with K over K and P over P. Make 2 pockets. Sew the pockets to the jacket, approx 28-30 cm from bottom edge and 3 sts from front band. Sew buttons on left front piece. |
|
 |
|
Have you finished this pattern?Tag your pictures with #dropspattern or submit them to the #dropsfan gallery. Do you need help with this pattern?You'll find 15 tutorial videos, a Comments/Questions area and more by visiting the pattern on garnstudio.com. © 1982-2026 DROPS Design A/S. We reserve all rights. This document, including all its sub-sections, has copyrights. Read more about what you can do with our patterns at the bottom of each pattern on our site. |


With over 40 years in knitting and crochet design, DROPS Design offers one of the most extensive collections of free patterns on the internet - translated to 17 languages. As of today we count 324 catalogues and 12290 patterns translated into English (UK/cm). 12290
We work hard to bring you the best knitting and crochet have to offer, inspiration and advice as well as great quality yarns at incredible prices! Would you like to use our patterns for other than personal use? You can read what you are allowed to do in the Copyright text at the bottom of all our patterns. Happy crafting!
Post a comment to pattern DROPS 125-31
We would love to hear what you have to say about this pattern!
If you want to leave a question, please make sure you select the correct category in the form below, to speed up the answering process. Required fields are marked *.