
Popular categories
Looking for a yarn?


Comments / Questions (30)
![]() Daniela wrote:
Daniela wrote:
Tolle Tasche - mein erster Versuch mit Filzwolle - ein voller Erfolg! Habe noch einen Magnetknopf als Verschluss eingenäht. Danke für die Inspiration.
18.02.2016 - 08:46
![]() Stefanie wrote:
Stefanie wrote:
Ich hänge dort, wo es mit Diagramm M1 weitergeht. Es sind noch 38 Maschen auf der Nadel. 1 Reihe links auf der Rückseite stricken. Und dann heißt es: "Danach mit M1 und je 1 Randmasche auf beiden Seiten weiterfahren ..." Wenn ich 38 Maschen habe, komme ich mit dem Diagramm M.1 (=8 Maschen) nicht hin. 38 Maschen abzüglich 2 Randmaschen = 36 Maschen. 36 Maschen : 8 Maschen (M.1) = 4,5 ??? Wie muss ich verfahren ... oder handelt es sich hierbei um einen Fehler?
08.02.2015 - 14:09DROPS Design answered:
Entschuldigen Sie die späte Rückmeldung. Es besteht kein Fehler, weder in Ihrer Rechnung noch in der Anleitung. Sie können M.1 einfach 4,5 x stricken - das Muster lässt sich problemlos nach der Hälfte beenden. Es besteht sozusagen aus 2 x 4 M, denn die fünfte bis achte Masche sind identisch mit der ersten bis vierten Masche.
17.02.2015 - 11:42
![]() Irina wrote:
Irina wrote:
Pitääkö laukku muovittaa ennen pesua, ettei se huovu kiinni?
18.02.2013 - 13:53DROPS Design answered:
Laukkua ei tarvitse muovittaa. Voit tietysti halutessasi tehdä niin.
22.02.2013 - 13:13
![]() Irina wrote:
Irina wrote:
Lankamäärä ei riitä millään. Kannattaa tilata 2-3 kerää ylimääräistä.
18.02.2013 - 11:25Maura wrote:
Buongiorno il modello e' davvero stupendo. Ho solo una domanda per la tracolla: riprendo 8 - 10 maglie e le lavoro per quanti cm? 80 - 90 cm? Grazie mille x la vostra risposta Maura
04.02.2013 - 14:04DROPS Design answered:
Buongiorno, effettivamente nella traduzione italiana mancava una parte, ora abbiamo corretto: la tracolla va lavorata per 80 cm.
14.02.2013 - 13:09
![]() Maria wrote:
Maria wrote:
Liebes DROPS-Team, vielen Dank für Ihre Antwort, Sie haben mir schnell und gut geholfen!
29.11.2012 - 18:28
![]() Maria wrote:
Maria wrote:
In der Anleitung für diese wunderschöne Tasche fehlt in der Beschreibung des Trägers der Hinweis, dass er kraus rechts gestrickt wird. Das kann man auf dem Foto erkennen. - Vielen Dank für dieses schöne Modell!
28.11.2012 - 14:40DROPS Design answered:
Liebe Maria, Danke für den Hinweis, ich habe es in der Anleitung ergänzt.
29.11.2012 - 10:59
![]() Maria wrote:
Maria wrote:
Der Träger soll nur 80 cm lang gestrickt werden. Wie lang ist er nach dem Filzen? Bleibt er so lang, dass man die Tasche bequem über der Schulter tragen kann? Ich wäre dankbar für eine Antwort.
28.11.2012 - 14:36DROPS Design answered:
Liebe Maria, nach unserer Anleitung wird der Träger wie auf dem Foto abgebildet. Wenn Sie ihn länger möchten (z.B. über einen Wintermantel tragen) finden Sie auf der Seite „Filzschule“ Angaben zu Eskimo vor und nach dem Filzen. Dann können Sie sich ausrechnen, wie lange Sie den Träger für die gewünschte Länge stricken müssen.
29.11.2012 - 11:02
![]() Annika wrote:
Annika wrote:
Wonderful bag, I've knitted it two times now. Thank you drops for this lovely pattern! But the amount of yarn was not enough for me either, even though the measurements were correct. So just a heads up for those who wants to do this bag: you might want to buy some extra yarn.
07.03.2010 - 20:55
![]() Pirve wrote:
Pirve wrote:
Ohjeen lankamäärä ei riittänyt. Sama tapahtui siskolleni hänen neuloessa lasten villatakkia. Onko ohjeiden lankamäärä laskettu aina näin tiukille? The amount of yarn/wool was not enough! The same happened to my sister when she knitted a children jacket with your instructions.
17.02.2010 - 19:39
|
|||||||||||||
Snow Pearls#snowpearlsbag |
|||||||||||||
 |
 |
||||||||||||
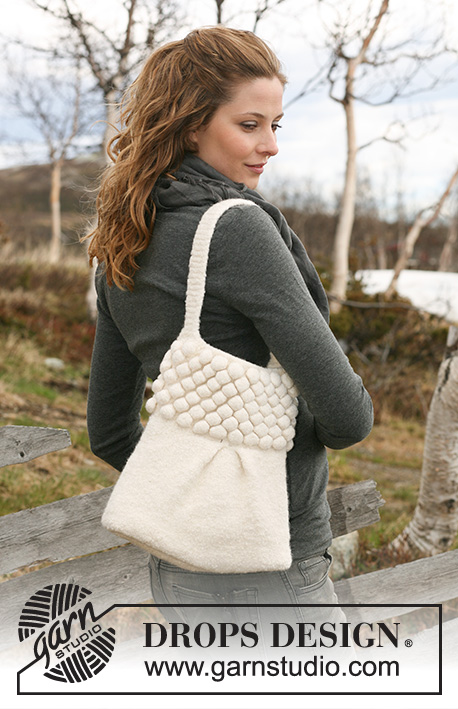
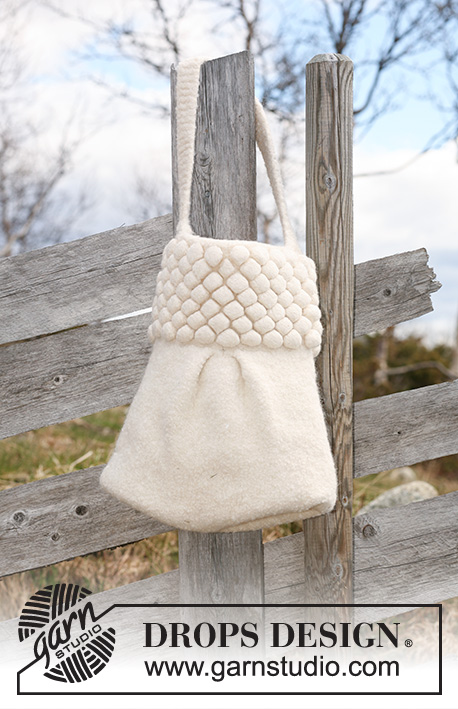
Felted DROPS bag in ”Snow” with bobbles.
DROPS 117-4 |
|||||||||||||
|
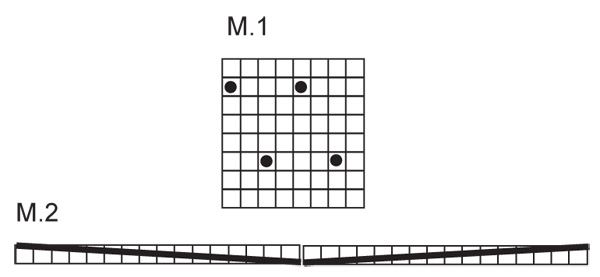
PATTERN: See diagram M.1 and M.2 – diagrams are seen from RS. BAG: Worked in 2 pieces and sewn tog afterwards. FRONT PIECE: Cast on 54 sts on needle size 8 mm with Snow and work stocking st for 38 cm. REMEMBER THE KNITTING TENSION! On next row from RS make a pleat as follows: K 11 sts, then M.2 (= 32 sts, reduced to 16 sts), K 11 sts. There are now 38 sts left on needle. P 1 row and continue in M.1 with 1 edge st each side for 20 cm. K 3 rows and cast off. Piece measures a total of approx 60 cm. BACK PIECE: Like front piece. ASSEMBLY: Sew front and back pieces tog at the sides and along bottom edge – sew in outer loops of sts STRAP: Worked in garter st, i.e. K all rows. Pick up 8 sts at the top on one side of bag (i.e. 4 sts on each side of seam) on needle size 8 mm with Snow. Work 2 rows, on next row K2 tog each side = 6 sts. Continue until strap measures 80 cm. On next row work 2 sts in the outermost st each side = 8 sts. Work 2 rows, and cast off. Sew strap to the other side of bag, with 4 sts on each side of seam. FELTING: The piece can be felted either in the washing machine or the tumble dryer – read description below. Remember: Subsequent washes are as for a normal wool garment. IN WASHING MACHINE: Washing machines will vary when felting. If the piece is not felted enough, it can be felted again. If it is felted too much, it can be stretched to the correct size while still wet. DO THE FOLLOWING: Lay the piece in the washing machine, using a programme of approx. 40 minutes (not a wool programme). Wash at 40 degrees without pre-wash, detergent is optional. After washing, shape the piece while it is still wet. IN TUMBLE DRYER: Felting in a tumble dryer gives good control over the degree of felting. The tumble dryer can be opened during drying to check the size of the piece. If it is not felted enough it can be thoroughly wetted and felted again. If it is felted too much it can be stretched to the correct size while still wet. DO THE FOLLOWING: Lay the piece in water so it becomes completely wet, then place it in the tumble dryer and begin the drying process. Dry to the desired size, checking regularly. |
|||||||||||||
Diagram explanations |
|||||||||||||
|
|||||||||||||
 |
|||||||||||||
Have you finished this pattern?Tag your pictures with #dropspattern #snowpearlsbag or submit them to the #dropsfan gallery. Do you need help with this pattern?You'll find 15 tutorial videos, a Comments/Questions area and more by visiting the pattern on garnstudio.com. © 1982-2026 DROPS Design A/S. We reserve all rights. This document, including all its sub-sections, has copyrights. Read more about what you can do with our patterns at the bottom of each pattern on our site. |
|||||||||||||


With over 40 years in knitting and crochet design, DROPS Design offers one of the most extensive collections of free patterns on the internet - translated to 17 languages. As of today we count 324 catalogues and 12290 patterns translated into English (UK/cm). 12290
We work hard to bring you the best knitting and crochet have to offer, inspiration and advice as well as great quality yarns at incredible prices! Would you like to use our patterns for other than personal use? You can read what you are allowed to do in the Copyright text at the bottom of all our patterns. Happy crafting!
Post a comment to pattern DROPS 117-4
We would love to hear what you have to say about this pattern!
If you want to leave a question, please make sure you select the correct category in the form below, to speed up the answering process. Required fields are marked *.