
Categorías populares
¿Buscas un hilo?


Comentarios / Preguntas (30)
![]() Louise escribió:
Louise escribió:
Ik begrijp niet goed hoe ik moet meerderen bij de mouwen. Dit omdat wanneer ik meerder, het telpatroon niet meer klopt. Hoe kan ik meerderen en het telpatroon behouden?
11.12.2022 - 22:23DROPS Design respondió:
Dag Louise,
Het telpatroon wordt inderdaad verbroken door het meerderen onder de mouwen, hier is niets aan te doen. Probeer het telpatroon zo ver mogelijk door te laten lopen, indien mogelijk.
12.12.2022 - 20:31
![]() Francoise Lucienne escribió:
Francoise Lucienne escribió:
Bonsoir encore merci a bientot
07.02.2022 - 17:56
![]() Francoise Lucienne escribió:
Francoise Lucienne escribió:
Bonsoir pourquoi on a au début 232 mailles et après 112 merci bonne soirée
06.02.2022 - 19:57DROPS Design respondió:
Bonjour Mme Lucienne, vous tricotez d'abord le bas du pull en rond, sur 232 mailles, puis vous rabattez les mailles des emmanchures (4 de chaque côté) et terminez chaque partie séparément soit: 4 mailles rabattues de chaque côté + 112 m pour le devant + 112 m rabattues pour le dos = 4+112+4+112= 232 m. Bon tricot!
07.02.2022 - 11:10
![]() Leen Sels escribió:
Leen Sels escribió:
Welke naalddikte gebruik ik best? Safran geeft volgens het label in tricot op nld3 een verhouding van 24st op 10cm. Ik brei vrij vast en heb nld4 nodig om in tricot deze verhouding te krijgen. Volgens het patroon heb je nld3,5 nodig om met teltekening een verhouding van 23st op 10cm te krijgen. Met nld4 heb ik 30st op 10cm. Met nld5 heb ik 25st op 10cm, maar dit is al vrij los gebreid (doorschijnend en losser dan op de foto) en ik zou nog omhoog moeten gaan naar nld 5,5 of 6. Klopt dit wel?
16.05.2021 - 21:08DROPS Design respondió:
Dag Leen Sels,
Ja, de stekenverhouding zoals aangegeven in het patroon klopt. Je hebt 23 steken op 10 cm in de breedte. Met name de breedte is van belang in dit geval bij de stekenverhouding. In deze link vind je meer informatie over de stekenverhouding.
20.05.2021 - 16:52
![]() Petra escribió:
Petra escribió:
Wat betekend sm ik dacht 2 samen breien. Daarna een omslag, ik krijg dan gaatjes klopt dit. Gr Petra
03.04.2021 - 14:32
![]() Myrna Laupland escribió:
Myrna Laupland escribió:
Ribbed Fantasy Should I do the neck ribbing and sew in the sleeves before or after blocking? Thank you
08.11.2020 - 05:31DROPS Design respondió:
Dear Mrs Laupland, some knitters always block, some other never - so this look to be just a personnal question. Contact your DROPS store for any further individual assistance. Happy knitting!
09.11.2020 - 10:42
![]() Fata Viden escribió:
Fata Viden escribió:
Kan jag få beskrivning på svenska tack på förhand Mvh //Fata
20.10.2020 - 17:40DROPS Design respondió:
Hej. Under bilden kan du ändra språk så att du får mönstret på svenska. Mvh DROPS Design
21.10.2020 - 09:48Carol escribió:
I've finally gotten the courage to pick it up again, but (sorry) I still don't understand how I'm meant to work the front & back separately with new yarn whilst on circular needles. Do I need to work back & forth, front & back separately, on straight needles, keeping half of the work on a stitch holder? I'm getting discouraged. Thanks.
04.12.2017 - 08:39DROPS Design respondió:
Dear Carol, that's right, just slip the sts on back piece onto a stitch holder/a thread and work the sts for front piece back and forth on straight (or circular) needle. Happy knitting!
04.12.2017 - 10:38Carol escribió:
Thanks for your reply. When you say: "Cut the yarn and continue front piece separately with 1st st on needle for front piece... " you don't take into account that the first stitch on the needle is actually two bound-off stitches away from the front, so there's a hole. If I can figure out a way to overcome that, do I then have to work it back & forth, not in a circle? Do I need extra needles? Thanks for your speedy reply.
27.11.2017 - 20:52DROPS Design respondió:
Dear Carol, you should bind off the last 2 sts on round so that there are 4 sts bound off on each side for armholes (= no st should remain on the side). Then work each piece separately with new yarn. Happy knitting!
28.11.2017 - 08:58Carol escribió:
I'm just at the point where I'm meant to bind off 2 or 4 stitches to begin the armhole, but I end up left with one stitch in the middle of a bound-off section. I have no idea how to proceed with this, and I've never worked in the round before. Can you explain how I proceed? It says I should work the front and back separately, so does that mean I add another ball of yarn and continue in the round? I'm completely confused! Thanks! Carol
26.11.2017 - 11:18DROPS Design respondió:
Dear Carol, you bind off for the armholes 2 sts at beg of round (half 1st armhole), 4 sts for 2nd armhole and the last 2 sts on round for 1st armhole (= 2nd half). Cut the yarn and continue front piece separately with 1st st on needle for front piece. Happy knitting!
27.11.2017 - 10:14
|
|||||||
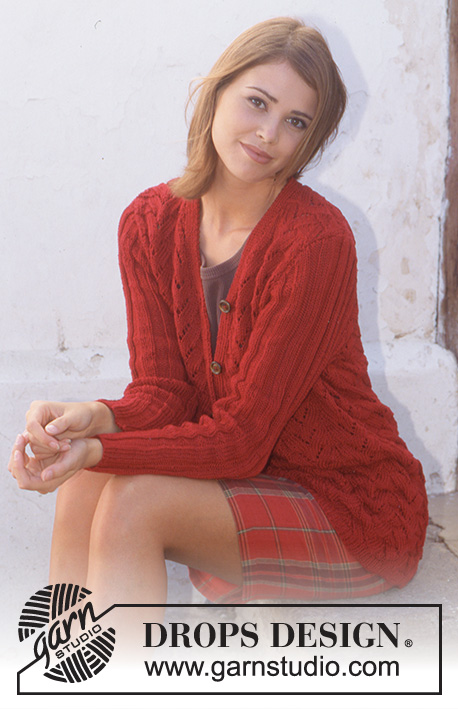
Ribbed Fantasy |
|||||||
 |
 |
||||||
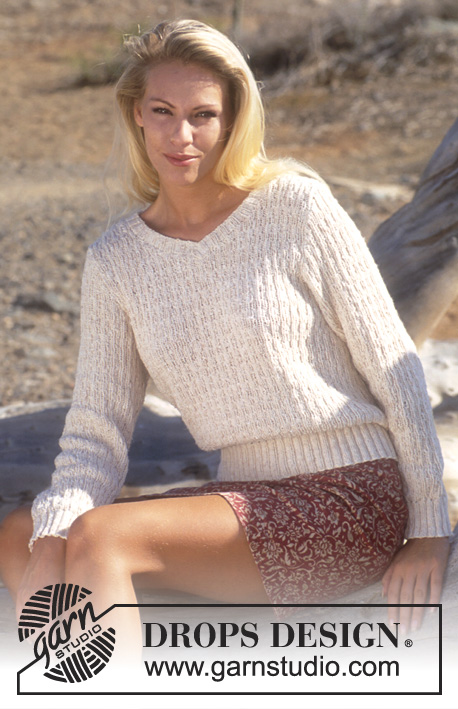
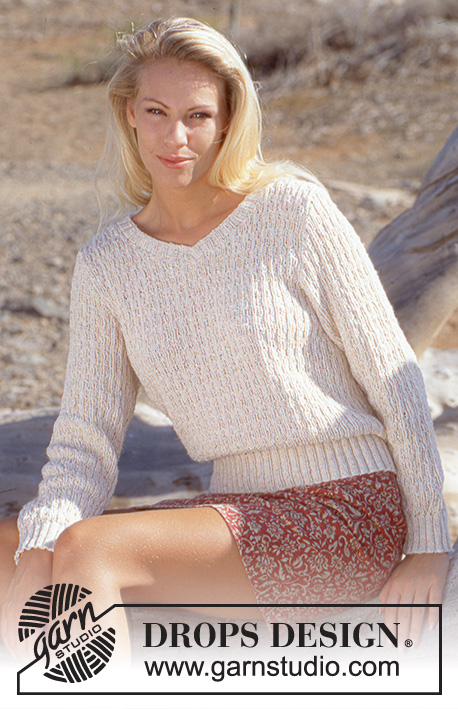
Jersey DROPS en Safran
DROPS 56-8 |
|||||||
|
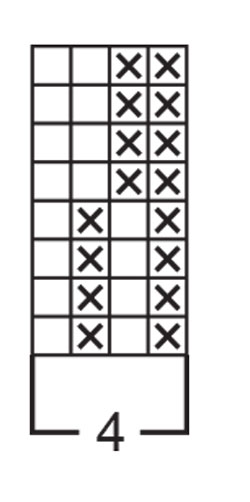
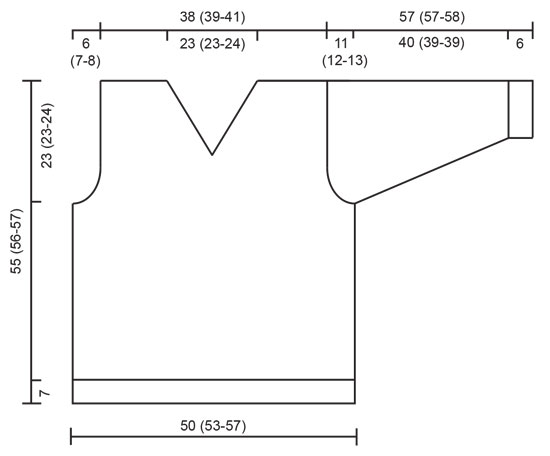
Tensión: 23 pts y 30 filas con las agujas más grandes trabajando el patrón = 10 x 10 cm Pt elástico: *2 d., 2 r.*. Repetir de * a *. Patrón: Ver el diagrama (1 diagrama = 1 repetición). El patrón se muestra por el LD (lado derecho). ----------------------------------------------------------------------- CUERPO: Mont 232 (244-260) pts con la aguja circular más pequeña; unir y colocar un MP (marcapuntos) en la unión. Trabajar 7 cm de pt elástico. Cambiar a la aguja circular más grande y tejer la sig fila como sigue: *2 pjd, 1 HEB*. Repetir de *a* toda la vta. Ahora trabajar el patrón. Cuando la labor mida 32 (33-33) cm, trabajar la sig vta como sigue: Cerrar 2 pts para la sisa, trabajar 112 (118-126) pts para el delantero, cerrar 4 pts para la sisa, trabajar 112 (118-126) pts para la espalda, cerrar 2 pts para la sisa. Ahora trabajar cada parte por separado. DELANTERO: = 112 (118-126) pts. Sisa: cerrar a cada lado cada 2ª fila: 3 pts 2 vcs, 2 pts 2 (3-3) vcs, 1 pt 2 (2-4) vcs = 88 (90-94) pts. Cuando la labor mida 43 (44-45) cm, dividir el delantero en el centro y trabajar el escote en “V” cerrando a cada lado cada 2ª fila: 3 pts 1 vez, 2 pts 10 vcs, 1 pt 2 (3-4) vcs, después cerrar 1 pt cada 4ª fila 1 vez. Rematar todos los pts cuando la labor mida 55 (56-57) cm ESPALDA: = 112 (118-126) pts. Trabajar la sisa como en el delantero = 88 (90-94) pts. Cuando la labor mida 53 (54-55) cm, cerrar los 46 (48-50) pts centrales para el escote. Ahora cerrar a cada lado del escote cada 2ª fila: 2 pts 1 vez y 1 pt una vez. Rematar todos los pts cuando la labor mida 55 (56-57) cm. MANGAS: Mont 60 (64-64) pts con las ag de doble punta de tamaño más pequeño; unir y colocar 1 MP en la unión. Trabajar 6 cm de pt elástico. Cambiar a las ag de doble punta de tamaño más grande y trabajar la sig fila como sigue: *2 pjd, 1 HEB*. Repetir de *a* toda la vta. Ahora trabajar el patrón y al mismo tiempo aum 1 pt a cada lado del MP 21 (20-21) vcs: Tallas S+L: cada 5ª vta Talla M: alternando cada 5ª y 6ª vta. = 102 (104-106) pts. Cuando la labor mida 46 (45-45) cm, cerrar 2 pta a cada lado del MP y trabajar el resto de los pts de ida y vta en la ag. Para la copa de la manga cerrar a cada lado, cada 2ª fila: 3 pts 4 (3-3) vcs, 2 pts 8 (11-13) vcs, 3 pts 4 (3-3) vcs, rematar todos los pts. TERMINACIÓN: Hacer la costura de los hombros. Recoger aprox. 142-162 pts (divisible por 4 pts + 2 pts) alrededor del escote con las ag de tamaño más pequeño y trabajar 2.5 cm en pt elástico de ida y vta desde el centro del delantero, rematar todos los pts. Colocar la cenefa derecha del escote sobre la izquierda y asegurar con unas puntadas. Montar las mangas. |
|||||||
Explicaciones del diagrama |
|||||||
|
|||||||
 |
|||||||
 |
|||||||
¿Terminaste este patrón?Entonces, etiqueta tus fotos con #dropspattern o envíalas a la galería #dropsfan. ¿Necesitas ayuda con este patrón?Encontrarás 18 videos tutoriales, un espacio para comentarios/preguntas y más visitando la página del patrón en garnstudio.com © 1982-2026 DROPS Design A/S. Todos los derechos reservados. Este documento, incluyendo todas sus sub-secciones, está protegido por los derechos de autor (copyright). Lee más acerca de lo que puedes hacer con nuestros patrones en la parte de abajo de cada patrón de nuestro sitio. |
|||||||


Con más de 40 años en el diseño de modelos de punto y de ganchillo, DROPS Design ofrece una de las más vastas colecciones de patrones gratuitos en el internet - traducidos en 17 idiomas. Al día de hoy, contamos con 324 catálogos y 12290 patrones - de los cuales 11685 están traducidos en español.
Nosotros trabajamos con mucho esmero para brindarte lo mejor que las labores de punto y ganchillo tienen para ofrecer,inspiración y consejos, así como hilos de magnífica calidad a precios increíbles! Te gustaría usar nuestros patrones para otro fin además del uso personal? Puedes leer acerca de lo que estás permitida a hacer en el texto de Copyright en la parte de abajo de todos nuestros patrones. Felices labores!
Escribe un comentario sobre DROPS 56-8
¡Nos encantaría saber qué piensas acerca de este patrón!
Si quieres escribir una pregunta referente al patrón, por favor asegúrate de elegir la categoría correcta en el formulario debajo, para acelerar el proceso de respuesta. Los campos obligatorios están marcados con un *.