
Categorías populares
¿Buscas un hilo?


Comentarios / Preguntas (41)
![]() Rousseau escribió:
Rousseau escribió:
Merci beaucoup. Bonne journée. AR
09.09.2024 - 13:09
![]() Anne ROUSSEAU escribió:
Anne ROUSSEAU escribió:
Bonjour. Je n'arrive pas à réaliser le point du tricot en suivant le diagramme j'obtiens le point de côte1/1! Dois je comprendre rang 2 maille endroit sur maille envers où maille à l'endroit si je suis sur l'envers ? Merci pour votre réponse. Cordialement. AR
08.09.2024 - 13:35DROPS Design respondió:
Bonjour Mme Rousseau, la 2ème maille de A.1 se tricote à l'endroit sur l'endroit mais à l'endroit sur l'envers, autrement dit, c'est une maille point mousse, vous aurez ainsi des côtes 1 maille jersey (1ère maille de A.1), 1 maille point mousse (2ème maille de A.1). Bon tricot!
09.09.2024 - 10:25
![]() Monika escribió:
Monika escribió:
Hallo, welche Art Maschenanschlag eignet sich denn noch gut, außer dem üblichen Kreuzanschlag, und sieht auch gut aus? Italienischer Anschlag oder Norwegischer Anschlag zum Beispiel?
13.04.2024 - 21:50DROPS Design respondió:
Liebe Monika, je nach jeder Strickerin kann die "beste" Technik verschieden sein, gerne können Sie bei Ihrer Maschenprobe versuchen, welche Technik Sie am besten haben. Viel Spaß beim Stricken!
15.04.2024 - 07:36
![]() Yvonne escribió:
Yvonne escribió:
Wenn ich in Runden stricken will, wie stricke ich in dann die Rückreihe?
05.03.2024 - 15:34DROPS Design respondió:
Liebe Yvonne, wenn man A.1 für den Kragen in Runden strickt, liest man jede Runde rechts nach links - hier lesen Sie mehr über Diagramme. Viel Spaß beim stricken!
05.03.2024 - 15:38
![]() Ika Andersson escribió:
Ika Andersson escribió:
Det skulle underlätta för mig om det stod att det är mönsterstickning, slätstickning, vartannat varv räta, vartannat aviga. På avigvarvet stickas varannan maska avig, varannan rät. Nu står rätstickning och då stämmer inte mönster A1 riktigt så jag fick klura och testa lite.
17.02.2024 - 12:19
![]() Dian Nanda escribió:
Dian Nanda escribió:
Hi, i would like to make this project. But i have a question about the neck. Can i change the neck to a short round neck? How should i do to get the short round neck? Thank You!
13.12.2023 - 14:00DROPS Design respondió:
Sure you can, just work the neck as long as you like it to be. Happy knitting!
13.12.2023 - 16:22
![]() Shelley escribió:
Shelley escribió:
Would like to confirm pattern. Is it, 'Cast on X stitches. Purl 1 row (WS). Repeat next two rows until X cm is reached. R1 (RS): K all the stitches. R2 (WS): K1, *K1, P1 until 1 stitch before the end, K1 Is that correct?
14.08.2023 - 05:57DROPS Design respondió:
Dear Shelly, on first row in A.1 you will end the row with the first stich in A.1, as the number of stitches is uneven. This means, from WS you will work ; k1 (edge stitch), then P1 (= first stitch A.1) and repeat now (K1, P1) to the edge stitch, end with K1. Happy knitting!
14.08.2023 - 10:26
![]() Phoebe Andrew escribió:
Phoebe Andrew escribió:
Hi, would this work with your Andes and Brushed Alpaca yarn? (I got these yarns for another of your vest patterns but I've lost my printed out pattern and this is the closest one I can find!)
03.03.2023 - 19:29DROPS Design respondió:
Dear Phoebe, you can't work this pattern with Andes, since the yarn used is thinner than Andes. You could try the following pattern, which is worked with Andes and a group C yarn: https://www.garnstudio.com/pattern.php?id=6213&cid=19. You can also check here all patterns worked in Andes: https://www.garnstudio.com/search.php?action=browse&c=women&y=drops-andes&lang=en. Happy knitting!
05.03.2023 - 19:39
![]() Mervi escribió:
Mervi escribió:
Tässä ohjeessa ei mikään pitänyt paikkaansa, ei silmukkamäärä, ei koko, ei langanmenekki, ei mikää. Ja , joo tein ”koepalan”
22.02.2023 - 21:34
![]() Liliana escribió:
Liliana escribió:
Me encanta, se puede hacer a crochet?
15.08.2022 - 20:50DROPS Design respondió:
Hola Liliana, este es un patrón a punto, podrías adaptarlo a ganchillo pero nosotros no hacemos patrones personalizados. En nuestro catálago puedes encontrar otros patrones similares a ganchillo, como el siguiente: https://www.garnstudio.com/pattern.php?id=9792&cid=23
21.08.2022 - 21:15
|
|||||||
City Cover#citycovervest |
|||||||
 |
 |
||||||
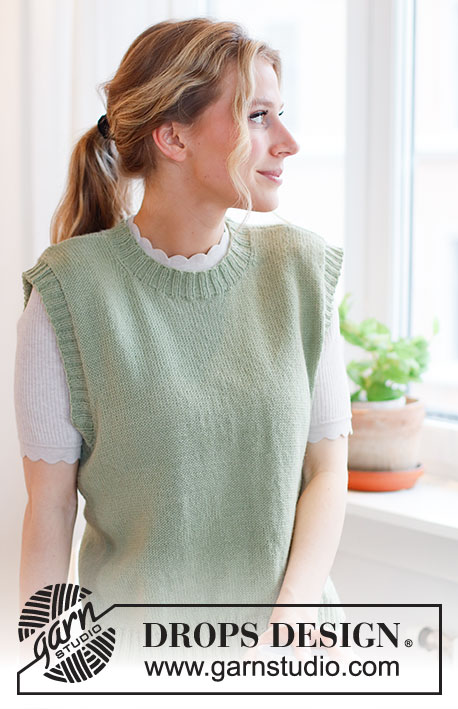
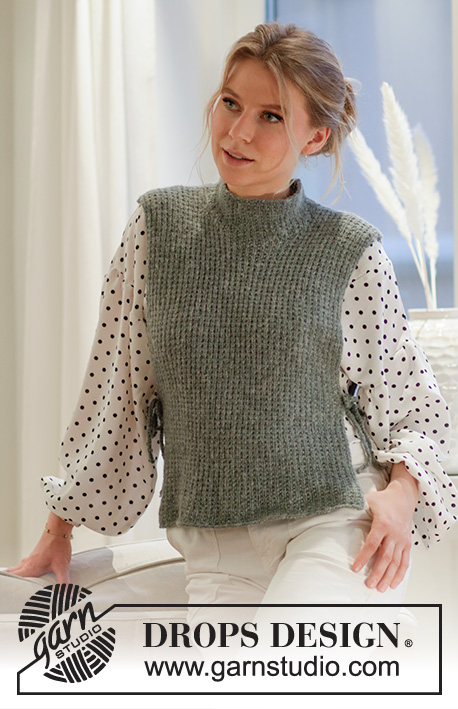
Chaleco a punto en DROPS Sky. La prenda está realizada con el patrón de textura, cuello alto y aberturas laterales. Tallas S - XXXL.
DROPS 212-45 |
|||||||
|
EXPLICACIONES PARA REALIZAR LA LABOR: ------------------------------------------------------- PLIEGUE/PUNTO MUSGO (de ida y vuelta): Trabajar todas las filas de derecho. 1 pliegue = trabajar 2 filas de derecho. PATRÓN: Ver el diagrama A.1. El diagrama muestra todas las filas del patrón vistas por el lado derecho. ------------------------------------------------------- COMENZAR LA LABOR AQUÍ: ------------------------------------------------------- CHALECO - RESUMEN DE LA LABOR: La prenda se trabaja de ida y vuelta por partes y se cose en los hombros. Se recogen los puntos para el escote. Para finalizar se cosen los cordones en los lados para finalizar. ESPALDA: Montar 77-79-81-83-85-87 puntos (incluyendo 1 punto orillo a cada lado) con una aguja circular de 4,5 mm y Sky. Trabajar una fila de revés (= lado revés). Ahora trabajar el patrón como sigue: 1 punto orillo en PUNTO MUSGO - leer las explicaciones arriba, A.1 hasta que quede 1 punto, 1 punto orillo en punto musgo. RECORDAR MANTENER LA TENSIÓN DEL TEJIDO! Cuando la labor mida 48-50-52-54-56-58 cm, cerrar los 29-29-31-31-33-33 puntos centrales para el escote y finalizar cada hombro por separado. Continuar cerrando 1 punto en la siguiente fila hacia el escote = quedan 23-24-24-25-25-26 puntos para el hombro. Cuando la labor mida 50-52-54-56-58-60 cm, cerrar todos los puntos. Trabajar otro hombro de la misma manera. DELANTERO: Montar 77-79-81-83-85-87 puntos (incluyendo 1 punto orillo a cada lado) con una aguja circular de 4,5 mm y Sky. Trabajar una fila de revés (= lado revés). Ahora trabajar el patrón como sigue: 1 punto orillo en punto musgo, A.1 hasta que quede 1 punto, 1 punto orillo en punto musgo. Cuando la labor mida 43-45-46-48-49-51 cm, colocar los 15-15-17-17-17-17 puntos centrales a un gancho auxiliar para el escote y terminar cada hombro por separado. Continuar cerrando en cada fila desde escote como sigue: Cerrar 3 puntos 1 vez, 2 puntos 2 veces y 1 punto 1-1-1-1-2-2 veces = quedan 23-24-24-25-25-26 puntos para el hombro. Cuando la labor mida 50-52-54-56-58-60 cm, cerrar todos los puntos. Trabajar el otro hombro de la misma manera. TERMINACIÓN: Coser las costuras de los hombros con grafting dentro del borde de remate. CUELLO: Comenzar por el lado derecho en una de las costuras del hombro y recoger con una aguja circular corta de 4,5 mm aprox. 78-92 puntos (incluyendo los 15-15-17-17-17-17 puntos en un gancho auxiliar) dentro de 1 punto alrededor del escote ( el número de puntos debe ser divisible entre 2). Trabajar el patrón de textura (=A.1) en redondo 8 cm - asegúrate de trabajar derecho sobre derecho y los puntos en punto musgo sobre los puntos en punto musgo cuando se trabajan los puntos desde el gancho auxiliar ( es decir, en el delantero). Cerrar con derecho sobre derecho y revés sobre los puntos en punto musgo. CORDONES EN LOS LADOS: Cortar 3 hilos de 80 cm y pasarlos por el lado lateral de la prenda aprox. 20 cm desde el borde de montaje y dentro de los 2 puntos del borde del delantero. Pasar los hilos por la labor y doblarlos por la mitad = 6 hilos. Ajustar los hilos a 3 grupos de 2 hilos cada uno, trabajando una trenza. Atar un nudo en la parte inferior para que no se deshaga la trenza. Cortar el hilo. Repetir en el otro lado del delantero y a cada lado de la espalda. |
|||||||
Explicaciones del diagrama |
|||||||
|
|||||||
 |
|||||||
¿Terminaste este patrón?Entonces, etiqueta tus fotos con #dropspattern #citycovervest o envíalas a la galería #dropsfan. ¿Necesitas ayuda con este patrón?Encontrarás 13 videos tutoriales, un espacio para comentarios/preguntas y más visitando la página del patrón en garnstudio.com © 1982-2026 DROPS Design A/S. Todos los derechos reservados. Este documento, incluyendo todas sus sub-secciones, está protegido por los derechos de autor (copyright). Lee más acerca de lo que puedes hacer con nuestros patrones en la parte de abajo de cada patrón de nuestro sitio. |
|||||||


Con más de 40 años en el diseño de modelos de punto y de ganchillo, DROPS Design ofrece una de las más vastas colecciones de patrones gratuitos en el internet - traducidos en 17 idiomas. Al día de hoy, contamos con 324 catálogos y 12290 patrones - de los cuales 11675 están traducidos en español.
Nosotros trabajamos con mucho esmero para brindarte lo mejor que las labores de punto y ganchillo tienen para ofrecer,inspiración y consejos, así como hilos de magnífica calidad a precios increíbles! Te gustaría usar nuestros patrones para otro fin además del uso personal? Puedes leer acerca de lo que estás permitida a hacer en el texto de Copyright en la parte de abajo de todos nuestros patrones. Felices labores!
Escribe un comentario sobre DROPS 212-45
¡Nos encantaría saber qué piensas acerca de este patrón!
Si quieres escribir una pregunta referente al patrón, por favor asegúrate de elegir la categoría correcta en el formulario debajo, para acelerar el proceso de respuesta. Los campos obligatorios están marcados con un *.