
Categorías populares
¿Buscas un hilo?


Comentarios / Preguntas (29)
![]() Petra escribió:
Petra escribió:
Ik ben bij a3 beland. Moet ik daar ook steeds 3 lossen haken? Op de voorbeeld foto zie ik geen gaatjes in de laatste toeren?
19.07.2023 - 20:22DROPS Design respondió:
Dag Petra,
Ja, A.3 haak je ook met lossen ertussen. De laatste toeren zijn alleen met stokjes en deze toeren staan beschreven in de tekst.
01.08.2023 - 20:47
![]() Lee escribió:
Lee escribió:
Is the model wearing a s/m hat? Are the s/m and m/l very different? Wider? Taller?
13.04.2023 - 05:38DROPS Design respondió:
Hi Lee, The measurements for the different sizes of the hat are given at the top of the page and the difference is both in the circumference and the height. Happy crafting!
13.04.2023 - 06:44
![]() Alexis escribió:
Alexis escribió:
What does “Repeat diagram A.2 3-4 times in total vertically” mean? Exactly what is vertically?
08.04.2023 - 17:37DROPS Design respondió:
Dear Alexis, one repeat in vertical means to work all rounds of diagram A.2. Therefore, if you need to work it 3-4 times vertically you need to work all rounds in A.2 3-4 times. Happy knitting!
08.04.2023 - 21:16
![]() Louise Green escribió:
Louise Green escribió:
When making the beret I am confused whether the instructions mean to crochet row A.2 four times in total - or - to repeat it four times i.e. crochet the row and then repeat it four times (which would give you five rows).
22.03.2023 - 20:53DROPS Design respondió:
Dear Louise, when we say "in total" that includes the initial time , we already explained before. I hope this helps. Happy Crafting!
23.03.2023 - 00:12
![]() Eibbed escribió:
Eibbed escribió:
How do you crochet A.1 9 times when chain ring only has 6 stitches? Do you crochet IN or AROUND the 6 chain stitches?
10.03.2023 - 17:04DROPS Design respondió:
Dear Eibbed, you work the first round of stitches around the chain-stitch-ring. Happy Crafting!
12.03.2023 - 15:40
![]() Louise Green escribió:
Louise Green escribió:
Is this using US and UK crochet terms. It would be so handy for this information to be displayed clearly at the beginning. I've looked up the crochet symbols and it would seem that you are using UK crochet terms so please do let me know if I've got this wrong!
27.02.2023 - 13:00DROPS Design respondió:
Dear Louise, we use both of them - depends on which English version you choose (UK x US). You can easily swich these versions in the menu under the photo. But every English pattern have this info also at the very beginning of pattern instructions. Happy crocheting!
27.02.2023 - 14:04
![]() Sandra escribió:
Sandra escribió:
Der Hut ist fertig. Muss ich ihn nun stärken, damit er in Form kommt bzw. bleibt?
19.05.2022 - 21:26DROPS Design respondió:
Liebe Sandra, dieses Video zeigt, wie man so eine Mütze in Form bringt. Viel Spaß beim häkeln!
20.05.2022 - 08:06
![]() Johnsie escribió:
Johnsie escribió:
Is there written instructions row for row for this pattern? I don’t know how to crochet by using a graft? I really love this pattern and would love to crochet it. Thank you for your help
06.05.2022 - 18:19DROPS Design respondió:
Dear Johnsie, our patterns are only available as published on our website, with a mixture of written instructions and graphs. You can learn how to read crochet graphs in the following lesson: https://www.garnstudio.com/lesson.php?id=69&cid=19 Happy crocheting!
08.05.2022 - 19:35
![]() Julie Guld escribió:
Julie Guld escribió:
Virkelig skøn opskrift, dog ikke helt uden problemer. Min hæklefasthed passede, men huen blev kæmpe stor hvis fulgte skemaet, så blev nødt til at lave den 3-4 runder mindre end hvad der fremgår i skemaet.
07.04.2022 - 17:55
![]() Marian Wyn escribió:
Marian Wyn escribió:
Apologies for my earlier question. I have just found charts A.4 and A.5!
05.01.2022 - 14:32
|
||||||||||||||||||||||
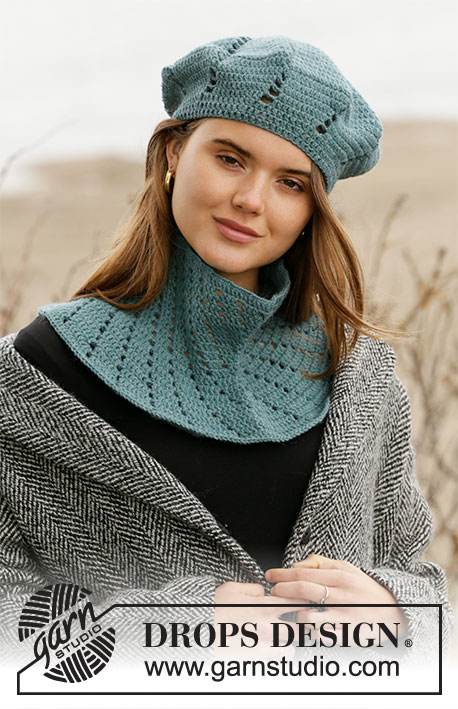
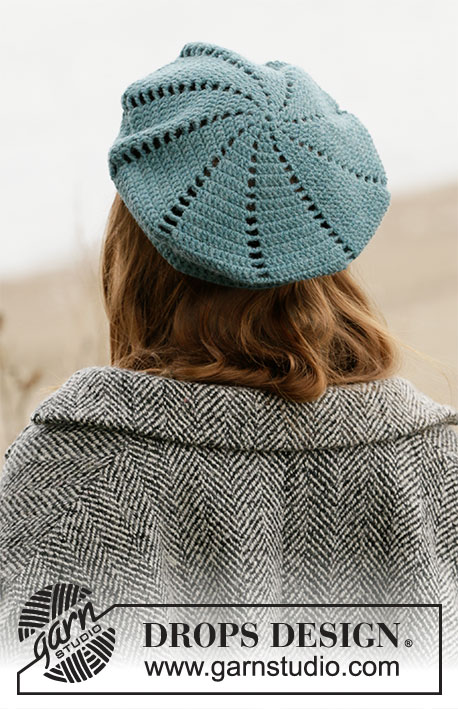
Green Gables#greengablesset |
||||||||||||||||||||||
 |
 |
|||||||||||||||||||||
Boina y cuello a ganchillo en DROPS Lima. La labor está realizada en patrón de espiral con puntos altos.
DROPS 204-26 |
||||||||||||||||||||||
|
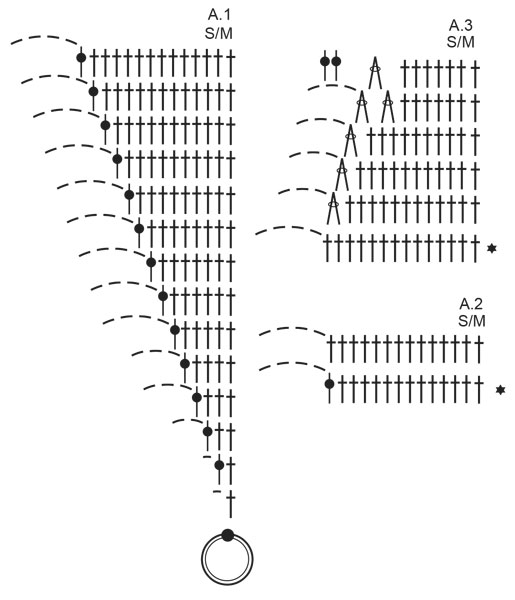
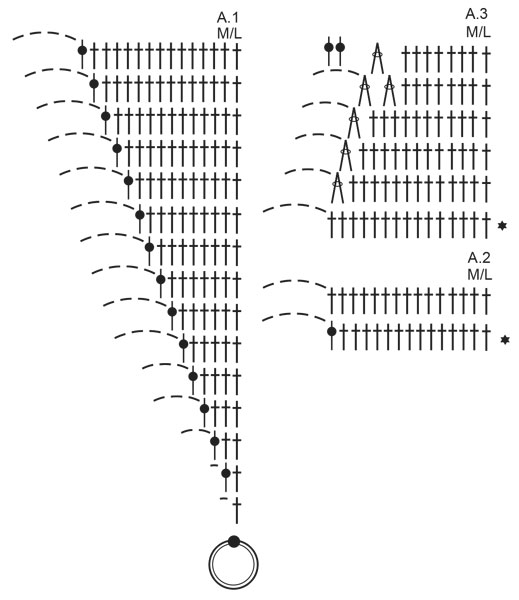
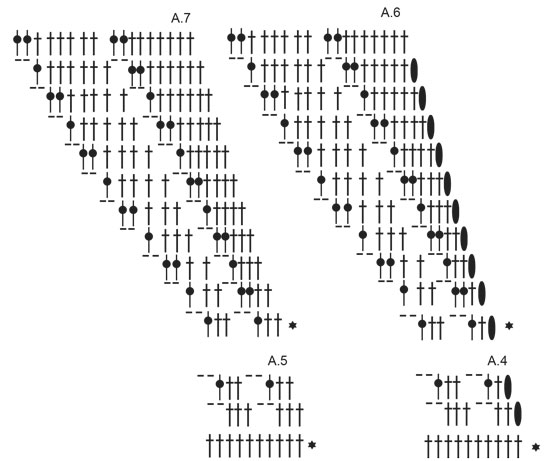
EXPLICACIONES PARA EL PATRÓN: ---------------------------------------------------------- PATRÓN: Gorro: Ver los diagramas A.1, A2 y A.3. Elegir el diagrama para la talla correspondiente. Cuello: Ver los diagramas A.4, A.5, A.6 y A.7. INFO PARA TRABAJAR A GANCHILLO: Sustituir el primer punto alto al inicio de la vuelta por 3 puntos de cadeneta, finalizar la vuelta con 1 punto enano en el 3er punto de cadeneta. PUNTO DE CADENETA: Si se trabaja en la punta del ganchillo, el punto de cadeneta a menudo quedará muy tenso; 1 punto de cadeneta debería ser tan largo como la anchura de 1 punto alto. TIP PARA LAS DISMINUCIONES (repartidos): Para calcular cómo disminuir puntos repartidos, contar el número total de puntos ( p.e 99 puntos altos) y dividirlos entre el número de disminuciones a trabajar (p.e 7) = 14,1 En este ejemplo, disminuir trabajando cada 13º y 14º puntos altos juntos. ---------------------------------------------------------- COMENZAR LA LABOR AQUÍ: ---------------------------------------------------------- GORRO - RESUMEN DE LA LABOR: La labor se trabaja en redondo de arriba abajo en patrón de espiral. GORRO: Usar el ganchillo de 4 mm y Lima. Leer INFO PARA TRABAJAR A GANCHILLO y PUNTO DE CADENETA como se explica arriba. Trabajar 6 puntos de cadeneta y formar un anillo con 1 punto enano en el 1er punto de cadeneta. Trabajar el diagrama A.1 un total de 9 veces dentro del anillo. Después de completar A.1 hay 14-15 puntos altos y 1 arco de cadenetas en cada repetición y hay un total de 126-135 puntos altos y 9 arcos de cadeneta en la vuelta. Trabajar el diagrama A.2 sobre A.1 la vuelta entera. Repetir A.2 un total de 3-4 veces en vertical. Trabajar el diagrama A.3 sobre A.2, después de completar el diagrama hay 10-11 puntos altos en cada repetición y hay un total de 90-99 puntos altos en la vuelta. Trabajar 1 vuelta con puntos altos y, AL MISMO TIEMPO, disminuir 2-7 puntos altos repartidos en la vuelta - leer TIP PARA LAS DISMINUCIONES, explicado arriba = 88-92 puntos altos. Trabajar 1 vuelta con 1 punto alto en cada punto alto la vuelta entera. Cortar y asegurar el hilo. ---------------------------------------------------------- CUELLO - RESUMEN DE LA LABOR: La labor se trabaja en redondo de arriba abajo en patrón de espiral. CUELLO: Usar el ganchillo de 4 mm y Lima. Leer PUNTO DE CADENETA explicado arriba. Trabajar 110-120 puntos de cadeneta y formar un anillo con 1 punto enano. Trabajar 1 vuelta con 1 punto alto en cada punto de cadeneta = 110-120 puntos altos. Trabajar según los diagramas A.4 y A.5 como sigue: Trabajar A.4 sobre 10 puntos (= 1-1 repetición), después repetir A.5 la vuelta entera (=10-11 repeticiones). Después de completar A.4 y A.5 1 vez en vertical, repetir la última vuelta hasta que la labor mida un total de 10-12 cm. Trabajar el diagrama A.6 sobre A.4 y el diagrama A.7 sobre A.5. Después de completar los diagramas hay 187-204 puntos altos en total en la última vuelta y la labor mide aprox. 21-23 cm desde el inicio. Cortar y asegurar el hilo. |
||||||||||||||||||||||
Explicaciones del diagrama |
||||||||||||||||||||||
|
||||||||||||||||||||||
 |
||||||||||||||||||||||
 |
||||||||||||||||||||||
 |
||||||||||||||||||||||
¿Terminaste este patrón?Entonces, etiqueta tus fotos con #dropspattern #greengablesset o envíalas a la galería #dropsfan. ¿Necesitas ayuda con este patrón?Encontrarás 7 videos tutoriales, un espacio para comentarios/preguntas y más visitando la página del patrón en garnstudio.com © 1982-2026 DROPS Design A/S. Todos los derechos reservados. Este documento, incluyendo todas sus sub-secciones, está protegido por los derechos de autor (copyright). Lee más acerca de lo que puedes hacer con nuestros patrones en la parte de abajo de cada patrón de nuestro sitio. |
||||||||||||||||||||||


Con más de 40 años en el diseño de modelos de punto y de ganchillo, DROPS Design ofrece una de las más vastas colecciones de patrones gratuitos en el internet - traducidos en 17 idiomas. Al día de hoy, contamos con 324 catálogos y 12290 patrones - de los cuales 11685 están traducidos en español.
Nosotros trabajamos con mucho esmero para brindarte lo mejor que las labores de punto y ganchillo tienen para ofrecer,inspiración y consejos, así como hilos de magnífica calidad a precios increíbles! Te gustaría usar nuestros patrones para otro fin además del uso personal? Puedes leer acerca de lo que estás permitida a hacer en el texto de Copyright en la parte de abajo de todos nuestros patrones. Felices labores!
Escribe un comentario sobre DROPS 204-26
¡Nos encantaría saber qué piensas acerca de este patrón!
Si quieres escribir una pregunta referente al patrón, por favor asegúrate de elegir la categoría correcta en el formulario debajo, para acelerar el proceso de respuesta. Los campos obligatorios están marcados con un *.