
Categorías populares
¿Buscas un hilo?


Comentarios / Preguntas (35)
![]() Maryam Rabie escribió:
Maryam Rabie escribió:
How we can adjust the pattern to less stitches?For example if I cast on 72 stitches, is it possible to reduce number of stitches in every pattern? A1 changes to 12 stitches.
05.11.2025 - 14:30DROPS Design respondió:
Hi Maryam, of course you can do this. Happy knitting!
27.11.2025 - 21:34
![]() Justyna escribió:
Justyna escribió:
Witam. Niestety mam problem z przerobieniem schematu A1. W 5 okrążeniu zaczynam narzutem i kończę 2 oczka razem. W okrążeniu 6 mam przerobić oczko prawe które wychodzi w narzucie który miał być przerobiony przekręcony na prawo? Czy oczko prawe i przekręcenie na prawo ma być zrobione równocześnie na narzucie? Z góry dziękuję
18.11.2024 - 20:44DROPS Design respondió:
Witaj Justyno, zobacz film video jak wykonać tą czapkę TUTAJ. Pozdrawiamy!
19.11.2024 - 09:17
![]() Emilia escribió:
Emilia escribió:
Hello! Does round needle length 40 cm mean the whole length from the top to the top or just the flexible middle part? Is it possible to use longer, then 40 cm?
24.09.2024 - 17:33DROPS Design respondió:
Dear Emilia, usually a 40 cm needle is measured from tip to tip, you can use a longer one such as a 80 cm and work with the magic loop technique, see video. Happy knitting!
25.09.2024 - 08:17
![]() Georgette Keneally escribió:
Georgette Keneally escribió:
Your video for the White Amaryllis hat shows the first stitch is a purl. Is that a Norwegian purl?
15.05.2024 - 20:08DROPS Design respondió:
Dear Georgette, yes, however, it really does not matter what way you purl, as long as you pay attention to which way your stitches sit on the needles. Happy Knitting!
16.05.2024 - 01:21
![]() Ellen Sawyer escribió:
Ellen Sawyer escribió:
I was wondering, if you could possibly put this pattern instructions into the English language for me. I would LOVE to make this! Thanks in advance.
14.12.2022 - 16:29DROPS Design respondió:
Dear Mrs Sawyer, sure, all our patterns are available in English, click on the scroll down menu below the photos and choose "English (US, in)". Happy knitting!
15.12.2022 - 09:02
![]() Imelda escribió:
Imelda escribió:
The piece is worked in the round with circular needle. You first work a displacement in the rib, then work stockinette stitch before finishing with rib. What is a displacement. How is it worked.
09.11.2022 - 20:19DROPS Design respondió:
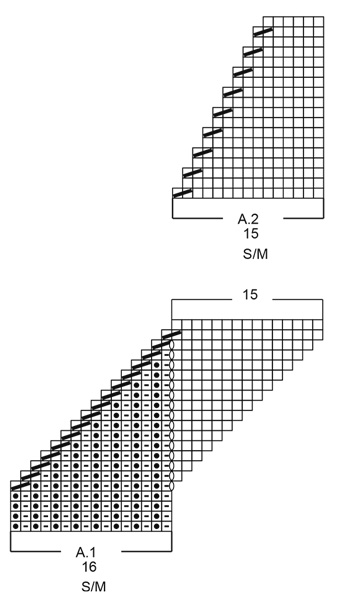
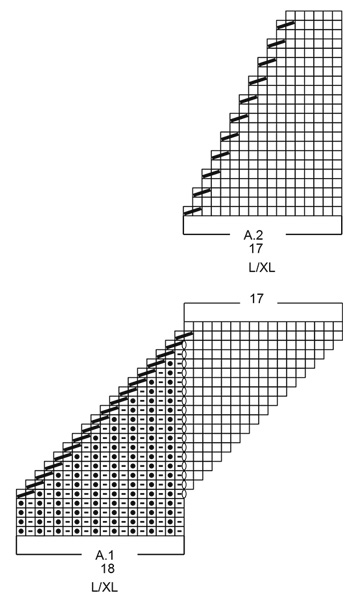
Hi Imelda, A displacement is when the pattern (in this case the ribbing) is moved sideways and the ribbing becomes diagonal instead of straight. This displacement is created by following the diagrams at the bottom of the pattern. Happy crafting!
10.11.2022 - 07:20
![]() Danuta escribió:
Danuta escribió:
Bardzo podoba mi się ta czapka kupiłam sobie włóczkę na tą czapkę, no i uczę się, polecam na wielu forach właśnie waszą stronę ze względu że ktoś tak jak ja dopiero zaczyna ma dokładnie opisane Jak robić no i filmiki są mega mega pomocne.
17.12.2021 - 23:26DROPS Design respondió:
Danusiu bardzo dziękujemy! Pamiętaj, że nawet jeśli nie będziesz mogła czegoś znaleźć, czy pojawi się jakakolwiek wątpliwość możesz śmiało pisać. Żadnych pytań nie pozostawiamy bez odpowiedzi. Serdecznie pozdrawiamy!
20.12.2021 - 08:50
![]() Georgette escribió:
Georgette escribió:
Hat: Lima is 4 ply yarn. Do I double it an use two strands plus the kid silk (3rd strand) ? I'm a new knitter. The Drops US locations no longer have any color I desire. Can you suggest where else I might order the yarn. Thank you
20.02.2021 - 04:25DROPS Design respondió:
Dear Georgette, this hat is knitted with 1 Lima and 1 kidsilk held together. For the yarn, you might try our find a store page HERE. Do not forget to check the "other stores shipping to the US" and "stores that ship worldwide" pages. Happy Knitting!
20.02.2021 - 12:04
![]() Ruth Leibbrandt escribió:
Ruth Leibbrandt escribió:
Your prompt response to my question regarding the White Amaryllis neck warmer is both helpful and greatly appreciated. Incidentally, love the off white yarn Lima and the mohair that I purchased from you.
02.10.2020 - 14:23
![]() Ruth Leibbrandt escribió:
Ruth Leibbrandt escribió:
What does your pattern for White Amaryllis mean when it says "you first work a displacement in the rib, then work stocking stitch before finishing with rib". The pattern does not even mention a rib. I am knitting the warmer and find the directions difficult, although I am an experienced knitter. I purchased the yarn stated in the pattern from you.
02.10.2020 - 00:25DROPS Design respondió:
Dear Mrs Leibbrandt, you start neck warmer wit diagram A.1 and while working diagram in the round you will displace automatically (with the Yarn over and K2 tog) the rib. After A.1 has been worked, all stitches are worked in stocking stitch, you continue in stockng stitch then work rib K1 twisted/P1. Happy knitting!
02.10.2020 - 08:31
|
||||||||||||||||
White Amaryllis#whiteamaryllisset |
||||||||||||||||
|
|
||||||||||||||||
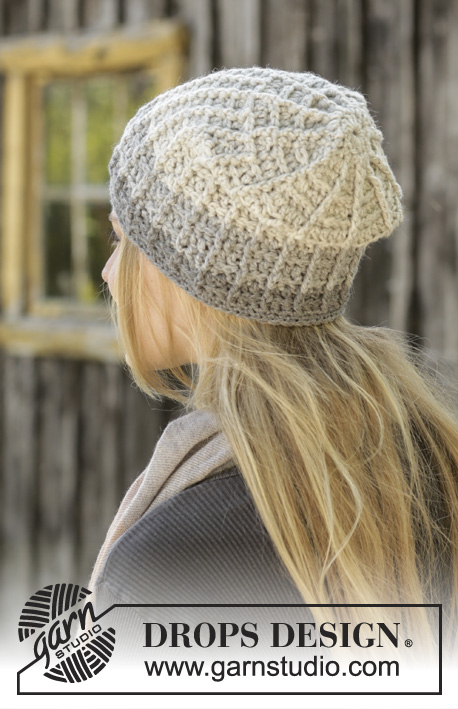
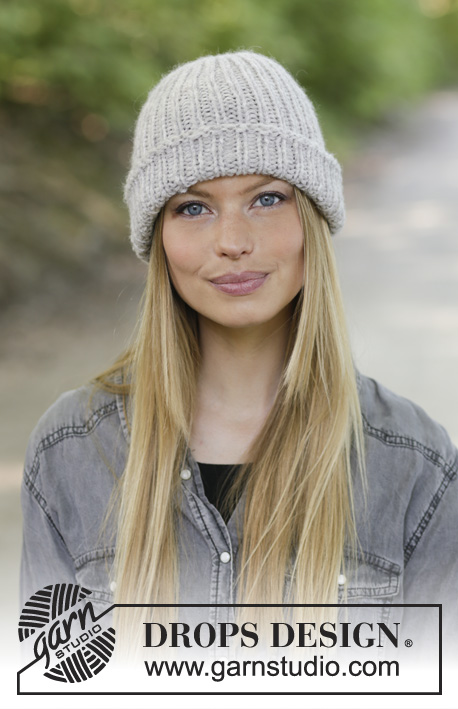
Gorro y cuello de punto DROPS con punto elástico en 1 hilo de DROPS Lima y 1 hilo de DROPS Kid-Silk.
DROPS 192-4 |
||||||||||||||||
|
EXPLICACIONES PARA REALIZAR EL PATRÓN: ------------------------------------------------------- PATRÓN: Ver los diagramas A.1 y A.2. Elegir el diagrama correspondiente a la talla. ------------------------------------------------------- COMIENZO DE LA LABOR AQUÍ: ------------------------------------------------------- GORRO - CORTO RESUMEN DE LA LABOR: El gorro se trabaja en redondo con agujas circulares. Cuando sea necesario cambiar a agujas de doble punta. GORRO: Montar 96-108 puntos con agujas circulares tamaño 4,5 mm y 1 hilo Lima + 1 hilo Kid-Silk (= 2 hilos). Trabajar A.1 (= 16-18 puntos) un total de 6 veces en horizontal. RECUERDE MANTENER LA MISMA TENSIÓN DEL TEJIDO. Después de trabajar A.1 una vez en vertical hay 90-102 puntos en las agujas. La labor mide aprox 9-10 cm. Cuando la labor mida 17-18 cm desde el borde de montaje, trabajar A.2 (= 15-17 puntos) un total de 6 veces en horizontal. Después de trabajar A.1 una vez en vertical hay 36 puntos en las agujas. Trabajar todos los puntos juntos de 2 en 2 = 18 puntos. Trabajar todos los puntos juntos de 2 en 2 = 9 puntos. Cortar el hilo, pasar por los puntos restantes, estirar el hilo y asegurar. El gorro mide aprox 26-28 cm de arriba abajo. ------------------------------------------------------- CUELLO - RESUMEN DE LA LABOR: La labor se trabaja en redondo con agujas circulares. Primero trabajar el desplazamiento en el punto elástico, después trabajar en punto jersey antes de finalizar con punto elástico. CUELLO: Montar 128-144 puntos con agujas circulares tamaño 4.5 mm y 1 hilo Lima + 1 hilo Kid-Silk (= 2 hilos). Trabajar A.1 (= 16-18 puntos) un total de 8 veces en horizontal. RECUERDE MANTENER LA MISMA TENSIÓN DEL TEJIDO! Después de trabajar A.1 una vez en vertical hay 120-136 puntos en las agujas. La labor mide aprox 9-10 cm. Continuar en punto jersey. Cuando la labor mida 22-24 cm desde el borde de montaje, aumentar 22-24 puntos repartidos en la vuelta (es decir, aumentar trabajando 1 hebra después de cada 5º y 6º punto alternadamente) = 142-160 puntos. En la siguiente vuelta trabajar las hebras retorcidas para evitar que se formen agujeros. Trabajar el elástico (= 1 derecho retorcido, 1 revés). Rematar con derecho retorcido sobre derecho retorcido y revés sobre revés cuando la labor mida 26-28 cm desde el borde de montaje. |
||||||||||||||||
Explicaciones del diagrama |
||||||||||||||||
|
||||||||||||||||
 |
||||||||||||||||
 |
||||||||||||||||
¿Terminaste este patrón?Entonces, etiqueta tus fotos con #dropspattern #whiteamaryllisset o envíalas a la galería #dropsfan. ¿Necesitas ayuda con este patrón?Encontrarás 17 videos tutoriales, un espacio para comentarios/preguntas y más visitando la página del patrón en garnstudio.com © 1982-2026 DROPS Design A/S. Todos los derechos reservados. Este documento, incluyendo todas sus sub-secciones, está protegido por los derechos de autor (copyright). Lee más acerca de lo que puedes hacer con nuestros patrones en la parte de abajo de cada patrón de nuestro sitio. |
||||||||||||||||


Con más de 40 años en el diseño de modelos de punto y de ganchillo, DROPS Design ofrece una de las más vastas colecciones de patrones gratuitos en el internet - traducidos en 17 idiomas. Al día de hoy, contamos con 325 catálogos y 12298 patrones - de los cuales 11698 están traducidos en español.
Nosotros trabajamos con mucho esmero para brindarte lo mejor que las labores de punto y ganchillo tienen para ofrecer,inspiración y consejos, así como hilos de magnífica calidad a precios increíbles! Te gustaría usar nuestros patrones para otro fin además del uso personal? Puedes leer acerca de lo que estás permitida a hacer en el texto de Copyright en la parte de abajo de todos nuestros patrones. Felices labores!
Escribe un comentario sobre DROPS 192-4
¡Nos encantaría saber qué piensas acerca de este patrón!
Si quieres escribir una pregunta referente al patrón, por favor asegúrate de elegir la categoría correcta en el formulario debajo, para acelerar el proceso de respuesta. Los campos obligatorios están marcados con un *.