
Categorías populares
¿Buscas un hilo?


Comentarios / Preguntas (17)
![]() Iris escribió:
Iris escribió:
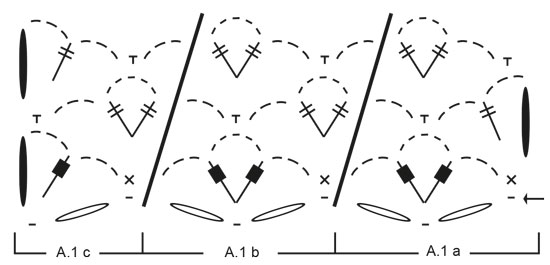
Hallo, ich komme mit der Häkelschrift einfach nicht klar, ist die erste Reihe, die mit dem Pfeil gekennzeichete, meine Luftmaschenkette mit den 64 Maschen die ich angeschlagen habe? Das würde heißen dass ich die eigentliche Arbeit mit Reihe 2 von links nach rechts beginne: 5 LM als Steigemaschen, 3 LM 1 Doppelstäbchen in die 1. LM der Vorreihe, 3 LM, 1 feste M. in die darunterliegende 8.(?) M der Vorreihe? Vielen Dank!
07.05.2025 - 13:17DROPS Design respondió:
Liebe Iris, die 1. Reihe im Diagram wird von rechts nach links gelesen = Luftmaschenkette am Anfang = Reihe mit dem Pfeil, dann wird man die nächste Reihe links nach rechts häkeln, dh zuerst A.1c (= 5 Lm + 3 Lm + 1 Doppelstäbhchen in die 9. Luftmasche ab Häkelnadel + 3 Lm, 6 Lm überspringen, 1 feste M in die nächste Lm) dann A.1b wiederholen: 3 Lm, 6 Lm überspringen und 1 Dstb+5 Lm+1 Dstb in die nächste Lm, 3 Lm, 6 Lm überspringen, 1 feste M in die nächste Lm; und dann mit A.1a enden: 3 Lm, 6 Lm überspringen, und 1 Dstb+5 Lm+1 Dstb in die nächste Lm, 3 Lm, 6 Lm überspringen, 1 feste M in die letzte Lm. Viel Spaß beim Häkeln!
07.05.2025 - 16:37
![]() Anna Magier escribió:
Anna Magier escribió:
Czy możesz mi wytłumaczyć w pierwszym rzędzie sekcję A.1c przedostatnią czyli trzy oczka ( gdzie je zaczepiam ) i co z ostatnimi 5-oma oczkami? To samo pytanie mam do rzędu drugiego i sekcji A.1a . Nie rozumiem jak to zrobić :(
02.03.2024 - 18:19DROPS Design respondió:
Witaj Aniu, pierwszy rząd jest na prawej stronie robótki - to łańcuszek. 2-gi rząd przerabiasz na lewej stronie robótki i teraz czytasz schemat od lewej do prawej: tj. zaczynasz od 5 oczek łańcuszka (A.1 c, 3 x A.1b, A.1a). 3-ci rząd jest na prawej stronie robótki (czytaj schemat od prawej do lewej) i przerabiasz A.1a, 3 x A.1b i na końcu A.1c. Pozdrawiamy!
18.04.2024 - 21:35
![]() Justyna escribió:
Justyna escribió:
Dzień dobry, bardzo podoba mi się ten komin. Prosty wzór, szybko przybywa robótki, można zastąpić dowolną włóczką. Świetny projekt!
12.08.2023 - 13:23
![]() Hannab Pitt escribió:
Hannab Pitt escribió:
Is the first row of the diagram the foundation row? If so the chains in a1 & a2 x 3 and then 1 a3 is more chains than 64. Not sure how to work this otherwise. Thanks
09.08.2023 - 22:21DROPS Design respondió:
Dear Mrs Pitt, you will work the 64 sts as follows: (seen from RS): A.1a = 14 chains; A.1b = 14 chains x 3 repeats and A.1c = 8 chains, so that you have: 14+42+8=64 chains. On the first row (from WS), crochet 5 chains to start with A.1, repeat A.1b and finish with A.1a. Happy crocheting!
10.08.2023 - 09:22
![]() Christina D Cersosimo escribió:
Christina D Cersosimo escribió:
Thanks for your response. Unfortunately, there are no retail stores in the US that sell Drops yarn within 1,000 miles of me. One final question - Do Charts A1.A, then A1B (3 times repeated) and then A1C make up one horizontal row/round?
23.03.2023 - 20:23DROPS Design respondió:
Dear Christina, you are absolutely correct. Chart A.1A, A.1Bx3 times, and A.1C makes up one row. Happy Crafting!
24.03.2023 - 02:44
![]() Christina Cersosimo escribió:
Christina Cersosimo escribió:
I am a beginner. I have read your tutorial on how to read crochet diagrams 5X and many other web descriptions. content. Still cannot figure out the starfish pattern from your schematic. Can you have someone write the pattern out in English?
22.03.2023 - 21:58DROPS Design respondió:
Dear Christina, we have the diagrams (instead of the written out patterns) not only because tehy are available for many languages, but also, because that they not only show you the very next step, but also the "big picture" as how stitches and rows relale to each other. If our lessons do not help, you can always as for help in the store where you bought your DROPS yarn from. Happy Crafting!
23.03.2023 - 00:07
![]() Manuel Fritzer escribió:
Manuel Fritzer escribió:
Ich versteh nicht ganz wie ich die 5 luftmaschen am ende von A.1c behandeln soll. Nach dem doppelstäbchen kommen ja 8 luftmaschen aber in die dritte davon soll icg dann eine feste masche für die reihe 2 machen.. wie komm uch zu dem punkt?
23.11.2021 - 21:48DROPS Design respondió:
Lieber Her Fritzer, die 5 Luftmaschen sind das Beginn der 2. Reihe - die 1. Reihe beginnt bei dem Pfeil = rechts nach links und die 2. Reihe beginnt mit A.1c und diese 5 Lufmtaschen und endet mit A.1a und die feste Masche in die 1. Luftmasche der vorrige Reihe. Viel Spaß beim häkeln!
24.11.2021 - 08:00
![]() Maria Hjortman escribió:
Maria Hjortman escribió:
Hej! Jag har svårt att få till slutet av varvet och starten på nästa. Jag uppfattar det som att jag ska virka 3 + 5 luftmassor. Sen då...
30.11.2020 - 20:59DROPS Design respondió:
Hej Maria, du virkar 5 lm + 3 lm, 1 dubbelst i sista lm på raden, 3 lm, hoppa över 6 lm, 1 fm i nästa osv. Lycka till :)
07.12.2020 - 13:54
![]() Mel escribió:
Mel escribió:
Hallo, ich versuche gerade zu verstehen, wo ich denn die erste "Verbindungsmasche" hier wohl die bei Muster A1c die 8te Luftmache, an meine Anschlagsreihe mit den 64 Luftmaschen fixieren muss. Leider gehen die AbstandsLuftmaschen zwischen den Mustern aus der Anleitung für mich nicht hervor. Und so kann ich leider nicht häkeln.
07.07.2020 - 10:46DROPS Design respondió:
Liebe Mel, nach dem Sie die 64 Lm gehäkelt haben (= Reihe mit dem Pfeil) häkeln Sie A.1c (= 5 Lm, 3 Lm, 1 DStb in die 9. Lm von der Häkelnadel (= die 64. Lm), 3 Lm, 6 Lm überspringen, 1 feste M in die nächste Lm, dann A.1b (3 Lm, 6 Lm überspringen, 1 DStb + 5 Lm + 1 DStb in die nächste Lm, 3 Lm, 6 Lm überspringen, 1 feste M in die nächste Lm) und mit A.1a (= 6 Lm überspringen, 1 DStb+5Lm+1 DStb in die nächste Lm, 3 Lm, 6 Luftmasche überpsringen, 1 feste M in die letzte Luftmasche). Viel Spaß beim häkeln!
07.07.2020 - 12:00
![]() Leslie Wood escribió:
Leslie Wood escribió:
Hello. I am a right-handed crocheter, so I read the Row 1 of a chart from right to left. I am trying to understand Row 1 of diagram A.1c. I am to make a single crochet in a chain stitch, chain 3 stitches, 1 treble crochet in chain stitch, chain 3 stitches, then what? I know there is something to do with 5 chain stitches. I appreciate any help you can offer.
17.04.2019 - 20:58DROPS Design respondió:
Dear Mrs Wood, First row = the one with the arrow (and every odd-numbered row) is read from the right towards the left and every even-numbered row will be read from the left towards the right. When you start row 2 with A.1c work: 5 chain stitches + 3 chain stitches, 1 treble in first chain stitch from previous row, 3 chain stitches, 1 sc in the chain stitch from previous row (= skip 6 chains from previous row). Happy crocheting!
23.04.2019 - 11:33
|
|||||||||||||||||||||||||
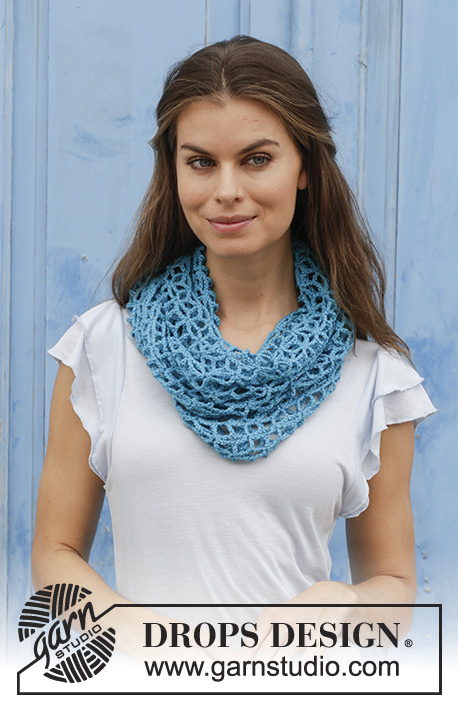
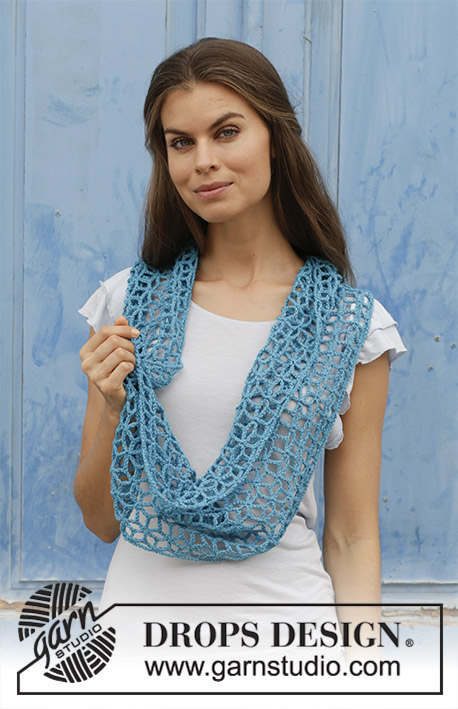
Starfish#starfishcowl |
|||||||||||||||||||||||||
 |
 |
||||||||||||||||||||||||
Cuello a ganchillo con patrón de estrellas. La pieza está elaborada en DROPS Cotton Merino.
DROPS 190-40 |
|||||||||||||||||||||||||
|
INFORMACIÓN PARA REALIZAR EL PATRÓN: PATRÓN: Ver diagrama A.1. ----------------------------------------------------- CUELLO: La pieza se trabaja de ida y vuelta. Después coserla entre sí en cada extremo. Trabajar 64 puntos de cadena en aguja de ganchillo tamaño 4.5 mm con Cotton Merino de la manera siguiente: Trabajar A.1a, A.1b 3 veces en total a lo ancho, terminar con A.1c. Cuando se ha trabajado A.1 verticalmente, repetir las últimas 2 hileras hacia arriba - ¡RECORDARSE DE MANTENER LA MISMA TENSIÓN DE LA MUESTRA! Cuando la pieza mida aprox 135 cm, cortar y asegurar el hilo. Coser la orilla de montaje y la orilla de remate entre sí, orilla con orilla. |
|||||||||||||||||||||||||
Explicaciones del diagrama |
|||||||||||||||||||||||||
|
|||||||||||||||||||||||||
 |
|||||||||||||||||||||||||
¿Terminaste este patrón?Entonces, etiqueta tus fotos con #dropspattern #starfishcowl o envíalas a la galería #dropsfan. ¿Necesitas ayuda con este patrón?Encontrarás 6 videos tutoriales, un espacio para comentarios/preguntas y más visitando la página del patrón en garnstudio.com © 1982-2026 DROPS Design A/S. Todos los derechos reservados. Este documento, incluyendo todas sus sub-secciones, está protegido por los derechos de autor (copyright). Lee más acerca de lo que puedes hacer con nuestros patrones en la parte de abajo de cada patrón de nuestro sitio. |
|||||||||||||||||||||||||


Con más de 40 años en el diseño de modelos de punto y de ganchillo, DROPS Design ofrece una de las más vastas colecciones de patrones gratuitos en el internet - traducidos en 17 idiomas. Al día de hoy, contamos con 324 catálogos y 12290 patrones - de los cuales 11685 están traducidos en español.
Nosotros trabajamos con mucho esmero para brindarte lo mejor que las labores de punto y ganchillo tienen para ofrecer,inspiración y consejos, así como hilos de magnífica calidad a precios increíbles! Te gustaría usar nuestros patrones para otro fin además del uso personal? Puedes leer acerca de lo que estás permitida a hacer en el texto de Copyright en la parte de abajo de todos nuestros patrones. Felices labores!
Escribe un comentario sobre DROPS 190-40
¡Nos encantaría saber qué piensas acerca de este patrón!
Si quieres escribir una pregunta referente al patrón, por favor asegúrate de elegir la categoría correcta en el formulario debajo, para acelerar el proceso de respuesta. Los campos obligatorios están marcados con un *.