
Categorías populares
¿Buscas un hilo?


Comentarios / Preguntas (11)
![]() Claudine escribió:
Claudine escribió:
I have issues with the top right & left front with extra stitches and cannot do the assembly correctly. Reading the comments below I agree the increases should be decreases. I am about to frog both tops of the front pieces.
03.01.2025 - 18:32DROPS Design respondió:
Dear Claudine, the pattern is correct; these increases are only for the neck which is raised kind of like a lapel, as seen in the picture. If you have a different thread or gauge than that of the pattern the resulting effect may be too loose and it will fall instead of staying straight. Happy knitting!
05.01.2025 - 19:33
![]() DROPS Design escribió:
DROPS Design escribió:
Molly, your are right that the shawl collar piece that goes around the neck will have a height measure of approx 5 inch. This drapes up along your neck, and you fold the upper edge only. Depending on which yarn you are using the collar might drape differently. In SilkeTweed which is very drapey and crisp this works beautifully. SilkeTweed used in this design holds it's shape and doesn't "fall" down.
17.04.2009 - 18:10
![]() Molly escribió:
Molly escribió:
Correction to my last comment: The gauge for this project is more like 6 sts per inch (which is what I'm getting) so that 32-34 stitch collar is over 5 inches in width (height).
17.04.2009 - 08:31
![]() Molly escribió:
Molly escribió:
If 9 stitches is 1 inch in Silke-Tweed (and that is what I'm getting) then the collar, which is 33 stitches, is over 3.5 inches before the 2 thread part. This does seem quite tall-- does it scrunch up behind under the more rigid 2 thread detail? Is it possible there is a detail picture of the back of the collar? Or perhaps a clearer close-up of the collar on the existing picture? I've done the front right panel and, other than my back collar questions, it looks like the picture.
17.04.2009 - 05:56
![]() DROPS Design escribió:
DROPS Design escribió:
The inc for collar is also made at the center front edge. Pattern is edited.
14.04.2009 - 19:27
![]() Molly escribió:
Molly escribió:
Could you clarify this: "At the same time when the piece measures 32-33-34 cm [12-5/8" - 13" - 13-3/8"] inc 1 st at the center front 8-9-10 times every 7-6-6 rows = 60-61-63 sts." Elsewhere in the pattern it says specifically "center front edge" yet the instruction above says only "center front." Does that mean the increases should no longer be on the edge? That I should put them in the middle, like a bust dart?
14.04.2009 - 18:05
![]() Karen escribió:
Karen escribió:
We did post a reply on the 11 November 2006, please check further down this page. As we said in our reply, 66-11 is a 5-year-old pattern and no errors have been found to date. Also we have double checked the translation and this follows the original pattern. It may be that the photo doesn't reflect the true shape/design of the cardigan, and if you want a different look, your suggestions seem a good idea. Again if the instructions
05.01.2007 - 10:16
![]() MKelly escribió:
MKelly escribió:
Hi this is the 2nd time that I've written to you regarding 66-11 but noone has emailed me back and I don't see any corrections posted. I have knit this pattern and found numerous errors in it. A novice knitter or even an intermediate knitter would not be able to maneuver this pattern. The front has errors where it says" When piece measures 13" inc.1 st. at the center front 9 times. This should be a decrease not an increas as by the time you get to the collar you have a big lapel shape. It needs to be consistently decreasing at the front to give the v shaping needed. Not increasing and getting larger. The way the collar is described makes absolutely no sense whatso ever if the instructions for the front are not changed. It only will work if the front decreases to end with only the 28 st at the shoulder. As well knitting 2.75 " for the collar is too long and will not stand up as shown in the picture on the website. 35 stitches is not enough for the collar either. I used 95 sts.on a smaller (2.25) needle and double yarn and it then had the length and weith needed to stand up. I also made it 1.5 " instead of 2.75.There is no shaping included in this pattern to allow for the gradual sloping from the front edge to the stand up collar so that it is incorporated smoothly. The sleeves work fine until the underarm decrease of 3 st. either side of marker, but then it says to just knit back and forthe which is not adequate instruction because it doesn't say for how long. also it moves directly to the cap shaping and if I had not knit before I would end up with a 6" arm opening when a 9" arm opening to fit the body is needed. I ended up at the underarm decrease shaping it myself aas for the arm shaping on the body and then added 6 extra rows and then the cap shaping then it worked out a novice would be unable to figure all this out. In the end this is going to be fine but it is a painful pattern and I think there needs to be corrections made.
30.12.2006 - 19:54
![]() karen escribió:
karen escribió:
Hi Ya Ya, The Scandinavian version of this pattern is 5 years old and no errors have been found or noted to date. I've checked the translation against the original pattern and Frederikka's translation is word perfect and the instructions in full accordance with the original pattern. The jacket is meant to have a collar/lapel. You increase 9 sts for the collar which in Silketweed amounts to just over 1 inch (the width of the collar on front pieces) and continue over 33 sts for the collar to be sewn tog at the back. Silketweed is a rather rugged quality and the collar will "stand" rather than fall when you have completed the edge in 2 threads and folded it double. I hope this helps. If you don't get the desired look by following the pattern, your alternative sounds a good idea. Kind regards Karen
19.11.2006 - 23:34
![]() Ya Ya escribió:
Ya Ya escribió:
I am writing regarding pattern 66-11 the wrap around cardigan in Silke Tweed. There is an error in the pattern for the left and right fronts. Where the pattern reads,"At the same time when the piece measures 13 " inc. 1 st. at the centre front 9 times every 6 rows. This adds far too much material which then actually crosses over at the top instead of angling back towards the shoulder as it shows in the picture and the diagram.As well the next section tells us to leave 33 st on the needle for the collar and knit it an additional 2.75 " When the project is knit in this exact fashion it ends up being huge at the front with a lapel effect. I have since ripped it out and am now doing dec. every 6 rows instead of increases and will continue this until I reach 28 st. and will then put the front and back together and do a 3 needle bind off of the 28sts. to form the shoulder instead of casting off and then sewing it together. I then plan to pick up the cast off 28 sts. on the back for the neck and pick up enough stitches to begin making a collar that looks like the picture using short rows to achieve this. Then I will pick up the stitches all the way around the front and knit in reverse stockinette stitch the last 5 rows. If You have already found the errors and have a correction sheet for this would you please send it to me. I would appreciate hearing back from you either way regarding this pattern. Thanks so much have a good day....Ya Ya
17.11.2006 - 05:42
|
|
Kathmandu |
|
|
|
|
Chaqueta cruzada DROPS en Silke-Tweed
DROPS 66-11 |
|
|
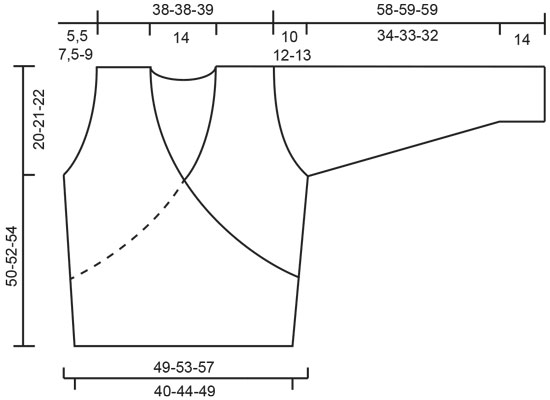
Tensión: 23 pts x 30 filas con agujas de 3,5 mm en punto jersey = 10 x 10 cm. Elástico: * 1d, 1r *. Repetir de * a *. Patrón: Repetir las siguientes 6 filas: * 3 filas en pt jersey con una aguja pequeña con 1 hilo verde, 3 filas en pt jersey revés con una aguja más grande con 1 hilo verde y 1 hilo verde musgo *, repetir de * a *. Delantero derecho: Montar 94-104-114 pts con una aguja más pequeña con verde. Trabajar el elástico 7 cm - ver instrucciones arriba. Cambiar a una aguja más grande y trabajar en pt jersey sobre todos los pts, y aum 1 pt a cada lado 10-10-10 veces cada 7-7-8 filas y 1 pt en la cenefa del centro del delantero 2-2-2 veces cada 7-7-8 filas. Cuando la labor mida aprox. (hay 98-108-118 pts en la aguja) comenzar dando forma en el borde en el centro del delantero (los aumentos continúan en el borde lateral): cerrar cada 2ª fila 8 pts 2-2-2 veces, 2 pts 6-9-12 veces, 1 pt 11-10-9 veces y después cada 4ª fila: 1 pt 2-2-2 veces = 65-70-75 pts. Cuando la labor mida 30-31-32 cm cerrar para la sisa en cada borde lateral cada 2ª fila: 3 pts 1-2-3 veces, 2 pts 3-3-4 veces y 1 pt 4-6-5 veces. Al mismo tiempo cuando la labor mida 32-33-34 cm aum 1 pt para el cuello en la cenefa del centro del delantero cada 7-6-6 filas 8-9-10 veces = 60-61-63 pts. Cuando la labor mida 50-52-54 cm cerrar para los hombros 28-28-29 pts por el borde lateral = quedan 32-33-34 pts en la aguja. Continuar con estos pts para el cuello en pt jersey 7 cm; cerrar todos los pts. Delantero izquierdo: Montar y trabajar de la misma manera que el derecho, trabajando la forma a la inversa. Espalda: Montar 94-104-114 pts con una aguja más pequeña con verde. Trabajar 7 cm del elástico. Cambiar a una aguja circular más grande y pt jersey, aumentando 1 pt a cada lado 10-10-10 veces cada 7-7-8 filas = 114-124-134 pts. Cuando la labor mida 30-31-32 cm cerrar para las sisas a cada lado como en el delantero = 88-88-90 pts. Cuando la labor mida 49-51-53 cm cerrar los 28-28-28 pts centrales para el escote. Cerrar 2 pts en cada cenefa del escote en la siguiente fila = quedan 28-28-29 pts en cada hombro. Cerrar cuando la labor mida 50-52-54 cm. Manga: Montar 58-60-62 pts con agujas de doble punta pequeñas con verde, unir y colocar un marcapuntos en la unión. Trabajar 4 filas en pt musgo, después trabajar el Patrón - ver instrucciones arriba - hasta que la labor mida aprox. 14-14-14 cm. Cambiar a agujas de doble punta más grandes, y trabajar en pt jersey hasta alcanzar las medidas finales. Al mismo tiempo, después del Patrón aum 1 pt a cada lado del marcapuntos 13-15-16 veces: Talla S: cada 8 filas Talla M: cada 6ª y 7ª fila alternadamente Talla L: cada 6 filas = 84-90-94 pts. Cuando la labor mida 48-47-46 cm cerrar 3-3-3 pts a cada lado del marcapuntos y trabajar el resto de ida y vuelta en las agujas. Dar forma para la copa de la manga a cada lado cada 2ª fila: cerrar 3 pts 1-1-1 vez, 2 pts 2-2-2 veces, 1 pt 7-10-12 veces, 2 pts 2-2-2 veces y 3 pts 2-2-2 veces. Cerrar los pts restantes, la labor mide aprox. 58-59-59 cm. Terminación: Hacer las costuras de los hombros. Recoger por el lado derecho con una aguja más grande con verde: aprox. 140-160 pts por el delantero derecho hacia el centro de la espalda. Cambiar a 1 hilo verde + 1 hilo verde musgo, trabajar 5 filas en pt jersey revés, cerrar. Repetir por el delantero izquierdo. Asegurar el cuello en el centro de la espalda. Doblar la cenefa en doble hilo hacia el lado revés y coser hacia abajo. Hacer las costuras laterales en el cuerpo, pero en lado derecho dejar una abertura de 4 cm justo encima del elástico (para que pase el cinturón), reforzar la abertura con el punto festón. Coser las mangas. Cinturón: Recoger 19 pts con una aguja pequeña con verde en la cenefa del delantero derecho (no recoger por el elástico). Trabajar el elástico manteniendo 1 pt en pt musgo a cada lado. Cuando la cenefa mida 3, 6 y 9 cm dism 1 pt a cada lado (dentro de los pts orillo) = 13 pts. Trabajar hasta que la cenefa mida aprox. 70 cm, cerrar según el patrón. Recoger y trabajar una cenefa idéntica en el delantero izquierdo. |
|
 |
|
¿Terminaste este patrón?Entonces, etiqueta tus fotos con #dropspattern o envíalas a la galería #dropsfan. ¿Necesitas ayuda con este patrón?Encontrarás 19 videos tutoriales, un espacio para comentarios/preguntas y más visitando la página del patrón en garnstudio.com © 1982-2026 DROPS Design A/S. Todos los derechos reservados. Este documento, incluyendo todas sus sub-secciones, está protegido por los derechos de autor (copyright). Lee más acerca de lo que puedes hacer con nuestros patrones en la parte de abajo de cada patrón de nuestro sitio. |


Con más de 40 años en el diseño de modelos de punto y de ganchillo, DROPS Design ofrece una de las más vastas colecciones de patrones gratuitos en el internet - traducidos en 17 idiomas. Al día de hoy, contamos con 324 catálogos y 12290 patrones - de los cuales 11673 están traducidos en español.
Nosotros trabajamos con mucho esmero para brindarte lo mejor que las labores de punto y ganchillo tienen para ofrecer,inspiración y consejos, así como hilos de magnífica calidad a precios increíbles! Te gustaría usar nuestros patrones para otro fin además del uso personal? Puedes leer acerca de lo que estás permitida a hacer en el texto de Copyright en la parte de abajo de todos nuestros patrones. Felices labores!
Escribe un comentario sobre DROPS 66-11
¡Nos encantaría saber qué piensas acerca de este patrón!
Si quieres escribir una pregunta referente al patrón, por favor asegúrate de elegir la categoría correcta en el formulario debajo, para acelerar el proceso de respuesta. Los campos obligatorios están marcados con un *.