
Categorías populares
¿Buscas un hilo?


Comentarios / Preguntas (90)
![]() Nefeli escribió:
Nefeli escribió:
Cortesemente, Avrei bisogno di chiarimenti su come proseguire dopo aver ultimato il rettangolo 45 x 65 per una taglia S. E’ corretto: 1)Lungo il bordo ai avvio riprendo 138 maglie (+28 maglie rispetto alle 110 iniziali) e riprendo 138 maglie lungo il bordo di chiusura (+28 m.) e in totale ho 276 maglie sul ferro circolare 2)Lavoro n.2 giri a Legaccio in tondo, quindi il lavoro si unisce creando qui lo spazio per infilare le braccia? 3) Lavoro per 10 cm a coste 2 dir + 2 rov.
31.08.2017 - 19:14
![]() Kerstin escribió:
Kerstin escribió:
Ich habe den Bolero erfolgreich zuende gestrickt. Kid-Silk habe ich gegen Baby-Merino ausgetauscht, damit es nicht so kratzt/juckt. Das Ergebnis ist trotz einiger Stolperfallen sehr schick geworden. Es hat sich sehr gelohnt, sich durchzubeißen. ;-)
29.08.2017 - 15:32
![]() Nefeli escribió:
Nefeli escribió:
Scusate, ho fatto un errore prima,riscrivo il messaggio... Sto per iniziare questo bel bolero. Ma non tutto mi è chiaro. Riepilogando: 1) si realizza un rettangolo; per una taglia S le misure finali sono: lungh. cm 65 e altezza cm 45; 2) il diagramma A1 si legge partendo dall'angolo in basso a DESTRA e in direzione SINISTRA, così il 2° ferro, poi il 3° ferro, etc.? 3) Non ho affatto capito come proseguire una volta ultimata la prima fase del rettangolo. Cortesemente mi date spiegazioni? Grazie
14.08.2017 - 15:06
![]() Nefeli escribió:
Nefeli escribió:
Sono in procinto di realizzare questo bel bolero. Ma non tutto mi è chiaro. Riepilogando: 1) si realizza un rettangolo (le misure variano a seconda della taglia). Per una taglia S le misure sono: lunghezza cm 65 e altezza cm 45 2) il diagramma A1 si legge partendo dall'amgolo in basso a sinistra e in direzione destra, così il 2° ferro, poi il 3° ferro, etc. 3) Non ho porprio capito come proseguire una volta ultimato il rettangolo. Cortesemente mi date spiegazioni? Grazie
14.08.2017 - 13:14DROPS Design respondió:
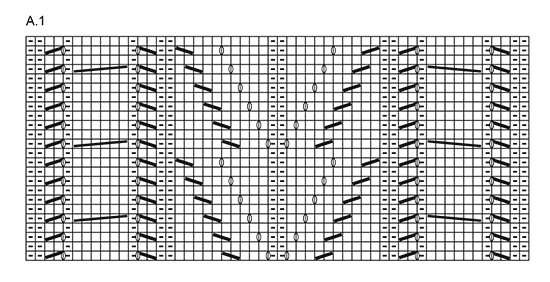
Buongiorno Nefeli, le misure del rettangolo per la taglia S sono corrette. IL diagramma A.1 si legge dall'angolo in basso a destra verso sinistra e sul ferro di ritorno da sinistra verso destra. Alla fine del rettangolo deve riprendere le maglie nel bordo di avvio e di chiusura per lavorare il bordo superiore e inferiore del rettangolo a coste. Buon lavoro!
14.08.2017 - 14:00
![]() Cristina escribió:
Cristina escribió:
Vorrei realizzare questo modello con il filato LIMA che ho recentemente acquistato, vorrei sapere quante maglie devo avviare per una taglia S (italiana) e pensavo con ferri 4,5 mm. Grazie
25.04.2017 - 22:27DROPS Design respondió:
Buonasera Cristina. Le consigliamo di fare il campione e contare quante maglie servono per avere 10 cm in larghezza. Deve poi riproporzionare il numero delle maglie in base al suo campione. Purtroppo non riusciamo a darle un aiuto così personalizzato, ma può rivolgersi al suo rivenditore Drops di fiducia. Buon lavoro!
25.04.2017 - 23:18
![]() Mary Moran escribió:
Mary Moran escribió:
I can't seem to figure out the first part of the pattern. It says knit 8, purl 3 etc. The stitch count doesn't work out. I really like the sweater and want to make it. If I could just understand the directions. They are very limited.
17.04.2017 - 21:49DROPS Design respondió:
Dear Mary, can you tell us, what does not add up? From the 8 knit stitches you mention I assume, you are knitting the 2nd size, which is siize L. In this case the first row, after the 3 rows of knit stitches (garter) should look like this (written out completely the american style): 4K, 8K, 3P, 8K, 3P, 8K, 1st row of A.1(=54), 8K, 3P,8K, 3P, 8K, 4K (= which is the 122 stitches you should cast on for this size). The second row: 4K, 8P, 3K, 8P, 3K, 8P, 2nd row of A.1(=54), 8P,3K,8P, 3K, 8K, 4K (=122 stitch). And then you should repeat row 1, and 2. I hope this helps, Happy knitting!
18.04.2017 - 08:22Andrea escribió:
I still don't see how/where to fold/sew the thing---it isn't in the directions! The sweater is cute but the directions don't give enough details!. Where and how do you fold and sew it? And the part where you pick up stitches--how do you pick up bound off and cast on---they are on 2 different sides, not next to each other??
14.03.2017 - 16:17DROPS Design respondió:
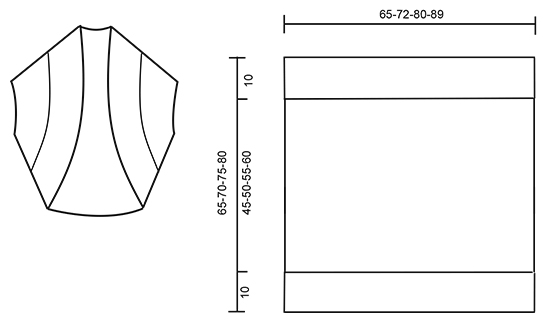
Dear Andrea, fold piece so that you will pick up the sts for edge along the cast off sts then along the cast on edge (from RS), in the chart on the left side you will see the edge = 10 cm at the bottom + 10 cm at the top.Sleeve will be between these edges, and there are no seam. Happy knitting!
15.03.2017 - 08:57
![]() Conny escribió:
Conny escribió:
Hallo.... Kann es sein, dass die Rückreihen falsch gezeichnet sind, wenn im Diagramm Hin - und Rückreihen aufgeführt sind??
04.03.2017 - 00:01DROPS Design respondió:
Liebe Conny, die Rückreihen lesen Sie im Diagram von links nach rechts, d.h. am 2. Reihe stricken Sie: 2 M re, 2 M li, 1 M re, 6 M li, 1 M re, 2 M li... Viel Spaß beim stricken!
06.03.2017 - 08:55
![]() Renate escribió:
Renate escribió:
Guten Tag, ich habe eine grundsätzliche Frage: Ist es richtig, dass die cm-Angaben im Diagramm nicht den Maßen des fertig gestrickten Teils entsprechen, im besonderen nicht, wenn ein Muster ( Loch oder Zopf) gestrickt wurde? Liegt bei den angegebenen Abmessungen die glatt rechts gestrickte Maschenprobe zugrunde? Vielen Dank für eine Antwort
02.03.2017 - 14:42DROPS Design respondió:
Liebe Renate, die Maßen in Diagram wurden genommen, wenn Teil fertig ist, damit können Sie Ihre Größe wählen, mehr können Sie hiere lesen. Viel Spaß beim stricken!
02.03.2017 - 14:46
![]() Susanne escribió:
Susanne escribió:
Ja, die Maschenprobe stimmt. Der Farb-Unterschied ist wirklich sehr krass. Aber ich werde das passende Garn schon finden... Viele Grüße
20.02.2017 - 19:35
|
||||||||||||||||||||||
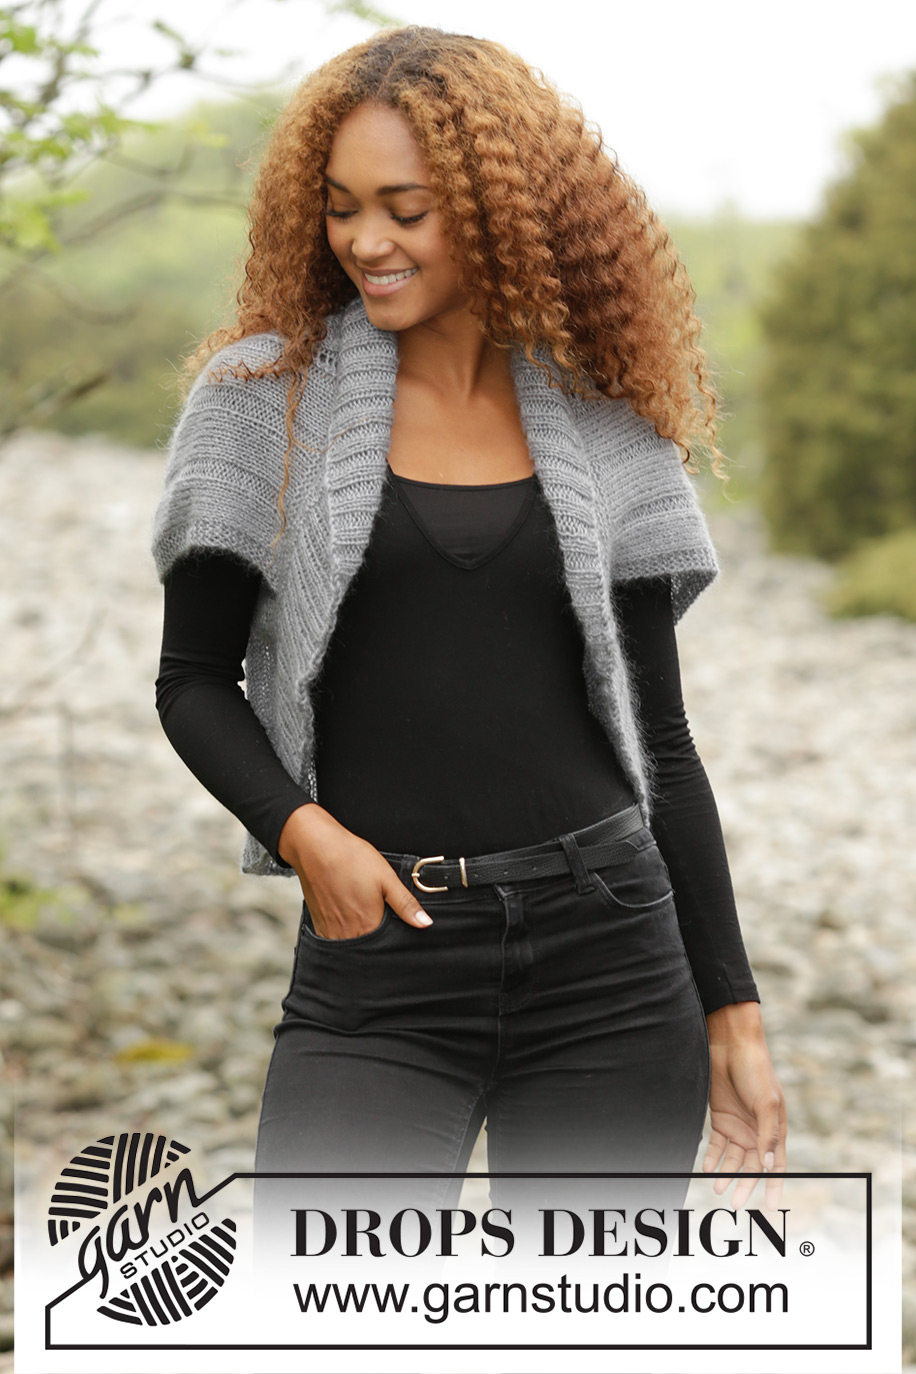
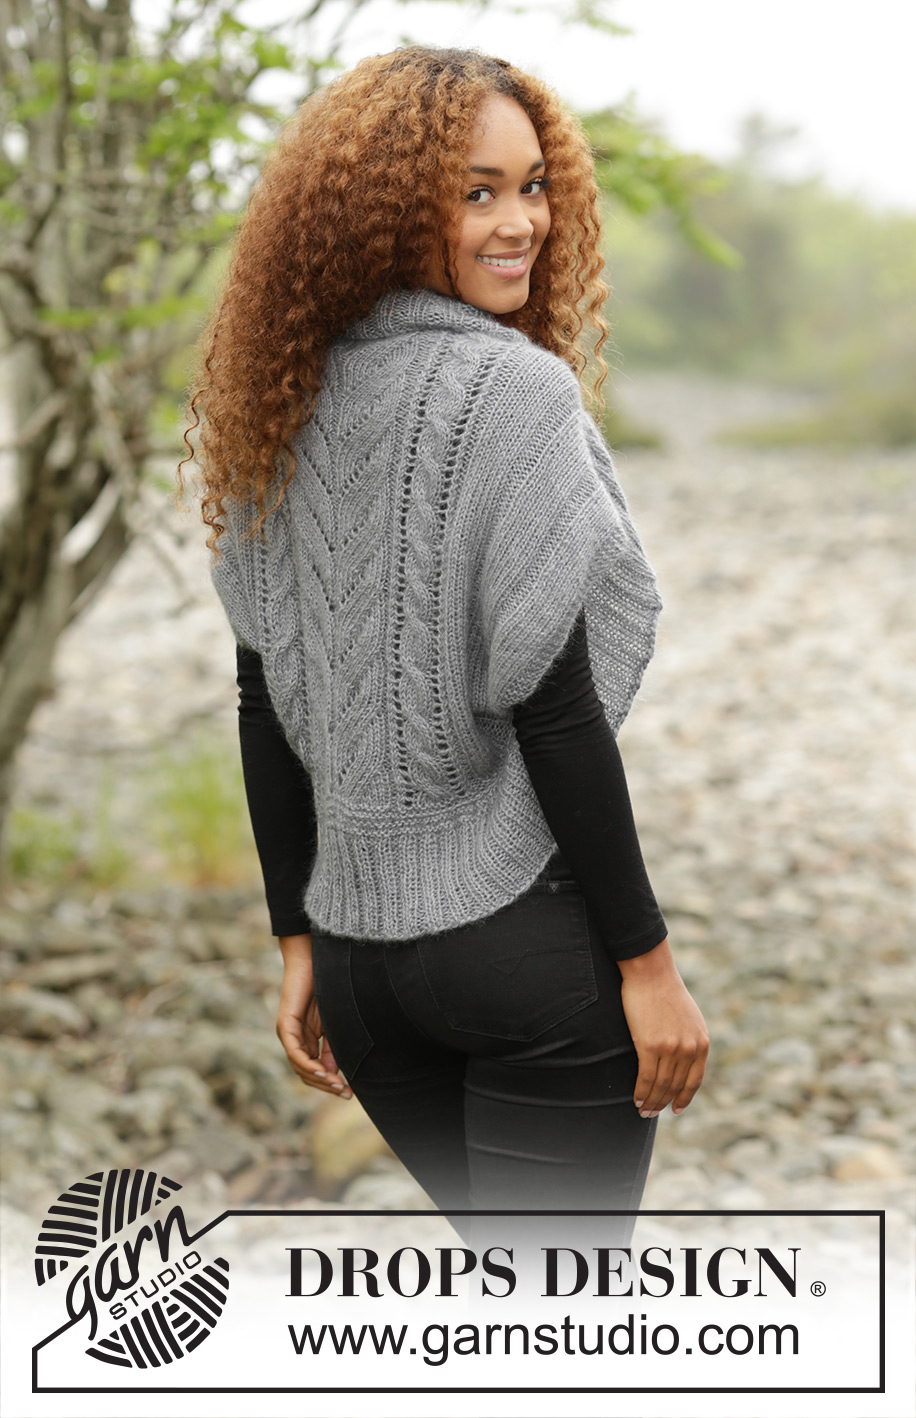
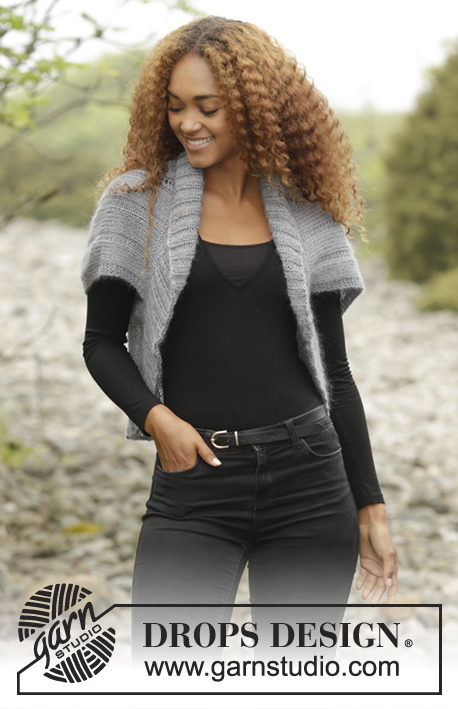
Grey Whisper#greywhispershoulderpiece |
||||||||||||||||||||||
 |
 |
|||||||||||||||||||||
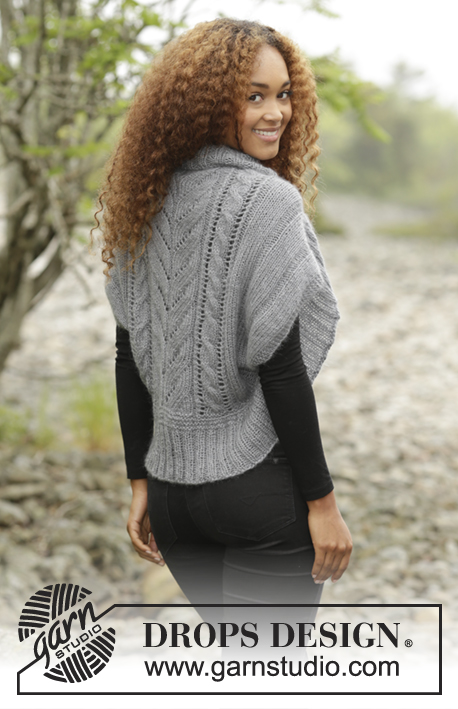
Bolero de punto DROPS con trenzas y pt elástico en "BabyAlpaca Silk" y "Kid-Silk". Talla: S - XXXL.
DROPS 173-40 |
||||||||||||||||||||||
|
PT MUSGO (de ida y vta en aguja):
Trabajar todas las filas de derecho. 1 pliegue = 2 filas de derecho. PT MUSGO (en redondo con ag circular): 1 pliegue = 2 vtas. *1 vta de derecho, 1 vta de revés*, repetir de *a*. PATRÓN: ver el diagrama A.1. El diagrama muestra todas las filas del patrón visto por el LD. ---------------------------------------------------------- BOLERO: Se trabaja de ida y vta con ag circular, después se trabaja un borde en redondo con ag circular. Mont flojo 110-122-136-152 pts con ag circular tamaño 5 mm, 1 hilo de BabyAlpaca Silk y 1 hilo de Kid-Silk (= 2 hilos). ATENCIÓN: Asegúrate de que el borde de montaje de pts no quede muy tenso. Trabajar 3 filas de derecho. Ahora trabajar el patrón como sigue comenzando por el LD: 4 pts en PT MUSGO - ver explicación arriba, * 6-8-7-9 d., 3 r.*, repetir de *a* 1-1-2-2 vcs más, 6-8-7-9 d., A.1 (= 54 pts), 6-8-7-9 d., *3 r., 6-8-7-9 d.*, repetir de *a* 1-1-2-2 vcs más, finalizar con 4 pts en pt musgo. Continuar con el patrón de la misma manera. RECUERDE MANTENER LA MISMA TENSIÓN DEL TEJIDO. Trabajar hasta que la labor mida 44-49-54-59 cm. Trabajar 2 pliegues sobre todos los pts. Rematar flojo. BORDE: Recoger 138-156-174-194 pts por el LD a lo largo del borde de remate y 138-156-174-194 pts a lo largo del borde de montaje con ag circular tamaño 4.5 mm con 1 hilo de BabyAlpaca Silk y 1 hilo de Kid-Silk (= 2 hilos) = 276-312-348-388 pts alrededor de la abertura. Trabajar 2 pliegues en PT MUSGO - ver explicación arriba - en redondo sobre todos los pts. Ahora trabajar pt elástico *2 d., 2 r.* hasta que el pt elástico mida aprox. 10 cm. Rematar con 2 hilos de cada calidad (= 4 hilos), con derecho sobre derecho y revés sobre revés. |
||||||||||||||||||||||
Explicaciones del diagrama |
||||||||||||||||||||||
|
||||||||||||||||||||||
 |
||||||||||||||||||||||
 |
||||||||||||||||||||||
¿Terminaste este patrón?Entonces, etiqueta tus fotos con #dropspattern #greywhispershoulderpiece o envíalas a la galería #dropsfan. ¿Necesitas ayuda con este patrón?Encontrarás 21 videos tutoriales, un espacio para comentarios/preguntas y más visitando la página del patrón en garnstudio.com © 1982-2026 DROPS Design A/S. Todos los derechos reservados. Este documento, incluyendo todas sus sub-secciones, está protegido por los derechos de autor (copyright). Lee más acerca de lo que puedes hacer con nuestros patrones en la parte de abajo de cada patrón de nuestro sitio. |
||||||||||||||||||||||


Con más de 40 años en el diseño de modelos de punto y de ganchillo, DROPS Design ofrece una de las más vastas colecciones de patrones gratuitos en el internet - traducidos en 17 idiomas. Al día de hoy, contamos con 324 catálogos y 12290 patrones - de los cuales 11685 están traducidos en español.
Nosotros trabajamos con mucho esmero para brindarte lo mejor que las labores de punto y ganchillo tienen para ofrecer,inspiración y consejos, así como hilos de magnífica calidad a precios increíbles! Te gustaría usar nuestros patrones para otro fin además del uso personal? Puedes leer acerca de lo que estás permitida a hacer en el texto de Copyright en la parte de abajo de todos nuestros patrones. Felices labores!
Escribe un comentario sobre DROPS 173-40
¡Nos encantaría saber qué piensas acerca de este patrón!
Si quieres escribir una pregunta referente al patrón, por favor asegúrate de elegir la categoría correcta en el formulario debajo, para acelerar el proceso de respuesta. Los campos obligatorios están marcados con un *.