
Categorías populares
¿Buscas un hilo?


Comentarios / Preguntas (6)
![]() Barbara Kamm escribió:
Barbara Kamm escribió:
Thanks you for those latest instructions. So the cable is not really a cable but I. Your last instructions I still don’t see the pattern for the o dented cable like pattern but I guess I can try to figure it out. Are there only 3 stitches in the cable like pattern?
05.09.2023 - 04:41DROPS Design respondió:
Dear Mrs Kamm, the cable is a real cable but you will either cross the first 6 sts or the last 6 sts - work 3rd row A.1 as follows: slip 3 sts on cable needle behind piece, K 3, K 3 from cable needle, K3, and work 11th row as follows: K3, slip 3 sts on cable needle behind piece, K 3, K 3 from cable needle. Happy knitting!
05.09.2023 - 13:35
![]() Barbara Kamm escribió:
Barbara Kamm escribió:
Wow, that I do not understand. I’m going to have to look for an American pattern. I don’t know how to read diagrams. It’s greek to me. So frustrating
03.09.2023 - 22:39
![]() Barbara Kamm escribió:
Barbara Kamm escribió:
I have 46 stitches on my needles, 4 stitches in garter, purl 1, 29 stitches in stocking knit, that 34 stitches than plus 3 at the end of the row =37, the other nine must be for the cable pattern. Which is on a diagonal. I don’t see any instructions on how to work the cable and the other stitches ?
02.09.2023 - 04:21DROPS Design respondió:
Dear Mrs Kamm, on right front piece in larger size, work the 46 sts as follows from right side: 4 front band stitches in garter stitch, work the 9 sts A.1 (= knit on 1st row, cable on 3rd row), then purl 1 and knit to the end of the row. from wrong side, work: K3, P29, K1, P9, K4. In A.1 as well as in A.2 all the stitches will not be crossed for the cable; in A.1 cross the first 6 sts and knit the last 3; then knit the first 3 and cross the last 6. Happy knitting!
04.09.2023 - 09:20
![]() Barbara Kamm escribió:
Barbara Kamm escribió:
I am sorry to keep bothering you. But I don’t see in The instructions how to do the cable pattern. I am totally lost
02.09.2023 - 03:57DROPS Design respondió:
Dear Barbara, the instructions for the cable pattern are in the charts A.1 and A.2, where, on specific rows, you will slip 3 stitches to the cable needle, knit 3 and place the stitches back onto the main needle. So you will have 1 stitch in garter stitch before the cable in A.2 and purl 1 after A.2. On the other front piece you will have A.1 instead of A.2 and 1 purl before the cable and the edge stitch after the cable. Happy knitting!
03.09.2023 - 20:08
![]() Barbara Kamm escribió:
Barbara Kamm escribió:
Hi: I am starting the right front and I am confused with the instructions. I am making the 3X size. I have knitted the first 4 stitches that you call Band. Then it states A.2, P1 which I assume is for pearl 1. That confuses me. Then it states 29 stitches in stocking knit. If I am looking at the picture and the right side is on the left, I am not sure what kind of stitch you do before and after the cable? I would think I would do pearl stitches bebore the cable and the cable is zig zag about
29.08.2023 - 05:39DROPS Design respondió:
Dear Mrs Kamm, on right front piece, work from RS as follows: 4 sts in garter stitch (K them on every row), then work A.2 (see diagram, read from right towards the left from RS and from the left towards the right from WS), purl 1 (this stitch will be knitted from WS), and work the next 29 sts in stocking stitch (= these stitches will be knitted from RS and purled from WS), end with 3 sts in garter stitch (knit them on every row). Happy knitting!
29.08.2023 - 09:27
![]() Barbara Kamm escribió:
Barbara Kamm escribió:
It confuses me that on the back piece of this sweater it say to do garter stitch on 3 stitches on each side and I interpret that at the beginning and end of the back ?? Why is that? I understand using it on the front pieces
19.08.2023 - 18:05DROPS Design respondió:
Dear Barbara, the 3 stitches in garter stitch in each side of the back form a small border for the vent at the lower part of the jacket. After finishing the vent, you will have a single edge stitch in garter stitch, which will be used for the seam. Happy knitting!
20.08.2023 - 17:19
|
||||||||||
Winter Sparkle Cardigan |
||||||||||
|
|
||||||||||
Chaqueta de punto DROPS con torsadas en 1 hilo Cloud o 2 hilos Air. Talla: S – XXXL.
DROPS Extra 0-1188 |
||||||||||
|
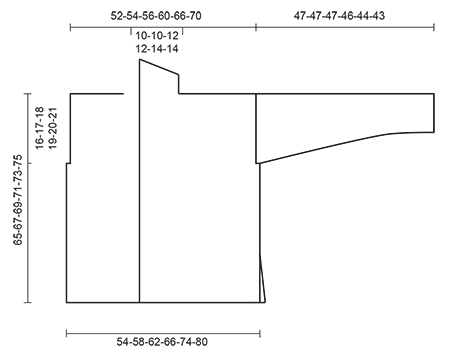
PT MUSGO (de ida y vuelta): Tejer todas las hileras de derecho. 1 surco = 2 hileras tejidas de derecho. PATRÓN: Ver diagramas A.1-A.2. Los diagramas muestran todas las hileras en el patrón vistas por el LD. OJALES: Disminuir por el LD para 4 ojales en el borde derecho. 1 OJAL = tejer 2 pts a partir del centro del frente, hacer 1 HEB (lazada), tejer los 2 pts sig juntamente de derecho. En la hilera sig, tejer la HEB de derecho. Disminuir para los ojales cuando la pieza mida aprox: TALLA S: 20, 29, 38 y 47 cm TALLA M: 20, 29, 38 y 47 cm TALLA L: 24, 33, 42 y 51 cm TALLA XL: 24, 33, 42 y 51 cm TALLA XXL: 25, 35, 45 y 55 cm TALLA XXXL: 25, 35, 45 y 55 cm ------------------------------------------------------ ESPALDA: Tejida de ida y vuelta en ag circular. Montar 54-58-62-66-74-80 pts en ag circular tamaño 8 mm con 1 hilo Cloud o 2 hilos Air. Tejer 2 surcos en PT MUSGO – ver explicación arriba. Cambiar a ag circular tamaño 9 mm. Tejer en pt jersey con 3 pts en pt musgo de cada lado. Cuando la pieza mida 14 cm (= abertura), tejer los 3 pts en pt musgo de cada lado de la pieza en pt jersey y, AL MISMO TIEMPO, montar 1 pt de orillo de cada lado de la pieza al final de las 2 hileras sig = 56-60-64-68-76-82 pts. Tejer los pts de orillo en pt musgo. RECORDARSE DE MANTENER LA MISMA TENSIÓN DE TEJIDO DE LA MUESTRA! Cuando la pieza mida 49-50-51-52-53-54 cm, rematar 2-3-4-4-5-6 pts de cada lado de la pieza para las sisas al principio de las 2 hileras sig = 52-54-56-60-66-70 pts. Cuando la pieza mida 63-65-67-69-71-73 cm, rematar los 10-10-12-12-14-14 pts centrales para el escote = 21-22-22-24-26-28 pts restantes para el hombro. Tejer en pt jersey hasta que la pieza mida 64-66-68-70-72-74 cm. Tejer 1 surco. Rematar. Tejer el otro hombro de la misma manera. FRENTE DERECHO: Montar 31-33-35-37-41-44 pts (incl. 4 pts del borde en pt musgo) en ag circular tamaño 8 mm con 1 hilo Cloud o 2 hilos Air. Tejer 2 surcos – AL MISMO TIEMPO, en la última hilera, aumentar 2 pts distribuidos equitativamente = 33-35-37-39-43-46 pts. Cambiar a ag circular tamaño 9 mm. Tejer de la manera sig por el LD: 4 pts del borde en pt musgo, A.2, 1 r, 16-18-20-22-26-29 pts en pt jersey, 3 pts en pt musgo. Cuando la pieza mida 14 cm, tejer los 3 pts en pt musgo al final de la hilera por el LD en pt jersey y, AL MISMO TIEMPO, montar 1 pt de orillo al final de la hilera por el LD = 34-36-38-40-44-47 pts Tejer los pts de orillo en pt musgo. Recordarse de los OJALES – ver explicación arriba. Cuando la pieza mida 49-50-51-52-53-54 cm, rematar 2-3-4-4-5-6 pts para la sisa al principio de la hilera sig por el LR = 32-33-34-36-39-41 pts. Cuando la pieza mida 64-66-68-70-72-74 cm, ajustar para que la hilera sig sea por el LR, tejer 1 surco sobre todos los pts. Después rematar los primeros 21-22-22-24-26-28 pts para el hombro = 11-11-12-12-13-13 pts restantes para el cuello chal. Continuar en pt musgo sobre estos pts – AL MISMO TIEMPO, tejer hileras cortas, comenzar a partir del escote (LD) de la manera sig: * Tejer 1 surco sobre todos los pts (= 2 hileras tejidas de derecho). En la hilera sig por el LD tejer 9 d, virar y tejer de regreso de derecho *, repetir de *a* hasta que la pieza mida 7-7-8-8-9-9 cm a partir de los pts rematados para el hombro (lado corto). Rematar flojamente todos los pts. FRENTE IZQUIERDO: Tejer como la pieza del frente derecho pero en sentido inverso, tejer A.1 en vez de A.2. Montar los pts de orillo al final de la hilera por el LR. Rematar para la sisa al principio de la hilera por el LD. Rematar para el hombro al principio de la hilera por el LD. MANGA: Tejida de ida y vuelta en ag circular. Montar 24-24-24-26-26-26 pts en ag circular tamaño 8 mm con 1 hilo Cloud o 2 hilos Air. Tejer 2 surcos. Cambiar a ag circular tamaño 9 mm. Tejer en pt jersey con 1 pt de orillo en pt musgo de cada lado. Cuando la pieza mida 9 cm, aumentar 1 pt en el interior de 1 pt de orillo de cada lado de la pieza, repetir los aumentos a cada 9-7-6-5½-4½-4 cm 4-5-6-6-7-8 veces más = 34-36-38-40-42-44 pts. Rematar cuando la pieza mida 47-47-47-46-44-43 cm. NOTA! Medidas más cortas en las tallas más grandes debido a que los hombros son más anchos. Tejer otra manga. ENSAMBLAJE: Hacer la costura de los hombros. Montar las mangas. Hacer la costura de las mangas y de los lados en una sola costura en el interior de 1 pt de orillo, hasta donde los pts de orillo fueron montados (es decir, aprox 14 cm de abertura). Unir el cuello con una costura al centro de la espalda. Coser el cuello a lo largo del escote de la espalda, coser orilla con orilla para evitar una costura abultada. Coser los botones en la pieza del frente izquierdo. |
||||||||||
Explicaciones del diagrama |
||||||||||
|
||||||||||
 |
||||||||||
 |
||||||||||
¿Terminaste este patrón?Entonces, etiqueta tus fotos con #dropspattern o envíalas a la galería #dropsfan. ¿Necesitas ayuda con este patrón?Encontrarás 26 videos tutoriales, un espacio para comentarios/preguntas y más visitando la página del patrón en garnstudio.com © 1982-2026 DROPS Design A/S. Todos los derechos reservados. Este documento, incluyendo todas sus sub-secciones, está protegido por los derechos de autor (copyright). Lee más acerca de lo que puedes hacer con nuestros patrones en la parte de abajo de cada patrón de nuestro sitio. |
||||||||||


Con más de 40 años en el diseño de modelos de punto y de ganchillo, DROPS Design ofrece una de las más vastas colecciones de patrones gratuitos en el internet - traducidos en 17 idiomas. Al día de hoy, contamos con 324 catálogos y 12291 patrones - de los cuales 11689 están traducidos en español.
Nosotros trabajamos con mucho esmero para brindarte lo mejor que las labores de punto y ganchillo tienen para ofrecer,inspiración y consejos, así como hilos de magnífica calidad a precios increíbles! Te gustaría usar nuestros patrones para otro fin además del uso personal? Puedes leer acerca de lo que estás permitida a hacer en el texto de Copyright en la parte de abajo de todos nuestros patrones. Felices labores!
Escribe un comentario sobre DROPS Extra 0-1188
¡Nos encantaría saber qué piensas acerca de este patrón!
Si quieres escribir una pregunta referente al patrón, por favor asegúrate de elegir la categoría correcta en el formulario debajo, para acelerar el proceso de respuesta. Los campos obligatorios están marcados con un *.