
Categorías populares
¿Buscas un hilo?


Comentarios / Preguntas (120)
![]() Simone Schwarz escribió:
Simone Schwarz escribió:
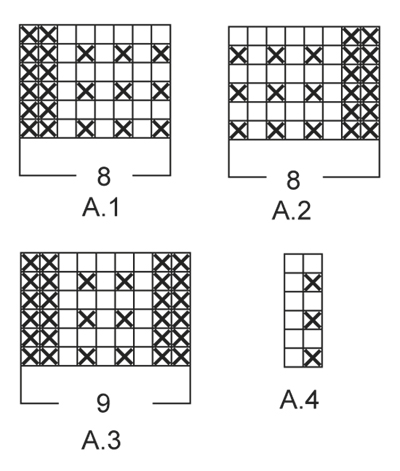
Hallo,ich möchte den Damenpullover Sigrid stricken.Sind in dem Muster die Randmaschen mit eingezeichnet? Muster A 1 beginnt z.B. mit einer linken Masche.Ist das die Randmasche? L.G.Simone
08.11.2024 - 20:01DROPS Design respondió:
Liebe Frau Schwarz, ja genau, schlagen Sie keine zusätzliche Maschen an. Die ersten 8 M werden wie im A.1 und die letzten 8 Maschen wie in A.2 gestrickt. Viel Spaß beim Stricken!
11.11.2024 - 07:47
![]() Shelley escribió:
Shelley escribió:
At displacement, I get that the pattern moves but mine did not match up. Once I do the inc 1 after the edge garter, what am I doing with that increased st on next rows? I did garter, inc and then A3 but does not look right ?
26.01.2024 - 05:53DROPS Design respondió:
Dear Shelley, could this video help you? We are showing there how to work A.3 and displacement. Happy knitting!
26.01.2024 - 08:22
![]() Shelley escribió:
Shelley escribió:
I am up to A3 but if I knit the pattern it does not match up for A1 and A2? I am adding the single garter and my rs row worked but the ws row does not?
21.01.2024 - 21:43DROPS Design respondió:
Dear Shelley, A.3 is just one stitch more than A.1 and A.2, you cast on 2 stitches at the end of the next 2 rows and work 1 edge stitch in garter stitch, then A.3 (work the 2nd new stitch as the first in A.3) over A.1/ and at the end of the row work A.2 as before finish with the first of the new sts as the last st in A.3 + 1 edge st in garter stitch (remaining sts will be worked as before. Happy knitting!
22.01.2024 - 10:34
![]() Heather Nicholls escribió:
Heather Nicholls escribió:
When displacing the pattern either side of the back, how do I work the extra stitches into the 9 stitch diagram, A3? I work the garter stitch edge stitch and have more than 9 stitches to work. Should I repeat the first few stitches of the A3 diagram? Thank you in advance. I’m confused! Heather Nicholls
08.01.2024 - 00:35DROPS Design respondió:
Dear Heather, you don't have any extra stitches, just "displace" or "move" pattern A.3. A.3 will always have 9 stitches; you decrease 1 stitch and increase 1 stitch to move the pattern but they aren't worked in the pattern. Happy knitting!
08.01.2024 - 00:45
![]() Denise Rudnicki escribió:
Denise Rudnicki escribió:
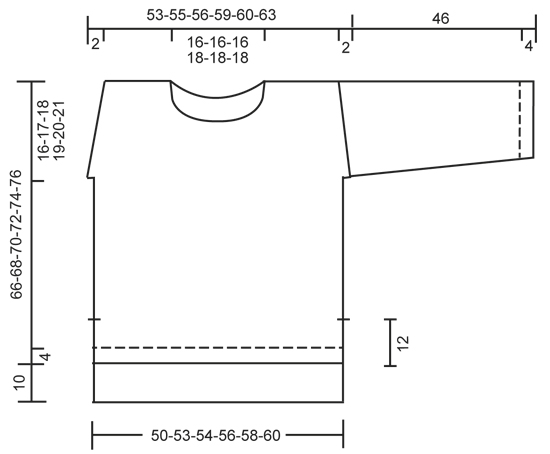
The schematic shows the shoulders sloping toward the neck, but there is no shoulder shaping in the pattern. Have I missed something?
10.08.2022 - 14:13DROPS Design respondió:
Dear Mrs Rudnicki, it looks like you are right, there are no decrease for the shoulders, the lines on the sides should be straight. Thanks for noticing. Happy knitting!
11.08.2022 - 10:08
![]() Cath Rault escribió:
Cath Rault escribió:
I’m with Madiloo! Could you possibly add other photos?? I think part of the problem with this is the back is completely different to the front? The “displacement” is a term i haven’t come across in a knitting pattern before, and I have spent ages trying to work out what you mean. I find the way you write the patterns infuriating, but I’m sure I’ll get the hang of it eventually. I. Love your designs, but the instructions drive me nuts!!!!
20.03.2022 - 19:53DROPS Design respondió:
Dear Mrs Rault, we don't have this jumper anymore so we can unfortunately not add any further picture; but this video shows how to work diagrams A.2 and A.3 as well as how to work the displacement and should help you to understand how to do. Happy knitting!
21.03.2022 - 09:42
![]() Jeannine Karas escribió:
Jeannine Karas escribió:
What is the recommended ease for this pattern?
15.09.2021 - 06:41DROPS Design respondió:
Dear Mrs Karas, measure a similar garment you have and like the shape and compare these measurements to those in the chart, that's the best way to find out the matching size. Read more here. Happy knitting!
15.09.2021 - 07:18
![]() Tania escribió:
Tania escribió:
Can you please clarify how many balls of yarn are required in total for this pattern XXL and XXXL sizes
02.07.2021 - 02:01DROPS Design respondió:
Dear Tania, you will always find the total amount of yarn required in grams in the header, ie in XXL: 500 g and in XXXL: 550 g /50 g a ball DROPS Air = 10 balls in XXL/11 balls in XXXL. Happy knitting!
02.07.2021 - 07:48
![]() Ula escribió:
Ula escribió:
Hello, I would like to ask about how the photo of the jumper matches the pattern. By looking at the photo, I cannot really see the displacement of A3. Is that correct that the jumper in the photo does not include the displacement? Thank you for clarifying!
24.09.2020 - 19:23DROPS Design respondió:
Dear Ula, both picture and pattern includes displacement - you start to displace A.3 after the vent, and repeat the displacement on every 4th row o*a total of 17 to 24 times depending on the size. Happy knitting!
25.09.2020 - 08:54
![]() Elise escribió:
Elise escribió:
Comment faire les augmentations avec le diagramme A-4 ? Merci
11.01.2020 - 14:50DROPS Design respondió:
Bonjour Elise, les augmentations de A.4 doivent se tricoter de sorte que les côtes continuent, vous devez ainsi toujours avoir 1 maille point mousse (=1ère m de A.4), 1 maille jersey (=2ème maille de A.4). Vous allez donc tricoter les augmentations soit comme la 1ère soit comme la 2ème maille. Bon tricot!
13.01.2020 - 09:13
|
|||||||
Sigrid#sigridsweater |
|||||||
|
|
|||||||
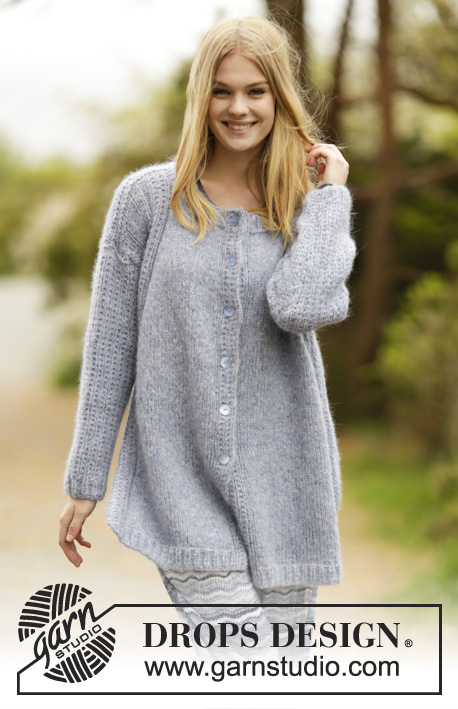
Jersey de punto DROPS con falso raglán, abertura y patrón de relieve en los hombros y las mangas en ”Air”. Talla: S - XXXL.
DROPS 166-18 |
|||||||
|
PUNTO MUSGO (de ida y vta en ag): Trabajar todas las filas de derecho. 1 pliegue = 2 filas de derecho. PATRÓN: Ver los diagramas A.1-A.4 Los diagramas muestran todas las filas del patrón vistas por el LD. TIP PARA LOS AUMENTOS: Aum 1 pt trabajando 1 HEB (lazada). En la sig fila trabajar la HEB como pt retorcido, es decir tejer por detrás del pt en vez de por delante para evitar que se formen agujeros. ATENCIÓN: Trabajar los pts aum dentro de A.4 TIP PARA LAS DISMINUCIONES: Dism 1 pt como sigue: Todas las dism se trabajan por el LD. Dism como sigue después de A.3: 2 pjd Dism como sigue antes de A.3: Trabajar hasta que queden 2 pts antes de A.3, desl 1 pt como de derecho, 1 d., pasar el pt desl por encima. ----------------------------------------------------------------------- JERSEY: Se trabaja de ida y vta en ag circular y se cose una vez finalizado. El delantero es más corto que la espalda. ESPALDA: Mont 95-98-101-107-113-116 pts con ag circular tamaño 5 mm y con Air. Trabajar en pt elástico: A.1 (= 8 pts), 1 d., *2 r., 1 d.*, repetir de * a * hasta que queden 8 pts en la fila, A.2 (= 8 pts). Continuar de la misma manera de ida y vta hasta que la labor mida 4 cm. En la sig fila del LD, cambiar a ag circular tamaño 5.5 mm y trabajar como sigue: A.1, pt jersey sobre los sig 79-82-85-91-97-100 pts, AL MISMO TIEMPO dism 15-14-15-17-21-20 pts repartidos, A.2 = un total de 80-84-86-90-92-96 pts en ag Continuar en pt jersey, trabajar A.1 y A.2 a cada lado como antes hasta que la labor mida 22 cm para todas las tallas. RECUERDE MANTENER LA MISMA TENSIÓN DEL TEJIDO. Al final de las sig 2 filas mont 2 pts nuevos (para marcar las aberturas laterales) = 84-88-90-94-96-100 pts Ahora trabajar A.3 (= 9 pts) sobre A.1 y A.2, es decir dentro de 1 pt orillo en PT MUSGO - ver explicaciones arriba - a cada lado. Cuando la labor mida 26-24-24-23-23-23 cm, comenzar el desplazamiento de A.3 hacia el centro de la espalda. Trabajar 1 pt orillo en pt musgo, aum 1 pt - LEER TIP PARA LOS AUMENTOS, A.3, dism 1 pt - LEER TIP PARA LAS DISMINUCIONES, pt jersey hasta queden 2 pts antes del sig A.3, dism 1 pt, A.3, aum 1 pt, 1 pt orillo en pt musgo. Repetir el desplazamiento de A.3 cada 4ª fila 17-19-20-21-22-24 vcs más. ATENCIÓN: aum siempre dentro del pt orillo en pt musgo a cada lado. AL MISMO TIEMPO cuando la labor mida 60-61-62-63-64-65 cm, mont 1 pt nuevo al final de las sig 2 filas para la sisa = 86-90-92-96-98-102 pts. Continuar con el patrón como antes dentro de 1 pt orillo en pt musgo y 1 pt en pt jersey a cada lado. Cuando la labor mida 74-76-78-80-82-84 cm, cerrar los 24-24-24-26-26-26 pts centrales para el escote y finalizar cada hombro por separado. En la sig fila desde el escote cerrar 1 pt = 30-32-33-34-35-37 pts quedan para cada hombro. Cuando la labor mida 76-78-80-82-84-86 cm, trabajar 1 pliegue sobre todos los pts. Rematar. Trabajar el otro hombro de la misma manera. DELANTERO: Mont los pts y trabajar como la espalda. Cuando la labor mida 12 cm, trabajar como sigue: al final de las sig 2 filas mont 2 pts nuevos (para marcar las aberturas laterales) = 84-88-90-94-96-100.- Ahora trabajar A.3 (= 9 pts) sobre A.1 y A.2 y trabajar 1 pt orillo en pt musgo - ver explicación arriba - a cada lado. Cuando la labor mida 16-14-14-13-13-13 cm, comenzar el desplazamiento de A.3 hacia el centro del delantero como en la espalda. AL MISMO TIEMPO cuando la labor mida 50-51-52-53-54-55 cm, mont 1 pt nuevo al final de las sig 2 filas para la sisa = 86-90-92-96-98-102 pts. Continuar con el patrón dentro de 1 pt orillo en pt musgo y 1 pt en pt jersey a cada lado. Cuando la labor mida 54-56-58-59-61-63 cm, desl los 14-14-14-16-16-16 pts centrales a un gancho aux y finalizar cada hombro por separado. Ahora cerrar en cada fila desde el escote como sigue: 3 pts 1 vez, 2 pts 1 vez y 1 pt 1 vez = 30-32-33-34-35-37 quedan para el hombro. Trabajar el pt orillo hacia el escote en pt musgo. Cuando la labor mida 66-68-70-72-74-76 cm, trabajar 1 pliegue sobre todos los pts. Rematar. Trabajar el otro hombro de la misma manera. MANGA: Se trabaja de ida y vta con ag circular. Mont 39-41-43-43-43-45 pts con ag circular tamaño 5 mm y con Air. Trabajar pt elástico como sigue:1 pt orillo en pt musgo, 1 d., *1 r., 1 d.*, repetir de * a * hasta que quede 1 pt, trabajar 1 pt orillo en pt musgo. Cuando el elástico mida 4 cm, cambiar a ag circular tamaño 5.5 mm y continuar con el patrón como sigue: 1 pt orillo en pt musgo, trabajar el último pt de A.4, repetir A.4 hasta que quede 1 pt. 1 pt orillo en pt musgo. Cuando la labor mida 10 cm aum 1 pt dentro del pt orillo en pt musgo a cada lado. Trabajar los pts aum dentro del patrón A.4. repetir los aum cada 5½-4½-4½-3½-3-3 cm 6-7-7-9-11-11 vcs más = 53-57-59-63-67-69 pts. Cuando la manga mida 46 cm en todas las tallas, trabajar la copa de la manga con filas acortadas como sigue por el LD: Trabajar hasta que queden 8-9-9-10-11-12 pts, girar y trabajar hasta que queden 8-9-9-10-11-12 pts, girar y trabajar hasta que queden 17-19-19-21-22-23 pts, girar y trabajar hasta que queden 17-19-19-21-22-23 pts. Girar y trabajar sobre todos los pts, girar y trabajar sobre todos los pts, Rematar con derecho por el LD. Trabajar la otra manga. TERMINACIÓN: Hacer la costura de los hombros. Montar las mangas al cuerpo dentro de 1 pt orillo en pt musgo. Hacer la costura bajo la manga y de los laterales en una vez, dentro de 1 pt orillo en pt musgo dejando 12 cm para la abertura lateral en la parte inferior del cuerpo (es decir 22 cm en la parte de la espalda y 12 cm en el delantero). CENEFA DEL ESCOTE: Comenzar desde el centro de la espalda y recoger aprox 120-130 pts (incl los pts del gancho aux) con ag tamaño 5 mm. Trabajar 1 vta de revés por el LR y al mismo tiempo ajustar el nº de pts hasta 75-75-75-84-84-84. Ahora trabajar 3 cm en pt elástico (= 1 d./2 r.). Rematar con derecho sobre derecho y revés sobre revés. |
|||||||
Explicaciones del diagrama |
|||||||
|
|||||||
 |
|||||||
 |
|||||||
¿Terminaste este patrón?Entonces, etiqueta tus fotos con #dropspattern #sigridsweater o envíalas a la galería #dropsfan. ¿Necesitas ayuda con este patrón?Encontrarás 31 videos tutoriales, un espacio para comentarios/preguntas y más visitando la página del patrón en garnstudio.com © 1982-2026 DROPS Design A/S. Todos los derechos reservados. Este documento, incluyendo todas sus sub-secciones, está protegido por los derechos de autor (copyright). Lee más acerca de lo que puedes hacer con nuestros patrones en la parte de abajo de cada patrón de nuestro sitio. |
|||||||


Con más de 40 años en el diseño de modelos de punto y de ganchillo, DROPS Design ofrece una de las más vastas colecciones de patrones gratuitos en el internet - traducidos en 17 idiomas. Al día de hoy, contamos con 324 catálogos y 12290 patrones - de los cuales 11685 están traducidos en español.
Nosotros trabajamos con mucho esmero para brindarte lo mejor que las labores de punto y ganchillo tienen para ofrecer,inspiración y consejos, así como hilos de magnífica calidad a precios increíbles! Te gustaría usar nuestros patrones para otro fin además del uso personal? Puedes leer acerca de lo que estás permitida a hacer en el texto de Copyright en la parte de abajo de todos nuestros patrones. Felices labores!
Escribe un comentario sobre DROPS 166-18
¡Nos encantaría saber qué piensas acerca de este patrón!
Si quieres escribir una pregunta referente al patrón, por favor asegúrate de elegir la categoría correcta en el formulario debajo, para acelerar el proceso de respuesta. Los campos obligatorios están marcados con un *.