
Categorías populares
¿Buscas un hilo?


Comentarios / Preguntas (109)
![]() CHATILLON escribió:
CHATILLON escribió:
Bonjour, nous aimerions avoir le diagramme complet pour realiser ce pull. Merci par avance Cordialement Me CHATILLON
18.11.2018 - 17:00DROPS Design respondió:
Bonjour Mme Chatillon, nous n'avons pas de diagramme complet pour chaque taille, suivez bien attentivement en même temps les diagrammes et les explications pour votre taille. Bon crochet!
19.11.2018 - 09:08
![]() Dina escribió:
Dina escribió:
I am sorry to say that my yoke size is small to start the diagram so May I add more rows to increase its length and to be under bust as shown in the photo ...or I had to repeat work by adding more rows in the WS ie working row 1RS then 3more rows then row 2RS then 3more rows and so on????!please advice
06.08.2018 - 17:02DROPS Design respondió:
Dear Dina, make sure to check and keep your tension, you should have 18 dc x 9 rows = 10 x 10 cm - if your tension is still too tight in height you can adjust the yoke length working some more rows evenly between the rows with increases. Hapy crocheting!
07.08.2018 - 09:44
![]() Dina escribió:
Dina escribió:
I am sorry to say that my yoke size is small to start the diagram so May I add more rows to increase its length and to be under bust as shown in the photo ...or I had to repeat work by adding more rows in the WS ie working row 1RS then 3more rows then row 2RS then 3more rows and so on????!please advice
06.08.2018 - 16:59
![]() Carrie escribió:
Carrie escribió:
On next row from RS, inc as follows: Inc 1 dc on each side of every marker (= 24 dc inc), repeat inc on every row from RS 3-3-4-6-7-9 times in total, then inc before every marker (= 12 dc inc), repeat inc on every row from RS 4-4-4-2-2-0 times in total I'm having trouble with this part. I did the 1st row but don't understand how many more rows I am supposed yo do or how exactly to increase... Can you please help?
31.07.2018 - 03:25DROPS Design respondió:
Dear Carrie, you will now increase for the round yoke 1 dc on each side of each marker (= 24 sts increased). Depending on your size you will work these increases on every row 3-3 times in total in size S and M, 4 times in total in size L, 6 times in total in size XL, 7 times in total in size XXL, 9 times in total in size XXXL. Then repeat these increase every other row 4 times in total in size S, M and L and 2 times in total in total in size XL and XXL (no increase every other row in the largest size). Happy crocheting!
31.07.2018 - 10:01
![]() Ellen escribió:
Ellen escribió:
Your explanation on the chains at beginning of pattern A1 is very confusing!! Looking through peoples questions you haven't answered simply you just say follow A1,A2,A3 then join. BUT the chain shows especially on bobble row. Does the starting point after the joins veer to left each time and not run vertically down the back of jumper? The start of the row of bobbles is particually confusing. To recap PLEASE explain starting chains IN VERY EASY DIALOGUE.
29.06.2018 - 18:03DROPS Design respondió:
Dear Ellen, you start either A.1 depending on the row with either 1, 3 or4 chains and finish each round with 1 sl st in the 1st, 3rd or 4th chain from beg of round. On the row with bobbles you start with 4 ch (then work 4 ch = 1st sch-space and 1 boblle, 3 ch = A.1) and finish with 1 sl st in the 4th ch from beg of round. Happy crocheting!
02.07.2018 - 08:49
![]() Sarah escribió:
Sarah escribió:
When doing the row before bobble it starts 3 chains then 2 chains 4 trebles 2 chains etc. At end of row 2 chains and sl st into previous 3 chains. I am left with a single line of chains where I have joined!!! Which doesn't look right! To recap- 4 trebles,2 Ch joined into 3 Ch at start which looks as if I have one line treble in the pattern. Please explain step by step where I am going wrong with the starting chains
28.06.2018 - 14:54DROPS Design respondió:
Dear Sarah, when working A.z you start round with A.1 and finish the round with A.3 = 2 chains at the end of last repeat before the sl st joining the beg of round. Happy crocheting!
28.06.2018 - 18:00
![]() Paula M escribió:
Paula M escribió:
Es muy enredada la explicación, mucha palabras, especialmente para el canesu, debieran colocar un video de cómo aumentar los puntos y especificar bien dónde comienzan los marcadores,los puntos se aumentan antes o después. Prefiero los patrones y no tanta letra sin sentido, dice repetir de *-* y ves cuentos de asteriscos(✴), al final no sabes de donde a dónde se repite!
27.06.2018 - 20:23
![]() Sarah escribió:
Sarah escribió:
WHEN STARTING THE PATTERN ARE THE 3 CHAINS AT BEGINNING TO BE USED AS THE FIRST TREBLE STITCH? IF NOT I AM CONFUSED ON WHAT TO DO WITH THEM AT THE JOINS????
26.06.2018 - 17:42DROPS Design respondió:
Dear Sarah, the 3 ch replace the first st at beg of row only when working piece back and forth, finish then each row with a sl st in the 3rd ch from beg of row, turn piece, work 3 ch at the beg of row and finish with 1 sl st in the 3rd ch from beg of round. When working diagrams, the first st in A.1 shows how to start and finish the round. Happy crocheting!
27.06.2018 - 08:19
![]() Yvonne escribió:
Yvonne escribió:
On lacey days jumper continuing with my previous question i cannot get neck size correct, far to wide and it is shoulder high not neck height?? i am determined to get it right but struggling how to do it!! i have unpicked it endlesss times! tension, chains and hook all correct!!!!
19.06.2018 - 15:14DROPS Design respondió:
Deaer Yvonne, see previous answer and check the number of chains and number of sts in your size. Hapy crocheting!
19.06.2018 - 15:54
![]() Yvonne escribió:
Yvonne escribió:
On lacey days jumper i am not getting on too good,!!!! I have correct amount of chains at the start,correct tension, i have just finished yoke, but the neck opening is far too big and it is too far down my back??? there is no way when i do neck edge it will be as high as the picture. what have i done wrong.?
19.06.2018 - 14:25DROPS Design respondió:
Dear Yvonne, at the very first round on yoke, you will skip chains evenly so that you should have 124-124-132-136-140-148 tr at the end of this first round over the 153-153-163-168-173-183 ch (this is to avoid that the foundation chain is too tight and prevent a tight neck edge). Happy crocheting!
19.06.2018 - 15:53
|
||||||||||||||||||||||||||||||||||
Lacey Days Jumper#laceydaysjumper |
||||||||||||||||||||||||||||||||||
 |
 |
|||||||||||||||||||||||||||||||||
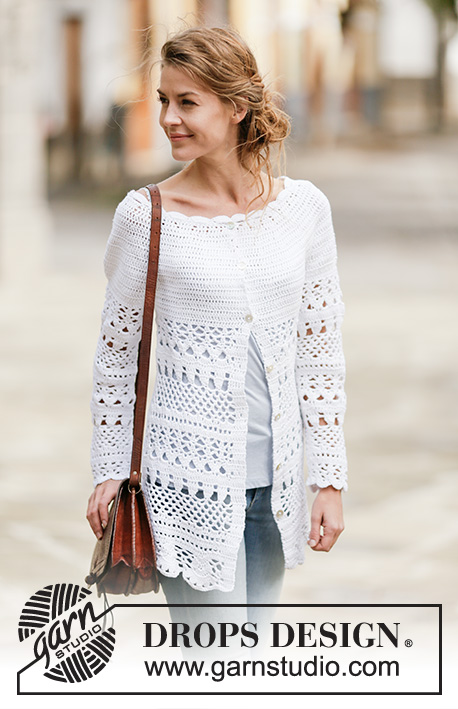
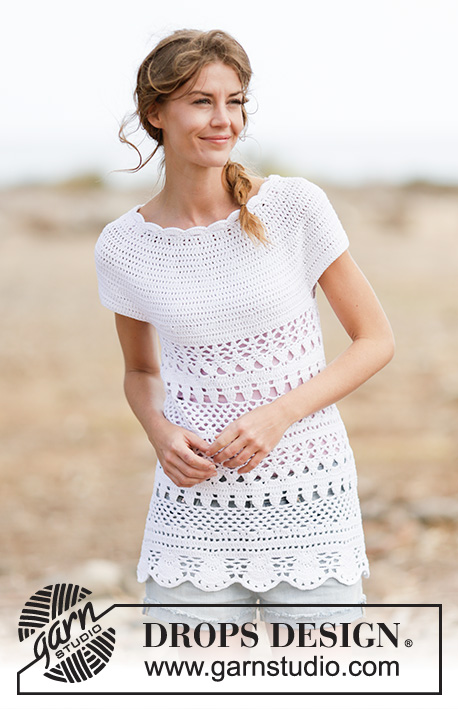
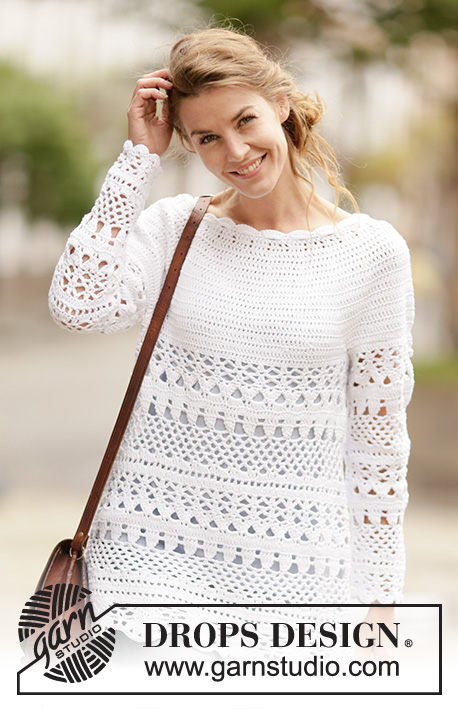
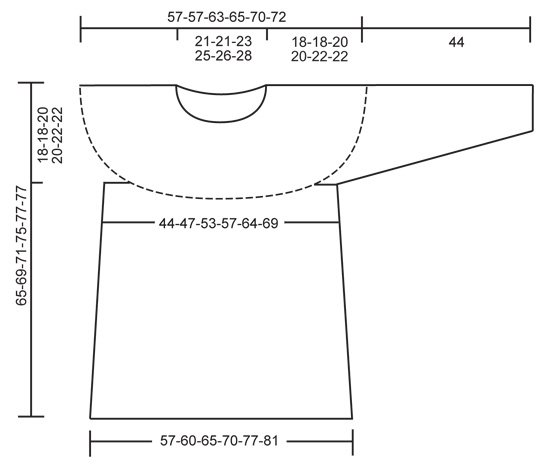
Jersey de ganchillo DROPS con patrón de calados y canesú redondo, tejido de arriba abajo en ”Cotton Light”. Talla: S - XXXL.
DROPS 162-27 |
||||||||||||||||||||||||||||||||||
|
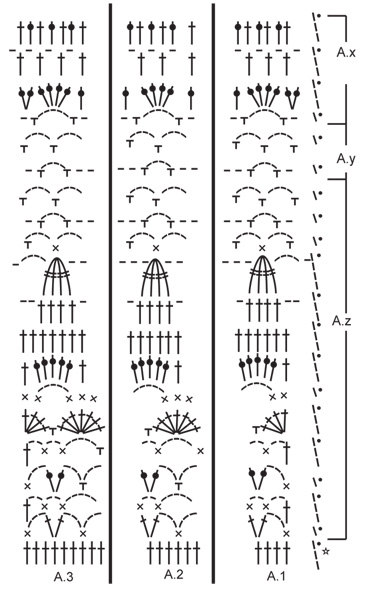
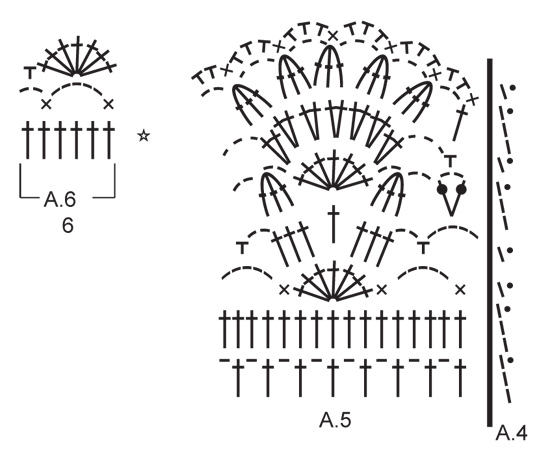
INFORMACIÓN PARA LA REALIZACIÓN DEL TRABAJO: Se aplica cuando trabajamos de ida y vta. Sustituir el primer p.a. de cada fila de p.a. por 3 p.de cad, finalizar la fila con 1 p.e. en el 3er p.de cad. TIP PARA LOS AUMENTOS: Aum 1 p.a. trabajando 2 p.a. en 1 p.a. TIP PARA LAS DISMINUCIONES: Trabajar 1 p.a. pero sin hacer la última lazada (= 2 pts en el ganchillo), trabajar el sig p.a. pero al hacer la última lazada pasar el hilo por todos los pts del ganchillo = 1 p.a. dism. PATRÓN: Ver los diagramas A.1- A.6. A.4 muestra como comienza y termina el patrón al trabajar en redondo. ----------------------------------------------------------------------- CANESÚ: Se trabaja de arriba abajo desde el centro de la espalda. Trabajar 153-153-163-168-173-183 p.de cad con ag de ganchillo tamaño 4 mm con Cotton Light y formar 1 anillo con 1 p.e en el primer p.de cad. Trabajar la sig vta como sigue: 3 p.de cad (= 1 p.a.), 1 p.a. en el primer p.de cad del anillo, 1 p.a. en cada uno de los sig 2 p.de cad, * saltar 1 p.de cad, 1 p.a. en cada uno de los sig 4 p.de cad *, repetir de *-* = 124-124-132-136-140-148 p.a.. Ahora trabajar la labor de ida y vta. Unir las filas al final de la fila con 1 p.e. en el primer p.de cad de la fila. Girar la labor. ¡LEER TIP PARA LA REALIZACIÓN DEL TRABAJO! Insertar 12 marcapuntos (MP) en la labor como sigue: Trabajar 15-15-17-18-19-21 p.a. AL MISMO TIEMPO aum 1-5-3-3-4-2 p.a. repartidos – LEER TIP PARA LOS AUMENTOS, insertar el primer MP, * trabajar 4 p.a., insertar el siguiente MP*, repetir de *a* una vez más, trabajar 16 p.a., insertar el sig MP, *trabajar 4 p.a., insertar el sig MP*, repetir de *-* 1 vez más, trabajar 30-30-34-36-38-42 p.a. AL MISMO TIEMPO aum 2-10-6-6-8-4 p.a. repartidos, insertar el sig MP, * trabajar 4 p.a., insertar el sig MP*, repetir de *a* una vez más, trabajar 16 p.a., insertar el sig MP, *trabajar 4 p.a., insertar el sig MP*, repetir de *-* 1 vez más, trabajar 15-15-17-18-19-21 p.a. AL MISMO TIEMPO aum 1-5-3-3-4-2 p.a. repartidos = 128-144-144-148-156-156 p.a. RECUERDE MANTENER LA MISMA TENSIÓN DEL TEJIDO! Girar la labor. En la sig fila por el LD, inc as follows: Aum 1 p.a. a cada lado de cada MP (= 24 p.a. aum), repetir los aum en cada fila del LD un total de 3-3-4-6-7-9 vcs, después aum antes de cada MP (= 12 p.a. aum), repetir los aum en cada fila del LD un total de 4-4-4-2-2-0 vcs = 248-264-288-316-348-372 p.a. La labor mide aprox. 17-17-19-19-21-21 cm. En la sig vta trabajar como sigue: 35-38-42-47-53-57 p.a. (media espalda), 8 p.de cad (sisa), saltar 54-56-60-64-68-72 p.a. de la fila anterior (para ser usados para la manga más adelante), 70-76-84-94-106-114 p.a. AL MISMO TIEMPO aum 1-1-3-1-1-3 p.a. repartidos (delantero), 8 p.de cad (sisa), saltar 54-56-60-64-68-72 p.a. de la fila anterior (para ser usados para la manga más adelante) y 35-38-42-47-53-57 p.a. (mitad de la espalda) = 157-169-187-205-229-247 p.a./p.de cad. Ahora trabajar la labor en redondo sin girar. Continuar trabajando como sigue: A.1, A.2 un total de 24-26-29-32-36-39 vcs en el ancho, finalizar con A.3. Trabajar las primeras 7 vtas de A.z. En la 8ª vta de A.z (= vta de p.a.) aum 6 p.a. repartidos – LEER TIP PARA LOS AUMENTOS = 163-175-193-211-235-253 p.a.. Continuar trabajando A.z como antes pero ahora trabajar A.2 25-27-30-33-37-40 vcs en el ancho. Cuando se ha trabajado A.z una vez en vertical, trabajar A.y sobre A.z un total de 1-2-2-3-3-3 vcs en vertical. Ahora trabajar A.x sobre A.y. En la 2ª vta de A.x aum 12 p.a. repartidos = 175-187-205-223-247-265 p.a. Continuar trabajando A.x como antes pero ahora trabajar A.2 27-29-32-35-39-42 vcs en el ancho. En la última vta de A.x aum 6 p.a. repartidos = 181-193-211-229-253-271 p.a. Ahora trabajar A.z sobre A.x (ahora trabajar A.2 28-30-33-36-40-43 vcs en el ancho). En la 8ª vta de A.z aum 12 p.a. repartidos = 193-205-223-241-265-283 p.a. Continuar trabajando A.z como antes pero ahora trabajar A.2 30-32-35-38-42-45 vcs en el ancho. Cuando se ha trabajado A.z 1 vez en vertical, trabajar A.y sobre A.z un total de 1-2-2-3-3-3 vcs en vertical. Ahora trabajar A.x sobre A.y. En la 2ª vta de A.x aum 6 p.a. repartidos = 199-211-229-247-271-289 p.a. Continuar trabajando A.x como antes pero ahora trabajar A.2 31-33-36-39-43-46 vcs en el ancho. En la última vta de A.x aum 9-13-11-9-17-15 p.a. repartidos = 208-224-240-256-288-304 p.a. Ahora trabajar como sigue: A.5 un total de 13-14-15-16-18-19 vcs (A.4 muestra como comienza y termina la vta). Asegurar el hilo cuando se haya trabajado A.5 una vez en vertical. La labor mide aprox. 65-69-71-75-77-77 cm. MANGA: Trabajar en redondo, de arriba abajo. Comenzar trabajando en el centro bajo la manga como sigue: Trabajar 1 p.b. en el 5º p.de cad de los 8 p.de cad trabajados en la sisa en la parte del cuerpo. Trabajar 3 p.de cad (= 1 p.a.). Ahora trabajar 1 p.a. en cada uno de los sig 3 p.de cad. Después trabajar 1 p.a. en cada p.a.sobre la manga AL MISMO TIEMPO dism 1-3-1-5-3-1 p.a. repartidos – LEER TIP PARA LAS DISMINUCIONES, antes de trabajar 1 p.a. en cada uno de los 4 p.de cad restantes bajo la manga = 61-61-67-67-73-79 p.a. Continuar trabajando como sigue: A.1, A.2 8-8-9-9-10-11 vcs en el ancho, finalizar con A.3. En la 8ª vta de A.z (= vta de p.a.) dism 6 p.a. repartidos = 55-55-61-61-67-73 p.a. Continuar trabajando A.z como antes pero ahora trabajar A.2 7-7-8-8-9-10 vcs en el ancho. Cuando se ha trabajado A.z una vez en vertical, trabajar A.y sobre A.z. Cuando se ha trabajado A.y una vez en vertical, trabajar A.x sobre A.y. En la última vta de A.x dism 6 p.a. repartidos = 49-49-55-55-61-67 p.a. Ahora trabajar A.z sobre A.x. A.2 se ha trabajado ahora 6-6-7-7-8-9 vcs en el ancho. En la 8ª vta dism 6 p.a. repartidos = 43-43-49-49-55-61 p.a. Cuando se ha trabajado A.z 1 vez en vertical trabajar A.y sobre A.z. Ahora trabajar A.x sobre A.y. En la última vta de A.x dism 0-0-0-0-6-6 p.a. repartidos = 43-43-49-49-49-55 p.a. Ahora trabajar las primeras 5 vtas de A.z. A.2 se ha trabajado ahora 5-5-6-6-6-7 vcs en el ancho. Rematar. La manga mide aprox. 44 cm en todas las tallas. Trabajar la otra manga de la misma manera. CENEFA DEL ESCOTE: Se trabaja en redondo. Trabajar una cenefa alrededor del escote dentro de la fila de montaje de p.de cad con aguja de ganchillo tamaño 4 mm y Cotton Light. Comenzar en el centro de la espalda por el LD como sigue: Trabajar hacia arriba 114-114-120-120-126-126 p.a. en la vta de p.de cad. Ahora trabajar A.6 19-19-20-20-21-21 vcs en el ancho. Asegurar el hilo |
||||||||||||||||||||||||||||||||||
Explicaciones del diagrama |
||||||||||||||||||||||||||||||||||
|
||||||||||||||||||||||||||||||||||
 |
||||||||||||||||||||||||||||||||||
 |
||||||||||||||||||||||||||||||||||
 |
||||||||||||||||||||||||||||||||||
¿Terminaste este patrón?Entonces, etiqueta tus fotos con #dropspattern #laceydaysjumper o envíalas a la galería #dropsfan. ¿Necesitas ayuda con este patrón?Encontrarás 15 videos tutoriales, un espacio para comentarios/preguntas y más visitando la página del patrón en garnstudio.com © 1982-2026 DROPS Design A/S. Todos los derechos reservados. Este documento, incluyendo todas sus sub-secciones, está protegido por los derechos de autor (copyright). Lee más acerca de lo que puedes hacer con nuestros patrones en la parte de abajo de cada patrón de nuestro sitio. |
||||||||||||||||||||||||||||||||||


Con más de 40 años en el diseño de modelos de punto y de ganchillo, DROPS Design ofrece una de las más vastas colecciones de patrones gratuitos en el internet - traducidos en 17 idiomas. Al día de hoy, contamos con 324 catálogos y 12290 patrones - de los cuales 11685 están traducidos en español.
Nosotros trabajamos con mucho esmero para brindarte lo mejor que las labores de punto y ganchillo tienen para ofrecer,inspiración y consejos, así como hilos de magnífica calidad a precios increíbles! Te gustaría usar nuestros patrones para otro fin además del uso personal? Puedes leer acerca de lo que estás permitida a hacer en el texto de Copyright en la parte de abajo de todos nuestros patrones. Felices labores!
Escribe un comentario sobre DROPS 162-27
¡Nos encantaría saber qué piensas acerca de este patrón!
Si quieres escribir una pregunta referente al patrón, por favor asegúrate de elegir la categoría correcta en el formulario debajo, para acelerar el proceso de respuesta. Los campos obligatorios están marcados con un *.