
Categorías populares
¿Buscas un hilo?


Comentarios / Preguntas (53)
![]() JOELLE BELLOC escribió:
JOELLE BELLOC escribió:
Bonsoir Je n'ai ni aiguille circulaire ni double pointe puis je faire le modèle quand même et comment? Merci
12.08.2015 - 22:16DROPS Design respondió:
Bonjour Mme Belloc, la veste se tricote sur aiguille circulaire pour avoir suffisamment de place pour y loger toutes les mailles. Vous pouvez tout à fait tricoter sur des aiguilles droites, toutefois pensez à bien vérifier votre tension (vos mailles seront beaucoup plus serrées), ou apprenez à l'aide de nos vidéos comment tricoter en allers et retours sur aiguille circulaire, votre magasin DROPS saura vous aider et vous conseiller. Bon tricot!
13.08.2015 - 09:37
![]() Scholiams escribió:
Scholiams escribió:
Would this be achievable to me , I am an absolute beginner at knitting?
14.06.2015 - 14:37DROPS Design respondió:
Dear Mrs Scholiams, you will find under the tab "videos" some related videos to the techniques used in that pattern. Should you need any further assistance remember you can get help from your DROPS store or ask your question here. Happy knitting!
15.06.2015 - 10:32
![]() Andrea escribió:
Andrea escribió:
Hi there, Thank you for replay this, but I still don't know what to do... In order to start right front piece do I have to cut the yarn? Because the yarn is on the another edge right?
12.05.2015 - 22:08DROPS Design respondió:
Dear Andrea, that's correct, when you have worked left front piece, cut the yarn and put sts onto a st holder. Slip sts from right front piece onto needle and join yarn to work right front piece, cut the yarn and put sts onto a st holder. Repeat for back piece. Then work all sts together joining yarn again. Happy knitting!
13.05.2015 - 10:33Andrea escribió:
I just finished working on the left front piece. It says to move that piece to a stich holder and work on theright front piece. I don't really understand how because the left front piece has the yarns do I cast of and work on the right front piece or?
12.05.2015 - 00:37DROPS Design respondió:
Dear Andrea, after you have worked the sts on left front piece, put the sts on a st holder and work the front piece as left piece and put sts on another st holder. Work then back sts from back piece the same height as both front pieces and then move all sts back onto needle and work all pieces together. Happy knitting!
12.05.2015 - 09:35
![]() Helen escribió:
Helen escribió:
Do you have a size guide anywhere on the web site?
27.04.2015 - 10:52DROPS Design respondió:
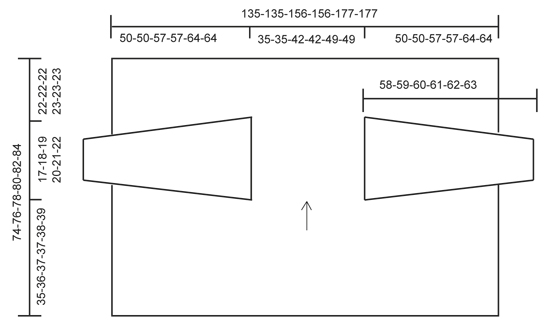
Dear Helen, you will find at the bottom of the pattern a measurement chart with all measures for each size in cm taken flat from side to side. Compare these to a similar garment you have and like the shape to find out the matching size. Happy knitting!
27.04.2015 - 11:51Andrea Alejandra Silveira De Anton escribió:
Hola escribo desde uruguay, si no tengo agujas circulares como puedo adaptarlo a 2 agujas? Muchas grcs
18.04.2015 - 20:03DROPS Design respondió:
Hola Andrea, la única razón para usar ag circular con este patrón es que en ag rectas es muy incomodo trabajar porque son muchos pts para distribuir y es dificil que quepan. Por lo demás se trabajaría igual.
20.04.2015 - 10:37Martha May escribió:
I have question on 158-28 In armhole area. I have 84 stitches on needles and 144 stitches on holder. Then I knitted 7 garter stitches and 54 stockinette Then 7 garter stitches for armhole. But all of this does not add up to 84 stitches. What did I do wrong?
14.04.2015 - 15:27DROPS Design respondió:
Dear Mrs May, when you work on the 84 sts for left front piece (the 144 sts for right front piece and back piece are onto a st holder), you continue on these 84 sts with 3 sts in garter st towards armhole (= towards sts on st holder) and 2 garter sts towards mid front (as before). The 7 sts worked in garter sts under each armhole are worked before dividing work. Happy knitting!
14.04.2015 - 16:17
![]() Mamiou escribió:
Mamiou escribió:
Ich finde die Jacke seeehr schön! Ich bin mir aber mit der Größe nicht sicher ... normalerweise trage ich Gr.42 - wäre das L oder XL ? Danke schonmal für die Hilfe !
14.02.2015 - 22:37DROPS Design respondió:
Am besten schauen Sie sich die Maße ganz unten in der Maßskizze an und entscheiden damit, welche Größe Ihnen am besten passt. Viel Spaß beim Stricken!
15.02.2015 - 19:14Donna W. Hall escribió:
Question in JACKET section: The last sentence says....."On next row from RS bind off the middle of the 7 sts in garter st for armhole and work each part separately to make an opening for the armhole." I am not sure WHICH sts to bind off because I have worked 2 sections of 7 sts in garter. I am very unsure about the instructions to "bind off the MIDDLE of the 7 sts". Please help! I love the jacket and can't wait to finish it. Thank you so much! Donna
05.02.2015 - 22:06DROPS Design respondió:
Dear Mrs Hall, you will bind off the middle st in each of the 7 sts garter sts (under armhole), you will then have 3 separate parts: right front piece, (1 st bound off), back piece, (1 st bound off), left front piece (seen from RS). Continue each part separately. Happy knitting!
06.02.2015 - 11:22
![]() Maya escribió:
Maya escribió:
Bonjour à tous, après avoit tricoté bonnets; écharpes et snood, je souhaite enfin me lancer sur de plus gros ouvrages. Les instructions ne sont pas très claires pour moi à ce niveau là (excusez, je débute :)) : "tricoter 2 côtes au POINT MOUSSE. Continuer avec l'aiguille circulaire 5 et tricoter en jersey avec 2 m lis au point mousse de chaque côté jusqu'à la fin. Est-ce que cela signifie que sur mon rang je vais avoir : 2 lis - 2 cotes mousses - le reste en jersey ?
18.01.2015 - 16:56DROPS Design respondió:
Bonjour Maya, 1 côte mousse = 2 rangs endroit - vous tricotez 4 rangs endroit sur toutes les mailles puis continuez ainsi: 2 m point mousse, jersey sur les mailles suivantes et vous terminez par 2 m point mousse. Ces 2 m de chaque côté se tricotent au point mousse tout le temps jusqu'à la fin. Bon tricot!
19.01.2015 - 11:52
|
|
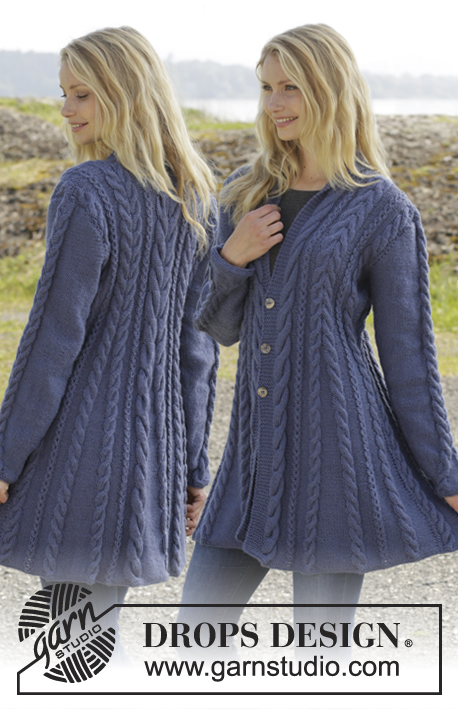
Ballade#balladecardigan |
|
 |
 |
Chaqueta de punto DROPS en ”Alpaca Bouclé.” Talla: S - XXXL.
DROPS 158-28 |
|
|
PUNTO MUSGO (de ida y vta en ag): Trabajar todas las filas de derecho. 1 pliegue = 2 filas de derecho. -------------------------- CHAQUETA: Se trabaja de ida y vta con ag circular para tener espacio suficiente para todos los pts. Mont 230-230-266-266-302-302 pts en ag circular tamaño 4 mm con Alpaca Bouclé. Trabajar 2 pliegues en PT MUSGO - ver explicación arriba. Cambiar a ag circular tamaño 5 mm y trabajar en pt jersey con 2 pts de la cenefa en pt musgo a cada lado hasta finalizar las medidas. RECUERDE MANTENER LA MISMA TENSIÓN DE LA MUESTRA! Trabajar hasta que la labor mida 34-35-36-36-37-38 cm. En la sig fila por el LD trabajar como antes sobre los primeros 81-81-93-93-105-105 pts, 7 pts en pt musgo, 54-54-66-66-78-78 pts en pt jersey, 7 pts en pt musgo y trabajar como antes sobre los últimos 81-81-93-93-105-105 pts. Trabajar por el LR como antes con 7 pts en pt musgo igual que por el LD. En la sig fila por el LD cerrar el pt central de los 7 pts en pt musgo para la sisa y trabajar cada lado por separado para hacer una abertura para la sisa. DELANTERO IZQUIERDO: Dejar los primeros 84-84-96-96-108-108 pts en la ag y desl los 144-144-168-168-192-192 pts restantes a un gancho aux. Trabajar en pt jersey con 3 pts en pt musgo hacia la sisa y 2 pts de la cenefa en pt musgo hacia el centro del delantero. Trabajar hasta que la labor mida 51-53-55-56-58-60 cm. Desl los pts a un gancho aux y trabajar el delantero derecho. DELANTERO DERECHO: Desl los 84-84-96-96-108-108 pts más externos de vta a la ag, trabajar como el delantero izquierdo. Asegúrate de tejer el mismo largo del delantero derecho que del delantero izquierdo. Desl los pts a 1 gancho aux y trabajar la espalda. ESPALDA: Desl los 60-60-72-72-84-84 pts centrales de vta a la ag. Trabajar en pt jersey con 3 pts en pt musgo a cada lado. Trabajar hasta que la labor mida 51-53-55-56-58-60 cm. Asegurate de que la espalda tiene la misma largura que los dos delanteros. Desl las tres partes de vta a la ag y trabajar como sigue: Pt jersey con 2 pts de la cenefa en pt musgo sobre los primeros 81-81-93-93-105-105 pts, 3 pts en pt musgo, mont 1 pt nuevo, 3 pts en pt musgo, pt jersey sobre 54-54-66-66-78-78 pts, 3 pts en pt musgo, mont 1 pt nuevo, 3 pts en pt musgo, pt jersey y 2 pts de la cenefa en pt musgo sobre los últimos 81-81-93-93-105-105 pts. Trabajar en pt musgo y pt jersey de la misma manera por el LR. Ahora trabajar en pt jersey con 2 pt de la cenefa en pt musgo hasta que la labor mida 73-75-77-89-81-84 cm. Cambiar a ag circular tamaño 4 mm y trabajar 2 pliegues. Rematar flojo por el LD. MANGA: Se trabaja de ida y vta en ag circular. Mont 32-35-37-38-39-41 pts en ag circular tamaño 4 mm con Alpaca Bouclé. Trabajar 4 pliegues. Cambiar a ag circular tamaño 5 mm y trabajar en pt jersey con 1 pt orillo a cada lado hasta finalizar las medidas. Cuando la labor mida 9 cm, aum 1 pt dentro de 1 pt orillo a cada lado de la labor. Repetir los aum cada 3-3-3-2½-2½-2½ cm un total de 13-13-14-15-16-17 vcs más = 60-63-67-70-73-77 pts en la ag. Trabajar en pt jersey hasta que la labor mida 52-53-54-55-56-57 cm. Cerrar 1 pt orillo a cada lado de la labor al inicio de las sig 2 filas = 58-61-65-68-71-75 pts restantes en la ag. Ahora cerrar para la copa de la manga a cada lado de la labor al inicio de cada fila como sigue: Cerrar 4 pts un total de 5 vcs = 18-21-25-28-31-35 pts restantes en la fila. Rematar los pts restantes. La labor mide aprox 58-59-60-61-62-63 cm. TERMINACIÓN: Montar las mangas. Coser la costura bajo la manga dentro de 1 pt orillo |
|
 |
|
¿Terminaste este patrón?Entonces, etiqueta tus fotos con #dropspattern #balladecardigan o envíalas a la galería #dropsfan. ¿Necesitas ayuda con este patrón?Encontrarás 16 videos tutoriales, un espacio para comentarios/preguntas y más visitando la página del patrón en garnstudio.com © 1982-2026 DROPS Design A/S. Todos los derechos reservados. Este documento, incluyendo todas sus sub-secciones, está protegido por los derechos de autor (copyright). Lee más acerca de lo que puedes hacer con nuestros patrones en la parte de abajo de cada patrón de nuestro sitio. |
|


Con más de 40 años en el diseño de modelos de punto y de ganchillo, DROPS Design ofrece una de las más vastas colecciones de patrones gratuitos en el internet - traducidos en 17 idiomas. Al día de hoy, contamos con 325 catálogos y 12298 patrones - de los cuales 11726 están traducidos en español.
Nosotros trabajamos con mucho esmero para brindarte lo mejor que las labores de punto y ganchillo tienen para ofrecer,inspiración y consejos, así como hilos de magnífica calidad a precios increíbles! Te gustaría usar nuestros patrones para otro fin además del uso personal? Puedes leer acerca de lo que estás permitida a hacer en el texto de Copyright en la parte de abajo de todos nuestros patrones. Felices labores!
Escribe un comentario sobre DROPS 158-28
¡Nos encantaría saber qué piensas acerca de este patrón!
Si quieres escribir una pregunta referente al patrón, por favor asegúrate de elegir la categoría correcta en el formulario debajo, para acelerar el proceso de respuesta. Los campos obligatorios están marcados con un *.