
Categorías populares
¿Buscas un hilo?


Comentarios / Preguntas (147)
![]() Anna escribió:
Anna escribió:
Hoi , de rechterkant is klaar. Erg mooi! Maar nu de linkerkant, tot en met de eerste naald snap ik. Is het zo dat je nu het patroon breit op de achterkant en de voorkant gewoon volgt? En bij A1 krijg ik aan de voorkant de ene omslag goed maar de andere omslag gaat de verkeerde kant op ! Wat doe ik fout? Alvast bedankt Anna
10.09.2015 - 18:35DROPS Design respondió:
Hoi Anna. Je begint met het breien van de 2e nld (verkeerde kant) en breit eerst de 2e nld van A.1 en A.3, maar het zou helemaal geen verschil maken hoe je het patroon op de goede kant breit, dus het omslag zou ook niet de verkeerde kant op gaan.
11.09.2015 - 14:05
![]() Nicky escribió:
Nicky escribió:
Hallo, ich bin da auch gestolpert. Bin immer wieder an der Anleitung an einer Stelle gescheitert. Wie unten vom Team schon aufgezählt wurde: * stricken Sie 5 kraus re, 2 re, 3 li, 2 re, A.1, 1 re, A.2A-A.2C, 2 re wenden und stricken zurück usw. Allerdings steht hier in der Schriftlichen Anleitung: * 2 M re, A.1 (= 23 M) ***(hier wenden)***, 1 M re, A.2A, A.2 B über die nächsten 8-14-20 M, A.2 C, 2 M re (hier wenden) Da ist doch ein *Wenden* (das mit den 3 Sternen) zu viel oder? Grüße Nicky
10.08.2015 - 02:34DROPS Design respondió:
Es gibt ein Video zu den verkürzten R dieser Jacke, vielleicht schauen Sie sich das mal an, das erklärt vieles besser, Sie finden es im Kopf neben dem Foto unter Videos, es heißt "Stricken: Verkürzte Reihen und Muster für die Kreisjacke 154-8". Wenn noch Fragen offen sind, fragen Sie gerne wieder.
16.08.2015 - 18:30
![]() Hannah escribió:
Hannah escribió:
So on the left side, the first row is knit every stitch? Ok, got it. thank you.
13.05.2015 - 15:47
![]() Hannah escribió:
Hannah escribió:
Thank you. I finally figured it out. It's a bit long winded but I got there. When knit the left back, it says work 1 row, then pattern. When Starting the LEFT side it says knit 1 row. Am I right in thinking this 1st row will be...... K5gs P2, K3, P2, A1(23sts), K1, A3A, A3B (8sts), A3C, K2, A1, K2 P3 K2 K5gs? Then start on row 2 of the pattern knitting 10sts, turn etc. Am I right?
13.05.2015 - 15:29DROPS Design respondió:
Dear Hannah, the pattern is correct as written, but short rows are worked from WS too, ie work 1st row from WS: K5 garter st, P2, K3, turn and work return row from RS, and continue short rows as for right piece, but turning on row from WS. Happy knitting!
13.05.2015 - 16:19
![]() Hannah escribió:
Hannah escribió:
Thank you. I finally figured it out. It's a bit long winded but I got there. When knit the left back, it says work 1 row, then pattern. Do I work the 7th row of the the pattern - all 86 stitches? And I knit A.1 and A.3 Left to right? Then I start the next row on row 2 of the pattern on the 10 stitches, then turn etc? Am I right?
12.05.2015 - 20:59
![]() Hannah escribió:
Hannah escribió:
Thank you. I finally figured it out. It's a bit long winded but I got there. When knit the left back, it says work 1 row, then pattern. Do I work the 7th row of the the pattern - all 86 stitches? And I knit A.1 and A.3 Left to right? Then I start the next row on row 2 of the pattern on the 10 stitches, then turn etc? Am I right?
12.05.2015 - 19:09
![]() Hannah escribió:
Hannah escribió:
Thank you. I finally figured it out. It's a bit long winded but I got there. When knit the left back, it says work 1 row, then pattern. Do I work 1 full row? And I knit A.1 Left to right - am I right?
12.05.2015 - 16:38DROPS Design respondió:
Dear Hannah, on left piece, K 1 row from RS over all sts, then start short rows and pattern from WS, ie starting on 2nd row in A.1 and A.3. Happy knitting!
13.05.2015 - 09:32
![]() Hannah escribió:
Hannah escribió:
Hi, I have never knitted a drops pattern before, I am used to knitting the patterns that tell you how to work each row; so I'm a bit confused as to what I need to do. So far I have cast on 86 stitches and knitted 2 rows in garter stitch. What do I have to do next?
12.05.2015 - 13:05DROPS Design respondió:
Dear Hannah, you then continue working in pattern and short rows at the same time: 2 rows over 10 sts (=5 sts in garter st, K 2, P 3), then 2 rows over 35 sts = the first 10 sts + K 2, A.1 (= 23 sts), then 2 rows over 51 sts = the first 35 sts + K 1, A.2A, A.2 B over the next 8 sts, A.2 C, K 2 and 2 rows over all sts = the first 51 sts + A.1(= 23 sts), K 2, P 3, K 2, 5 sts in garter st. Happy knitting!
12.05.2015 - 13:26
![]() Angelique escribió:
Angelique escribió:
Hallo, ik heb het parroon succesvol doorlopen en het is prachtig. Ik weet helaas niet goed hoe ik het in elkaar moet zetten. Wanneer ik de opzet- en afkantrand aan elkaar zet kan ik er toch geen vest meer van maken? Ik hoop dat julioe een andere manier hebben om het uit te leggen. Bvd Angelique
28.04.2015 - 20:16DROPS Design respondió:
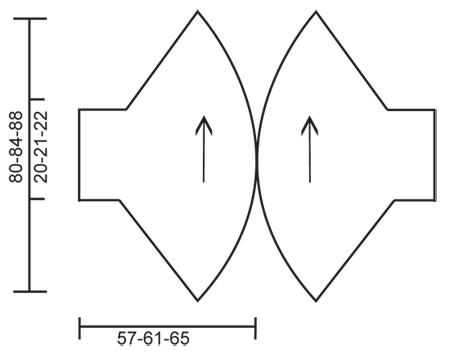
Hoi Angelique. Je naait eerst de opzetrand samen met de afkantrand - dat doe je op beide delen. Dan krijg je twee delen (mouw + voorpand en helft achterpand) zoals te zien op de maattekening onderaan. Je naait deze twee aan elkaar zoals beschreven
29.04.2015 - 13:55
![]() Marlies Batz escribió:
Marlies Batz escribió:
Hallo, ich habe leichte Schwierigkeiten mit der Anleitung für SUMMER SNUG. Sind die Rückreihen nicht mit angegeben? ( Die Maschen werden dann sicherlich so gestrickt wie sie erscheinen, ausser die Krausrippen.) Ansonsten macht die Anleitung für mich leider keinen Sinn. Über eine Antwort freue ich mich sehr. Viele Grüße Marlies Batz
23.02.2015 - 19:01DROPS Design respondió:
Es sind alle R in den Diagrammen eingezeichnet, auch die Rück-R. Da wir schon einige Verständnisfragen bei diesem Modell hatten, möchte ich Sie bitten, sich die vorherigen deutschen Fragen und Antworten in dieser Kommentarliste durchzulesen, vielleicht wird dann einiges klarer. Ansonsten können Sie aber natürlich gerne weiter fragen, die Jacke soll Ihnen ja gut gelingen!
24.02.2015 - 22:42
|
||||||||||||||||
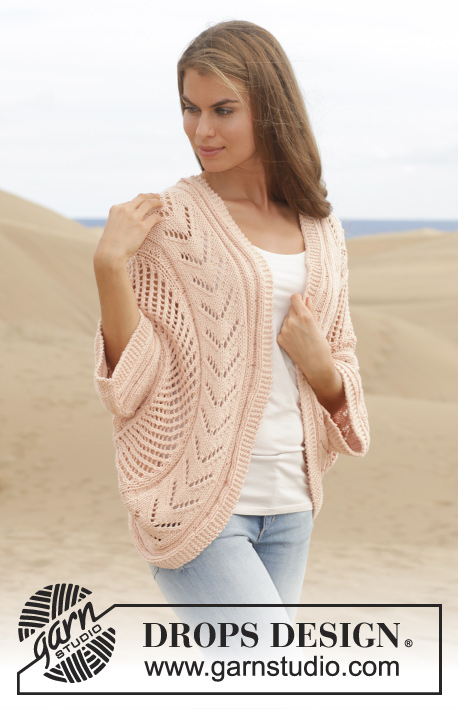
Summer Snug#summersnugjacket |
||||||||||||||||
 |
 |
|||||||||||||||
Chaqueta de punto DROPS trabajada en un círculo con patrón de calados en ”Paris”. Talla: S - XXXL.
DROPS 154-8 |
||||||||||||||||
|
PUNTO MUSGO ( de ida y vta en ag): Trabajar todas las filas de derecho. 1 pliegue = 2 filas de derecho. PATRÓN: Ver los diagramas A.1-A.3. Los diagramas muestran todas las filas del patrón visto por el LD. TIP PARA TRABAJAR FILAS ACORTADAS: *Trabajar 1 fila sobre los primeros 10 pts de la fila, girar la labor y trabajar la vta. Trabajar 1 fila sobre los primeros 35 pts de la fila, girar la labor y trabajar la vta. Trabajar 1 fila sobre los primeros 51-57-63 pts de la fila, girar y trabajar la vta. Trabajar 1 fila sobre todos los pts, girar y trabajar la vta*. Repetir de * a *, es decir 8 filas en la parte más ancha y 2 en la parte más estrecha en 1 repetición. ------------------------------------------------------------- DELANTERO DERECHO/ LA PARTE DE LA ESPALDA: Se trabaja de ida y vta en ag circular . Mont 86-92-98 pts en ag circular tamaño 6 mm con Paris. Trabajar 1 pliegue en PT MUSGO - ver explicación arriba. Ahora trabajar el patrón, AL MISMO TIEMPO trabajar LAS FILAS ACORTADAS - ver explicación arriba (1ª fila = por el LD): 5 pts en pt musgo, 2 d., 3 r., (girar aquí), 2 d., A.1 (= 23 pts) (girar aquí), 1 d., A.2A, A.2B sobre los sig 8-14-20 pts, A.2C, 2 d.,(girar aquí), A.1 (= 23 pts), 2 d., 3 r., 2 d., 5 pts en pt musgo. Continuar con el patrón hasta que la labor mida 40-42-44 cm en la parte más estrecha y 160-168-176 cm en la parte más ancha. Trabajar 1 pliegue sobre todos los pts y rematar. DELANTERO IZQUIERDO/ LA PARTE DE LA ESPALDA: Se trabaja de ida y vta en ag circular . Mont 86-92-98 pts en ag circular tamaño 6 mm con Paris. Trabajar 1 pliegue en PT MUSGO - ver explicación arriba. Trabajar 1 fila de derecho por el LD. Ahora trabajar el patrón, AL MISMO TIEMPO trabajar LAS FILAS ACORTADAS - ver explicación arriba (1ª fila = por el LR - ATENCIÓN: Comenzar en la 2ª fila de A.1 y A.3 ): 5 pts en pt musgo, 2 r.,3 d., ( girar aquí), 2 r., A.1 (= 23 pts) (girar aquí), 1 r., A.3A, A.3B sobre los sig 8-14-20 pts, A.3C, 2 r.,( girar aquí), A.1 (= 23 pts), 2 r., 3 d., 2 r., 5 pts en pt musgo. Continuar con el patrón hasta que la labor mida 40-42-44 cm en la parte más estrecha y 160-168-176 cm en la parte más ancha. Trabajar 1 pliegue sobre todos los pts y rematar. TERMINACIÓN: Coser el borde de montaje con el borde de remate. Colocar las 2 partes enfrentadas de manera que los 5 pts en pt musgo de la parte más ancha se unan. Coser aprox 58-62 cm en el centro de la espalda, borde con borde - asegúrese de que la costura de cada parte quede en el centro bajo la manga. |
||||||||||||||||
Explicaciones del diagrama |
||||||||||||||||
|
||||||||||||||||
 |
||||||||||||||||
 |
||||||||||||||||
¿Terminaste este patrón?Entonces, etiqueta tus fotos con #dropspattern #summersnugjacket o envíalas a la galería #dropsfan. ¿Necesitas ayuda con este patrón?Encontrarás 20 videos tutoriales, un espacio para comentarios/preguntas y más visitando la página del patrón en garnstudio.com © 1982-2026 DROPS Design A/S. Todos los derechos reservados. Este documento, incluyendo todas sus sub-secciones, está protegido por los derechos de autor (copyright). Lee más acerca de lo que puedes hacer con nuestros patrones en la parte de abajo de cada patrón de nuestro sitio. |
||||||||||||||||


Con más de 40 años en el diseño de modelos de punto y de ganchillo, DROPS Design ofrece una de las más vastas colecciones de patrones gratuitos en el internet - traducidos en 17 idiomas. Al día de hoy, contamos con 324 catálogos y 12290 patrones - de los cuales 11685 están traducidos en español.
Nosotros trabajamos con mucho esmero para brindarte lo mejor que las labores de punto y ganchillo tienen para ofrecer,inspiración y consejos, así como hilos de magnífica calidad a precios increíbles! Te gustaría usar nuestros patrones para otro fin además del uso personal? Puedes leer acerca de lo que estás permitida a hacer en el texto de Copyright en la parte de abajo de todos nuestros patrones. Felices labores!
Escribe un comentario sobre DROPS 154-8
¡Nos encantaría saber qué piensas acerca de este patrón!
Si quieres escribir una pregunta referente al patrón, por favor asegúrate de elegir la categoría correcta en el formulario debajo, para acelerar el proceso de respuesta. Los campos obligatorios están marcados con un *.