
Categorías populares
¿Buscas un hilo?


Comentarios / Preguntas (147)
![]() Tina Nielsen escribió:
Tina Nielsen escribió:
Glemte lige noget... Hvordan kan det være der er ulige antal pinde i A1 og A2A mm man skal jo strikke vrang pinden tilbage eller læser jeg mønstret forkert?
19.06.2016 - 20:06DROPS Design respondió:
Hej Tina. Jeg tror der er glemt noget der, men jeg ville strikke en vrang pind tilbage og saa starte paany.
24.06.2016 - 12:55
![]() Tina Nielsen escribió:
Tina Nielsen escribió:
Nu har jeg lavet de første 8 rk af A1 så der er 8 rk i den brede ende og to i den smalle ende. Starter jeg så forfra med 10 m og vend. Der er så 4 pinde tilbage af A1 fortsætter jeg bare der og det samme med de andre mønstre. Spørgsmålet er altså... Efter hver gang man har nået 8 pinde starter man så med 10m og vende 35 m og vend 51 m og vend alle masker og vend...? Håber i forstår mit spørgsmål...
19.06.2016 - 19:49DROPS Design respondió:
Hej Tina. Du skal hele tiden fortsaette med vendinger og mönster som det kommer. Det betyder at du vil have flere gentagelser af A.1 i den ene side end i den anden. Saa det er at holde tungen lige i munden og eventuelt notere hvor du er i hvert mönster.
24.06.2016 - 12:54
![]() Barbara Kerr escribió:
Barbara Kerr escribió:
I found the pattern works if I did A2B for 10sts instead of 8 sts The video unfortunately fast forwards at that point
19.05.2016 - 20:12DROPS Design respondió:
Dear Mrs Kerr, in A.2 (1st size), you work A.3A (= 3 sts), then A.2B (= 4 sts) a total of 2 times over the next 8 sts then finish with A.2C (= 2 sts) - on 1st row A.2C is similar as the last 2 sts in A.2B, but on row 2, you will have to work with A.2C over the last 3 sts in A.2. Happy knitting!
20.05.2016 - 10:53
![]() Barbara escribió:
Barbara escribió:
The cast on is 86, the stitch count is 83 10+25+9+4+25+10=83 Please help me to set it up correctly Thank you
16.05.2016 - 01:19DROPS Design respondió:
Dear Barbara, you cast on 86 sts but then you have to work short rows, so you don't work on all the sts on needle: which is the point you've got stuck? Happy knitting!
16.05.2016 - 09:32Jirapannee Supratya escribió:
The video shows upto 8 rows. How about the last 4rows of the work pattern 1set of A1. Do we start the work shot row right away with the work pattern OR we work 4 rows over all sts. and starting the work short row with the next repetition of 1st set of A1. Note: I understand that short row will be worked through out not only the 1set of work.
23.11.2015 - 13:38DROPS Design respondió:
Dear Mrs Supratya, you will work following A.1 when working on these sts, so that both A.1 will be worked differently - follow each A.1 with the following row you are working on. Happy knitting!
23.11.2015 - 13:58Jirapannee Supratya escribió:
Since the web not allow me to finish my question in one input, here is the 2nd question 2) The work SHORT ROW is an 8 rows set. ( 8rows at the widest and 2rows at the most narrow in 1 repetition) . The work pattern calls for 12 rows. When I finish the 8 rows , I will continue work 4 more rows over all sts before repeating the work pattern and work short row. Do I understand it correctly ? if not, pls help clarifying the next step.
22.11.2015 - 08:02DROPS Design respondió:
Dear Mrs Supratya, the short rows are worked over 8 rows and are repeated all the way to shape the piece. Look at the video in the previous answer to figure out how to work. Happy knitting!
23.11.2015 - 09:54
![]() Ruth Jose escribió:
Ruth Jose escribió:
Thank you. wrap on wrong side! the purl row! going to buy the yarn tomorrow!
17.09.2015 - 03:11
![]() Ruth Jose escribió:
Ruth Jose escribió:
One more question! on left side, do I read the pattern from rt to left and start on a all purl row? which is row 2, and is it purl 2 tog and spp? I love Paris
16.09.2015 - 00:13DROPS Design respondió:
Dear Ruth Jose, all rows with yo have to be done from RS. On right front piece, work row 1 from RS and start short rows from RS. On left front piece, K first 1 row from RS and work short rows beg with row 2 in A.1 and A.3. (nb: from RS: read diagram from the right towards the left, from WS: read from the left towards the right). Happy knitting!
16.09.2015 - 09:17
![]() Ruth Jose escribió:
Ruth Jose escribió:
Hi , Is this correct? Third turn K1(K1, K2T0G ,0 ,K2TOG, O, K2TOG ,O)X2, K2TOG,O,K2, ==19 STITCHES +35= 54 I should have 57???? Please help before I buy the yarn!
15.09.2015 - 00:16DROPS Design respondió:
Dear Ruth Jose, when working 1st row in A.2 on 3rd turn, continue as follows after A.1 and first sts: K1, A.2A (= K1, K2 tog, YO), then work A.2B over the next 14 sts (repeat A.2B a total of 3 times: K2 tog, YO, K2, YO, then work K2, YO), and work A.2C (= K2 tog, YO). Happy knitting!
15.09.2015 - 09:58
![]() Ruth Jose escribió:
Ruth Jose escribió:
Lost three stitches on third turn! I have 19 stitches and 35=54. I should have 57
14.09.2015 - 23:52DROPS Design respondió:
Dear Ruth Jose, remember to check your number of sts worked in each diagram, a good idea can be to add extra marker between each kind of pattern/diagram so that you can check if your number of sts match. Happy knitting!
15.09.2015 - 09:49
|
||||||||||||||||
Summer Snug#summersnugjacket |
||||||||||||||||
 |
 |
|||||||||||||||
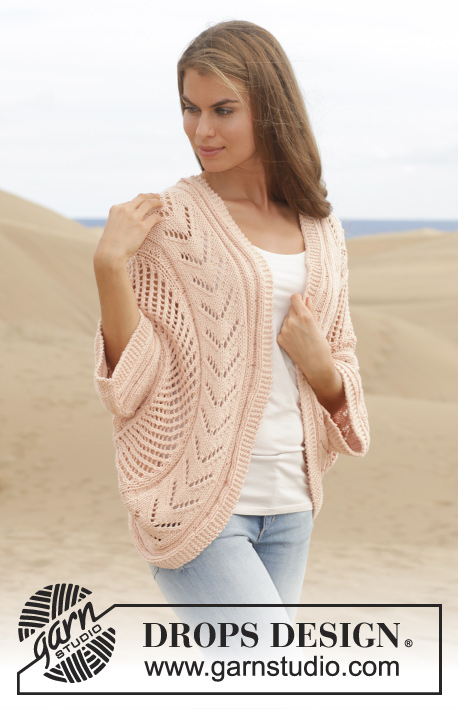
Chaqueta de punto DROPS trabajada en un círculo con patrón de calados en ”Paris”. Talla: S - XXXL.
DROPS 154-8 |
||||||||||||||||
|
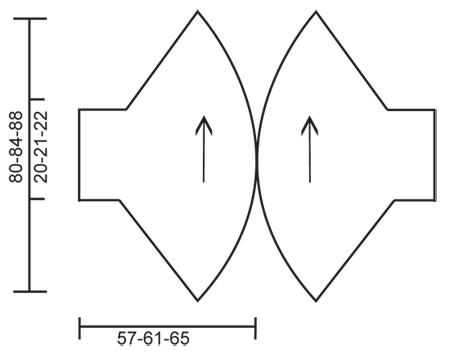
PUNTO MUSGO ( de ida y vta en ag): Trabajar todas las filas de derecho. 1 pliegue = 2 filas de derecho. PATRÓN: Ver los diagramas A.1-A.3. Los diagramas muestran todas las filas del patrón visto por el LD. TIP PARA TRABAJAR FILAS ACORTADAS: *Trabajar 1 fila sobre los primeros 10 pts de la fila, girar la labor y trabajar la vta. Trabajar 1 fila sobre los primeros 35 pts de la fila, girar la labor y trabajar la vta. Trabajar 1 fila sobre los primeros 51-57-63 pts de la fila, girar y trabajar la vta. Trabajar 1 fila sobre todos los pts, girar y trabajar la vta*. Repetir de * a *, es decir 8 filas en la parte más ancha y 2 en la parte más estrecha en 1 repetición. ------------------------------------------------------------- DELANTERO DERECHO/ LA PARTE DE LA ESPALDA: Se trabaja de ida y vta en ag circular . Mont 86-92-98 pts en ag circular tamaño 6 mm con Paris. Trabajar 1 pliegue en PT MUSGO - ver explicación arriba. Ahora trabajar el patrón, AL MISMO TIEMPO trabajar LAS FILAS ACORTADAS - ver explicación arriba (1ª fila = por el LD): 5 pts en pt musgo, 2 d., 3 r., (girar aquí), 2 d., A.1 (= 23 pts) (girar aquí), 1 d., A.2A, A.2B sobre los sig 8-14-20 pts, A.2C, 2 d.,(girar aquí), A.1 (= 23 pts), 2 d., 3 r., 2 d., 5 pts en pt musgo. Continuar con el patrón hasta que la labor mida 40-42-44 cm en la parte más estrecha y 160-168-176 cm en la parte más ancha. Trabajar 1 pliegue sobre todos los pts y rematar. DELANTERO IZQUIERDO/ LA PARTE DE LA ESPALDA: Se trabaja de ida y vta en ag circular . Mont 86-92-98 pts en ag circular tamaño 6 mm con Paris. Trabajar 1 pliegue en PT MUSGO - ver explicación arriba. Trabajar 1 fila de derecho por el LD. Ahora trabajar el patrón, AL MISMO TIEMPO trabajar LAS FILAS ACORTADAS - ver explicación arriba (1ª fila = por el LR - ATENCIÓN: Comenzar en la 2ª fila de A.1 y A.3 ): 5 pts en pt musgo, 2 r.,3 d., ( girar aquí), 2 r., A.1 (= 23 pts) (girar aquí), 1 r., A.3A, A.3B sobre los sig 8-14-20 pts, A.3C, 2 r.,( girar aquí), A.1 (= 23 pts), 2 r., 3 d., 2 r., 5 pts en pt musgo. Continuar con el patrón hasta que la labor mida 40-42-44 cm en la parte más estrecha y 160-168-176 cm en la parte más ancha. Trabajar 1 pliegue sobre todos los pts y rematar. TERMINACIÓN: Coser el borde de montaje con el borde de remate. Colocar las 2 partes enfrentadas de manera que los 5 pts en pt musgo de la parte más ancha se unan. Coser aprox 58-62 cm en el centro de la espalda, borde con borde - asegúrese de que la costura de cada parte quede en el centro bajo la manga. |
||||||||||||||||
Explicaciones del diagrama |
||||||||||||||||
|
||||||||||||||||
 |
||||||||||||||||
 |
||||||||||||||||
¿Terminaste este patrón?Entonces, etiqueta tus fotos con #dropspattern #summersnugjacket o envíalas a la galería #dropsfan. ¿Necesitas ayuda con este patrón?Encontrarás 20 videos tutoriales, un espacio para comentarios/preguntas y más visitando la página del patrón en garnstudio.com © 1982-2026 DROPS Design A/S. Todos los derechos reservados. Este documento, incluyendo todas sus sub-secciones, está protegido por los derechos de autor (copyright). Lee más acerca de lo que puedes hacer con nuestros patrones en la parte de abajo de cada patrón de nuestro sitio. |
||||||||||||||||


Con más de 40 años en el diseño de modelos de punto y de ganchillo, DROPS Design ofrece una de las más vastas colecciones de patrones gratuitos en el internet - traducidos en 17 idiomas. Al día de hoy, contamos con 324 catálogos y 12290 patrones - de los cuales 11685 están traducidos en español.
Nosotros trabajamos con mucho esmero para brindarte lo mejor que las labores de punto y ganchillo tienen para ofrecer,inspiración y consejos, así como hilos de magnífica calidad a precios increíbles! Te gustaría usar nuestros patrones para otro fin además del uso personal? Puedes leer acerca de lo que estás permitida a hacer en el texto de Copyright en la parte de abajo de todos nuestros patrones. Felices labores!
Escribe un comentario sobre DROPS 154-8
¡Nos encantaría saber qué piensas acerca de este patrón!
Si quieres escribir una pregunta referente al patrón, por favor asegúrate de elegir la categoría correcta en el formulario debajo, para acelerar el proceso de respuesta. Los campos obligatorios están marcados con un *.