
Categorías populares
¿Buscas un hilo?


Comentarios / Preguntas (147)
![]() Patricia Cardenas escribió:
Patricia Cardenas escribió:
Cuanta lana de va
26.04.2020 - 05:25DROPS Design respondió:
Hola Patricia. Necesitas entre 600 - 900 gr de la calidad Paris (es decir, 12- 15-18 ovillos) depende de la talla.
28.04.2020 - 16:52
![]() Jane Coleman escribió:
Jane Coleman escribió:
I love this pattern, but even after watching the video, I don't understand it.
31.03.2020 - 21:39DROPS Design respondió:
Dear Mrs Coleman, can you explain more about the part you don't understand? To resume the pattern, you are working 2 different pieces - from mid back/mid front to sleeve edge and with short rows to get sleeve side shorter than the mid back/mid front. Simply turn as explained and work diagrams over the stitches you should work. Read thouroughly the pattern before watching the video to understand what is done - try to adjust the speed of the video by clicking on the icon on the playbar. For any further individual assistance you are welcome to contact your DROPS store or try to ask other knitters in our DROPS Workshop. Happy knitting!
01.04.2020 - 08:39
![]() Karolyn Fredette escribió:
Karolyn Fredette escribió:
I watched the video because I thought it might tell me some clue on this pattern. I know how to do short rows. I have now made 15 3/4" and the shape looks nothing like that pictured. I have remade this twice today. There is NO explanation on what to do FOLLOWING row 7. I am making it up from my past experience. But it does not come out looking like the sketch of the shape. I have been knitting for 50 years. What do you DO with the remaining sts after row 7? Do you work backwards?
12.11.2019 - 09:26DROPS Design respondió:
Dear Mrs Fredette, you have to work short rows and pattern at the same time, ie work row 1+2 over 10 sts (turn after P3 on row 1), work row 3+4 over 35 sts (turn on row 3 afterA.1 = you work row 1+2 in A.1), work row 5-6 over 51-57-63 sts (= work row 3+4 inA.1 + row 1 +2 in A.2), work row 7-8 over all sts (= work row 5+6 in A.1 + row 3 +4 in A.2). Continue like this, ie work next row in diagram as shown in diagram when you work over these stitches - when diagram has been worked 1 time in height, repeat from row 1. Happy knitting!
12.11.2019 - 12:36
![]() Elke Schröter escribió:
Elke Schröter escribió:
Ich habe bei der verkürzten Reihe nach dem Lochmuster immer eine kleine und eine sehr große Masche. Wie kann ich das gleichmäßig stricken. Mit freundlichen Grüßen Elke Schröter
05.11.2019 - 16:53DROPS Design respondió:
Liebe Frau Schröter, hier sehen Sie, wie man diese verkürzten Reihen strickt - Sie können auch diese Technik mit Umschlag links oder Umschlag rechts stricken. Viel Spaß beim stricken!
06.11.2019 - 08:26
![]() Fiona Mullally escribió:
Fiona Mullally escribió:
So when doing the long full rows is that for 2 rows every 7 and 8th rows? and at the end of 7th row and beginning of 8th row is that when you add in the A1 diagram? Please
17.07.2019 - 19:57DROPS Design respondió:
Dear Mrs Mullaly, short rows are repeated over 8 rows: 5 sts in garter st, K2, P3 turn and work WS row, turn and work from RS: 5 sts in garter st, K2, P3, K2, row 1 in A.1, turn and work WS row (= row 2 in A.1), turn and work 5 sts in garter st, K2, P3, K2, row 3 in A.1, K1, row1 in A.2A, row1 in A.2 B, row 1 in A.2 C, K2, turn and work WS row (= row 4 in A.1 and row 2 in A.2), turn, work 5 sts in garter st, K2, P3, K2, row 5 in A.1, K1, row 3 in A.2A, row 3 in A.2 B, row 3 in A.2 C, K2 row 1 in A.1, K2, P3, K2, 5 sts in garter st, turn and work WS row over all sts. Continue that way with next row in diagram as before. Happy knitting!
18.07.2019 - 10:23
![]() Suzann Toresson escribió:
Suzann Toresson escribió:
Behöver inget svar. Har löst problemet.
19.04.2019 - 20:15
![]() Suzann Toresson escribió:
Suzann Toresson escribió:
Hej. Andra delen från avigan ställer till det för mig, jag har stickat från vänster till höger som det står från avigan, men görs alla omslag och ihoptagningar från avigsidan med aviga maskor?
15.04.2019 - 09:40
![]() Michele escribió:
Michele escribió:
I forgot to mention 35 sts were worked so there are 16 sts to be worked{ K 1, A.2A, A.2 B over the next 8-14-20 sts, A.2 C, K 2} (turn here)to make 51sts
31.03.2019 - 15:36DROPS Design respondió:
Dear Michele, you work the short rows first over the first 10 sts (2 rows = 1 row from RS + 1 row from WS over the first 10 sts following pattern), then work 2 rows over 35 sts in pattern (= with row 1 and 2 in A.1), then work 2 rows over 51 sts in pattern (= with row 3 and 4 in A.1 + row 1 and 2 in A.2), then work 2 rows over all sts (= row 5 and 6 in A.1 + row 2 and 3 in A.2 + row 1 and 2 in A.1). And repeat the short rows always continuing the next row in diagram you worked before. Happy knitting!
01.04.2019 - 13:26
![]() Michele escribió:
Michele escribió:
Hello, when the pattern says work over next 51 sts...what do I do? K 1, A.2A, A.2 B over the next 8-14-20 sts, A.2 C, K 2, (turn here) can you tell me for size s/m stitch by stitch. I watched video but still can't figure it out..(drops 154/8) Thank you so very much
31.03.2019 - 15:16DROPS Design respondió:
Dear Michelle, you are right, that's how you have to work the first 51 sts = as explained with 5 sts in garter st, K 2, P 3, K 2, A.1 (= 23 sts) (work here next row after the one previously worked before), K 1, A.2A, A.2 B over the next 8 sts, A.2 C, K 2, turn and work row from WS as shown in diagram. Happy knitting!
01.04.2019 - 13:17
![]() Germana escribió:
Germana escribió:
Grazieee allora ricapitolando i ferri accorciati sono sul rovescio sempre mentre i motivi si lavorano sul dritto...ma se comincio dal 2 ferro poi devo cominciare il motivo sul dritto dal primo giusto? Scusate le tante domande ....
15.09.2018 - 16:35DROPS Design respondió:
Buonasera Germana. Sì ha capito correttamente. Buon lavoro!
15.09.2018 - 20:56
|
||||||||||||||||
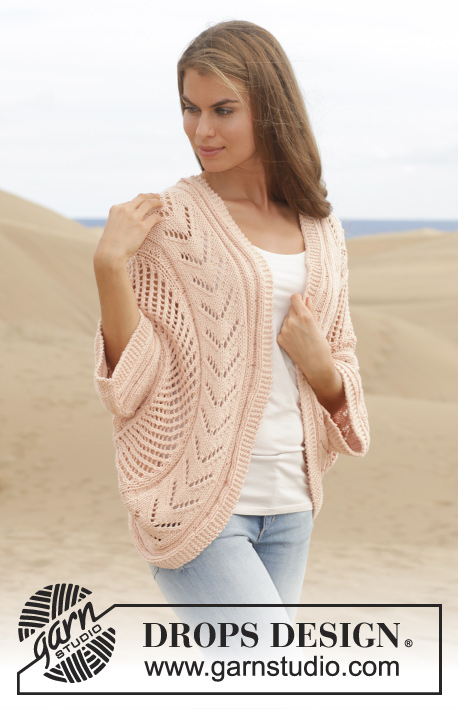
Summer Snug#summersnugjacket |
||||||||||||||||
 |
 |
|||||||||||||||
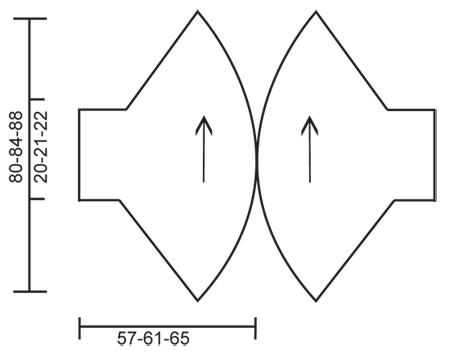
Chaqueta de punto DROPS trabajada en un círculo con patrón de calados en ”Paris”. Talla: S - XXXL.
DROPS 154-8 |
||||||||||||||||
|
PUNTO MUSGO ( de ida y vta en ag): Trabajar todas las filas de derecho. 1 pliegue = 2 filas de derecho. PATRÓN: Ver los diagramas A.1-A.3. Los diagramas muestran todas las filas del patrón visto por el LD. TIP PARA TRABAJAR FILAS ACORTADAS: *Trabajar 1 fila sobre los primeros 10 pts de la fila, girar la labor y trabajar la vta. Trabajar 1 fila sobre los primeros 35 pts de la fila, girar la labor y trabajar la vta. Trabajar 1 fila sobre los primeros 51-57-63 pts de la fila, girar y trabajar la vta. Trabajar 1 fila sobre todos los pts, girar y trabajar la vta*. Repetir de * a *, es decir 8 filas en la parte más ancha y 2 en la parte más estrecha en 1 repetición. ------------------------------------------------------------- DELANTERO DERECHO/ LA PARTE DE LA ESPALDA: Se trabaja de ida y vta en ag circular . Mont 86-92-98 pts en ag circular tamaño 6 mm con Paris. Trabajar 1 pliegue en PT MUSGO - ver explicación arriba. Ahora trabajar el patrón, AL MISMO TIEMPO trabajar LAS FILAS ACORTADAS - ver explicación arriba (1ª fila = por el LD): 5 pts en pt musgo, 2 d., 3 r., (girar aquí), 2 d., A.1 (= 23 pts) (girar aquí), 1 d., A.2A, A.2B sobre los sig 8-14-20 pts, A.2C, 2 d.,(girar aquí), A.1 (= 23 pts), 2 d., 3 r., 2 d., 5 pts en pt musgo. Continuar con el patrón hasta que la labor mida 40-42-44 cm en la parte más estrecha y 160-168-176 cm en la parte más ancha. Trabajar 1 pliegue sobre todos los pts y rematar. DELANTERO IZQUIERDO/ LA PARTE DE LA ESPALDA: Se trabaja de ida y vta en ag circular . Mont 86-92-98 pts en ag circular tamaño 6 mm con Paris. Trabajar 1 pliegue en PT MUSGO - ver explicación arriba. Trabajar 1 fila de derecho por el LD. Ahora trabajar el patrón, AL MISMO TIEMPO trabajar LAS FILAS ACORTADAS - ver explicación arriba (1ª fila = por el LR - ATENCIÓN: Comenzar en la 2ª fila de A.1 y A.3 ): 5 pts en pt musgo, 2 r.,3 d., ( girar aquí), 2 r., A.1 (= 23 pts) (girar aquí), 1 r., A.3A, A.3B sobre los sig 8-14-20 pts, A.3C, 2 r.,( girar aquí), A.1 (= 23 pts), 2 r., 3 d., 2 r., 5 pts en pt musgo. Continuar con el patrón hasta que la labor mida 40-42-44 cm en la parte más estrecha y 160-168-176 cm en la parte más ancha. Trabajar 1 pliegue sobre todos los pts y rematar. TERMINACIÓN: Coser el borde de montaje con el borde de remate. Colocar las 2 partes enfrentadas de manera que los 5 pts en pt musgo de la parte más ancha se unan. Coser aprox 58-62 cm en el centro de la espalda, borde con borde - asegúrese de que la costura de cada parte quede en el centro bajo la manga. |
||||||||||||||||
Explicaciones del diagrama |
||||||||||||||||
|
||||||||||||||||
 |
||||||||||||||||
 |
||||||||||||||||
¿Terminaste este patrón?Entonces, etiqueta tus fotos con #dropspattern #summersnugjacket o envíalas a la galería #dropsfan. ¿Necesitas ayuda con este patrón?Encontrarás 20 videos tutoriales, un espacio para comentarios/preguntas y más visitando la página del patrón en garnstudio.com © 1982-2026 DROPS Design A/S. Todos los derechos reservados. Este documento, incluyendo todas sus sub-secciones, está protegido por los derechos de autor (copyright). Lee más acerca de lo que puedes hacer con nuestros patrones en la parte de abajo de cada patrón de nuestro sitio. |
||||||||||||||||


Con más de 40 años en el diseño de modelos de punto y de ganchillo, DROPS Design ofrece una de las más vastas colecciones de patrones gratuitos en el internet - traducidos en 17 idiomas. Al día de hoy, contamos con 324 catálogos y 12290 patrones - de los cuales 11685 están traducidos en español.
Nosotros trabajamos con mucho esmero para brindarte lo mejor que las labores de punto y ganchillo tienen para ofrecer,inspiración y consejos, así como hilos de magnífica calidad a precios increíbles! Te gustaría usar nuestros patrones para otro fin además del uso personal? Puedes leer acerca de lo que estás permitida a hacer en el texto de Copyright en la parte de abajo de todos nuestros patrones. Felices labores!
Escribe un comentario sobre DROPS 154-8
¡Nos encantaría saber qué piensas acerca de este patrón!
Si quieres escribir una pregunta referente al patrón, por favor asegúrate de elegir la categoría correcta en el formulario debajo, para acelerar el proceso de respuesta. Los campos obligatorios están marcados con un *.