
Categorías populares
¿Buscas un hilo?


Comentarios / Preguntas (36)
![]() Lynn Hanrahan escribió:
Lynn Hanrahan escribió:
Dear Judy, Lynn Hanrahan here again . I just started the sleeve and got the rib pattern completed. I am now at the part of the pattern where i changed to larger needles. So now im susposed to continue as follows: 2 sts stockette st, p1 over 52 sts, stockinette st. When the piece measures 12cm inc 1 at each side a total of 18 times alternately every 4th and 5th row = 92 sts.
10.12.2022 - 16:28DROPS Design respondió:
Dear Lynn, work 2 sts in stockinette stitch, repeat the pattern M.1 over 52 stitches and work the last 2 sts in stockinette stitch. Continue this way. When the piece measures 12 cm, start increasing 1 stitch at each side 18 times every 4th and 5th row alternately. That is, increase 1 st at the beginning and at the end of the row and repeat this increase every 4th and 5th row alternately. You need to work these increases 18 times (so you will have increased 36 sts after finishing all increases). 56 initial sts + 2 sts* 18 times = 92 sts. Happy knitting!
11.12.2022 - 21:16
![]() Lynn Hanrahan escribió:
Lynn Hanrahan escribió:
I am at the part of "when the piece measures approx 43 cm etc." How do i complete this part ? I am doing size XL
05.12.2022 - 14:56DROPS Design respondió:
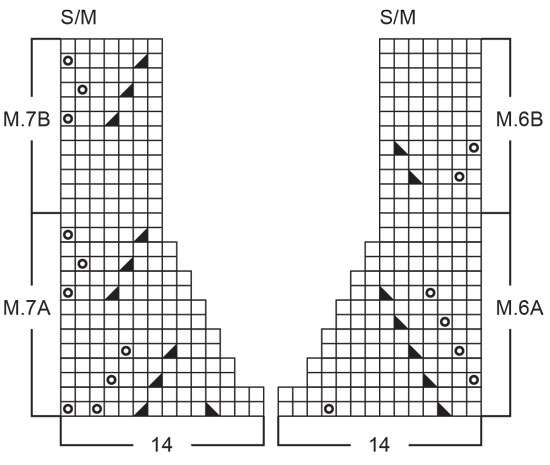
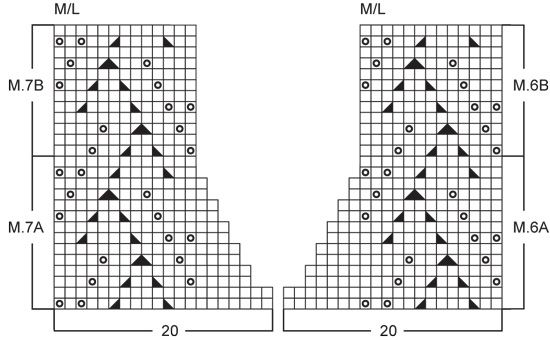
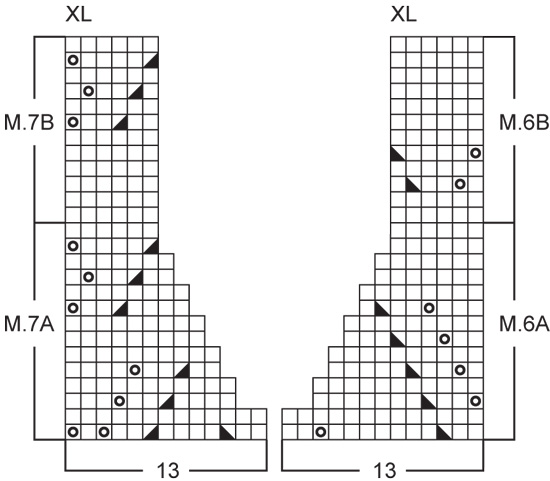
Dear Mrs Hanrahan, make sure you have finished a whole M.1 in height (work more or less cm if needed), then work: 1 st in stocking st, 26 sts in M.1, M.6A (13 sts in XL), bind off 13 sts for the neck, M.7A (13 sts in XL), work 26 sts of M.1 and 1 st in stocking stitch. Work now each shoulder separately, slip the stitches before the cast of sts (seen from RS) on a thread/st holder and work the first shoulder casting off for neck as shown in the diagram M.7/M.6. Happy knitting!
06.12.2022 - 10:35
![]() Lynn Hanrahan escribió:
Lynn Hanrahan escribió:
Can you explain to me what you do after the first row.The pattern is wisteria weaving
30.10.2022 - 20:50DROPS Design respondió:
Hi Lynn, You work 6 rows of rib (K2, P4), with 1 edge stitch in garter stitch (knitted from both the right and wrong sides). After these 6 rows you change to needle size 4.5 mm and work M.1. Happy knitting!
31.10.2022 - 06:48
![]() Annette Kierkegaard Priess escribió:
Annette Kierkegaard Priess escribió:
Jeg er ved at strikke første ærme i str l/xl, og er nu færdig med at lukke af til ærmekuppel 4 x 1, 2 x 5 og 1x1, så står der at jeg videre skal lukke 2 masker af til arb måler 55 cm, er det stadig hver anden pind flere gange? Hvor mange masker ender man med, når ærmet er helt færdigt?
09.05.2022 - 15:33DROPS Design respondió:
Hej Annette, ja det er på hver 2.pind til du når de 55 cm. Det gør du for at ærmekuplen skal blive afrundet. Antal masker du har tilbage er afhængig af hvor mange cm du har tilbage :)
11.05.2022 - 07:50
![]() Giorgia escribió:
Giorgia escribió:
Un'ulteriore domanda da principiante: per il modellamento del collo(taglia S/M) devo intrecciare le maglie? Sempre sul ferro rovescio per M6A, e invece per M7A sempre ad inizio ferro, quindi sul diritto del lavoro?
18.02.2022 - 09:50DROPS Design respondió:
Buonasera Giorgia, deve seguire i motivo M6A e M7A per modellare il collo. Buon lavoro!
22.02.2022 - 22:43
![]() Angela escribió:
Angela escribió:
If I increase 2 stitches evenly across the first row of the pattern, then surely the subsequent pattern rows will not sit correctly above this evenly increased first row? I’m knitting the M/L size and the pattern will repeat 8 times with 2 stitches left over. Are these extra 2 stitches not meant to be edge stitches? Or should I knit an increase row and start the pattern rows after this, then I can naturally knit the extra stitches one at each end without compromising the pattern repeats?
17.02.2022 - 15:17DROPS Design respondió:
Dear Angela, in the 2nd size you will work M.1 as follows: 1 edge stitch, repeat a total of 8 times the 13 stitches in the diagram M.1 and end with 1 edge stitch 1+ 8x13 + 1 =106 sts. Happy knitting!
17.02.2022 - 16:16
![]() Giorgia escribió:
Giorgia escribió:
Arrivata a 34 cm e finito interamente il Motivo1, lavoro 14 m. a m. rasata ad ogni lato del lavoro. Il successivo ferro lo lavoro tutto a rovescio. È dal 3° ferro che iniziò ad intrecciare ad ogni lato per lo scalfo? Grazie per la risposta
17.02.2022 - 12:30DROPS Design respondió:
Buonasera Giorgia, può procedere in questo modo. Buon lavoro!
22.02.2022 - 22:46
![]() Giorgia escribió:
Giorgia escribió:
C'è un errore nella spiegazione delle maniche: avviare 56 m. (di cui 1 m. di vivagno a legaccio ad ogni lato). Dopo aver lavorato 10 cm a coste scrivete di passare ai ferri + grandi e lavorare come segue: "2 m. a m. rasata, il motivo 1 sulle 52 m. successive , 2 m. a m. rasata" ..per un totale quindi di 56 m. Ora le 2 maglie di vivagno da lavorare a legaccio che fine hanno fatto?
14.11.2021 - 15:35DROPS Design respondió:
Buonasera Giorgia, abbiamo inoltrato la sua richiesta al settore design. Se ci saranno delle correzioni le potrà trovare direttamente online. Buon lavoro!
28.12.2021 - 16:57
![]() Bine escribió:
Bine escribió:
Wie wird das Dreieck im Diagramm gestrickt?
08.07.2021 - 12:57DROPS Design respondió:
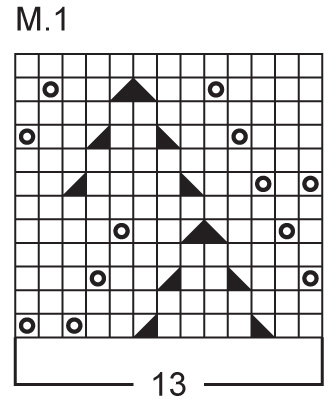
Liebe Bine, das Dreieck = das 4. Symbol (= 1 M re abheben, 1 re, die abgehobene M über die gestrickte ziehen) + das 3. Symbol (= 2 re zusammen), dh es sind 2 Abnahmen nebeneindander. Viel Spaß beim stricken!
08.07.2021 - 13:42
![]() Alessia escribió:
Alessia escribió:
Buonasera, sto lavorando una taglia S/M. Potreste aiutarmi a capire meglio questo passaggio? "intrecciare per l’arrotondamento della manica a ogni lato a f. alterni: 4 m. 1 volta, 2 m. 4 volte, 1 m. 2 volte, poi intrecciare 2 m. a ogni lato... e poi intrecciare 4 m. 1 volta." "A ogni lato a ferri alterni" significa che devo diminuire all'inizio di ogni ferro, cioè lato dx sempre a dritto e lato sx sempre a rovescio, fino alla fine delle diminuzioni? Grazie
16.02.2021 - 18:56DROPS Design respondió:
Buonasera Alessia, si, esatto, è corretta la sua interpretazione. Buon lavoro!
16.02.2021 - 22:33
|
|||||||||||||
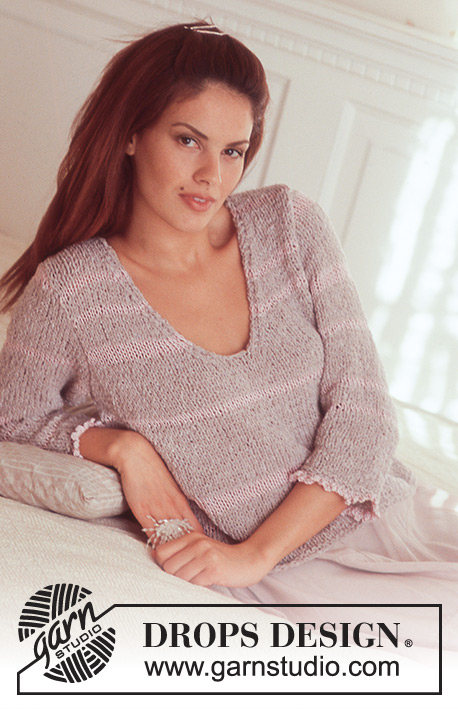
Wisteria Weaving |
|||||||||||||
|
|
|||||||||||||
Jersey DROPS en Muskat
DROPS 73-5 |
|||||||||||||
|
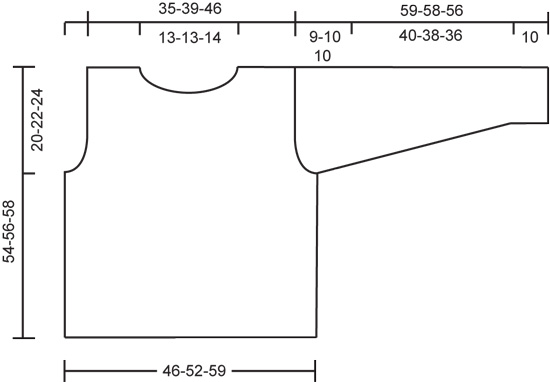
Tensión del tejido: 20 pts x 26 filas = 10 x 10 cm con las ag de tamaño más grande. 1 repetición del Patrón 1 = 7 cm en el ancho. Punto elástico: *2 d., 4 r.*, repetir de * a *. Punto musgo (de ida y vta en ag): trabajar todas las filas de derecho. Patrón: Ver el diagrama. El patrón se muestra por el LD. Atención: Los patrones 6 y 7 (dism del escote) son diferentes en cada talla - utilizar el diagrama correspondiente a la talla. ------------------------------------------------------------------ Delantero: Mont 92-104-116 pts con las ag de tamaño más pequeño. Trabajar 6 filas en pt elástico, dejando 1 pt a cada lado en pt musgo a modo de pt orillo. Cambiar a las ag de tamaño más grande y trabajar el Patrón 1, aum 1-2-3 pts repartidos en la primera fila = 93-106-119 pts (el pt orillo a cada lado no se trabaja dentro del Patrón 1). Cuando la labor mida aprox 34 cm - ajustar para finalizar después de 1 repetición completa del Patrón 1 - trabajar la sig fila como sigue (= fila del LD): 14 pts en pt jersey, Patrón 1 sobre 65-78-91 pts, 14 pts en pt jersey. Continuar con el Patrón 1 y pt jersey a cada lado de éste y cerrar para la sisa a cada lado cada 2ª fila: 4 pts 1 vez, 2 pts 2 vcs y 1 pt 3-5-5 vcs = 71-80-93 pts. Continuar con el Patrón 1, con 3-1-1 pts en pt jersey a cada lado. Cuando la labor mida aprox 43 cm (ajustar para terminar después de 1 repetición completa del Patrón 1) trabajar la sig fila como sigue: 3-1-1 pts en pt jersey, 13-13-26 pts con el Patrón 1, Patrón 6A (trabajar el diagrama correspondiente a la talla) en los 14-20-13 pts sig, cerrar 11-12-13 pts para el escote, Patrón 7A (trabajar el diagrama correspondiente a la talla) en los 14-20-13 pts sig, 13-13-26 pts del Patrón 1 y 3-1-1 pts en pt jersey. Trabajar la forma del escote siguiendo los patrones 6A y 7A. Después de completar las dism del escote quedan 23-27-33 pts para cada hombro. Continuar con los patrones 6B y 7B sobre 7-13-6 pts hasta finalizar las medidas, trabajar los pts restantes como antes. Rematar cuando la labor mida 54-56-58 cm. Espalda: Mont pts y trabajar de la misma manera que el delantero. Cerrar para la sisa como en el delantero y continuar hasta que la labor mida 52-54-56 cm. Ahora cerrar los 23-24-25 pts centrales para el escote. En la sig fila cerrar 1 pt a cada lado del escote = 23-27-33 pts restantes para cada hombro. Rematar cuando la labor mida 54-56-58 cm. Manga: Mont 56-56-56 pts con las ag de tamaño más pequeño y trabajar 10 cm en pt elástico, dejando 1 pt a cada lado en pt musgo. Cambiar a las ag de tamaño más grande y continuar como sigue: 2 pts en pt jersey, Patrón 1 sobre 52 pts, 2 pts en pt jersey. Cuando la labor mida 12 cm aum 1 pt a cada lado un total de 10-14-18 vcs. Talla S/M: cada 10 filas. Talla M/L: de modo alterno cada 6ª/7ª fila. Talla XL: de modo alterno cada 4ª y 5ª fila. = 76-84-92 pts - trabajar los pts aum en pt jersey. Cuando la labor mida 50-48-46 cm cerrar para la copa de la manga a cada lado, cada 2ª fila (no trabajar ninguna HEB en el patrón aunque se trabajen pts juntos): 4 pts 1 vez, 2 pts 4-5-5 vcs, 1 pt 2-2-1 vcs, después cerrar 2 pts a cada lado hasta que la labor mida 58-57-55 cm y después cerrar 4 pts 1 vez. Rematar, la manga mide aprox 59-58-56 cm. Terminación: Coser el hombro derecho. Cenefa del escote: Recoger aprox 80-90 pts alrededor del escote con las ag de tamaño más pequeño. Trabajar 4 filas en pt musgo, rematar. Coser el hombro izquierdo y continuar a lo largo de la cenefa del escote. Montar las mangas y coser las mangas y los lados dentro del pt orillo Cinturón: Mont 7 pts con las ag de doble punta. Trabajar 1 fila de derecho, *pasar los pts al extremo derecho de la ag sin girar la labor, pasar el hilo por detrás de la labor y trabajar 1 fila de derecho por el mismo lado que la fila anterior*. Repetir de * a *. Para un mejor resultado, estirar el hilo antes de trabajar la fila sig. Rematar cuando el cinturón mida aprox 120-150 cm. |
|||||||||||||
Explicaciones del diagrama |
|||||||||||||
|
|||||||||||||
 |
|||||||||||||
 |
|||||||||||||
 |
|||||||||||||
 |
|||||||||||||
 |
|||||||||||||
¿Terminaste este patrón?Entonces, etiqueta tus fotos con #dropspattern o envíalas a la galería #dropsfan. ¿Necesitas ayuda con este patrón?Encontrarás 19 videos tutoriales, un espacio para comentarios/preguntas y más visitando la página del patrón en garnstudio.com © 1982-2026 DROPS Design A/S. Todos los derechos reservados. Este documento, incluyendo todas sus sub-secciones, está protegido por los derechos de autor (copyright). Lee más acerca de lo que puedes hacer con nuestros patrones en la parte de abajo de cada patrón de nuestro sitio. |
|||||||||||||


Con más de 40 años en el diseño de modelos de punto y de ganchillo, DROPS Design ofrece una de las más vastas colecciones de patrones gratuitos en el internet - traducidos en 17 idiomas. Al día de hoy, contamos con 324 catálogos y 12290 patrones - de los cuales 11685 están traducidos en español.
Nosotros trabajamos con mucho esmero para brindarte lo mejor que las labores de punto y ganchillo tienen para ofrecer,inspiración y consejos, así como hilos de magnífica calidad a precios increíbles! Te gustaría usar nuestros patrones para otro fin además del uso personal? Puedes leer acerca de lo que estás permitida a hacer en el texto de Copyright en la parte de abajo de todos nuestros patrones. Felices labores!
Escribe un comentario sobre DROPS 73-5
¡Nos encantaría saber qué piensas acerca de este patrón!
Si quieres escribir una pregunta referente al patrón, por favor asegúrate de elegir la categoría correcta en el formulario debajo, para acelerar el proceso de respuesta. Los campos obligatorios están marcados con un *.