
Categorías populares
¿Buscas un hilo?


Comentarios / Preguntas (59)
Sandra escribió:
I'm a beginner and the finished product was too tight at the end. What did I do wrong?
12.12.2018 - 15:21DROPS Design respondió:
Dear Sandra, did you get the correct tension? You should have 17 dc (UK)/ sc (US) = 10 cm/4" in width - and keep the same tension while working the hat. Happy crocheting!
12.12.2018 - 16:10Libby escribió:
Hi, first of all great pattern it comes out really good! My question is, do I keep decrease as I go along from the black or do I decrease only once in the black row in this pattern? I hope you understand my question
14.11.2018 - 14:24DROPS Design respondió:
Dear Libby, you decrease only 1 time 12-14 sts on one round (the first round after the 3 rounds with medium brown) = there are now 76-82 sts continue working the last 6 rounds without decreasing anymore. Happy crocheting!
14.11.2018 - 15:04
![]() Angelina escribió:
Angelina escribió:
How do I stop the spiral? There's not obvious transition from the beginning of the spiral to the end, so I can't tell where to put my sl st before I change colors.
16.08.2018 - 02:12DROPS Design respondió:
Dear Angelina, for a nicer transition for the stripes, add a marker in the first st of every round and let the marker follow the piece so that you can sl st the last st with first colour in this stitch. You can also continue working in the round in a spiral with the new colour, the transition will be quite smooth. Happy crocheting!
16.08.2018 - 09:37Lyn escribió:
Thanks for your prompt reply and video. I understand working in the round but it doesn't work the same in a spiral for me. Is the jog unavoidable in this situation
23.05.2018 - 15:02DROPS Design respondió:
Dear Lynn, when working stripes, stop the spiral and join in the round with the technique shown in the video will avoid you a jog at the beg of round. Happy crocheting!
23.05.2018 - 16:07Lyn escribió:
I am failing to be able to join my spiral stripes without the "jog" despite reading an earlier comment you made. "before changing colour you can join with a sl st with the new colour and continue as before without joining until next stripe, you will then avoid a jog at the back of hat" It sounds simple enough but not working for me. Can you suggest what I'm missing in the interpretation n explain again
23.05.2018 - 14:24Lyn escribió:
I'm failing to be able to join my spiral stripes without the "jog" despite reading your earlier answer to Lori. I'm obviously not interpreting something correctly "before changing colour you can join with a sl st with the new colour and continue as before without joining until next stripe, you will then avoid a jog at the back of hat" It sounds simple enough but it's not working for me..any suggestions what I'm missing.
23.05.2018 - 14:18DROPS Design respondió:
Dear Lynn, this video shows how to change colour at the end of round, ie work the beg of st with first colour (same of the round you are finishing) and make the last pull through with the colour used on next round. Happy crocheting!
23.05.2018 - 14:39
![]() Lori escribió:
Lori escribió:
Because the rows are worked in a spiral, my stripes are not straight at the join. Any advice?
06.04.2018 - 06:21DROPS Design respondió:
Dear Lori, before changing colour you can join with a sl st with the new colour and continue as before without joining until next stripe, you will then avoid a jog at the back of hat. Happy crocheting!
06.04.2018 - 08:47
![]() Sciakath escribió:
Sciakath escribió:
I have made two of these now and am on my third -- and I NEVER usually repeat a pattern! These beanies have such a nice weight to them -- not too bulky. I used yarn I had in my stash (Loops & Threads Impeccable) and it worked great. Thanks for the EXCELLENT pattern!
04.03.2018 - 22:12Margarita Lucero Apolonio escribió:
Podría mandarme el patrón de este gorro
19.03.2017 - 06:55DROPS Design respondió:
Hola Margarita. Con este línk puedes descargar el patrón gratis: https://www.garnstudio.com/pattern.php?id=6379&cid=23
27.03.2017 - 20:49Danielle escribió:
It seems to me that this is worked in single crochet, am I wrong?
27.01.2017 - 21:58DROPS Design respondió:
Dear Danielle, you are right, this hat is worked in sc, crocheting in back loop of sts. See US-English pattern here. Happy crocheting!
30.01.2017 - 10:33
|
|
Carmel |
|
 |
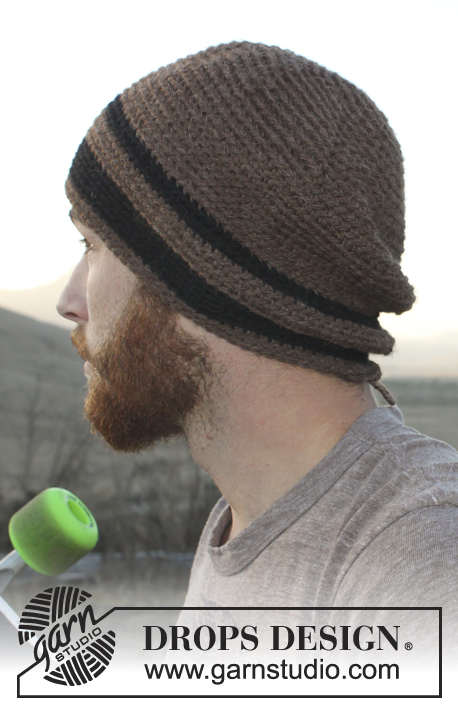 |
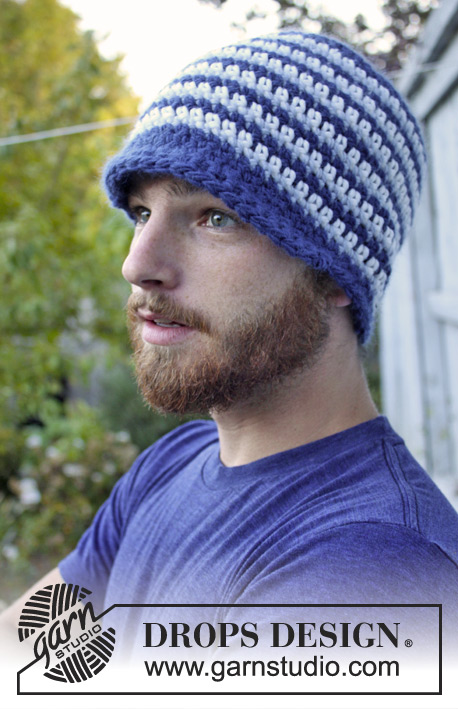
Gorro DROPS para hombres, a ganchillo, en “Nepal”. Talla: S – XL.
DROPS Extra 0-980 |
|
|
INFORMACIÓN PARA LA ELABORACIÓN DEL TRABAJO: Después del último p.b. de la vta, continuar hacia la vta sig con 1 p.b. en el p.b. sig (= primer p.b. de la vta anterior). NOTA: Insertar un marcapuntos al inicio de la vta entre el último p.b. y el primer p.b. de la vta, mover el marcapuntos hacia arriba. Trabajar los p.b. insertando la ag en las hebras posteriores de los pts para crear una textura con franjas. CÍRCULO MÁGICO: Empezar con esta técnica para evitar que se forme un agujero en el centro (en vez del anillo de cadenas): Sostener la punta del hilo y enrollarlo una vez alrededor del dedo índice para formar un bucle. Sostener el bucle con el pulgar izquierdo y el dedo medio, colocar el hilo sobre el dedo índice izquierdo. Insertar la ag a través del bucle, hacer una lazada y extraer el hilo a través del bucle, hacer 1 cad, después hacer p.b. alrededor del bucle. Cuando se ha alcanzado el número de p.b. deseado, tirar de la punta del hilo para apretar el bucle. Asegurar la punta del hilo por el lado de atrás. Continuar trabajando en redondo, en espiral. TIP PARA DISMINUCIÓN: Trabajar juntos aprox cada 7º/8º p.b. – 6º/7º p.b. de la vta. Trabajar 2 p.b. juntos de la manera sig: Insertar la ag en el primer p.b. y extraer el hilo, insertar la ag en el p.b. sig y extraer el hilo, hacer una lazada y extraer el hilo a través de todos los pts en la ag. ------------------------------------------------------ GORRO: Con ag de ganchillo tamaño 5 mm y café hacer un CÍRCULO MÁGICO – ver arriba, o mon 4 cad y formar un anillo con 1 p.bjs en la 1ª cad. LEER INFORMACIÓN PARA LA ELABORACIÓN DEL TRABAJO! VUELTA 1: Hacer 8 p.b. en el círculo mágico/anillo de cad. Ahora hacer p.b. insertando la ag en las hebras posteriores de los pts. VUELTA 2: Hacer 2 p.b. en cada p.b. = 16 p.b. VUELTA 3: * 1 p.b. en el primer p.b., 2 p.b. en el p.b. sig *, repetir de *a* = 24 p.b. VUELTA 4: * 1 p.b. en los 2 p.b. sig, 2 p.b. en el p.b. sig *, repetir de *a* = 32 p.b. VUELTA 5: Hacer 1 p.b. en cada p.b. = 32 p.b. RECUERDE MANTENER LA MISMA TENSIÓN DE LA MUESTRA! VUELTA 6: * 1 p.b. en los 3 p.b. sig, 2 p.b. en el p.b. sig *, repetir de *a* = 40 p.b. VUELTA 7: * 1 p.b. en los 4 p.b. sig, 2 p.b. en el p.b. sig *, repetir de *a* = 48 p.b. VUELTA 8: * 1 p.b. en los 5 p.b. sig, 2 p.b. en el p.b. sig *, repetir de *a* = 56 p.b. VUELTA 9: * 1 p.b. en los 6 p.b. sig, 2 p.b. en el p.b. sig *, repetir de *a* = 64 p.b. VUELTA 10: * 1 p.b. en los 7 p.b. sig, 2 p.b. en el p.b. sig *, repetir de *a* = 72 p.b. VUELTA 11: * 1 p.b. en los 8 p.b. sig, 2 p.b. en el p.b. sig *, repetir de *a* = 80 p.b. VUELTA 12: * 1 p.b. en los 9 p.b. sig, 2 p.b. en el p.b. sig * repetir de *a* = 88 p.b. Terminar los aum en la talla S/M aquí, continuar haciendo p.b. en redondo. VUELTA 13: * 1 p.b. en los 10 p.b. sig, 2 p.b. en el p.b. sig *, repetir de *a* = 96 p.b. Terminar los aum en la talla L/XL aquí, continuar haciendo p.b. en redondo. Cuando la pieza mida 12-15 cm, hacer p.b. como antes y cambiar la combinación de colores de la manera sig: 2 vtas negro, 3 vtas café, 1 vta negro y, en esta vta, dism 12-14 p.b. distribuidos equitativamente – LEER TIP PARA DISMINUCIÓN (= 76-82 p.b. restantes), 4 vtas negro, 2 vtas café. El gorro mide aprox 20-23 cm a partir de la parte de arriba. Asegurar los hilos. |
|
¿Terminaste este patrón?Entonces, etiqueta tus fotos con #dropspattern o envíalas a la galería #dropsfan. ¿Necesitas ayuda con este patrón?Encontrarás 7 videos tutoriales, un espacio para comentarios/preguntas y más visitando la página del patrón en garnstudio.com © 1982-2026 DROPS Design A/S. Todos los derechos reservados. Este documento, incluyendo todas sus sub-secciones, está protegido por los derechos de autor (copyright). Lee más acerca de lo que puedes hacer con nuestros patrones en la parte de abajo de cada patrón de nuestro sitio. |
|


Con más de 40 años en el diseño de modelos de punto y de ganchillo, DROPS Design ofrece una de las más vastas colecciones de patrones gratuitos en el internet - traducidos en 17 idiomas. Al día de hoy, contamos con 324 catálogos y 12290 patrones - de los cuales 11675 están traducidos en español.
Nosotros trabajamos con mucho esmero para brindarte lo mejor que las labores de punto y ganchillo tienen para ofrecer,inspiración y consejos, así como hilos de magnífica calidad a precios increíbles! Te gustaría usar nuestros patrones para otro fin además del uso personal? Puedes leer acerca de lo que estás permitida a hacer en el texto de Copyright en la parte de abajo de todos nuestros patrones. Felices labores!
Escribe un comentario sobre DROPS Extra 0-980
¡Nos encantaría saber qué piensas acerca de este patrón!
Si quieres escribir una pregunta referente al patrón, por favor asegúrate de elegir la categoría correcta en el formulario debajo, para acelerar el proceso de respuesta. Los campos obligatorios están marcados con un *.