
Categorías populares
¿Buscas un hilo?


Comentarios / Preguntas (59)
![]() Jason Ebert escribió:
Jason Ebert escribió:
Hallo ich habe ihr Anleitung gelesen und wollte es nach machen nur ich habe da ein Problem bei Runde 3, da steht wie folgt: \" 3. Runde: 1fm in die nächste fm*, von * - * wdh 24fm.\" und dazu ist meine frage, wenn ich die 2 Reihe so fort setze komme ich am ende der Runde auf 36, wie komme ich auf die 24 fm?. Ich habe vieles Probiert aber dies ist mir nicht gelungen. ich finde euche anleitung Toll macht weiter so, Bleibt Gesund. mit freundlichen gruß Jason
02.01.2022 - 10:49
![]() Geri escribió:
Geri escribió:
When you say hat measures 8 to 9 inches from the top, top of what please
21.08.2021 - 21:05DROPS Design respondió:
Dear Geri, it is measured from teh top of the hat (from the point you started making it. Happy Stintching!
22.08.2021 - 01:02
![]() Claudia escribió:
Claudia escribió:
I have never the term "get yarn" in a crochet pattern. When I clicked "here" for terms, the size chart opens. Both links lead to the size chart. There is no explanation of terms available. So, what does "get yarn" mean?
07.01.2021 - 13:54DROPS Design respondió:
Dear Claudia, I cannot find this wording in this pattern, maybe you could ask the question under the question section of one of a pattern you found this wording, this will be the best way to be sure to answer you properly. Thanks for your comprehension.
07.01.2021 - 16:22
![]() Carlien escribió:
Carlien escribió:
Thank you for a wonderful pattern! I made one in med grey and light blue for my son and it came out beautiful.
04.06.2020 - 20:00
![]() Kdamm escribió:
Kdamm escribió:
I just finished row 12 and it’s completely flat, when I ta time to do the 1 decrease row will it actually give it shape ? And when I do get to that decrease row do I sc tog every 7th st?
30.12.2019 - 08:53DROPS Design respondió:
Dear Kdamm, you are supposed to increase for the top of hat (crown) until you get either 88 sts (round 12 in first size) or 96 sts (round 13 in larger size), then work straight to shape the edge of the hat (the length) to the striped edge. Happy crocheting!
02.01.2020 - 13:29
![]() Jennifer escribió:
Jennifer escribió:
My hat is turning out flat like a pancake at round 10, what am i doing wrong? Pmease help
26.10.2019 - 15:58DROPS Design respondió:
Dear Jennifer, the top of hat will be finished after round 12 in size S/M and after round 13 in size L/XL, and then you will work without any increases to make the "sides" of the hat. Happy crocheting!
05.11.2019 - 09:56
![]() Claudia escribió:
Claudia escribió:
Thank you! So far so good! You explain everything so well :-)
18.06.2019 - 22:48
![]() Claudia escribió:
Claudia escribió:
How big should the magic circle be, please? Thank you.
14.06.2019 - 19:25DROPS Design respondió:
Dear Claudia, dont worry about it - size of magic circle is not so important as you will "close" it (by pulling the strand) afterwards. Happy crafting!
15.06.2019 - 23:44
![]() Adiba escribió:
Adiba escribió:
Bonjour, J'ai réalisé ce bonnet pour mon frère, il est juste génial, car maintenant 3 autres personnes de ma famille qui voudraient que je leur en fasse un !! Merci.
07.05.2019 - 12:09
![]() Kelly T escribió:
Kelly T escribió:
Is it possible to make this with super bulky yarn? what adjustments are needed?
06.02.2019 - 02:41DROPS Design respondió:
Dear Kelly, your tension will be completely different and pattern would have to be completely adjusted to your own tension. Should you need any individual assistance to adjust the pattern to your yarn please contact the store where you bought the yarn. Happy crocheting!
06.02.2019 - 09:08
|
|
Carmel |
|
 |
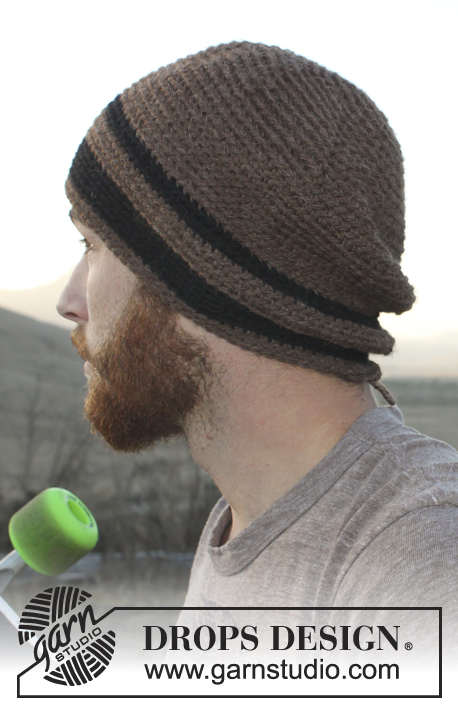 |
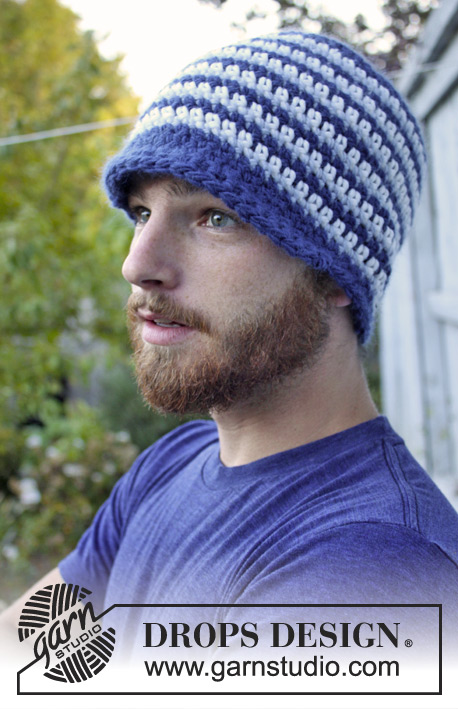
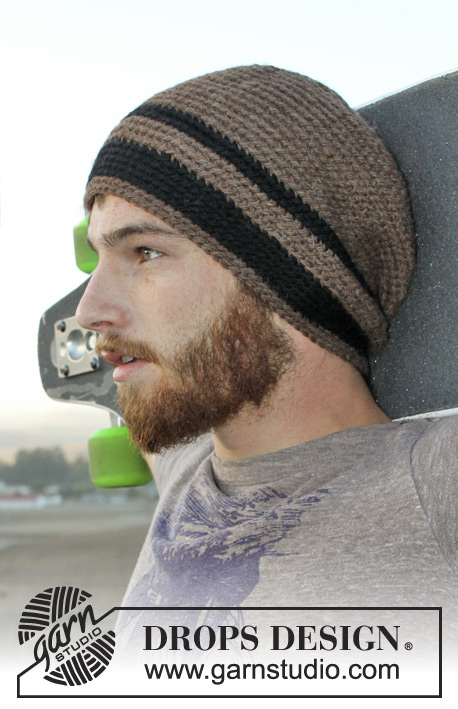
Gorro DROPS para hombres, a ganchillo, en “Nepal”. Talla: S – XL.
DROPS Extra 0-980 |
|
|
INFORMACIÓN PARA LA ELABORACIÓN DEL TRABAJO: Después del último p.b. de la vta, continuar hacia la vta sig con 1 p.b. en el p.b. sig (= primer p.b. de la vta anterior). NOTA: Insertar un marcapuntos al inicio de la vta entre el último p.b. y el primer p.b. de la vta, mover el marcapuntos hacia arriba. Trabajar los p.b. insertando la ag en las hebras posteriores de los pts para crear una textura con franjas. CÍRCULO MÁGICO: Empezar con esta técnica para evitar que se forme un agujero en el centro (en vez del anillo de cadenas): Sostener la punta del hilo y enrollarlo una vez alrededor del dedo índice para formar un bucle. Sostener el bucle con el pulgar izquierdo y el dedo medio, colocar el hilo sobre el dedo índice izquierdo. Insertar la ag a través del bucle, hacer una lazada y extraer el hilo a través del bucle, hacer 1 cad, después hacer p.b. alrededor del bucle. Cuando se ha alcanzado el número de p.b. deseado, tirar de la punta del hilo para apretar el bucle. Asegurar la punta del hilo por el lado de atrás. Continuar trabajando en redondo, en espiral. TIP PARA DISMINUCIÓN: Trabajar juntos aprox cada 7º/8º p.b. – 6º/7º p.b. de la vta. Trabajar 2 p.b. juntos de la manera sig: Insertar la ag en el primer p.b. y extraer el hilo, insertar la ag en el p.b. sig y extraer el hilo, hacer una lazada y extraer el hilo a través de todos los pts en la ag. ------------------------------------------------------ GORRO: Con ag de ganchillo tamaño 5 mm y café hacer un CÍRCULO MÁGICO – ver arriba, o mon 4 cad y formar un anillo con 1 p.bjs en la 1ª cad. LEER INFORMACIÓN PARA LA ELABORACIÓN DEL TRABAJO! VUELTA 1: Hacer 8 p.b. en el círculo mágico/anillo de cad. Ahora hacer p.b. insertando la ag en las hebras posteriores de los pts. VUELTA 2: Hacer 2 p.b. en cada p.b. = 16 p.b. VUELTA 3: * 1 p.b. en el primer p.b., 2 p.b. en el p.b. sig *, repetir de *a* = 24 p.b. VUELTA 4: * 1 p.b. en los 2 p.b. sig, 2 p.b. en el p.b. sig *, repetir de *a* = 32 p.b. VUELTA 5: Hacer 1 p.b. en cada p.b. = 32 p.b. RECUERDE MANTENER LA MISMA TENSIÓN DE LA MUESTRA! VUELTA 6: * 1 p.b. en los 3 p.b. sig, 2 p.b. en el p.b. sig *, repetir de *a* = 40 p.b. VUELTA 7: * 1 p.b. en los 4 p.b. sig, 2 p.b. en el p.b. sig *, repetir de *a* = 48 p.b. VUELTA 8: * 1 p.b. en los 5 p.b. sig, 2 p.b. en el p.b. sig *, repetir de *a* = 56 p.b. VUELTA 9: * 1 p.b. en los 6 p.b. sig, 2 p.b. en el p.b. sig *, repetir de *a* = 64 p.b. VUELTA 10: * 1 p.b. en los 7 p.b. sig, 2 p.b. en el p.b. sig *, repetir de *a* = 72 p.b. VUELTA 11: * 1 p.b. en los 8 p.b. sig, 2 p.b. en el p.b. sig *, repetir de *a* = 80 p.b. VUELTA 12: * 1 p.b. en los 9 p.b. sig, 2 p.b. en el p.b. sig * repetir de *a* = 88 p.b. Terminar los aum en la talla S/M aquí, continuar haciendo p.b. en redondo. VUELTA 13: * 1 p.b. en los 10 p.b. sig, 2 p.b. en el p.b. sig *, repetir de *a* = 96 p.b. Terminar los aum en la talla L/XL aquí, continuar haciendo p.b. en redondo. Cuando la pieza mida 12-15 cm, hacer p.b. como antes y cambiar la combinación de colores de la manera sig: 2 vtas negro, 3 vtas café, 1 vta negro y, en esta vta, dism 12-14 p.b. distribuidos equitativamente – LEER TIP PARA DISMINUCIÓN (= 76-82 p.b. restantes), 4 vtas negro, 2 vtas café. El gorro mide aprox 20-23 cm a partir de la parte de arriba. Asegurar los hilos. |
|
¿Terminaste este patrón?Entonces, etiqueta tus fotos con #dropspattern o envíalas a la galería #dropsfan. ¿Necesitas ayuda con este patrón?Encontrarás 7 videos tutoriales, un espacio para comentarios/preguntas y más visitando la página del patrón en garnstudio.com © 1982-2026 DROPS Design A/S. Todos los derechos reservados. Este documento, incluyendo todas sus sub-secciones, está protegido por los derechos de autor (copyright). Lee más acerca de lo que puedes hacer con nuestros patrones en la parte de abajo de cada patrón de nuestro sitio. |
|


Con más de 40 años en el diseño de modelos de punto y de ganchillo, DROPS Design ofrece una de las más vastas colecciones de patrones gratuitos en el internet - traducidos en 17 idiomas. Al día de hoy, contamos con 324 catálogos y 12290 patrones - de los cuales 11675 están traducidos en español.
Nosotros trabajamos con mucho esmero para brindarte lo mejor que las labores de punto y ganchillo tienen para ofrecer,inspiración y consejos, así como hilos de magnífica calidad a precios increíbles! Te gustaría usar nuestros patrones para otro fin además del uso personal? Puedes leer acerca de lo que estás permitida a hacer en el texto de Copyright en la parte de abajo de todos nuestros patrones. Felices labores!
Escribe un comentario sobre DROPS Extra 0-980
¡Nos encantaría saber qué piensas acerca de este patrón!
Si quieres escribir una pregunta referente al patrón, por favor asegúrate de elegir la categoría correcta en el formulario debajo, para acelerar el proceso de respuesta. Los campos obligatorios están marcados con un *.