
Categorías populares
¿Buscas un hilo?


Comentarios / Preguntas (59)
![]() Nataliia escribió:
Nataliia escribió:
Hello, could you explain how do I pick the size correctly? I see the widest part S/M has 88 dc and L/XL 96dc. Taking the tension of 17dc/10cm that product width will measure roughly 52cm and 56 respectively. In the meantime the size chart says S/M -58/60 cm and L/XL – 62/64 cm. Is there any mistake?
16.12.2025 - 10:39DROPS Design respondió:
Dear Natallia, the hat needs to be somewhat tighter than the circumference of the head to stay nicely on place, reason why it's smaller, but piece is elastic enough to stretch around the head. Happy crocheting!
17.12.2025 - 10:14
![]() Brigitte escribió:
Brigitte escribió:
Hi do you have a version of this hat for regular hat not a beanie
10.12.2025 - 12:09DROPS Design respondió:
Dear Brigitte, you will find all our crochet patterns for hat here, for men. One of them might inspire you. Happy crocheting!
11.12.2025 - 08:51
![]() Lydia escribió:
Lydia escribió:
He leído la sección del anillo mágico y la información para la elaboración de trabajo, pero no me queda claro cuántos puntos bajos tengo que hacer en el anillo mágico para formarlo. ¿La primera vuelta corresponde a que debo hacer 8 puntos bajos en ese anillo como primer trabajo? Gracias.
01.09.2025 - 13:52
![]() Jeannie escribió:
Jeannie escribió:
I see a tip regarding decreases, but I never see the pattern call for any decreases?
22.12.2024 - 03:12DROPS Design respondió:
Dear Jeannie, you work the decreases at the very end of the pattern: "When piece measures 12-15 cm, work dc as before and change colour as follows: 2 rounds black, 3 rounds medium brown, 1 round black and on this round dec 12-14 dc evenly – READ DECREASE TIP (= 76-82 dc remain)" or, for the US version, "(When piece measures 12-15 cm, work dc as before and change colour as follows: 2 rounds black, 3 rounds medium brown, 1 round black and on this round dec 12-14 dc evenly – READ DECREASE TIP (= 76-82 dc remain)". Happy crochetting!
22.12.2024 - 20:35
![]() Don Lynne escribió:
Don Lynne escribió:
I am confused by the decrease section. I want to make the small hat, will I decrease each of the color changing rows by the same number of stitches? How do I know if I work together every 6, 7, or 8th stitch?
11.02.2024 - 19:16DROPS Design respondió:
Dear Don, for the smallest size you work always as indicated first in a sequence. In the case of the decreases, as indicated in DECREASE TIP, work together every 7th and 8th dc. That is, *6 dc, work the next 2 dc together*. Repeat from * to * 12 times. This is worked only in the black round, where there are no color changes. Happy crochetting!
12.02.2024 - 00:00
![]() Don escribió:
Don escribió:
When decreasing for the small hat, do I decrease each row by the same number of work together stitches? I am doing the small hat do I decrease every 6, 7, or 8 stitches?
11.02.2024 - 19:14DROPS Design respondió:
Dear Don, for the smallest size you work always as indicated first in a sequence. In the case of the decreases, as indicated in DECREASE TIP, work together every 7th and 8th dc. That is, *6 dc, work the next 2 dc together*. Repeat from * to * 12 times. This is worked only in the black round, where there are no color changes. Happy crochetting!
11.02.2024 - 23:59
![]() Anna escribió:
Anna escribió:
Ja det har jeg. Ok men det er fellingen jeg trenger hjelp med. Jeg får det ikke til når jeg teller. Kan dere hjelpe meg med det?
22.01.2024 - 14:59DROPS Design respondió:
Hei Anna. Beklager, men skjønner ikke hva du ikke får til når du teller? Om du har 96 masker og skal felle 14 masker jevnt fordelt, hekler du en omgang der du hekler 2 fastmasker sammen 14 ganger jevnt over omgangen (du hekler ca 4 fastmasker, så 2 fastmasker sammen, så hekler du 5 fastmasker, så 2 fastmasker sammen, så gjentar du dette omgangen ut). Du skal da få 82 masker. mvh DROPS Design
29.01.2024 - 13:16
![]() Anna Johansson escribió:
Anna Johansson escribió:
Hei,har et spørsmål om når jeg skall felle av str. L/XL Det står at man skal hekle sammen 7,8-6,7 masker på omgangen. Skal bli 82 masker og 14 masker som felles av. Har tellt mange ganger. For ikke det at stemme. Det blir masker til overs. Hva gjør jeg for feil?
19.01.2024 - 18:48DROPS Design respondió:
Hei Anna. I str. L/XL har du 96 masker når økningene / 13. omg er ferdig. Så hekler du til arbeidet måler 15 cm, bytt farge og samtidig skal det felles 14 fastmasker jevnt fordelt i str. L/XL = 96 - 14 = 82 fastmasker. mvh DROPS Design
22.01.2024 - 14:08
![]() Abby escribió:
Abby escribió:
Row 5 makes the hat have a strange bump … is this meant to be that way?? I don’t understand why it doesn’t just increase evenly … I’m already on row 14 and don’t want to pull it out …
05.01.2024 - 06:03DROPS Design respondió:
Dear Abby, make sure your tension is right and you still keep it, on 5th round you won't increase, but you will then continue increasing. Happy crocheting!
05.01.2024 - 08:25
![]() Julia escribió:
Julia escribió:
Hallo, super tolle und einfache Anleitung allerdings habe ich Probleme mit der Größe. Ich bin Anfänger und das wäre meine zweite Mütze. Der Kopfumfang ist 60 cm und ich habe naach der Anleitung für L/XL gehäkelt. War auch eigentlich schon fertig aber leider war die Mütze immer noch zu Eng. Die hat mir gepasst, ich habe ca einen Umfang von 58 cm. Kann es daran liegen, dass ich vielleicht zu eng gehäkelt habe? Die erste Mütze war nämlich auch zu eng.
03.01.2022 - 08:43DROPS Design respondió:
Liebe Julia, die Mütze soll immer etwas fester sein, damit die Mütze richtig hält, aber gerne können Sie weniger Maschen abnehmen, je nach der gewünschte Größe/Umfang. Gerne wird Ihnen Ihr Laden damit helfen, auch telefonisch oder per E-Mail. Viel Spaß beim häkeln!
03.01.2022 - 13:17
|
|
Carmel |
|
 |
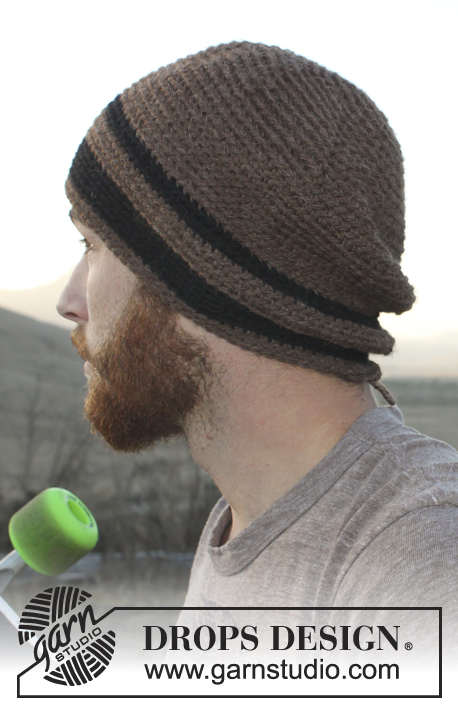 |
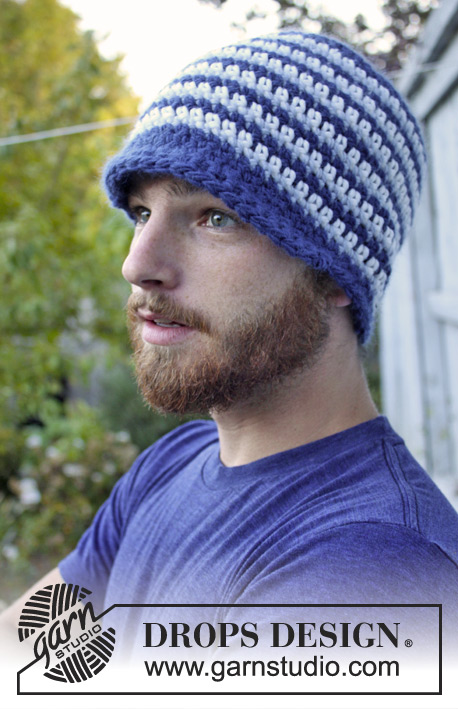
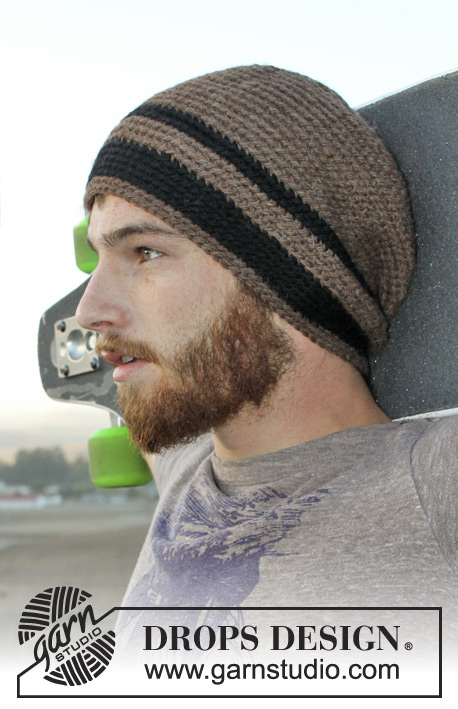
Gorro DROPS para hombres, a ganchillo, en “Nepal”. Talla: S – XL.
DROPS Extra 0-980 |
|
|
INFORMACIÓN PARA LA ELABORACIÓN DEL TRABAJO: Después del último p.b. de la vta, continuar hacia la vta sig con 1 p.b. en el p.b. sig (= primer p.b. de la vta anterior). NOTA: Insertar un marcapuntos al inicio de la vta entre el último p.b. y el primer p.b. de la vta, mover el marcapuntos hacia arriba. Trabajar los p.b. insertando la ag en las hebras posteriores de los pts para crear una textura con franjas. CÍRCULO MÁGICO: Empezar con esta técnica para evitar que se forme un agujero en el centro (en vez del anillo de cadenas): Sostener la punta del hilo y enrollarlo una vez alrededor del dedo índice para formar un bucle. Sostener el bucle con el pulgar izquierdo y el dedo medio, colocar el hilo sobre el dedo índice izquierdo. Insertar la ag a través del bucle, hacer una lazada y extraer el hilo a través del bucle, hacer 1 cad, después hacer p.b. alrededor del bucle. Cuando se ha alcanzado el número de p.b. deseado, tirar de la punta del hilo para apretar el bucle. Asegurar la punta del hilo por el lado de atrás. Continuar trabajando en redondo, en espiral. TIP PARA DISMINUCIÓN: Trabajar juntos aprox cada 7º/8º p.b. – 6º/7º p.b. de la vta. Trabajar 2 p.b. juntos de la manera sig: Insertar la ag en el primer p.b. y extraer el hilo, insertar la ag en el p.b. sig y extraer el hilo, hacer una lazada y extraer el hilo a través de todos los pts en la ag. ------------------------------------------------------ GORRO: Con ag de ganchillo tamaño 5 mm y café hacer un CÍRCULO MÁGICO – ver arriba, o mon 4 cad y formar un anillo con 1 p.bjs en la 1ª cad. LEER INFORMACIÓN PARA LA ELABORACIÓN DEL TRABAJO! VUELTA 1: Hacer 8 p.b. en el círculo mágico/anillo de cad. Ahora hacer p.b. insertando la ag en las hebras posteriores de los pts. VUELTA 2: Hacer 2 p.b. en cada p.b. = 16 p.b. VUELTA 3: * 1 p.b. en el primer p.b., 2 p.b. en el p.b. sig *, repetir de *a* = 24 p.b. VUELTA 4: * 1 p.b. en los 2 p.b. sig, 2 p.b. en el p.b. sig *, repetir de *a* = 32 p.b. VUELTA 5: Hacer 1 p.b. en cada p.b. = 32 p.b. RECUERDE MANTENER LA MISMA TENSIÓN DE LA MUESTRA! VUELTA 6: * 1 p.b. en los 3 p.b. sig, 2 p.b. en el p.b. sig *, repetir de *a* = 40 p.b. VUELTA 7: * 1 p.b. en los 4 p.b. sig, 2 p.b. en el p.b. sig *, repetir de *a* = 48 p.b. VUELTA 8: * 1 p.b. en los 5 p.b. sig, 2 p.b. en el p.b. sig *, repetir de *a* = 56 p.b. VUELTA 9: * 1 p.b. en los 6 p.b. sig, 2 p.b. en el p.b. sig *, repetir de *a* = 64 p.b. VUELTA 10: * 1 p.b. en los 7 p.b. sig, 2 p.b. en el p.b. sig *, repetir de *a* = 72 p.b. VUELTA 11: * 1 p.b. en los 8 p.b. sig, 2 p.b. en el p.b. sig *, repetir de *a* = 80 p.b. VUELTA 12: * 1 p.b. en los 9 p.b. sig, 2 p.b. en el p.b. sig * repetir de *a* = 88 p.b. Terminar los aum en la talla S/M aquí, continuar haciendo p.b. en redondo. VUELTA 13: * 1 p.b. en los 10 p.b. sig, 2 p.b. en el p.b. sig *, repetir de *a* = 96 p.b. Terminar los aum en la talla L/XL aquí, continuar haciendo p.b. en redondo. Cuando la pieza mida 12-15 cm, hacer p.b. como antes y cambiar la combinación de colores de la manera sig: 2 vtas negro, 3 vtas café, 1 vta negro y, en esta vta, dism 12-14 p.b. distribuidos equitativamente – LEER TIP PARA DISMINUCIÓN (= 76-82 p.b. restantes), 4 vtas negro, 2 vtas café. El gorro mide aprox 20-23 cm a partir de la parte de arriba. Asegurar los hilos. |
|
¿Terminaste este patrón?Entonces, etiqueta tus fotos con #dropspattern o envíalas a la galería #dropsfan. ¿Necesitas ayuda con este patrón?Encontrarás 7 videos tutoriales, un espacio para comentarios/preguntas y más visitando la página del patrón en garnstudio.com © 1982-2026 DROPS Design A/S. Todos los derechos reservados. Este documento, incluyendo todas sus sub-secciones, está protegido por los derechos de autor (copyright). Lee más acerca de lo que puedes hacer con nuestros patrones en la parte de abajo de cada patrón de nuestro sitio. |
|


Con más de 40 años en el diseño de modelos de punto y de ganchillo, DROPS Design ofrece una de las más vastas colecciones de patrones gratuitos en el internet - traducidos en 17 idiomas. Al día de hoy, contamos con 324 catálogos y 12290 patrones - de los cuales 11675 están traducidos en español.
Nosotros trabajamos con mucho esmero para brindarte lo mejor que las labores de punto y ganchillo tienen para ofrecer,inspiración y consejos, así como hilos de magnífica calidad a precios increíbles! Te gustaría usar nuestros patrones para otro fin además del uso personal? Puedes leer acerca de lo que estás permitida a hacer en el texto de Copyright en la parte de abajo de todos nuestros patrones. Felices labores!
Escribe un comentario sobre DROPS Extra 0-980
¡Nos encantaría saber qué piensas acerca de este patrón!
Si quieres escribir una pregunta referente al patrón, por favor asegúrate de elegir la categoría correcta en el formulario debajo, para acelerar el proceso de respuesta. Los campos obligatorios están marcados con un *.