
Categorías populares
¿Buscas un hilo?


Comentarios / Preguntas (21)
![]() Maren escribió:
Maren escribió:
Hallo, was bedeutet \"auf jeder Seite alle 2.Ndl abketten\"? Jede zweite Reihe abketten?
05.09.2025 - 10:07DROPS Design respondió:
Liebe Maren, ja, das bedeutet "in jeder 2. Reihe abketten". Die Anleitung ist schon recht alt und hat daher noch sprachliche Mängel, sie wird bei Gelegenheit überarbeitet.
23.10.2025 - 22:19
![]() Trille Leerbech escribió:
Trille Leerbech escribió:
Jeg kan forstå, at det der normalt er vrangsiden i glatstrikning er på denne model retsiden ? Så forstår jeg ikke, at der på ærmet efter 1 0 cm glatstrikning med vrangen ud samt 4 p ret nu skal strikkes glatstrikning med retsiden ud ?? Ser på fotoet ud som om ærmet har vrangsiden udad også...
01.08.2025 - 13:23DROPS Design respondió:
Hei Trille. På denne genseren er det vrangmasker som vises på bolen/bærestykket og de 10 første cm på ermene, men hoveddelen på ermet er i glattstrikk. mvh DROPS Design
25.08.2025 - 11:33
![]() Louise Odendaal escribió:
Louise Odendaal escribió:
Hi. Thank you for your answer. So in other words, the first part (first 10cm) of the slvs are in reverse stock sts, and then the rest of the slv is normal stock sts (knit rows are the right side). And the body section of the pattern is only in reverse stock sts (purl rows are the right side)? Thank you
15.01.2023 - 11:30DROPS Design respondió:
Dear Louise, you work the first 4 rows of the sleeves in garter stitch. Then work in reverste stocking stitch until the sleeve measures approx. 10 cm. Then work 4 rows in garter stitch and continue in normal stocking stitch until the end. The body is worked completely in reverse stocking stitch. To finish, you work the neckband in garter stitch. Happy knitting!
15.01.2023 - 11:38
![]() Louise Odendaal escribió:
Louise Odendaal escribió:
Hi. For the slv, pattern starts with 4 rows garter sts (4 rows just knit sts), then reverse stock sts. My understanding of reverse stock sts is knit 1 row, purl 1 row, but that the purl side = right side. At 10cm mark, starting with a right (purl side?) i do 4 rows garter sts (4 rows just knit sts). Is this correct thusfar? And then pattern states knit rest of slv in stock sts....is this again reverse stock (purl rows are right side), or normal stock sts (knit rows are right side)? Thank you
14.01.2023 - 22:51DROPS Design respondió:
Dear Louise, yes, in reverse stocking stitch you have: purl row (right side) and knit row (wrong side). Before garter stitch, the last row should have been a knit row on the wrong side. Then work the 4 rows in garter stitch and continue with normal stocking stitch. Happy knitting!
15.01.2023 - 10:00
![]() Angelika escribió:
Angelika escribió:
Guten tag, um wie viel reihen muss man die ärmel verlängern bei normaler ärmellänge liebe grüße angelika
15.09.2022 - 16:14DROPS Design respondió:
Liebe Angelika, gerne können Sie sich dafür von einem Modell mit langen Ärmeln inspirieren lassen. Viel Spaß beim stricken!
16.09.2022 - 09:17
![]() Brigitta Gerosa escribió:
Brigitta Gerosa escribió:
Guten Tag Ist das korrekt, dass die linke Seite beim Vorder- und Hinterteil aussen ist und der Ärmel zuerst linke Seite aussen und dann rechte Seite aussen? Auf dem Foto sieht es irgendwie anders aus. Könnte auch die rechte Seite aussen sein? Davon bin ich zuerst ausgegangen. Vielen Dank für die Hilfe! Brigitta
02.03.2022 - 13:19DROPS Design respondió:
Liebe Frau Gerosa, so stimmt es, Vorder- und Rückenteil werden glatt links gestrickt, und die Ärmel werden zuerst glatt links dann glatt rechts (nach 10 cm und 2 Krausrippen) gestrickt. Viel Spaß beim stricken!
02.03.2022 - 17:34
![]() Brigitta Gerosa escribió:
Brigitta Gerosa escribió:
Hallo! Zuerst besten Dank für die tolle Anleitung! Ich stricke den Pullover mit einem fast gleichen Garn. Die beiden ersten Krausrippen am Vorderteil habe ich mit Nadel 2 gestrickt, glatt rechts stricke ich mit Nadel 3, so stimmt es mit der Maschenprobe überein. Leider rollen sich die beiden Krausrippen ein. Was kann ich tun? Brigitta
06.02.2022 - 11:44DROPS Design respondió:
Liebe Brigitta, Sie können den Pullover danach mit Stecknadeln auf einer geeigneten Unterlage spannen, anfeuchten (z.B. mit einer Sprühflasche für Blumen) und trocknen lassen, danach entfernen Sie die Stecknadeln, dann sollte sich der Rand nicht mehr rollen. Viel Spaß beim stricken!
07.02.2022 - 10:21
![]() Maya Natzkoff escribió:
Maya Natzkoff escribió:
Hi, I am on front side and I have to bind off for the armhole. The pattern says bind off at each side every other row 4 st. Is that mean bind off 4 st. on the beginning of RS and knit till the end of row, turn, bind off 4 st on the beginning of WS and purl till the end of row? And the same for the other decreases.
19.12.2021 - 21:14DROPS Design respondió:
Dear Mrs Natzkoff, correct, that's exactly how to do: cast of first 4 sts at the beginning of next 2 rows (4 sts at the beg of row from RS and 4 sts at the beg of next row from WS). and so on. Happy knitting!
20.12.2021 - 08:17
![]() Cabanis escribió:
Cabanis escribió:
Je ne comprends les explications pour les emmanchures au total le nombre de points ne correspond pas pour la taille m
05.08.2020 - 14:43
![]() Cabanis escribió:
Cabanis escribió:
Les diminutions pour les emmanchures Que veut -o-1 etc quand je vais le compte des diminutions je n’arrive pas à 87 de mailles une fois les diminutions faites .j arrive à 89 .je ne comprends pas pour ce modèle l,explication
05.08.2020 - 14:41DROPS Design respondió:
Bonjour Mme Cabanis, chaque nombre se réfère à la taille concerné, par ex pour 87 m, vous tricotez la 2ème taille, vous allez rabattre pour les emmanchures de chaque côté: 1 fois 4 m, 1 fois 3 m, 2 fois 2 m et 2 fois 1 m. soit: 113 - (4+3+2+2+1+1)x2 = 113 - 26 = 87 m. Bon tricot!
05.08.2020 - 16:45
|
|
DROPS 76-23 |
|
|
|
|
Pulóver DROPS en “Cotton Viscose”
DROPS 76-23 |
|
|
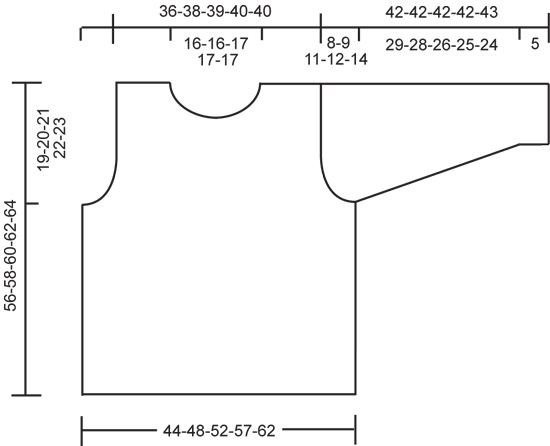
Muestra: 23 pts x 30 vtas = 10 x 10 cm en las ag grandes con pt jersey. Delantero: Mon 104-113-122-133-145 pts en las ag pequeñas y tejer 4 vtas de pt musgo. Cambiar a las ag grandes y pt jersey revés. Cuando la pieza mida 37-38-39-40-41 cm rem para la sisa en cada lado en vtas alternas: 4-4-5-6-7 pts 1 vez, 3 pts 0-1-1-1-2 veces, 2 pts 2-2-2-4-5 veces y 1 pt 3-2-4-4-4 veces = 82-87-90-91-91 pt. Cuando la pieza mida 48-50-52-54-56 cm rem los 18-19-20-21-21 pts centrales para el cuello. Luego rem en cada orilla del cuello en vtas alternas: 3 pts 1 vez, 2 pts 2 veces y 1 pt 2 veces = 23-25-26-26-26 pts restantes en cada hombro. Rem pts cuando la pieza mida 56-58-60-62-64 cm. Espalda: Mon pts y tejer igual que el delantero. Rem para la sisa como en el delantero y cont hasta que la pieza mida 54-56-58-60-62 cm. A cont rem los 32-33-34-35-35 pts centrales para el cuello. Dism 1 pt en cada orilla del cuello en vtas alternas 2 veces = 23-25-26-26-26 pts restantes en el hombro. Rem pts cuando la pieza mida 56-58-60-62-64 cm. Manga: Mon 62-62-67-67-71 pts en las ag pequeñas y tejer 4 vtas de pt musgo. Cambiar a las ag grandes y pt jersey revés. Leer completamente la sección siguiente antes de tejer: Aum: Cuando la pieza mida 5 cm aum 1 pt en cada lado un total de 9-11-11-13-14 veces: Talla S: cada 10 vtas. Talla M: alternadamente cada 7ª y 8ª vta. Talla L: cada 7 vtas. Talla XL: alternadamente cada 5ª y 6ª vta. Talla XXL: cada 5 vtas = 80-84-89-93-99 pts. Patrón: Al mismo tiempo cuando la manga mida aprox 10 cm – ajustar para que la sig vta sea una vta por el lado dereco – tejer 4 vtas de pt musgo. Luego tejer el resto en pt jersey. Cuando la manga mida 34-33-31-30-29 cm rem para el copete de manga en cada lado en vtas alternas: 4 pts 1 vez, 3 pts 2-2-1-1-1 veces, 2 pts 3-3-2-2-2 veces y 1 pt 2-3-8-10-14 veces, después rem 2 pts en cada lado hasta que la pieza mida 41-41-41-41-42 cm, luego rem 3 pts 1 vez en cada lado. Rem los pts restantes, la pieza mida aprox 42-42-42-42-43 cm. Terminación: Coser los hombros. Borde del cuello: Levantar aprox 94 a 104 pts alrededor del cuello en la ag circular pequeña; unir y tejer 4 vtas de pt musgo, rem pts. Pegar las mangas. Coser las costuras de mangas y laterales utilizando los pts de orillo como margen de costura. |
|
 |
|
¿Terminaste este patrón?Entonces, etiqueta tus fotos con #dropspattern o envíalas a la galería #dropsfan. ¿Necesitas ayuda con este patrón?Encontrarás 16 videos tutoriales, un espacio para comentarios/preguntas y más visitando la página del patrón en garnstudio.com © 1982-2026 DROPS Design A/S. Todos los derechos reservados. Este documento, incluyendo todas sus sub-secciones, está protegido por los derechos de autor (copyright). Lee más acerca de lo que puedes hacer con nuestros patrones en la parte de abajo de cada patrón de nuestro sitio. |


Con más de 40 años en el diseño de modelos de punto y de ganchillo, DROPS Design ofrece una de las más vastas colecciones de patrones gratuitos en el internet - traducidos en 17 idiomas. Al día de hoy, contamos con 324 catálogos y 12290 patrones - de los cuales 11685 están traducidos en español.
Nosotros trabajamos con mucho esmero para brindarte lo mejor que las labores de punto y ganchillo tienen para ofrecer,inspiración y consejos, así como hilos de magnífica calidad a precios increíbles! Te gustaría usar nuestros patrones para otro fin además del uso personal? Puedes leer acerca de lo que estás permitida a hacer en el texto de Copyright en la parte de abajo de todos nuestros patrones. Felices labores!
Escribe un comentario sobre DROPS 76-23
¡Nos encantaría saber qué piensas acerca de este patrón!
Si quieres escribir una pregunta referente al patrón, por favor asegúrate de elegir la categoría correcta en el formulario debajo, para acelerar el proceso de respuesta. Los campos obligatorios están marcados con un *.