
Categorías populares
¿Buscas un hilo?


Comentarios / Preguntas (38)
![]() Uta Wolf escribió:
Uta Wolf escribió:
Ich hatte anfangs auch Probleme, das Muster richtig zu stricken, es wurden entweder immer mehr Maschen auf der oder weniger. Die Aussage, dass die Rückreihe "verkehrt herum" gesehen werden muss, macht es nicht einfacher. Wenn man es aber erst mal kapiert hat, ist es ein sehr schönes, schnell zu strickendes Muster, das auch mal für einen Sommerpulli oder eine Weste geeignet ist.
10.11.2015 - 12:42Sue escribió:
Sorry I am posting twice. I put my question under the wrong section. I tried to make this, but it doesn't look right. Mine looks very tight and small. How do you count the 13 stitches of the lace to get it to measure 4 inches? I am thinking this may be where I messed up. I have a picture, but I don't see how I can post it to show. I am new to knitting and I love how this pattern looks and want to really get it to work out.
27.03.2015 - 01:16DROPS Design respondió:
Dear Sue, for your gauge you can cast on 13 sts + 2 edge sts each side (worked in garter st), then measure your sts in width and in height and adjust needle size if necessary. Happy knitting!
30.03.2015 - 14:17Sue escribió:
I tried to make this, but it doesn't look right. Mine looks very tight and small. How do you count the 13 stitches of the lace to get it to measure 4 inches? I am thinking this may be where I messed up. I have a picture, but I don't see how I can post it to show. I am new to knitting and I love how this pattern looks and want to really get it to work out.
27.03.2015 - 01:14
![]() Monique escribió:
Monique escribió:
Reactie op uitleg van drops 22.01.2014: naald 3: 2 recht samenbreien, 2 omslagen, 2 recht samenbreien..... toch?
22.01.2014 - 22:01DROPS Design respondió:
Hoi Monique, Ja, twee omslagen.
23.01.2014 - 10:52
![]() Lenie escribió:
Lenie escribió:
Heb het al gevonden misschien voortaan een tekening over meerdere steken laten zien
17.01.2014 - 08:26
![]() Lenie escribió:
Lenie escribió:
Hoe moet de 3e naald gebreid worden hetzelfde als de 1e nld? als ik brei volgens tekening krijg ik meer steken.doe ik iets verkeerd
16.01.2014 - 15:31DROPS Design respondió:
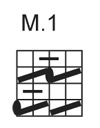
Hoi Lenie. Nee, die brei je als volgt: *2 r samen, 1 omslag, 2 r samen* Herhaal *-* (zie ook de teltekening). Het is dezelfde werkwijze als nld 1 alleen is het motief (de omslag) 2 st verschoven. Door zo te breien onstaat het "zigzag" motief je ook ziet op de foto.
22.01.2014 - 17:29
![]() Michelle escribió:
Michelle escribió:
Does anyone have any suggestions... I an new to needle knitting and I can not seem to get a row to come out with 42 stitches when I get past the ribbing. I have spent 6 hours trying this and at first I wasn't counting the stitches each row, and I was dropping stitches and was down to 30 stitches on the needle. I tried again and I ended up with 43 stitches on the needle multiple times. Then again last night, I ended up with only 38 stitches multiple times.
07.01.2013 - 14:44DROPS Design respondió:
Dear Michelle, M.1 is worked this way : R1 : K2 tog, K2 tog, 2 yo (= 2 sts, 2 yos). R2 : K the first yo into front loop and K the 2nd yo into back loop, K3 (= 4 sts). R3 : K2 tog, 2 yos, K2 tog (2 sts, 2yos). R4 : K1, K the first yo into front loop, and K the 2nd yo into back loopl, K1 (= 4 sts). Repeat each row these 4 sts all the row as stated. You should then have always same number of sts. Happy Knitting !
07.01.2013 - 16:59
![]() MARTINA escribió:
MARTINA escribió:
Help.. non capisco come si interpreta il diagramma.. ovvero dopo le 2 maglie a legaggio..con quale punti devo proseguire....grazie mille Martina
27.11.2012 - 09:34DROPS Design respondió:
I diagrammi si lavorano da destra verso sinistra, quindi devi fare 2 m legaccio, 2 m insieme a dir, 2 m insieme a dir, 2 gettati, poi si inizia da 2 m insieme a dir, 2 m insieme a dir, 2 gettati ancora per 28 m e terminare con 2 m leg. Si lavora avanti e indietro, quindi al f successivo, inizia da sinistra e lavora verso destra sul rovescio del lavoro.
28.11.2012 - 14:41Rut escribió:
Du ska inte börja raden med "kast" utan sluta med detta. Man stickar diagrammet från höger till vänster som vanligt
24.11.2012 - 14:05
![]() Liv escribió:
Liv escribió:
Ok, da syns jeg oppskriften er litt dårlig forklart. Diagrammet sier ingenting om jeg skal begynne med kast. Jeg får prøve å strikke på skjønn. Takk for hjelpen.
24.11.2012 - 01:45
|
|||||||||||||
Petula#petulashawl |
|||||||||||||
 |
 |
||||||||||||
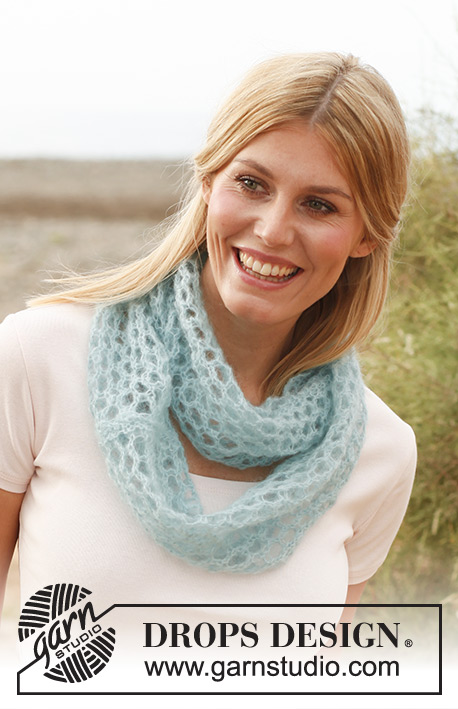
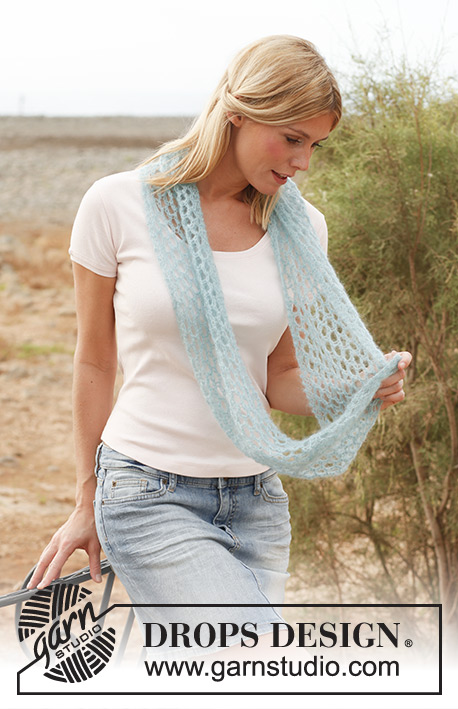
Calentador de cuello DROPS, de punto, en “Vivaldi”.
DROPS 137-11 |
|||||||||||||
|
PT MUSGO (de ida y vuelta en la ag): Tejer todas las vtas de derecho. PATRÓN: Ver diagrama M.1. El diagrama muestra el patrón por el LD. ------------------------------------------------------ ------------------------------------------------------ CALENTADOR DE CUELLO: Tejida de ida y vuelta en la ag. Mon 32 pts en ag tamaño 5 mm con Vivaldi. Tejer 4 vtas de derecho. Después tejer de la manera sig, por el LD: 2 pts en pt musgo, diagrama M.1 sobre los 28 pts sig y terminar con 2 pts en pt musgo. RECUERDE MANTENER LA MISMA TENSIÓN DE TEJIDO DE LA MUESTRA! Continuar de esta manera hasta que la pieza mida aprox 138 cm, tejer 4 vtas de derecho y rem flojamente. Unir la pieza con una costura, orilla de montaje contra la orilla de rem para formar un círculo. Coser en la hebra delantera del pt más externo para evitar que se forme una costura abultada. |
|||||||||||||
Explicaciones del diagrama |
|||||||||||||
|
|||||||||||||
 |
|||||||||||||
¿Terminaste este patrón?Entonces, etiqueta tus fotos con #dropspattern #petulashawl o envíalas a la galería #dropsfan. ¿Necesitas ayuda con este patrón?Encontrarás 6 videos tutoriales, un espacio para comentarios/preguntas y más visitando la página del patrón en garnstudio.com © 1982-2026 DROPS Design A/S. Todos los derechos reservados. Este documento, incluyendo todas sus sub-secciones, está protegido por los derechos de autor (copyright). Lee más acerca de lo que puedes hacer con nuestros patrones en la parte de abajo de cada patrón de nuestro sitio. |
|||||||||||||


Con más de 40 años en el diseño de modelos de punto y de ganchillo, DROPS Design ofrece una de las más vastas colecciones de patrones gratuitos en el internet - traducidos en 17 idiomas. Al día de hoy, contamos con 324 catálogos y 12290 patrones - de los cuales 11685 están traducidos en español.
Nosotros trabajamos con mucho esmero para brindarte lo mejor que las labores de punto y ganchillo tienen para ofrecer,inspiración y consejos, así como hilos de magnífica calidad a precios increíbles! Te gustaría usar nuestros patrones para otro fin además del uso personal? Puedes leer acerca de lo que estás permitida a hacer en el texto de Copyright en la parte de abajo de todos nuestros patrones. Felices labores!
Escribe un comentario sobre DROPS 137-11
¡Nos encantaría saber qué piensas acerca de este patrón!
Si quieres escribir una pregunta referente al patrón, por favor asegúrate de elegir la categoría correcta en el formulario debajo, para acelerar el proceso de respuesta. Los campos obligatorios están marcados con un *.