
Categorías populares
¿Buscas un hilo?


Comentarios / Preguntas (190)
![]() Brigitte Laronze escribió:
Brigitte Laronze escribió:
Bonjour et merci beaucoup pour votre précédente réponse. J’ai toutefois encore une question. : j’ai commencé les manches mais en augmentant 14 fois 2 brides de chaque côté à tous les rangs, je ne suis pas à 24 cm de hauteur pour commencer les diminutions. Je ne suis qu’à 14 cm de hauteur. Dois je continuer sans augmenter jusqu’à 24 cm de hauteur ou alors faire autrement ? Merci encore pour votre aide précieuse.
01.09.2020 - 22:58DROPS Design respondió:
Bonjour Mme Laronze, continuez jusqu'à ce que la manche mesure 24 cm mais n'augmentez plus si vous avez bien votre bon nombre de mailles maintenant. Bon crochet!
02.09.2020 - 08:36
![]() Brigitte Laronze escribió:
Brigitte Laronze escribió:
Bonjour, je commence les augmentations mais j’ai 2 problèmes :1/ j’ai en tout 220 mailles et je dois repartir 30 augmentations. J’ai calculé mais tous les 7 mailles c’est pas assez et toutes les 8 mailles c’est trop. Comment faire ? 2/ si on augmente alors le point ajouré va être décalé par rapport aux rangs précédents. Comment faire ? Merci pour votre réponse car je ne peux plus avancer dans mon travail.
01.09.2020 - 00:19DROPS Design respondió:
Bonjour Mme Laronze, cette leçon explique comment répartir des diminutions/augmentations - continuez ensuite le point ajouré comme avant, il ne va pas s'aligner au-dessus du point ajouré des rangs précédents, c'est normal et ça ne se verra pas. Bon crochet!
01.09.2020 - 09:35
![]() Dawn Hand escribió:
Dawn Hand escribió:
Pattern 138-6, I have done the body and sleeves but am struggling to do the edging stitch from the diagram, it says to do it vertically, but I don’t understand how to do it, do I just do it as 2 rows round?
26.08.2020 - 02:32DROPS Design respondió:
Dear Mrs Hand, at the botto mof sleeve as well as the bottom of edge piece, you work the 2 rows as shown in M.1 (read more about diagrams here. Happy crocheting!
26.08.2020 - 08:23
![]() Esther escribió:
Esther escribió:
Ik ben bij de mouw. 77 lossen daarna 60 stokjes.Nu moet ik tegelijkertijd ,17 keer, tegelijkertijd 1 stokje meerderen aan iedere kant, elke toer..moet ik dan telkens in het éerste én laatste stokje meerderen van een toer? Of telkens alleen in het eerste stokje van de toer meerderen..help.
09.07.2020 - 20:09DROPS Design respondió:
Dag Esther,
Je meerdert inderdaad in de eerste en de laatste steek van de toer, dus steeds aan beide kanten, door 2 stokjes in 1 stokje te haken.
04.08.2020 - 13:21
![]() Beverly Lerch escribió:
Beverly Lerch escribió:
If you are ch3 and putting a tr in 4th ch from hook and tr in next ch you have only used 5 ch. your count in the first size is 59 not 58 and at the end of the first row pattern you end with 1 tr not 2.
05.06.2020 - 20:54
![]() Caroline escribió:
Caroline escribió:
I'm very new to crochet, and don't understand what I'm doing on the chain going into the tr crochet on the second row. Your notes say chain 3 for first tr and then tr into 4th ch stitch which I've done, then tr 3 more mis chain and carry on till 2 sts remain, I have 3 tr at this end and one chain space remaining, my count of tr stitches is 59 if i include the first chain 3, I've taken it out 3 times, and am carfully counting as i go, I don't understand where it is going wrong.
19.04.2020 - 18:28DROPS Design respondió:
Dear Caroline, in first size you have 78 chains, then crochet 1 tr in 4th ch from hook (= 2 trebles, 6 chains), then repeat (1 tr in each of the next 3 ch, skip 1 ch) a total of 18 times ((= 3 tr, 4 chains)x 18 = 54 tr, 72 chains), finish with 1 tr in each of the last 2 ch (2 tr, 2 ch) you have now: 2+54+2 tr over 6+72+2 chains. Hope this helps, happy crocheting!
20.04.2020 - 10:41
![]() Pipit Fitri escribió:
Pipit Fitri escribió:
Hello, i'd like to try making this, is there a possibility if i work the sleeve in round? Thank you
18.03.2020 - 06:41DROPS Design respondió:
Dear Mrs Fitri, you could start to work the sleeve in the round but to get the same texture for sleeve cap remember to work alternately from RS and from WS - when working sleeve cap you will have then to work in rows decreasing on each side. Happy crocheting!
18.03.2020 - 08:49
![]() Linda escribió:
Linda escribió:
I a m so confused. The edge piece says you should have 56+56+44+44=196 but then directions says 204. Am I missing something?
06.03.2020 - 21:26DROPS Design respondió:
Dear Linda, you work 1 st in each st in the top of back piece = 62 sts + 42 sts in the 56 chains + 1 st in each st in the bottom of back piece = 58 sts + 42 sts in the 56 chains = 62+42+58+42=204 sts. Happy crocheting!
09.03.2020 - 09:40
![]() Namrata escribió:
Namrata escribió:
The pattern is very nice n have completed making the body and edging . In sleeve part , what will be the count of stitch in the last line? Is it possible to send pics of just the sleeve to see the shape that v achieve afterall the decreases.
01.02.2020 - 22:12DROPS Design respondió:
Dear Mrs Namrata, the number of stitches at the end of the sleeve (sleeve cap) will depends on your tension in height. Just make sure that you decrease the same number of stitches on each side and that the measurements are right. Happy crocheting!
03.02.2020 - 09:54
![]() Zhell escribió:
Zhell escribió:
I was confused with the edge piece, if i ch 58 and in each ch loop ill do 44 tr, how will get the total of 220 tr?
01.11.2019 - 17:44DROPS Design respondió:
Dear Zhell, you crochet 44 tr in the 58 ch (skipping chains evenly) = 44 tr; then 1 tr in each of the 64 tr from the bottom of piece, then 44 tr in the 58 ch = 44 tr and 1 tr in each of the 68 tr on top of back piece = 44+64+44+68= 220 tr. Happy crocheting!
04.11.2019 - 15:28
|
||||||||||
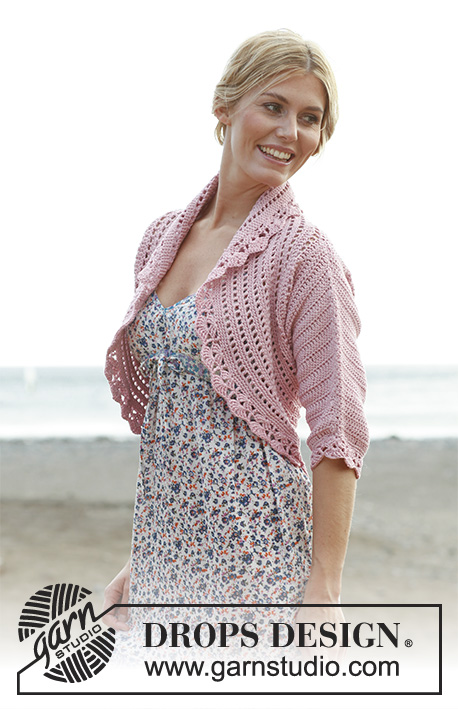
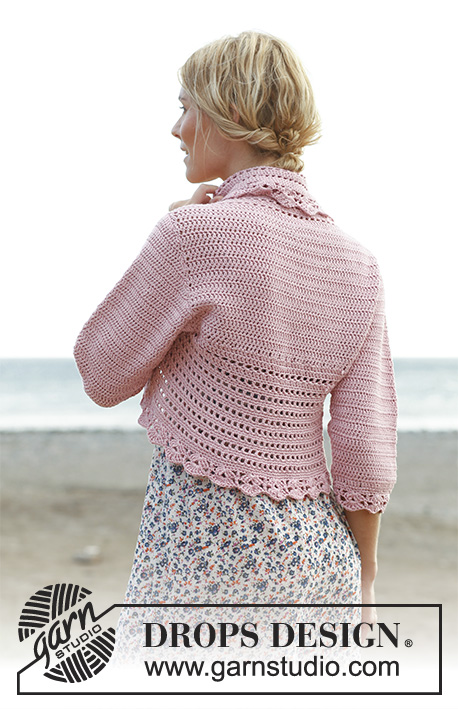
Country Rose#countryrosebolero |
||||||||||
 |
 |
|||||||||
Saco DROPS, en ganchillo / crochet, en “Cotton Light” y “Glitter”. Talla: S – XXXL.
DROPS 138-6 |
||||||||||
|
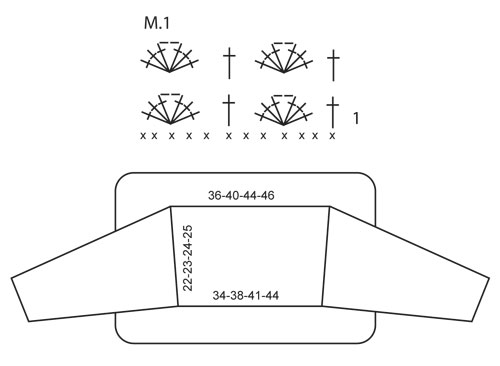
INFORMACIÓN PARA LA ELABORACIÓN DEL TEJIDO: Sustituir el primer p.a. en cada hilera con 3 cad. Sustituir el primer p.b. en cada vta con 1 cad. Terminar cada vta de p.b. con 1 p.bjs en la 1ª cad del inicio de la vta. Sustituir el primer p.a. en cada vta con 3 cad. Terminar cada vta de p.a. con 1 p.bjs en la 3ª cad del inicio de la vta. TIP PARA AUMENTO: Aum haciendo 2 p.a. en el primero y último p.a. en la hilera. TIP PARA DISMINUCIÓN: Dism al inicio de la hilera de la manera sig: Hacer p.bjs sobre el número de p.a. a ser dism. Dism al final de la hilera de la manera sig: Cuando reste el número de p.a. a ser dism, virar la pieza. ------------------------------------------------------ ESPALDA: Mon 78-86-94-99 cad flojas en ag tamaño 4 mm con 1 hilo Cotton Light y 1 hilo Glitter (= 2 hilos). Hacer 1 p.a. en la 4ª cad a partir de la ag, * 1 p.a. en cada una de las 3 cad sig, saltar 1 cad *, repetir de *a*, y terminar con 1 p.a. en cada una de las últimas 2-2-2-3 cad = 58-64-70-74 p.a.. Después hacer 1 p.a. en cada p.a. – LEER INFORMACIÓN PARA LA ELABORACIÓN DEL TEJIDO. Cuando la pieza mida 7 cm, aum 1 p.a. en cada lado – LEER TIP PARA AUMENTO, repetir los aum cuando la pieza mida 15 cm = 62-68-74-78 p.a.. Trabajar hasta que la pieza mida 22-23-24-25 cm. PIEZA DE LA ORILLA: Hacer 1 p.a. en cada p.a. en el lado superior de la pieza de la espalda, hacer 56-58-60-64 cad, 1 p.a. en cada p.a. de la parte de abajo de la pieza de la espalda, hacer 56-58-60-64 cad y terminar con 1 p.bjs en el 1er p.a. en el lado superior de la pieza de la espalda. Hacer 1 p.a. en cada p.a. de la pieza de la espalda, en los bucles de cad hacer 42-44-46-48 p.a. = 204-220-236-248 p.a.. Continuar trabajando en redondo de la manera sig: VUELTA 1: 1 p.a. en el primer p.a., * 1 cad, saltar 1 p.a., 1 p.a. en el p.a. sig *, repetir de *a* y terminar con 1 cad, saltar 1 p.a. y hacer 1 p.bjs en el inicio de la vta. VUELTA 2: 1 p.b. en cada p.a. y 1 p.b. en cada cad. VUELTA 3: 1 p.b. en cada p.b. Repetir estas 3 vtas. AL MISMO TIEMPO, cuando la orilla mida 5, 10 y 15 cm (ajustar para que esta sea una vta con p.b.), aum 30-30-30-32 p.b. distribuidos equitativamente en la vta – LEER TIP PARA AUMENTO = 294-310-326-344 p.b.. Cuando la orilla mida 17-18-19-20 cm (ajustar para que la vta sig sea una vta con p.b.), hacer 1 hilera con p.b. y, AL MISMO TIEMPO, aum 0-2-4-4 p.b. distribuidos equitativamente = 294-312-330-348 p.b.. Después trabajar el diagrama M.1. NOTA! Empezar a trabajar en la hilera marcada con 1 en el diagrama. Trabajar el diagrama M.1 1 vez verticalmente, cortar y asegurar el hilo. MANGA: Mon 67-72-72-77 cad flojas en ag tamaño 4 mm con 1 hilo Cotton Light y 1 hilo Glitter (= 2 hilos). Hacer 1 p.a. en la 4ª cad a partir de la ag (= 2 p.a.), * saltar 1 cad, 1 p.a. en cada una de las 4 cad sig *, repetir de *a* y terminar saltando 1 cad y hacer 1 p.a. en cada una de las últimas 2 cad = 52-56-56-60 p.a.. Hacer 1 p.a. en cada p.a., de ida y vuelta, y, AL MISMO TIEMPO, aum 1 p.a. en cada lado, en cada hilera, un total de 13-14-16-17 veces, leer TIP PARA AUMENTO = 78-84-88-94 p.a.. Cuando la pieza mida 24-24-22-20 cm (medidas más cortas en las tallas más grandes debido a una mayor anchura de hombros), dism para el copete de manga, en cada lado, en cada hilera – LEER TIP PARA DISMINUCIÓN: 4 p.a. 1 vez, después 3-3-2-2 p.a. en cada lado hasta que la pieza mida 31-33-33-34 cm, ahora dism 4 p.a. 1 vez en cada lado. Cortar y asegurar el hilo. Hacer la costura debajo de la manga con pequeñas puntadas prolijas. Trabajar alrededor de la parte de abajo de la manga de la manera sig: Hacer 1 vta con 1 p.b. en cada p.a. y, al mismo tiempo, aum 2-4-4-0 p.b. distribuidos equitativamente = 54-60-60-60 p.b.. Después trabajar el diagrama M.1 1 vez verticalmente. Cortar y asegurar el hilo. TERMINACIÓN: Montar las mangas. |
||||||||||
Explicaciones del diagrama |
||||||||||
|
||||||||||
 |
||||||||||
¿Terminaste este patrón?Entonces, etiqueta tus fotos con #dropspattern #countryrosebolero o envíalas a la galería #dropsfan. ¿Necesitas ayuda con este patrón?Encontrarás 8 videos tutoriales, un espacio para comentarios/preguntas y más visitando la página del patrón en garnstudio.com © 1982-2026 DROPS Design A/S. Todos los derechos reservados. Este documento, incluyendo todas sus sub-secciones, está protegido por los derechos de autor (copyright). Lee más acerca de lo que puedes hacer con nuestros patrones en la parte de abajo de cada patrón de nuestro sitio. |
||||||||||


Con más de 40 años en el diseño de modelos de punto y de ganchillo, DROPS Design ofrece una de las más vastas colecciones de patrones gratuitos en el internet - traducidos en 17 idiomas. Al día de hoy, contamos con 324 catálogos y 12290 patrones - de los cuales 11675 están traducidos en español.
Nosotros trabajamos con mucho esmero para brindarte lo mejor que las labores de punto y ganchillo tienen para ofrecer,inspiración y consejos, así como hilos de magnífica calidad a precios increíbles! Te gustaría usar nuestros patrones para otro fin además del uso personal? Puedes leer acerca de lo que estás permitida a hacer en el texto de Copyright en la parte de abajo de todos nuestros patrones. Felices labores!
Escribe un comentario sobre DROPS 138-6
¡Nos encantaría saber qué piensas acerca de este patrón!
Si quieres escribir una pregunta referente al patrón, por favor asegúrate de elegir la categoría correcta en el formulario debajo, para acelerar el proceso de respuesta. Los campos obligatorios están marcados con un *.