
Categorías populares
¿Buscas un hilo?


Comentarios / Preguntas (68)
![]() Mona Lunding escribió:
Mona Lunding escribió:
Hvorfor er der ikke mønster med til 123_2
27.03.2026 - 18:06
![]() Werna escribió:
Werna escribió:
Thank you for your reply. But there is still something I do not understand. Please explain : 1 Edge stitch in garter stitch, 5 stocking sts, M.1. How does this come to 9 sts ?
23.01.2025 - 07:30DROPS Design respondió:
Dear Werna, M.1 is a chart, such as M.2A, M.2B and M.2C and chart M.1 has 9 stitches. It's not that the edge stitches, the stocking st stitches and M.1 add up to 9, it means that M.1 has 9 stitches. We write the numbers here so that you can add up the number of stitches in the row without having to look at the charts below. Happy knitting!
25.01.2025 - 18:45
![]() Werna escribió:
Werna escribió:
I am knitting the med. It says : Work next row as follows from RS: 1 edge st in garter st, 5-5-6-7-8-8 stocking sts, M.1 (= 9 sts), 62-72-79-89-100-111 stocking sts, M.2A . Instead of 9 stitches I only have 5. What is M.2A , M.2B and C ?
21.01.2025 - 14:43DROPS Design respondió:
Dear Werna, M.1 and M. 2 are the diagrams you will find at the bottom of the page; M.1 is worked over 9 sts and M.2 over 19 sts as shown in diagram, then work in M: 1 edge st in garter st, 5 stocking sts, M.1 (= 9 sts), 72 stocking sts, M.2A (= 19 sts), 72 stocking sts, M.1 (= 9 sts), 5 stocking sts and 1 edge st in garter st. Read more about diagrams here. You will here first work M.2A then repeat the rows marker with M.2B a total of 8 times (in height) then work M.2C and finish with reversed stocking stitch as explained in the written pattern. Happy knitting!
21.01.2025 - 17:12
![]() Saisha Gardner escribió:
Saisha Gardner escribió:
Help, I am very confused. I am knitting the Large size. I got to 45 cm and did all the binding off as instructed and finished off the right and left front pieces all fine. But I am left with 107 stitches on the back not 93 stitches as I should I have gone back over all the instructions again and again and cannot see where or why I have an extra 14 stitches everything was done as instructed. What has gone wrong?
16.12.2023 - 22:30DROPS Design respondió:
Dear Saisha, before working each piece separately, you should have checked that all of the pieces were correctly divided. After the piece, reaches 46 cm divide as follows: 44 stitches for the front piece, cast off 10 stitches for armhole, 93 stitches for the back, cast off 10 stitches for armhole and 44 stitches for the front piece. Remember that, 1cm before dividing the piece (at the 45 cm mark) you should have cast off 7 stitches towards the mid-front in each front piece, for the neck. So you will have 14 stitches less when dividing the front pieces and back piece. Happy knitting!
17.12.2023 - 19:06
![]() Saisha Gardner escribió:
Saisha Gardner escribió:
Hi I cannot buy the buttons for this pattern anymore : 533 what size were they so I can pick a replacement? Thank you so much Saisha
17.09.2023 - 00:00DROPS Design respondió:
Dear Saisha, we use 20mm buttons. Happy knitting!
17.09.2023 - 21:11
![]() Caroline escribió:
Caroline escribió:
When I've made the 8 decreases = 32 stitches in size M, it says I should be left with 161 stitches, do I discount the stitches of the leaf pattern when counting these? Thank you
15.03.2022 - 18:31DROPS Design respondió:
Dear Caroline, count M.1 = 9 sts and M.2A = 19 sts when checking your number of stitches (= do not count the extra stitches increased in the leaf pattern). Happy knitting!
16.03.2022 - 09:08
![]() Manuela Meyer escribió:
Manuela Meyer escribió:
Rechtes Vorderteil: Ich verstehevnicht den Unterschied von „zur Mitte“ und „zum Hals“ hin abketten“ ! Bitte um eine Erklärung! Dankeschön
21.02.2022 - 01:21DROPS Design respondió:
Liebe Frau Meyer, wenn Sie "gegen die Mitte" abketten/abnehmen sollen, sollen Sie die Maschen am Anfang der Reihe vom Hals abketten/abnehmen, dh beim rechten Vorderteil ketten/nehmen Sie am Anfang einer Hinreihe ab; beim linken Vorderteil ketten Sie bei den Rückreihen ab und nehmen Sie am Ende einer Hinreihe; Viel Spaß beim stricken!
21.02.2022 - 10:16
![]() Sylke Prager-Ngejeme escribió:
Sylke Prager-Ngejeme escribió:
Fehler bei der Maschenangabe für Gr. M: Es sollen 193 M angeschlagen werden, dann Markierung nach 47 und 99 M. Also 2x 47 M für die Voederseiten und 99 für das Rückenteil . Dies ergeben insgesamt 183 und nicht 193 M. Werde statt 72 M glatt rechts also nur 67 M stricken.
03.12.2021 - 19:29DROPS Design respondió:
Liebe Frau Prager-Ngejeme, die Maschenanzahl stimmt so: 47+99+47=193 Maschen - Viel Spaß beim stricken!
06.12.2021 - 09:23Hanaa Zahran escribió:
Hi I'm fm Egypt I wish to do this pattern I need yr help to do same with double pointed needles unfortunately I can't make it with circle needles thanks
02.03.2017 - 19:42DROPS Design respondió:
Dear Mrs Zahran, pattern is here worked back and forth on needle, only edges around armholes are worked in the round. Please find here how to adjust a pattern on straight needle. For any further assistance you are welcome to contact your DROPS store even per mail or telephone. Happy knitting!
03.03.2017 - 10:06
![]() Katja escribió:
Katja escribió:
Habe gerade die schöne Weste angefangen, aber finde in der Anleitung nicht, wie ich die Rückseite des Musters stricken muss?!
12.04.2016 - 17:34DROPS Design respondió:
Liebe Katja, es sind Hin-und Rückreihen dargestellt.
12.04.2016 - 19:16
|
|||||||||||||||||||||||||||||||
Misty vines |
|||||||||||||||||||||||||||||||
 |
 |
||||||||||||||||||||||||||||||
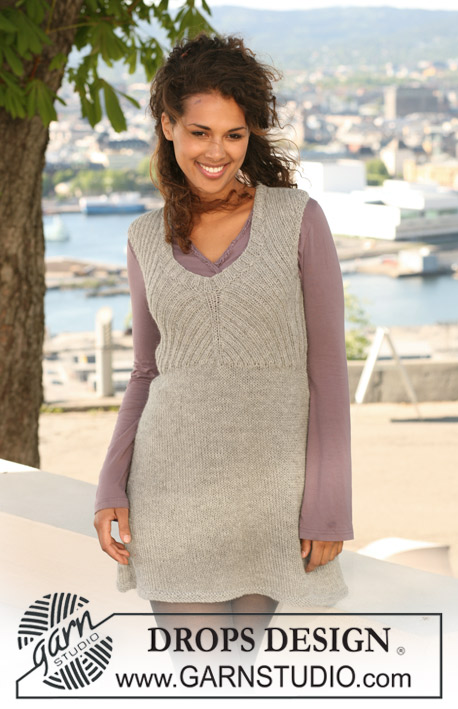
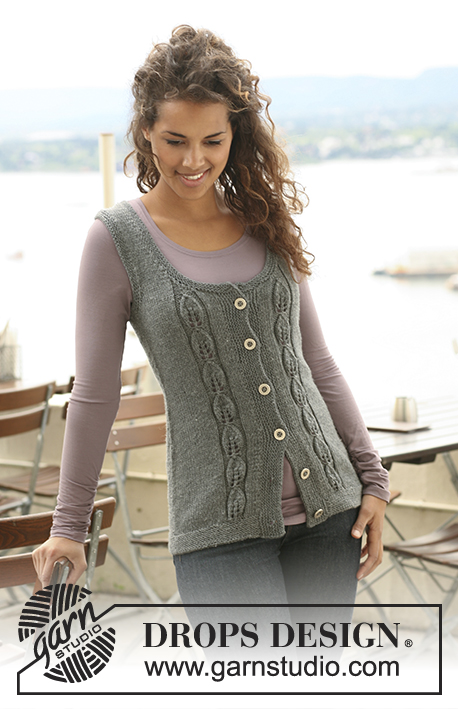
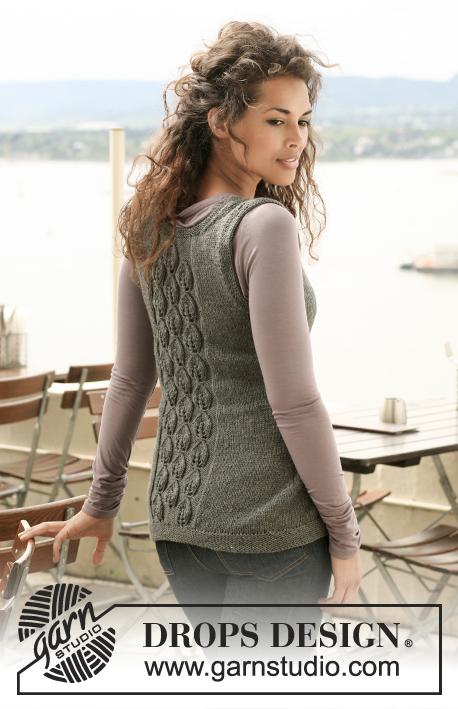
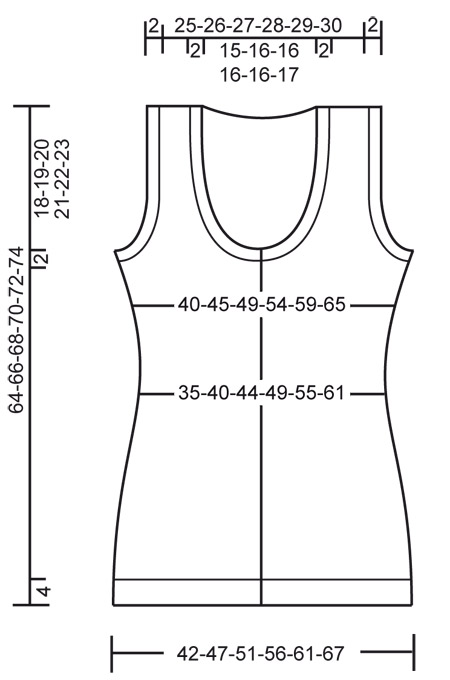
Top sin mangas DROPS, tejido en patrón con motivo de hojas en “Karisma”. Talla S – XXXL.
DROPS 125-2 |
|||||||||||||||||||||||||||||||
|
PT MUSGO (de ida y vuelta en ag): Todas las vtas del derecho. PT MUSGO (en redondo): 1 vta del derecho, 1 vta del revés. TIP PARA DISMINUCIÓN (aplica a un lado en la pieza del cuerpo): Hacer todas las dism por el LD. Empezar 2 pts antes del marcapuntos (MP): 2 pjd, desl 1 pt del derecho, 1d, pasar pt desl por encima. TIP PARA AUMENTO (aplica a un lado en la pieza del cuerpo): Hacer todos los aum por el LD. Aum 1 pt, levantando el pt de la vta anterior y tejiéndolo del derecho. PATRÓN: Ver diagrama M.1 y M.2. El diagrama muestra el patrón por el LD y la vuelta 1 en el diagrama = LD. -------------------------------------------------------- TOP SIN MANGAS: Se teje de ida y vuelta en ag circular a partir del centro del frente. CUERPO: Mon 173-193-209-231-255-277 pts en ag circular tamaño 3.5 mm con Karisma. Tejer PT MUSGO de ida y vuelta en la ag – ver arriba. Cuando la pieza mida 4 cm cambiar a ag circular tamaño 4 mm. Ahora colocar 2 MP a 42-47-51-57-63-68 pts de cada lado = 89-99-107-117-129-141 pts entre MP en la pieza de la espalda. Tejer la vta sig por el LD así: 1 pt de orillo en pt musgo, 5-5-6-7-8-8 pts jersey, M.1 (= 9 pts), 62-72-79-89-100-111 pts jersey, M.2A (= 19 pts), 62-72-79-89-100-111 pts jersey, M.1 (= 9 pts), 5-5-6-7-8-8 pts jersey y 1 pt de orillo en pt musgo. Cont el patrón de esta manera – NOTA: Después de 1 repetición vertical de M.2A, cont en M.2B, tejer 8-8-8-8-9-9 repeticiones verticales de M.2B, después tejer 1 repetición de M.2C y después cont en pt jersey revés en los 19 pts en M.2 hasta la dism de la línea del escote. Tejer 7 repeticiones verticales de M.1 para todas las tallas, después cont en pt jersey revés en los 9 pts en M.1 hasta la dism de la línea del escote. RECUERDE MANTENER LA MISMA TENSIÓN DE TEJIDO DE LA MUESTRA! AL MISMO TIEMPO cuando la pieza mida 5 cm dism 1 pt de cada lado de ambos MP (= 4 pts dism) – Ver TIP PARA DISMINUCIÓN! Repetir la dism cada 3-3-3.5-3.5-3.5-4 cm un total de 8-8-7-7-7-6 veces = 141-161-181-203-227-253 pts. Cuando la pieza mida 31-32-31-31-32-31 cm aum 1 pt de cada lado de ambos MP (= 4 pts aum) – Ver TIP PARA AUMENTO! Repetir el aum cada 2-2-3-3-4-4.5 cm un total de 6-6-5-5-4-4 veces = 165-185-201-223-243-269 pts. Nota! Cuando la pieza mida 45 cm empezar las dism para el cuello en todas las tallas. Ver explicación bajo pieza delantera derecha. Cuando la pieza mida 44-45-46-47-48-49 cm tejer la vta sig así: tejer 36-41-44-50-54-60 pts como antes (= delantero), rem 8-8-10-10-12-12 pts para la sisa (es decir, 4-4-5-5-6-6 pts de cada lado del MP), tejer 77-87-93-103-111-125 pts (= espalda), rem 8-8-10-10-12-12 pts para la sisa y tejer los 36-41-44-50-54-60 pts restantes como antes (= delantero). Completar cada pieza por separado. ESPALDA: = 77-87-93-103-111-125 pts. Cont como antes en pt jersey y M.2 en los 19 pts centrales. AL MISMO TIEMPO rem para la sisa al inicio de cada vta, de cada lado, de la manera sig: 3 pts 0-0-0-1-1-2 veces, 2 pts 3-5-6-7-8-10 veces y 1 pt 5-5-5-4-5-4 veces = 55-57-59-61-63-65 pts (incl 1 pt de orillo de cada lado). Cont el patrón como antes. Cuando la pieza mida 61-63-64-66-68-69 cm rem los 31-33-27-29-29-31 pts centrales para el cuello y completar cada hombro por separado. Rem para la línea del escote al inicio de cada vta a partir del cuello: 2 pts 1-1-2-2-2-2 veces y 1 pt 2-2-3-3-3-3 veces = 8-8-9-9-10-10 pts restantes en el hombro. Rem pts cuando la pieza mida 64-66-68-70-72-74 cm. DELANTERO DERECHO: = 36-41-44-50-54-60 pts. Cont como antes en pt jersey y M.1, AL MISMO TIEMPO rem para la sisa al inicio de cada vta a partir de un lado (es decir, en cada vta por el LR) como se describe para la pieza de la espalda. AL MISMO TIEMPO cuando la pieza mida 45 cm para todas las tallas rem 6-6-7-8-9-9 pts hacia el centro del frente, es decir, por el LD para el cuello. Rem para formar la línea del escote al inicio de cada vta a partir del centro del frente de la manera sig: 2 pts 3 veces y 1 pt 3 veces, después rem al inicio de vtas alternas a partir del centro del frente: 1 pt 2-3-2-3-2-2 veces. Cuando todas las dism para la sisa y línea del escote están completas tenemos 8-8-9-9-10-10 pts restantes en la ag. Rem pts como se describe para la pieza de la espalda. DELANTERO IZQUIERDO: Como la pieza del delantero derecho, pero a la inversa, es decir, rem para la sisa en cada vta por el LD y rem para el cuello por el LR. TERMINACIÓN: Coser los hombros. ORILLA DE MANGA: Levantar por el LD aprox 84-106 pts alrededor de la sisa, a 1 pt del pt de orillo, en ag circular tamaño 3.5 mm. Tejer PT MUSGO en redondo – ver arriba. Cuando la orilla mida aprox 2 cm rem los pts. Repetir alrededor de la otra sisa. BORDE DELANTERO DERECHO: Levantar por el LD aprox 86-102 pts a lo largo del delantero derecho, a 1 pt del pt de orillo, en ag circular tamaño 3.5 mm con Karisma. Tejer pt musgo de ida y vuelta en la ag. Después de 2.5 cm hacer 6 ojales distribuidos equitativamente – colocar el ojal superior a aprox 1 cm de la línea del escote y el ojal inferior a 2-3 cm de la orilla inferior. 1 OJAL = rem 1 pt y mon 1 pt nuevo en la vta sig. Rem pts cuando el borde delantero mida 4 cm. BORDE DELANTERO IZQUIERDO: Como el borde delantero derecho, pero sin ojales. Coser los botones en el borde delantero izquierdo. LÍNEA DEL ESCOTE: Levantar por el LD aprox 140-170 pts alrededor del cuello (también levantar en los bordes delanteros) en ag circular tamaño 3.5 mm. Tejer pt musgo de ida y vuelta en la ag hasta que la línea del escote mida aprox 2 cm. Rem pts. |
|||||||||||||||||||||||||||||||
Explicaciones del diagrama |
|||||||||||||||||||||||||||||||
|
|||||||||||||||||||||||||||||||
 |
|||||||||||||||||||||||||||||||
 |
|||||||||||||||||||||||||||||||
¿Terminaste este patrón?Entonces, etiqueta tus fotos con #dropspattern o envíalas a la galería #dropsfan. ¿Necesitas ayuda con este patrón?Encontrarás 20 videos tutoriales, un espacio para comentarios/preguntas y más visitando la página del patrón en garnstudio.com © 1982-2026 DROPS Design A/S. Todos los derechos reservados. Este documento, incluyendo todas sus sub-secciones, está protegido por los derechos de autor (copyright). Lee más acerca de lo que puedes hacer con nuestros patrones en la parte de abajo de cada patrón de nuestro sitio. |
|||||||||||||||||||||||||||||||


Con más de 40 años en el diseño de modelos de punto y de ganchillo, DROPS Design ofrece una de las más vastas colecciones de patrones gratuitos en el internet - traducidos en 17 idiomas. Al día de hoy, contamos con 324 catálogos y 12290 patrones - de los cuales 11675 están traducidos en español.
Nosotros trabajamos con mucho esmero para brindarte lo mejor que las labores de punto y ganchillo tienen para ofrecer,inspiración y consejos, así como hilos de magnífica calidad a precios increíbles! Te gustaría usar nuestros patrones para otro fin además del uso personal? Puedes leer acerca de lo que estás permitida a hacer en el texto de Copyright en la parte de abajo de todos nuestros patrones. Felices labores!
Escribe un comentario sobre DROPS 125-2
¡Nos encantaría saber qué piensas acerca de este patrón!
Si quieres escribir una pregunta referente al patrón, por favor asegúrate de elegir la categoría correcta en el formulario debajo, para acelerar el proceso de respuesta. Los campos obligatorios están marcados con un *.