
Categorías populares
¿Buscas un hilo?


Comentarios / Preguntas (27)
![]() Marianne Bendtsen escribió:
Marianne Bendtsen escribió:
Jeg har strikket denne model i bomuld (Drops muskat). Den er blevet SÅ lækker
29.12.2025 - 23:23
![]() Birgitte Kræhmer escribió:
Birgitte Kræhmer escribió:
Findes denne opskrift også til herrer
30.12.2023 - 11:26DROPS Design respondió:
Hej Birgitte, her ser du alle vores herreopskrifter med nordisk mønster: Herre - Nordisk mønster Du kan følge opskriften i den rigtige brystvidde og så følge målene fra en herreopskrift i samme kvalitet og strikkefasthed :)
03.01.2024 - 08:11
![]() Catherine escribió:
Catherine escribió:
In size XL the stitching for the back armhole does not compute. If I cast off 2 stitches at the BEGINNING of each row 6 times, I have only reduced by 12 stitches, plus 3 more when I cast of 1 stitch at the BEGINNING of each row. I end up with 100 stitches on the needle, although the directions say I should have 85. Its only possible to get 85 stitches by casting off staches at BOTH ENDS OF EACH ROW. Can you confirm that this is correct?
16.04.2023 - 15:36DROPS Design respondió:
Dear Catherine, you cast off at the beginning of each row on each side 6 times, so in total you cast off 12 times (6 at the beginning of right side rows and 6 at the beginning of wrong side rows). So you cast off 24 stitches. The same with the next instructions: 1 stitch 3 times from the right side and 3 times from the wrong side, so 6 times. Therefore, you should have cast off 30 stitches; 115-30 = 85. Happy knitting!
16.04.2023 - 19:27
![]() Ingeborg escribió:
Ingeborg escribió:
Goedendag, ik ga voor het eerst rondbreien. Als ik de panden verder apart moet breien, is dit dan met rechte pennen?
15.07.2021 - 12:58DROPS Design respondió:
Dag Ingeborg,
Het vest wordt heen en weer gebreid met een rondbreinaald, van middenvoor naar midden voor. Als je alle steken op rechte naalden zet wordt het erg proppen, zeker in de grotere maten, vandaar er een rondbreinaald geadviseerd wordt.
20.07.2021 - 15:50
![]() Rosema escribió:
Rosema escribió:
Moet dit patroon ook op de averechts kant gebreid worden? Of is het op de rechte pen patroon breien en dan averechts pen overbreien.?
08.10.2019 - 18:13
![]() Marjorie Kemp escribió:
Marjorie Kemp escribió:
Continued The overall sleeve length was as specified but the sleeve cap was way too short and would never have matched the opening in the sweater body.
26.03.2017 - 23:06DROPS Design respondió:
Dear Mrs Kemp, after you cast off 6 sts mid under sleeve continue M.2A (and B, C see size), then work M.2D while casting off for sts on each side for sleeve cap. Happy knitting!
27.03.2017 - 09:58
![]() Marjorie Kemp escribió:
Marjorie Kemp escribió:
Continued After decreasing the 6 stitches I started on the next row doing 2 decreases on each side for the specified number of times and then 1 decrease each side for the number of rows indicated. Then on the next rows I deceased 2 stitches each side until the specified overall length was accomplished. I finished as the pattern said.
26.03.2017 - 23:05
![]() Marjorie Kemp escribió:
Marjorie Kemp escribió:
I tried that, as the directions seemed to specify, but as I said in my first post, following these steps netted a very short sleeve cap. Any further elucidation?
26.03.2017 - 23:04
![]() Marjorie Kemp Kemp escribió:
Marjorie Kemp Kemp escribió:
Having trouble with the directions on the sleeve cap. I decreased the 6 stitches then started the decreased but the cap ended up being too short. Then I tried doing the 6 stitches decrease and following with completing the chart pattern before doing the (10 rows plus) decreases. Then the cap was pretty long. And I'm not sure when to start the "then 2 stitches each side until piece measures (22-3/4"). Can you restate that part so it's more clear?
20.03.2017 - 04:25DROPS Design respondió:
Dear Mrs Kemp, after binding off the 6 sts mid under sleeve, continue back and forth (see pattern & diagram in written pattern) casting off at the beg of each row on each side: 2 sts 3-4-4-4-5-3 times, 1 st 1-2-4-6-6-14 times, then 2 sts each side until piece measures 56-57-57-58-58-58 cm, now cast off 3 sts 1 time each side, and cast off remaining sts. Sleeve should now measure approx. 57-59 cm (see size). Happy knitting!
20.03.2017 - 10:23
![]() Ruby Jones escribió:
Ruby Jones escribió:
On the decrease for the back piece for the armholes. The pattern clearly says at the BEGINING or each row 6 times! Which adds up to 12 stitches and then 1 st at the Beginning of a row 3 times. How do you get 24 sts decreased. how is this possible if we are only to decrease at the beginning of each row? Should I be decreasing 2 sts at each end and not just at the beginning of each row & pattern is wrong
08.10.2016 - 13:35DROPS Design respondió:
Dear Mrs Jones, in 4th size you have to cast off at the beg of every row on each side, ie at the beg of row both from RS and from WS: 2 sts 6 times (= 12 sts on each side) + 1 st 3 times (= 3 sts on each side). There were 115 sts - (12+3x2 sides) = 85 sts. Happy knitting!
10.10.2016 - 09:05
|
|||||||
DROPS 116-11 |
|||||||
|
|
|||||||
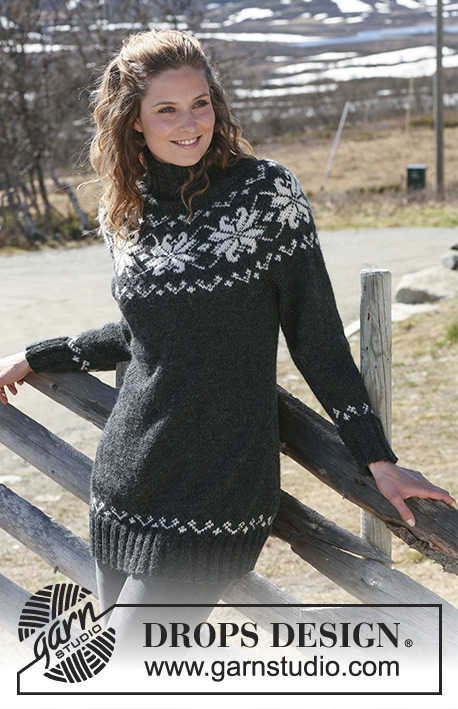
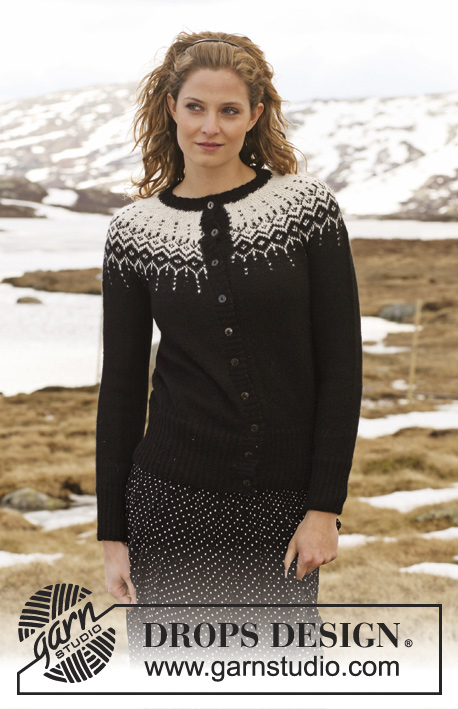
Chaqueta de punto DROPS en punto jacquard con ”Karisma”. Talla S-XXXL.
DROPS 116-11 |
|||||||
|
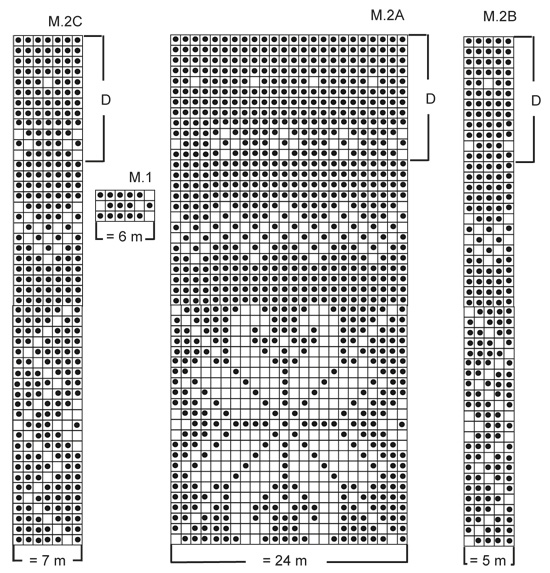
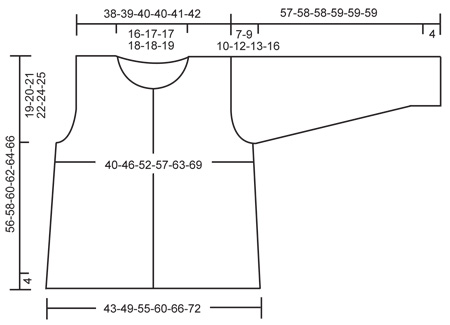
PUNTO MUSGO (de ida y vta en ag): Trabajar todas las filas de derecho. OJALES: Hacer los ojales en la cenefa derecha. 1 ojal = cerrar el 6º pt desde el centro del delantero y mont 1 pt nuevo en la fila de vta. Hacer los ojales cuando la labor mida: Talla S: 7, 14, 21, 28, 35, 42 y 49 cm. Talla M: 9, 16, 23, 30, 37, 44 y 51 cm. Talla L: 5, 13, 21, 29, 37, 45 y 53 cm. Talla XL: 7, 15, 23, 31, 39, 47 y 55 cm. Talla XXL: 9, 17, 25, 33, 41, 49 y 57 cm. Talla XXXL: 5, 14, 23, 32, 41, 50 y 59 cm. PATRÓN: Ver los diagramas M.1 y M.2. Los diagramas muestran el patrón por el LD. ---------------------------------------------- CHAQUETA: Se trabaja de ida y vta en ag circular desde el centro del delantero. Mont 250-278-310-338-370-398 pts en ag circular tamaño 3.5 mm con gris marengo. Continuar como sigue por el LD: 10 pts en PT MUSGO - ver arriba, pt elástico 2 d./2 r. hasta que queden 12 pts, finalizar con 2 d. y 10 pts en pt musgo. Continuar en pt elástico con 10 pts en pt musgo a cada lado hacia el centro del delantero (= los pts de las cenefas se trabajan siempre en pt musgo). Cuando el elástico mida 4 cm trabajar 1 fila en pt jersey, AL MISMO TIEMPO dism 49-53-61-65-73-77 pts repartidos (no dism en los pts de la cenefa) = 201-225-249-273-297-321 pts. Cambiar a ag circular tamaño 4 mm y continuar en pt jersey con 10 pts en pt musgo a cada lado. RECUERDE MANTENER LA MISMA TENSIÓN DE LA MUESTRA! Cuando la labor mida 5 cm continuar con el PATRÓN - ver arriba - en la sig fila por el LD como sigue: 10 pts en pt musgo, M.1 (= 6 pts) a lo largo de la fila hasta que queden 11 pts, finalizar con el primer pt de M.1 y 10 pts en pt musgo. AL MISMO TIEMPO cuando la labor mida 7-9-5-7-9-5 cm hacer los OJALES en la cenefa derecha - ver arriba. Después de 1 repetición en vertical de M.1 continuar con gris marengo. Insertar 2 marcapuntos (MP) en la labor, a 55-61-67-73-79-85 pts de cada lado (espalda = 91-103-115-127-139-151 pts). Cuando la labor mida 10 cm dism 1 pt a cada lado de ambos MP y repetir las dism cada 8-9-9-10-10-11 cm un total de 3 vcs = 189-213-237-261-285-309 pts. Cuando la labor mida 28-29-30-31-31-32 cm trabajar el patrón en la sig fila por el LD como sigue: 10 pts en pt musgo, M.2A (= 24 pts) un total de 7-8-9-10-11-12 vcs a lo largo de la fila y finalizar con el primer pt de M.2A y 10 pts en pt musgo. Continuar con el patrón de la misma manera. Cuando la labor mida 37-38-39-40-40-41 cm cerrar 6 pts a cada lado para la sisa (= 3 pts a cada lado del MP). Ahora completar cada parte por separado. ESPALDA: = 79-91-103-115-127-139 pts. Continuar en M.2A como antes, AL MISMO TIEMPO cerrar para la sisa a cada lado al inicio de cada fila: 2 pts 0-2-4-6-8-10 vcs y 1 pt 0-1-2-3-4-5 vcs = 79-81-83-85-87-89 pts. Cuando la labor mida 54-56-58-60-62-64 cm cerrar los 31-33-33-35-35-37 pts centrales para el escote y completar cada hombro por separado. Cerrar 1 pt en el escote en la sig fila = quedan 23-23-24-24-25-25 pts para el hombro. Después de 1 repetición en vertical de M.2A completar la labor en M.2D. Rematar cuando la labor mide 56-58-60-62-64-66 cm. DELANTERO IZQUIERDO: = 49-55-61-67-73-79 pts. Continuar con el patrón como antes, AL MISMO TIEMPO cerrar para la sisa en el lado como se describe para la espalda = 49-50-51-52-53-54 pts. Cuando la labor mida 50-52-54-56-58-60 cm desl 18-19-19-20-20-21 pts hacia el centro del delantero a un gancho aux. Cerrar para la forma del escote al inicio de cad fila desde el centro del delantero: 2 pts 4 vcs = 23-23-24-24-25-25 pts quedan para el hombro. Rematar cuando la labor mida 56-58-60-62-64-66 cm. DELANTERO DERECHO: Trabajar de la misma manera que el delantero izquierdo pero a la inversa. Recuerde LOS OJALES - ver arriba! MANGA: Se trabaja en redondo en ag de doble punta. Mont 60-60-68-68-68-68 pts en ag de doble punta tamaño 3.5 mm con gris marengo. Trabajar 1 vta en pt jersey y continuar en pt elástico 2 d./2r. Cuando la labor mide 4 cm trabajar 1 vta en pt jersey AL MISMO TIEMPO dism 12-12-14-14-14-14 pts repartidos = 48-48-54-54-54-54 pts. Cambiar a ag de doble punta tamaño 4 mm e insertar un marcapuntos (MP) al inicio de la vta. Continuar en pt jersey. Cuando la labor mida 5 cm continuar con el patrón en la sig vta como sigue: M.1 un total de 8-8-9-9-9-9 vcs a lo largo de la vta. Después de 1 repetición en vertical de M.1 continuar en pt jersey en gris marengo. Cuando la labor mida 6-6-8-8-6-8 cm aum 1 pt a cada lado del MP y repetir los aum cada 3-3-2-2-1.5-1 cm un total de 12-12-15-15-21-21 vcs = 72-72-84-84-96-96 pts. Cuando la labor mida 41-40-39-38-37-34 cm continuar con el patrón en la sig vta como sigue: Talla S/M: M.2A un total de 3-3 vcs. Talla L/XL: M.2B (= 5 pts), M.2A 3 vcs, M.2C (= 7 pts). Talla XXL/XXXL: M.2A un total de 4-4 vcs. Cuando la labor mida 50-49-48-47-46-43 cm (medidas más cortas en las tallas más grandes debido a una mayor largura de la copa de la manga y una mayor anchura de hombros) cerrar 6 pts en el centro bajo la manga (= 3 pts a cada lado del MP - ajustar al cuerpo, es decir la misma fila del patrón ) y completar la manga de ida y vta en ag. Después de 1 repetición del patrón en vertical completar la labor en M.2D para todas las tallas. AL MISMO TIEMPO cerrar para la copa de la manga a cada lado al inicio de cada fila: 2 pts 3-4-4-4-5-3 vcs, 1 pt 1-2-4-6-6-14 vcs, después 2 pts a cada lado hasta que la labor mida 56-57-57-58-58-58 cm, ahora cerrar 3 pts 1 vez a cada lado y rematar los pts restantes. La labor mide aprox 57-58-58-59-59-59 cm. TERMINACIÓN: Hacer la costura de los hombros. Montar las mangas. Coser los botones. CENEFA DEL ESCOTE: Se trabaja de ida y vta en ag circular. Recoger 102-106-106-110-110-114 pts (incl los pts en los ganchos aux) alrededor del escote en ag circular tamaño 3.5 mm con gris marengo. Trabajar 1 fila por el LR y continuar como sigue por el LD: 10 pts en pt musgo, pt elástico 2 d./2r. hasta que queden 12 pts, finalizar con 2 d., 10 pt en pt musgo, AL MISMO TIEMPO aum 24 pts repartidos en la fila (no aum en la cenefa) = 126-130-130-134-134-138 pts. Continuar en pt elástico hasta que la cenefa del escote mida 3 cm. Rematar con derecho sobre derecho y revés sobre revés. |
|||||||
Explicaciones del diagrama |
|||||||
|
|||||||
 |
|||||||
 |
|||||||
¿Terminaste este patrón?Entonces, etiqueta tus fotos con #dropspattern o envíalas a la galería #dropsfan. ¿Necesitas ayuda con este patrón?Encontrarás 25 videos tutoriales, un espacio para comentarios/preguntas y más visitando la página del patrón en garnstudio.com © 1982-2026 DROPS Design A/S. Todos los derechos reservados. Este documento, incluyendo todas sus sub-secciones, está protegido por los derechos de autor (copyright). Lee más acerca de lo que puedes hacer con nuestros patrones en la parte de abajo de cada patrón de nuestro sitio. |
|||||||


Con más de 40 años en el diseño de modelos de punto y de ganchillo, DROPS Design ofrece una de las más vastas colecciones de patrones gratuitos en el internet - traducidos en 17 idiomas. Al día de hoy, contamos con 324 catálogos y 12290 patrones - de los cuales 11685 están traducidos en español.
Nosotros trabajamos con mucho esmero para brindarte lo mejor que las labores de punto y ganchillo tienen para ofrecer,inspiración y consejos, así como hilos de magnífica calidad a precios increíbles! Te gustaría usar nuestros patrones para otro fin además del uso personal? Puedes leer acerca de lo que estás permitida a hacer en el texto de Copyright en la parte de abajo de todos nuestros patrones. Felices labores!
Escribe un comentario sobre DROPS 116-11
¡Nos encantaría saber qué piensas acerca de este patrón!
Si quieres escribir una pregunta referente al patrón, por favor asegúrate de elegir la categoría correcta en el formulario debajo, para acelerar el proceso de respuesta. Los campos obligatorios están marcados con un *.