
Categorías populares
¿Buscas un hilo?


Comentarios / Preguntas (60)
![]() Vidal escribió:
Vidal escribió:
Bonjour, je suis en train de tricoter ce boléro et j\'ai du mal à comprendre la phrasé : \"EN MÊME TEMPS, au 2ème rang, monter 1 m côté milieu devant\". Cela veut-il dire qu\'il faut simplement faire 1 augmentation de 1 maille au milieu du devant ? Merci
25.07.2021 - 14:29DROPS Design respondió:
Bonjour Mme Vidal, vous allez monter 1 maille côté milieu devant (= côté ouverture du devant si vous préférez) à la fin de chaque rang (sur l'envers pour le devant gauche, sur l'endroit pour le devant droit) - cette vidéo montre comment procéder pour monter plusieurs mailles en fin de rang. Bon tricot!
26.07.2021 - 08:58
![]() Jeanette Gaboardi escribió:
Jeanette Gaboardi escribió:
Regarding 3/4 sleeve bolero AC 013 pattern. My piece measures 24" instead of the 28 I told you in the previous inquiry. This is the width before binding off for the arm holes. Will these extra inches make the finished bolero larger all over? Do you think 24" will work for the size L? Thank you Jeanette Gaboardi
20.04.2016 - 17:16DROPS Design respondió:
Dear Mrs Gaboardi, the best way to be sure about the size would be to compare a similar garment she has and like the shape to the finished measurements (taken flat from side to side, and remember in cm) - see here. Happy knitting!
20.04.2016 - 17:44
![]() Jeanette Gaboardi escribió:
Jeanette Gaboardi escribió:
Regarding the pattern for the Bolero w/3/4 sleeve pattern AC-013, I am now at the stage where you bind off for armholes. My work, before starting the bind off, is 28" wide. For size L should this piece measure 36 " as shown in diagram? Does the diagram mean the shoulder seams are 36" apart? When do you use the chart? Thank you. Jeanette Gaboardi
20.04.2016 - 14:13DROPS Design respondió:
Dear Mrs Gaboardi, with a tension of 20 sts = 10 cm (see under tab "materials") you should get approx. 50 cm/20 inc with the 102 sts in size L before binding off for armholes - remember to check and keep correct gauge. Measurement in chart are in cm, convert here into inches. Happy knitting!
20.04.2016 - 16:11
![]() Jeanette Gaboardi escribió:
Jeanette Gaboardi escribió:
In regards to Bolero w/3/4 sleeve pattern AC-013. Back piece (binding off for armholes size L). Pattern reads bind off 3 sts O-2 times. Don't understand this. Does it mean bind off 3 sts at the beg of two rows or no sts for 2 rows for size L?
19.04.2016 - 14:46DROPS Design respondió:
Dear Mrs Gaboardi, each number refers to a size, in size L, bind off for armholes as follows - at the beg of every row on each side: 4 sts 1 time, 2 sts 3 times and 1 st 3 times = 76 sts remain. Happy knitting!
19.04.2016 - 16:46
![]() Jessica escribió:
Jessica escribió:
Thank you for the response but i'm still strugglinig with how I end up with 38 sts. If I cast on 18 and do 6 increases (one every row RS and WS) and then 8 increases (every other row) and then 12 increases (inc 1 stitch each side 6 times) this equals 44 instead of the 38 I need. Can you help me understand where I have too many sts? Thank you!
21.01.2013 - 23:17DROPS Design respondió:
Dear Jessica, you will inc 12 sts towards mid front and only 6 sts towards the side (back piece are each side but front piece is only 1 side = towards seam to back), so 18 sts + 14 sts (6 every row + 8 every 2nd row) + 6 sts towards back piece = 38 sts. Happy knitting!
22.01.2013 - 09:48
![]() Jessica escribió:
Jessica escribió:
I'm struggling with the front and am wondering if someone can help. It says on row 2 increase 1st towards frond mid every row. Is this only supposed to be on the front knit side of the garment or on both knit and purl sides? I am doing size M and struggling to understand how I end up with only 38 sts at end of increases. Right now I am casting on 18 +6 every row +8 inc every other + 12 (inc 1st each side 6 times) = 44. Can u help me understand where I have too many stitches?
19.01.2013 - 18:09DROPS Design respondió:
Dear Jessica, there are 2 kinds of inc for front pieces : the first one every row (= from RS and from WS) towards mid front (to shape the round border) + the same inc as for back piece towards the side. Happy knitting !
21.01.2013 - 09:18
![]() Jessica escribió:
Jessica escribió:
I'm struggling with the front and am wondering if someone can help. It says on row 2 increase 1st towards frond mid every row. Is this only supposed to be on the front knit side of the garment or on both knit and purl sides? I am doing size M and struggling to understand how I end up with only 38 sts at end of increases. Right now I am casting on 18 +6 every row +8 inc every other + 12 (inc 1st each side 6 times) = 44. Can u help me understand where I have too many stitches?
19.01.2013 - 18:08
![]() Cobi Keus escribió:
Cobi Keus escribió:
Ik ben bezig met de rand langs de bolero, nu begrijp ik niet goed welke steken er tussen het patroon gebreid moet worden. Na de 12e nld moeten dan de steken afgekant worden? Heeft u een iets duidelijkere omschrijving?
14.12.2012 - 09:08DROPS Design respondió:
U moet geen steken tussen het patroon breien, ALLEEN de st van de teltekening. Bijv maat S, heeft u 288 st op de nld. U herhaalt M.1 over alle st (16 st per herhaling = 18 herhalingen over de hele nld). Volgt u de teltekening en de beschrijving hiervoor, dan komen er eerst automatisch meerderingen (= omsl) en in nld 12 breit u st samen (zie beschrijving) Brei door volgens de teltekening.
15.12.2012 - 17:28
![]() Becky Brock escribió:
Becky Brock escribió:
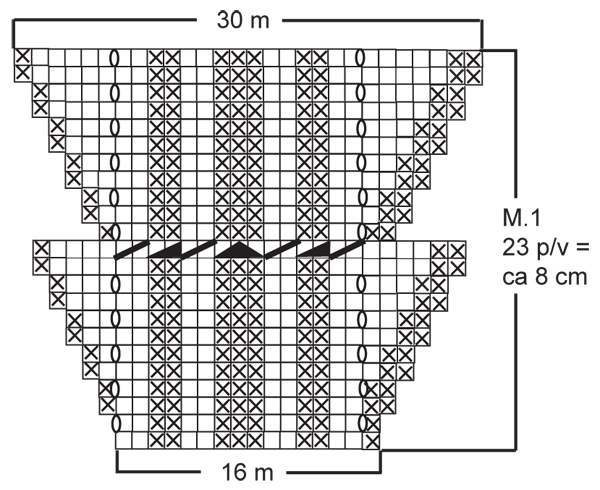
Thanks, the chart is upside down. It shows you starting with 30 sts.
20.11.2012 - 13:30
|
|||||||||||||||||||
Elegant Dreams |
|||||||||||||||||||
|
|
|||||||||||||||||||
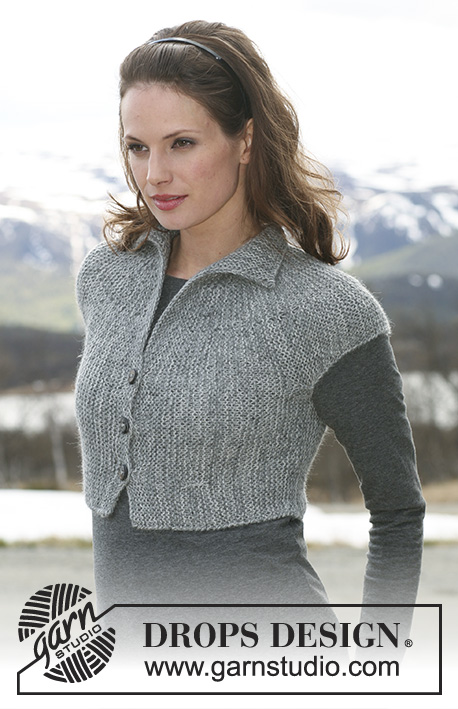
Bolero DROPS en “Classic Alpaca” con mangas ¾. Talla S – XXXL. DROPS Design: Patrón No. AC-013
DROPS 115-16 |
|||||||||||||||||||
|
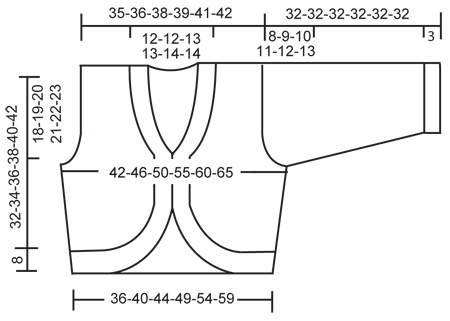
PATRON: Ver diagrama M.1 – el diagrama es visto por el LD y muestra 1 repetición horizontal del patrón. TIP PARA DISMINUCIÓN (aplica a la línea del escote): Dism por el LD dentro de 1 pt de orillo. Dism como sigue DESPUÉS de 1 pt: desl 1 pt al derecho, 1d, pasar pt desl por encima. Dism como sigue ANTES de 1 pt: tejer 2 pjd. ESPALDA: Se teje de ida y vuelta en ag. Mon 74-82-90-100-110-120 pts (incl 1 pt de orillo a cada lado) en ag tamaño 4.5 mm con Classic Alpaca. Tejer pt jersey. RECUERDE MANTENER LA MISMA TENSION DE TEJIDO DE LA MUESTRA! Cuando la pieza mida 2-2-3-3-4-4 cm aum 1 pt a cada lado, y repetir el aum cada 2 cm un total de 6 veces = 86-94-102-112-122-132 pts. Cuando la pieza mida 14-15-16-17-18-19 cm rem para la sisa a cada lado al inicio de cada vta: 4 pts 1 vez, 3 pts 0-0-0-1-2-2 veces, 2 pts 1-2-3-3-3-5 veces y 1 pt 2-3-3-4-4-4 veces = 70-72-76-78-82-84 pts. Cuando la pieza mida 30-32-34-36-38-40 cm desl los 22-22-24-24-26-26 pts centrales a un gancho o seguro aux para el cuello y completar cada hombro por separado. Rem 1 pt en la línea del escote en la vta sig = 23-24-25-26-27-28 pts restantes en cada hombro. Rem pts cuando la pieza mida 32-34-36-38-40-42 cm. DELANTERO DERECHO: Se teje de ida y vuelta en ag. Mon 14-18-21-27-31-36 pts en ag tamaño 4.5 mm con Classic Alpaca. Tejer pt jersey, AL MISMO TIEMPO en la vta 2 aum 1 pt hacia el delantero central, y repetir el aum en cada vta un total de 6 veces y luego en vtas alternas un total de 8 veces. AL MISMO TIEMPO cuando la pieza mida 2-2-3-3-4-4 cm aum a un lado como se describe para la espalda. Cuando todos los aum y dism han sido completados deberá tener 34-38-41-47-51-56 pts en la ag. Cuando la pieza mida 14-15-16-17-18-19 cm rem para la sisa a un lado como se describe para la espalda. AL MISMO TIEMPO cuando la pieza mida 16-17-18-19-20-21 cm dism 1 pt hacia el delantero central – VER TIP PARA DISMINUCIÓN – y repetir la dism cada 4 cm un total de 3-3-3-4-4-4 veces = 23-24-25-26-27-28 pts restantes en el hombro. Rem pts cuando la pieza mida 32-34-36-38-40-42 cm. DELANTERO IZQUIERDO: Como el delantero derecho, pero a la inversa. MANGA: Se teje de ida y vuelta en ag. Mon 54-58-62-66-70-74 pts en ag tamano 3.5 mm con Classic Alpaca. Tejer pt resorte, 2d/2r, con 1 pt de orillo en cada lado. Cuando la pieza mida 3 cm cambiar a ag tamaño 4.5 mm y cont en pt jersey, AL MISMO TIEMPO dism 8-8-8-10-10-10 pts distribuidos equitativamente en la primera vta = 46-50-54-56-60-64 pts. Cuando la pieza mida 5 cm aum 1 pt en cada lado, y repetir el aum cada 5-4-4-3-3-3 vta un total de 10-10-10-12-12-13 veces = 66-70-74-80-84-90 pts. Cuando la pieza mida 24-23-22-21-20-19 cm (menos para las tallas más grandes por copete de manga más largo y hombros más anchos) rem para el copete de manga a cada lado al inicio de cada vta: 4 pts 1 vez y 3 pts 1 vez, luego 2 pts a cada lado hasta que la pieza mida 31 cm, a cont rem 3 pts a cada lado 1 vez y rem los pts restantes, la pieza mide aprox 32 cm. TERMINACION: Coser hombros y laterales (dentro de 1 pt de orillo). Levantar 288-304-336-352-384-400 pts (incl pts en el gancho aux en la pieza de la espalda) alrededor de toda la abertura del bolero en ag circular tamaño 3.5 mm con Classic Alpaca. NOTA: Cerciorarse de levantar suficientes pts a lo largo de las piezas delanteras. Tejer M.1 (= 18-19-21-22-24-25 repeticiones). Después de M.1 deberá tener 540-570-630-660-720-750 pts en la ag, rem pts derecho sobre derecho y revés sobre revés. Coser la costura de mangas dentro de 1 pt de orillo y colocar las mangas. |
|||||||||||||||||||
Explicaciones del diagrama |
|||||||||||||||||||
|
|||||||||||||||||||
 |
|||||||||||||||||||
 |
|||||||||||||||||||
¿Terminaste este patrón?Entonces, etiqueta tus fotos con #dropspattern o envíalas a la galería #dropsfan. ¿Necesitas ayuda con este patrón?Encontrarás 23 videos tutoriales, un espacio para comentarios/preguntas y más visitando la página del patrón en garnstudio.com © 1982-2026 DROPS Design A/S. Todos los derechos reservados. Este documento, incluyendo todas sus sub-secciones, está protegido por los derechos de autor (copyright). Lee más acerca de lo que puedes hacer con nuestros patrones en la parte de abajo de cada patrón de nuestro sitio. |
|||||||||||||||||||


Con más de 40 años en el diseño de modelos de punto y de ganchillo, DROPS Design ofrece una de las más vastas colecciones de patrones gratuitos en el internet - traducidos en 17 idiomas. Al día de hoy, contamos con 324 catálogos y 12290 patrones - de los cuales 11675 están traducidos en español.
Nosotros trabajamos con mucho esmero para brindarte lo mejor que las labores de punto y ganchillo tienen para ofrecer,inspiración y consejos, así como hilos de magnífica calidad a precios increíbles! Te gustaría usar nuestros patrones para otro fin además del uso personal? Puedes leer acerca de lo que estás permitida a hacer en el texto de Copyright en la parte de abajo de todos nuestros patrones. Felices labores!
Escribe un comentario sobre DROPS 115-16
¡Nos encantaría saber qué piensas acerca de este patrón!
Si quieres escribir una pregunta referente al patrón, por favor asegúrate de elegir la categoría correcta en el formulario debajo, para acelerar el proceso de respuesta. Los campos obligatorios están marcados con un *.