
Categorías populares
¿Buscas un hilo?


Comentarios / Preguntas (73)
![]() Sharon escribió:
Sharon escribió:
Hi, this is strange. Started this sweater from scratch and am getting 21 sts per inch, but the width at the bottom of the sweater is 107. Rows per inch am n not getting so more yarn I know I have to shop, but I do t understand the width which is 107 with the correct stitch gauge.
30.04.2024 - 10:52DROPS Design respondió:
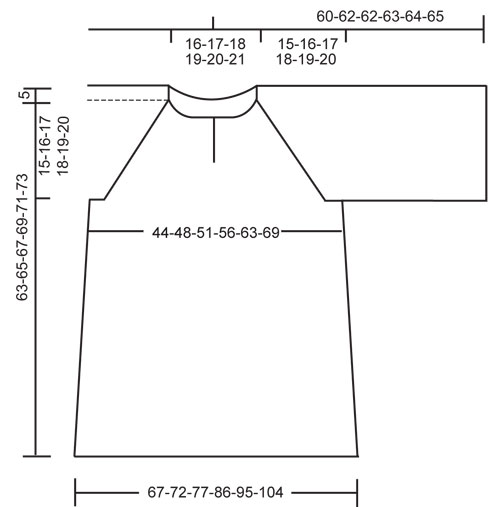
Dear Sharon, not sure which size you are working on, but with 21 sts = 10 cm/4", the 280-304-328-360-400-440 sts cast on should be approx. 133-145-155-172-190-210 cm in circumference, ie approx. 67-72-77-86-95-104 cm measured flat from side to side - just as shown in chart. Can this help?
30.04.2024 - 11:23
![]() Sharon Hunt-Edwards escribió:
Sharon Hunt-Edwards escribió:
Is the width on the lower part of this sweater 40 all around or 80? Sorry I work so I cannot go to the yarn store for help. Everytime. I was told in a response to a question about row gauge. I always swatch and did I did 3 times for this project and row gauge is not an achievable for me am not way off. Gauge is too long. What do I do here. Thank you.
25.04.2024 - 10:38DROPS Design respondió:
Dear Mrs Hunt-Edwards, all measurements are taken flat, from side to side, ie the bottom width is here 67-104 cm, ie 134-208 cm circumference. Read more about charts here, in this kind of garment, if your tension in height is not exactly the same, it might not be a problem as you can adjust to the measurments in cm, but remember that the total amount of yarn might be affected. Happy knitting!
25.04.2024 - 12:36
![]() Sharon Hunt-Edwards escribió:
Sharon Hunt-Edwards escribió:
Hi, am working on this sweater and need more yarn because I did not get rows per inch. Usually I would make size 52 which is not an option here. The sweater size I chose is 54 so this is a bit larger which is ok. Do I still need to knit an extra row between increases in this case?
20.04.2024 - 21:05DROPS Design respondió:
Dear Sharon, please do a gauge swatch and compare to the pattern and the diagram. If your gauge swatch matches the tension given in the pattern for rows as well, you should get the proper size, if you follow the pattern. If you are still unsure, you can always ask for help either over the phone or in person, in the store where you bought your DROPS yarn from. Happy Knitting!
20.04.2024 - 23:00
![]() Sharon Hunt escribió:
Sharon Hunt escribió:
Where the pattern says to do to decreases on body and not sleeves refers to the first part of decrease tip and 2 rounds? Please explain am not sure I understand. Thank you
13.04.2024 - 09:20DROPS Design respondió:
Dear Sharon, the decreasing tip only indicates how to work each decrease, both before and after the marker, not when to work them. You have the markers in the transitions between the body pieces and the sleeves. The first 2 rows with decreases (included in the total of times indicated later) you will only decrease on one side of the marker, the side in which you have the body pieces. For example, in the marker between the left sleeve and the front piece, decrease on the side of the front piece stitches. Happy knitting!
14.04.2024 - 23:19
![]() Sharon Hunt-Edwards escribió:
Sharon Hunt-Edwards escribió:
How many balls of yarn does it take to make this sweater. Am asking because 1 bought 21 ball of yarn per pattern, unless I calculated incorretly, and i have just 8 balls left. I used the yarn called for in the patteren and am getting row and stitch gauge. Yarn left won’t be enough to complete the sleeves and yoke. I took the 1050 divided by 50 to get the amount I needed. Is this incorrect? Please advise as I d not want to make same mistake again. Not sure if I will get same dyelot.
06.04.2024 - 10:42DROPS Design respondió:
Dear Sharon, the amount should be correct: 1050gr for the largest size in total and each ball is 50gr, so you should need 21 balls. Have you used 13 balls only for the body section? It should be half the balls for the body and half for the rest, approximately. Is the length and width of the body correct? Please check all of these first, before continuing. In case you still can only use these 8 balls, start working the sleeves and check the remaining balls; you could have approx. 3 balls for the yoke which could be enough. Happy knitting!
07.04.2024 - 21:08
![]() Annika escribió:
Annika escribió:
Hej! Stickar L, behöver förstå OK raglan avmaskningen. Står maska av vartannat varv 16ggr, varje varv 27ggr men att det är några varv som det ej avmaskas. Ska det maskas av på ärmar 16ggr? På fram/bak 27ggr? Sen sista 10ggr på vartannat varv maskas det inte av på ärm? Hur många gånger på ett varv ska det avmaskas? 8ggr dvs både på ärm och fram/bak? Är det vissa varv som det bara är avmaskning på fram/bak men inte på ärmen eller tvärt om? Mvh, Annika
30.03.2024 - 19:34DROPS Design respondió:
Hej Annika, du minskar för raglan på vartannat v 16 ggr, MEN de 2 første gange minskar du endast på fram och bakst. Når du er klar med de 16 ggr (32varv), minskar du till raglan på varje varv :)
05.04.2024 - 12:08
![]() Sharon Hunt-Edwards escribió:
Sharon Hunt-Edwards escribió:
Hello? 👋 how many balls of yarn are used before the armhole shaping on this sweater am concerned that maybe it’s not enough. Knitting to gauge.
28.03.2024 - 21:00DROPS Design respondió:
Dear Sharon, since the exact amount of yarn depends on many factors 8size, your personal gauge, etc), we cannot tell you exactly how many balls you are using until the armholes. Happy Knitting!
29.03.2024 - 08:33
![]() Ewelina escribió:
Ewelina escribió:
Witam!! Jestem na etapie łączenia tyłu, przodu z rękawami - gdzie teraz będzie się znajdować początek rzędu? Pozdrawiam
22.02.2022 - 13:59DROPS Design respondió:
Witaj Ewelino, nie jest do dookreślone. Ja umieściłabym ten 1 dodatkowy marker na początek okrążenia na środku przodu (tam gdzie robótka będzie dzielona, aby powstało pęknięcie przy dekolcie). Użyj markera w innym kolorze niż te na oznaczenie reglanów. Miłej pracy!
22.02.2022 - 15:04
![]() Ilka Keller escribió:
Ilka Keller escribió:
Wie lautet die Rückenabnahme (Halsausschnitt )?
23.01.2022 - 16:02DROPS Design respondió:
Liebe Frau Keller, bei diesem Modell wird man nur Maschen für das Halsauschnitt am Vorderteil abketten, nicht für Rückenteil. Viel Spaß beim stricken!
24.01.2022 - 09:49
![]() Manuela Hauenstein escribió:
Manuela Hauenstein escribió:
Ich stricke die Tunika in XXXL, Leider stimmt die Mengenangabe überhaupt nicht..... Habe xmal kontrolliert, ob ICH etwas falsch gemacht habe. Habe jetzt zweimal nachbestellt, das ist sehr ärgerlich! Vielleicht prüft ihr einmal die Mengenangabe nach? Ansonsten bin und bleibe ich ein treuer Fan
14.04.2021 - 22:53
|
|
Nicola#nicolatunic |
|
|
|
|
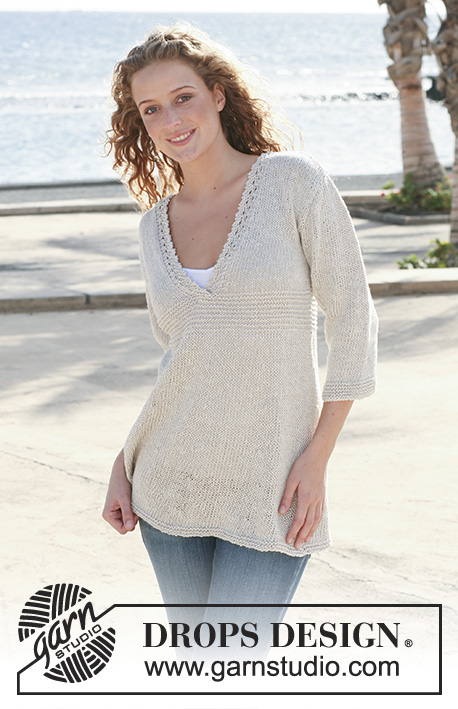
Túnica de punto DROPS con canesú y mangas raglán en pt elástico en ”Muskat”. Talla: S - XXXL.
DROPS 112-3 |
|
|
PT MUSGO (en redondo): 1 vuelta del derecho, 1 vuelta del revés PT MUSGO (de ida y vuelta en aguja): Todas las filas del derecho. TIP PARA LA ELABORACIÓN DEL TRABAJO: Si la tensión de la muestra es demasiado prieta, el raglán será demasiado corto y la sisa muy pequeña. Esto se puede compensar tejiendo una vuelta extra sin dism a intervalos regulares entre vueltas con dism. TIP PARA LAS DISMINUCIONES (se aplica al raglán): Dism como sigue por el LD: Antes del marcapuntos: 2 pjd Después del marcapuntos: Desl 1 pt del derecho, 1 d., pasar el pt desl por encima. Dism como sigue por el LR:(después de dividir la labor para el escote): Antes del marcapuntos: 2 pjr retorcido Después del marcapuntos: 2 pjr -------------------------------------------------------- CUERPO: Se trabaja en redondo en ag circular. Montar 280-304-328-360-400-440 pts en ag circular tamaño 4 mm con Muskat. Trabajar 2 vueltas en pt jersey, 4 vueltas en pt musgo - ver arriba - y ahora continuar en pt jersey. Cuando la labor mida 41 cm cambiar a ag circular tamaño 2.5 mm, tejer 1 vta del derecho y continuar en pt elástico 1d./1r. Insertar 2 marcapuntos (MP) en la labor con 140-152-164-180-200-220 pts entre ellos (para marcar los laterales). Cuando la labor mida 48-49-50-51-52-53 cm cerrar 10 pts a cada lado para la sisa (= 5 pts a cada lado del MP) = 260-284-308-340-380-420 pts. Apartar y tejer las mangas. MANGA: Se trabaja en redondo con ag de doble punta. Montar 112-118-124-130-136-142 pts en ag de doble punta tamaño 4 mm con Muskat. Insertar un MP al comienzo de la vuelta. Tejer 2 vueltas en pt jersey, 4 vueltas en pt musgo y continuar en pt jersey. Cuando la labor mida 14 cm cambiar a ag de doble punta tamaño 2.5 mm, tejer 1 vta en pt jersey y continuar en pt elástico 1d./1r. Cuando la labor mida 37-37-36-36-35-35 cm cerrar 5 pts a cada lado del MP = 102-108-114-120-126-132 pts. Apartar y tejer la otra manga. CANESÚ: VER TIP PARA LA ELABORACIÓN DEL TRABAJO! Pasar las mangas a la misma ag circular tamaño 2.5 mm del cuerpo, donde se cerró para las sisas = 464-500-536-580-632-684 pts. Insertar 1 MP en todas las transiciones entre la parte del cuerpo y las mangas = 4 MP. Continuar en pt elástico 1d./1r., AL MISMO TIEMPO dism para el raglán – VER TIP PARA LAS DISMINUCIONES! ATENCIÓN! Hacer las primeras 2 dism sólo en la parte del cuerpo y no en las mangas. Dism cada segunda fila un total de 15-15-16-16-17-17 veces y después en todas las filas 22-25-27-30-32-35 veces. ATENCIÓN! En las filas sin dism tejer 1d. a cada lado de los MP por el LD. AL MISMO TIEMPO cuando la labor mida 49-50-51-52-53-54 cm dividir la labor en el centro del delantero y continuar de ida y vuelta en ag como sigue: 5 pts en pt musgo, * 1d./1r. * , repetir de *a* hasta que queden 5 pts, tejer 1d., 4 pts en pt musgo y montar 1 pt nuevo al final de la fila. Ahora continuar con 5 pts en pt musgo a cada lado hacia el centro del delantero y tejer el resto de pts como antes. AL MISMO TIEMPO cuando la labor mida 57-58-59-60-61-62 cm desl 11-14-17-20-27-34 pts de cada lado hacia el centro del delantero a ganchos aux para el escote. Cerrar para dar forma al escote a cada lado al inicio de cada fila desde el centro del delantero: 2 pts 4-4-4-5-5-5 veces y 1 pt 5 veces. Cuando se han completado todas las dism hay 129-135-141-151-165-179 pts en la fila. Ahora recoger 33-36-39-42-49-56 pts (incl los pts en las ganchos aux) a lo largo del escote en cada parte delantera= 195-207-219-235-263-291 pts. Tejer 2 filas del derecho, AL MISMO TIEMPO dism 31-37-41-51-73-93 pts repartidos en la primera fila = 164-170-178-184-190-198 pts. Rematar. TERMINACIÓN: Coser la abertura bajo las mangas. REMATE A GANCHILLO: Realizar un remate alrededor del escote con ag de ganchillo tamaño 4 mm como sigue: 1 p.b. en el 1er p., * 3 p. de cad., saltar aprox 1-1.5 cm, 1 p.b. en el sig p. *, repetir de *a*. En la parte superior de cada lado de la abertura hacer un cordón como sigue: 60 p. de cad., girar y trabajar 1 p.e. en cada p. de cad. en la fila de vuelta. Cortar y asegurar el hilo. |
|
 |
|
¿Terminaste este patrón?Entonces, etiqueta tus fotos con #dropspattern #nicolatunic o envíalas a la galería #dropsfan. ¿Necesitas ayuda con este patrón?Encontrarás 31 videos tutoriales, un espacio para comentarios/preguntas y más visitando la página del patrón en garnstudio.com © 1982-2026 DROPS Design A/S. Todos los derechos reservados. Este documento, incluyendo todas sus sub-secciones, está protegido por los derechos de autor (copyright). Lee más acerca de lo que puedes hacer con nuestros patrones en la parte de abajo de cada patrón de nuestro sitio. |


Con más de 40 años en el diseño de modelos de punto y de ganchillo, DROPS Design ofrece una de las más vastas colecciones de patrones gratuitos en el internet - traducidos en 17 idiomas. Al día de hoy, contamos con 324 catálogos y 12290 patrones - de los cuales 11685 están traducidos en español.
Nosotros trabajamos con mucho esmero para brindarte lo mejor que las labores de punto y ganchillo tienen para ofrecer,inspiración y consejos, así como hilos de magnífica calidad a precios increíbles! Te gustaría usar nuestros patrones para otro fin además del uso personal? Puedes leer acerca de lo que estás permitida a hacer en el texto de Copyright en la parte de abajo de todos nuestros patrones. Felices labores!
Escribe un comentario sobre DROPS 112-3
¡Nos encantaría saber qué piensas acerca de este patrón!
Si quieres escribir una pregunta referente al patrón, por favor asegúrate de elegir la categoría correcta en el formulario debajo, para acelerar el proceso de respuesta. Los campos obligatorios están marcados con un *.