
Categorías populares
¿Buscas un hilo?


Comentarios / Preguntas (29)
![]() Sanne escribió:
Sanne escribió:
Op de foto lijkt de tuniek getailleerd, maar op het getekende patroon is het een A-lijn. Wat is het model van deze tuniek? Naald 7 geeft grote gaten, terwijl het op de foto niet zulke grote gaten zijn. Klopt naald 7? Er staat dat je bovenaan de schouderbandjes 4 toueren in ribbelsteek moet breien, maar op de foto is dat niet terug te zien. Is de foto de correcte foto bij dit patroon?
09.05.2023 - 15:55DROPS Design respondió:
Dag Sanne,
Het is een a-lijn tuniek en niet getailleerd. Je, de naalddikte klopt, maar maak altijd een proeflapje om te controleren of de stekenverhouding klopt en pas eventueel de naalddikte aan totdat je op de juiste verhouding komt. Ik denk dat de ribbelsteken wegvallen op de foto.
11.05.2023 - 21:10
![]() Kim Adams escribió:
Kim Adams escribió:
I am making this top in XL. I have cast off a total of 6 stitches per side to begin the arm hole. For the back , the instructions say to bind off 2 stitches 3 times at the beg of each row (for a total of 6 fewer stitches ) then 1 stitch at the beg of each row 2 times (for a total of 2 fewer stitches). This would mean 8 fewer stitches. Your directions say that I should have 53 (16 fewer). Please explain? If I am to bind off at the beginning AND end of each row - do you have a tutorial??
04.08.2020 - 01:01DROPS Design respondió:
Dear Mrs Adams, you are supposed to cast off the stitches for the armhole on each side, ie 2 sts a total of 3 times on each side (= 2 sts at the beg of the next 6 rows) then 1 st 2 times on each side (= 1 st at the beg of next 4 rows) = you will have cast off 8 sts on each side. Happy knitting!
04.08.2020 - 09:37
![]() Maria Grazia Vitturini escribió:
Maria Grazia Vitturini escribió:
Nel misurare il campione (filato Bomull, ferro 7 mm) non sono sicura di quanto deve essere tesa la maglia, dato che l'effetto è una rete piuttosto lassa. Forse dovrei stirarlo?
07.07.2015 - 15:07DROPS Design respondió:
Buongiorno Maria Grazia, i capi lavorati ai ferri non andrebbero mai stirati, deve trattare il campione come il capo finale, bloccandolo con degli spilli. La tensione deve essere quella del capo finale, senza tirare troppo il lavoro. Buon lavoro!
07.07.2015 - 15:16
![]() Maria Grazia Vitturini escribió:
Maria Grazia Vitturini escribió:
Nel misurare il campione (filato Bomull, ferro 7 mm) non sono sicura di quanto deve essere tesa la maglia, dato che l'effetto è una rete piuttosto lassa. Forse dovrei stirarlo?
07.07.2015 - 14:57DROPS Design respondió:
Buongiorno Maria Grazia, i capi lavorati ai ferri non andrebbero mai stirati, deve trattare il campione come il capo finale, bloccandolo con degli spilli. La tensione deve essere quella del capo finale, senza tirare troppo il lavoro. Buon lavoro!
07.07.2015 - 15:16
![]() Maria Grazia Vitturini escribió:
Maria Grazia Vitturini escribió:
Buongiorno, ho realizzato il capo con il filato e i ferri indicati ma, prima di completare il dietro, ho esaurito il filato e le misure non corrispondono. Credo che il problema sia dovuto alla difficoltà incontrata nel misurare il con esattezza il campione. Potete darmi un suggerimento? Grazie in anticipo. Maria Grazia Vitturini
07.07.2015 - 13:06DROPS Design respondió:
Buongiorno Maria Grazia, che difficoltà ha incontrato nel misurare il campione? Se il campione corrisponde a quello indicato la quantità di filato indicata è sufficiente a realizzare il modello. Il filato è quello suggerito? Buon lavoro!
07.07.2015 - 14:20
![]() Ardelicia escribió:
Ardelicia escribió:
Guten Abend, ich habe da eine Verständnisfrage zur Größe S. Nachdem man 7 mal nach jeweils 6 1/2 cm M abnimmt, wird dann nach insgesamt 50 cm die Arbeit geteilt. Alledings ergeben doch die ersten 6 cm + (7 * 6 1/2 cm) insgesamt 51,5 cm. Wie kann man denn dann nach 50 cm die Arbeit teilen? Vielen Dank für die Antwort schonmal im voraus.
01.05.2014 - 21:20DROPS Design respondió:
Liebe Ardelicia, die erste Abnahme machen Sie ja bereits nach einer Gesamthöhe von 6 cm. Dann nehmen Sie noch weitere 6 x nach jeweils 6,5 cm ab, das macht 39 cm. 6 cm + 39 cm = 45 cm bei insgesamt 7 Abnahmen.
02.05.2014 - 00:29
![]() Heidi Andersen escribió:
Heidi Andersen escribió:
Det står pinne 7? men da blir det jo kjempestore masker, og det står jo 5.5, men syntes også det blir stort, hva gjør jeg?
17.04.2014 - 19:08DROPS Design respondió:
Hei Heidi. Denne skal strikkes meget löst og du skal bruge den pind som skal til for at faa 14 m x 17 p glattstrikke paa 10x10 cm. Vi anbefaler pinde 7, men strik en pröve og se hvad du skal bruge. God fornöjelse.
22.04.2014 - 17:16
![]() Nita Krygier escribió:
Nita Krygier escribió:
Got to the point where I need to decrease from 180 st. to 110. Confused about what alternate means. Every other marker? Or alternate right and left sides of marker? Thanks.
24.03.2014 - 19:13DROPS Design respondió:
Dear Mrs Krygier, you will dec 1 st at each marker (=10 dec/dec round) a total of 7 times every 6.5-8cm (see size). On 1st dec round dec on the right side of every marker, on 2nd dec round, dec on the left side of every marker. Repeat alternately on the right and on the left side of every marker until all dec are done. Happy knitting!
25.03.2014 - 09:06
![]() Gwen Shaw escribió:
Gwen Shaw escribió:
Please can you advise re sizing, what is L or XL. I don't know which size to knit, Thank you.
18.05.2013 - 08:25DROPS Design respondió:
Dear Mrs Shaw, to figure out which size to make, the best is to measure a garment that you already have and like the size of and compare with the chart. Happy knitting!
18.05.2013 - 09:02
![]() Carol Singer escribió:
Carol Singer escribió:
Does decease 1 stitch to the right and to the left alternately of all markers mean to the right and left on same row or to the right of all markers on one row and then the left of all markers on the next decease row?
20.04.2013 - 22:37DROPS Design respondió:
Dear Mrs Singer, it means to dec on the same row eg for 1st dec k2 tog before all markers and for 2nd dec, k2 tog after all markers and repeat these 2 dec. Happy knitting!
22.04.2013 - 09:02
|
|
Aliz#aliztunic |
|
|
|
|
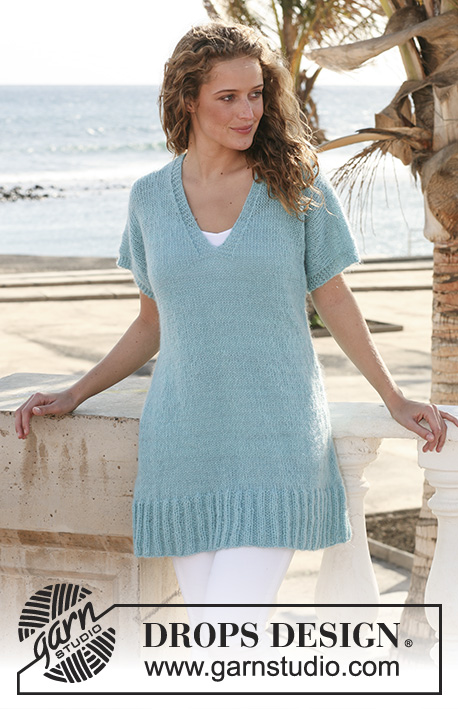
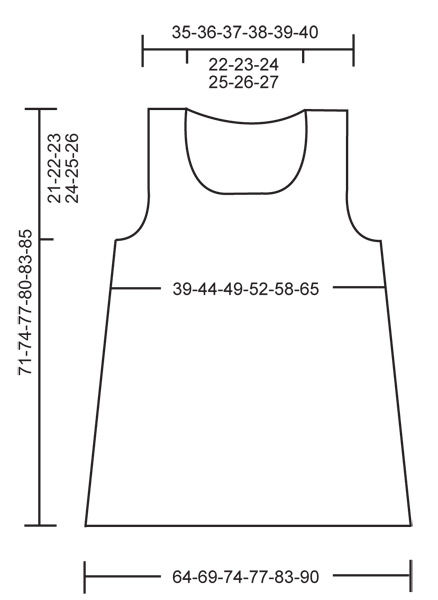
Túnica de punto DROPS en ” Bomull-Lin”. Talla S - XXXL.
DROPS 112-10 |
|
|
PUNTO MUSGO (en redondo): 1 vta del derecho, 1 vta del revés PUNTO MUSGO (de ida y vuelta en ag): todas las vtas del derecho TIP PARA DISMINUCIÓN: Dism 1 pt tejiendo 2 pjd. ------------------------------------------------------------------------------------- TUNICA: Se trabaja en redondo en ag circular. Mont 180-190-210-220-230-250 pts en ag circular tamaño 7 mm con 1 hilo Bomull-Lin. Trabajar 4 vtas en pt musgo - VER ARRIBA - y continuar en pt jersey. RECUERDE MANTENER LA MISMA TENSIÓN DE LA MUESTRA! Cuando la labor mida 6 cm insertar 10 marcapuntos (MP) en la labor con 18-19-21-22-23-25 pts entre cada MP. Dism 1 pt alternando antes o después de todos MP cada 6.5-7-7.5-7.5-8-8 cm un total de 7 vcs - VER TIP PARA DISMINUCIÓN = 110-120-140-150-160-180 pts. Ahora insertar 2 nuevos MP, 1 al inicio de la vta y 1 después de 55-60-70-75-80-90 pts ( para marcar los lados). Cuando la labor mida 50-52-54-56-58-59 cerrar los 3 pts a cada lado de los MP de los lados y completar cada parte por separado. ESPALDA: = 49-54-64-69-74-84 pts. Continuar en pt jersey, AL MISMO TIEMPO cerrar para la sisa a cada lado al inicio de cada fila: 2 pts 0-1-2-3-3-4 vcs y 1 pt 0-0-2-2-4-6 vcs = 49-50-52-53-54-56 pts. Cuando la labor mida 67-70-73-76-79-81 cm cerrar los 29-30-32-33-34-36 pts centrales para el escote y completar cada lado por separado: Cerrar 1 pt para el escote en la sig fila = 9-9-9-9-9-9 pts restantes en la ag para el hombro. Cuando la labor mida 69-72-75-78-81-83 cm trabajar 4 filas en pt musgo - VER ARRIBA - y rem. La labor mide aprox 71-74-77-80-83-85 cm. DELANTERO: = 49-54-64-69-74-84 pts. Continuar en pt jersey, AL MISMO TIEMPO cerrar para la sisa como se describe en la espalda. AL MISMO TIEMPO cuando la labor mida 55-58-61-63-66-68 cm cerrar los 11-12-14-15-16-18 pts centrales para el escote y completar cada lado por separado. Cerrar para la forma del escote al inicio de cad fila desde el centro del delantero: 2 pts 3 vcs y 1 pt 4 vcs. Después de que todas las dism han sido completadas quedan 9-9-9-9-9-9 pts para el hombro. Cuando la labor mida 69-72-75-78-81-83 cm trabajar 4 filas en pt musgo y rem. La labor mide aprox 71-74-77-80-83-85 cm. TERMINACIÓN: Coser los hombros. REMATE A GANCHILLO: Rematar a ganchillo alrededor del escote y las sisas con ag de ganchillo tamaño 3 mm y 2 hilos Bomull-Lin como sigue: 1 p.b., * 2 p.de cad., saltar aprox 1 cm, 1 p.b.*, repetir de * a * y finalizar con 1 p.e. en el 1er p.b. |
|
 |
|
¿Terminaste este patrón?Entonces, etiqueta tus fotos con #dropspattern #aliztunic o envíalas a la galería #dropsfan. ¿Necesitas ayuda con este patrón?Encontrarás 18 videos tutoriales, un espacio para comentarios/preguntas y más visitando la página del patrón en garnstudio.com © 1982-2026 DROPS Design A/S. Todos los derechos reservados. Este documento, incluyendo todas sus sub-secciones, está protegido por los derechos de autor (copyright). Lee más acerca de lo que puedes hacer con nuestros patrones en la parte de abajo de cada patrón de nuestro sitio. |


Con más de 40 años en el diseño de modelos de punto y de ganchillo, DROPS Design ofrece una de las más vastas colecciones de patrones gratuitos en el internet - traducidos en 17 idiomas. Al día de hoy, contamos con 324 catálogos y 12290 patrones - de los cuales 11685 están traducidos en español.
Nosotros trabajamos con mucho esmero para brindarte lo mejor que las labores de punto y ganchillo tienen para ofrecer,inspiración y consejos, así como hilos de magnífica calidad a precios increíbles! Te gustaría usar nuestros patrones para otro fin además del uso personal? Puedes leer acerca de lo que estás permitida a hacer en el texto de Copyright en la parte de abajo de todos nuestros patrones. Felices labores!
Escribe un comentario sobre DROPS 112-10
¡Nos encantaría saber qué piensas acerca de este patrón!
Si quieres escribir una pregunta referente al patrón, por favor asegúrate de elegir la categoría correcta en el formulario debajo, para acelerar el proceso de respuesta. Los campos obligatorios están marcados con un *.