
Categorías populares
¿Buscas un hilo?


Comentarios / Preguntas (48)
![]() Berit Bethke escribió:
Berit Bethke escribió:
Wie muss ich das verstehen? Bei einer Gesamtlänge von 8 cm in jedem Linksbereich 1 M abnehmen. Was bzw. wo ist der Linksbereich?
21.11.2024 - 18:47DROPS Design respondió:
Liebe Frau Bethke, mit "Linksbereich" meinen wir die "Gruppen" von 14 bis 28 linken Maschen die zwischen M.1 gestrickt werden; so werden diese Maschen abgenommen. Viel Spaß beim Stricken!
22.11.2024 - 08:54
![]() Ingrid escribió:
Ingrid escribió:
Korrigan Kaputzenpulli Frage zur PASSE: in Hoehe von 63cm werden 8 Maschen auf jeder Seite still gelegt.. Welche Maschen werden still gelegt?
03.02.2023 - 20:43DROPS Design respondió:
Liebe Ingrid, in L legen Sie die ersten 5 Maschen am Anfang der 2 nächsten Reihe für den Halsausschnitt still, dann stricken Sie wie zuvor (mit Raglanabnahmen) und gleichzeitig ketten Sie für den Hals beidseitig ab: 2 M x 2 Mal + 1 Masche x 3 Mal = es sind dann 60 M übrig. Für die Kapuze stricken Sie dann die stillgelegten Maschen, fassen Sie Maschen in die abgekettenen Maschen auf und stricken Sie die restlichen Maschen der Passen. Viel Spaß beim stricken!
06.02.2023 - 09:06
![]() Bella escribió:
Bella escribió:
Habe ich richtig verstanden, dass die Kapuze glatt rechts gestrickt wird? Mit jeweils 5 Krausrippe an den Aussernseiten?
18.01.2021 - 22:25DROPS Design respondió:
Liebe Bella, Kapuze wird glatt links (= links bei Hinreihen, rechts bei Rückreihen) mit 5 Maschen krausrechts beidseitig gestrickt. Viel Spaß beim stricken!
19.01.2021 - 07:17Maria escribió:
I'm sorry, but I still don't understand. If I slip 5 extetnal stiches on the stich holder and I have to decrease 1 next stich it would be the stich 'belonging' to the cable. How can I continue the cable if I'm suposed to cast off 3 stiches out of 8 of the pattern? And than, for the hoid I have to cast on 10 stiches, so 5 new stiches. Would be 5 siches enough for several rows (right now I'm only a bit after the middle of the raglan). Thanks
17.10.2018 - 09:46DROPS Design respondió:
Dear Maria, you stop working the cables when there are not enough stitches anymore to work them = when you start to cast off sts on each side, you stop working the cables. you don't cast on any new sts for the hood, you only pick up the stitches from the thread and work the sts remaining on needle and then work the hood (not sure what you mean with fold here). Happy knitting!
17.10.2018 - 12:16Maria escribió:
Dear Drops, thanks a lot. So if I've understood well, after 11 cm from the cast off row I shoud slip the band stiches on the stich holder, start decreasing for the neck, stop with the cables and in the same time continue decreasing for raglan?
16.10.2018 - 19:03DROPS Design respondió:
Dear Maria, correct, you continue decreasing for raglan as before and shape the neck on each side at the same time - (stop the cables when there is no stitches anymore to work them). Happy knitting!
17.10.2018 - 07:47Maria escribió:
I don't understand the explanation for the reglan. I have to start decrese for raglan when the piece mesures 50 cm. The reglan should take 50 rows (8x4 + 9x2). When the piece mesures 59 cm I'm supposed to slip external stiches on the stich holder and it seems like the raglan should be finished. It's 9 cm for 50 rows or I don't understand something? I'm making size S. Thanks.
16.10.2018 - 09:33DROPS Design respondió:
Dear Maria, in size S you start Yoke 1 row after body measures 48 cm, then decrease on yoke for the raglan as explained, and at the same time shape neckline: when piece measures 59 cm from the cast on row, slip the 5 sts at the beg of next 2 rows aside for neck and cast off/decrease for neck at the same time continue raglan decreases. Happy knitting!
16.10.2018 - 15:27
![]() Liath Hollins escribió:
Liath Hollins escribió:
All going well with this so far, but I’m stuck on the hood. I don’t understand the bit about putting stitches at mid front onto a holder - that is surely interfering with the cables? It would have really helped for the pattern to have had a diagram of this.
16.03.2018 - 14:01DROPS Design respondió:
Dear Mrs Hollins, you first put 5-6-8 sts (see size) on a st holder on each size for neck (these sts will be then knit back for hood) and bind off for neck as explained, the cables will "disappear", there are then no cable anymore on the hood. Happy knitting!
16.03.2018 - 14:28
![]() Ines escribió:
Ines escribió:
Guten Morgen, Könnt Ihr mir ungefähr sagen, wie viele Raglanabnahmen noch übrig sind, bei Größe XL, und die 8 Maschen für den Halsausschnitt still legt? Oder cm? Wenn ich nur, zu den 8 Maschen, 6 Maschen = 14, zunehmen soll, passt das alles nicht. Habe aber in einer Höhe von 66 cm angefangen. Lg
29.01.2018 - 07:15DROPS Design respondió:
Liebe Ines, es hängt von Ihrer Maschenprobe, aber der Halsausschnitt muss bei 64 cm anfangen, sonnst wird er etwas zu hoch sein (und Passe könnte auch länger sein). Viel Spaß beim stricken!
29.01.2018 - 10:32
![]() Eva escribió:
Eva escribió:
Hallo. Ich würde diesen Pulli gern ohne Kapuze stricken... Habt ihr da vielleicht einen kleinen Tipp, wie man das schön ausarbeiten könnte? Vielen Dank für eine Anregung und viele Grüße!!!
17.07.2016 - 15:54DROPS Design respondió:
Liebe Eva, Sie können zum Beisiel mit der angegebenen Maschenzahl eine Blende als Abschluss stricken.
18.07.2016 - 19:40
![]() Laperrière escribió:
Laperrière escribió:
Je tiens a vous remercier de m'avoir aider dans mon tricot.A bientôt peut etre.
02.03.2016 - 01:04
|
|||||||||||||
Korrigan |
|||||||||||||
|
|
|||||||||||||
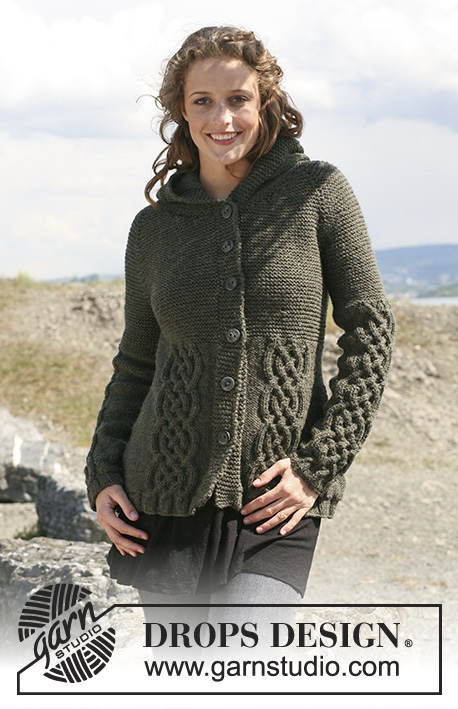
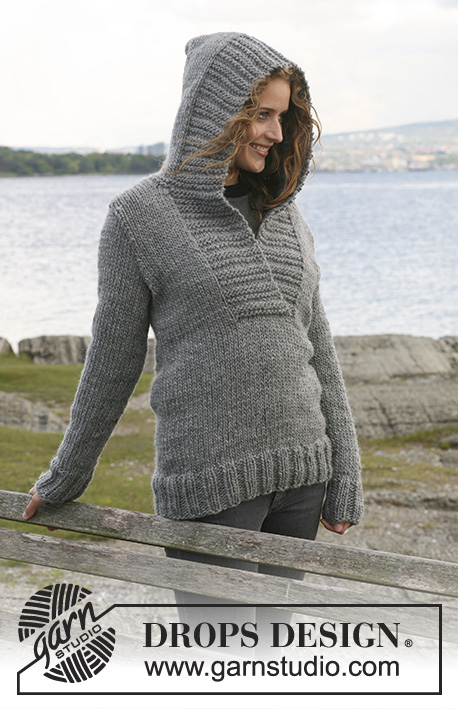
Suéter de punto DROPS en “Alaska” con torsadas (trenzas) y manga raglán. Talla S – XXXL.
DROPS 109-2 |
|||||||||||||
|
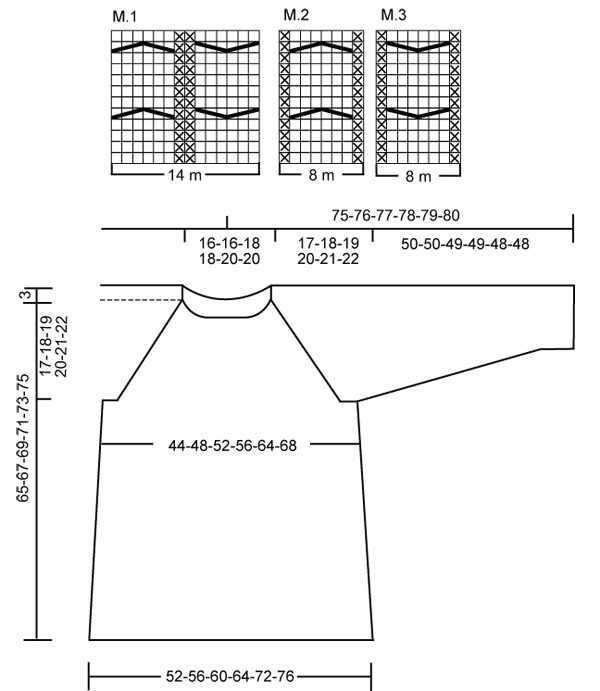
CUERPO: Se teje en redondo. Mon 156-168-180-192-216-228 pts en ag circular tamaño 5.5 mm con Alaska. Tejer 6 vtas pt musgo – ver arriba, al mismo tiempo aum 24 pts distribuidos equitativamente en la última vta = 180-192-204-216-240-252 pts. Colocar 1 marcapuntos (MP) al inicio de la vta y 1 MP después de 90-96-102-108-120-126 pts (= para marcar los laterales). En la sig vta cambiar a ag tamaño 6 mm y cont como sigue: 8-9-10-11-13-14 r, *M.1 (= 14 pts), 16-18-20-22-26-28 r*, repetir de *a* un total de 5 veces, y terminar con M.1 y 8-9-10-11-13-14 r. Recuerde tejer la muestra! Cuando la pieza mida 8 cm dism 1 pt en cada sección de reveses (= 6 dism por vta) cada 10 cm un total de 4 veces = 156-168-180-192-216-228 pts. Dism tejiendo 2 pjr (puntos juntos del revés) en el lado derecho y en el lado izquierdo alternadamente de cada sección de reveses. Cuando la pieza mida 42 cm tejer 1 vta del derecho, al mismo tiempo dism 20 pts distribuidos de forma equitativa – asegurarse dism 10 pts en la pieza delantera y 10 pts en la pieza de la espalda, 5 pts antes de la torsada (trenza) central y 5 pts después de la torsada central = 136-148-160-172-196-208 pts. Cambiar a ag tamaño 5.5 mm y tejer 8 vtas pt musgo. Ahora cortar el hilo y terminar la pieza de ida y vuelta en la ag. Empezar tejiendo la vta 34-37-40-43-49-52 pts después del MP al inicio de la vta - = delantero central – como sigue (por el LD): 5 pts musgo, M.2 (= 8 pts), 110-122-134-146-170-182 pts musgo, y terminar con M.3 (= 8 pts) y 5 pts musgo. Cuando la pieza mida 48-49-50-51-52-53 cm rem 8 pts a cada lado (es decir, 4 pts a cada lado de ambos MP) = 120-132-144-156-180-192 pts. Dejar la pieza a un lado y tejer las mangas. MANGA: Se teje en redondo con ag de doble punta. Mon 34-36-38-40-42-42 pts en ag tamaño 5.5 mm con Alaska. Tejer 6 vtas pt musgo, al mismo tiempo aum 8 pts distribuidos equitativamente en la última vta = 42-44-46-48-50-50 pts. Colocar 1 MP al inicio de la vta. En la sig vta cambiar a ag tamaño 6 mm y cont como sigue: 4-5-5-6-6-6 r, M.1 (= 14 pts), 6-6-8-8-10-10 r, M.1 y terminar con 4-5-5-6-6-6 r. Cuando la pieza mida 8 cm aum 1 pt a cada lado del MP cada 4.5-4-4-3.5-3.5-3 cm un total de 9-10-10-11-11-13 veces – tejer los aum del revés. Al mismo tiempo cuando la pieza mida 44-43-41-40-38-37 cm cambiar a ag tamaño 5.5 mm, tejer 1 vta del derecho, dism 8 pts distribuidos equitativamente y cont en pt musgo en todos los pts. Cuando todas las dism y aum hayan sido completados hay 52-56-58-62-64-68 pts en ag. Cuando la pieza mida 50-50-49-49-48-48 cm – menos en las tallas más grandes por copete de manga más largo y hombros más anchos – rem 8 pts al centro por debajo del brazo = 44-48-50-54-56-60 pts. Dejar la pieza a un lado y tejer la otra manga. CUELLO: ver tip para la elaboración del tejido! Desl las mangas a la misma ag circular tamaño 5.5 mm que el cuerpo en el rem para las sisas = 208-228-244-264-292-312 pts. Colocar un MP en todas las uniones entre mangas y la pieza del cuerpo = 4 MP. Tejer pt musgo de ida y vuelta en ag con M.2/M.3 y 5 pts musgo hacia el delantero central como se hizo anteriormente, al mismo tiempo que dism para el raglán – ver tip para disminución. Dism cada 4ª vta 8-8-8-8-8-8 veces y en vtas alternas 9-11-12-14-15-17 veces. Al mismo tiempo cuando la pieza mida 59-61-63-64-66-68 cm desl 5-5-5-6-8-8 pts a cada lado hacia el delantero central a un gancho o seguro aux para el cuello. Dism para dar forma a la línea del escote a cada lado al inicio de cada vta: 2 pts 1-1-2-2-3-3 veces y 1 pt 2-3-3-3-4-5 veces. Cuando todas las dism hayan sido completadas hay 54-56-60-62-72-74 pts en ag. Tejer 1 vta del derecho, dism 6-6-8-8-12-14 pts distribuidos equitativamente = 48-50-52-54-60-60 pts. CAPUCHA (CAPERUZA): Levantar 10-10-12-12-14-14 pts en cada pieza delantera (incluyendo pts de ganchos aux) = 68-70-76-78-88-88 pts. Tejer 4 vtas pt musgo en ag tamaño 5.5 mm, al mismo tiempo aum 12 pts distribuidos equitativamente en la primera vta = 80-82-88-90-100-100 pts. Colocar 1 MP en el centro posterior (después de 40-41-44-45-50-50 pts). Cambiar a ag tamaño 6 mm y cont en pt jersey revés con 5 pts musgo a cada lado. Al mismo tiempo aum 1 pt a cada lado del MP cada 8ª vta un total de 4 veces = 88-90-96-98-108-108 pts. Rem pts cuando la capucha mida 38-38-39-39-40-40 cm. TERMINACION: Coser aberturas debajo de los brazos. Doblar la capucha en dos y unir cosiendo en la parte superior por el LD. |
|||||||||||||
Explicaciones del diagrama |
|||||||||||||
|
|||||||||||||
 |
|||||||||||||
¿Terminaste este patrón?Entonces, etiqueta tus fotos con #dropspattern o envíalas a la galería #dropsfan. ¿Necesitas ayuda con este patrón?Encontrarás 29 videos tutoriales, un espacio para comentarios/preguntas y más visitando la página del patrón en garnstudio.com © 1982-2026 DROPS Design A/S. Todos los derechos reservados. Este documento, incluyendo todas sus sub-secciones, está protegido por los derechos de autor (copyright). Lee más acerca de lo que puedes hacer con nuestros patrones en la parte de abajo de cada patrón de nuestro sitio. |
|||||||||||||


Con más de 40 años en el diseño de modelos de punto y de ganchillo, DROPS Design ofrece una de las más vastas colecciones de patrones gratuitos en el internet - traducidos en 17 idiomas. Al día de hoy, contamos con 324 catálogos y 12290 patrones - de los cuales 11685 están traducidos en español.
Nosotros trabajamos con mucho esmero para brindarte lo mejor que las labores de punto y ganchillo tienen para ofrecer,inspiración y consejos, así como hilos de magnífica calidad a precios increíbles! Te gustaría usar nuestros patrones para otro fin además del uso personal? Puedes leer acerca de lo que estás permitida a hacer en el texto de Copyright en la parte de abajo de todos nuestros patrones. Felices labores!
Escribe un comentario sobre DROPS 109-2
¡Nos encantaría saber qué piensas acerca de este patrón!
Si quieres escribir una pregunta referente al patrón, por favor asegúrate de elegir la categoría correcta en el formulario debajo, para acelerar el proceso de respuesta. Los campos obligatorios están marcados con un *.