
Categorías populares
¿Buscas un hilo?


Comentarios / Preguntas (87)
Michele escribió:
I have cast off both Parts 1 and Parts 2 but am totally confused about how to put it together, and where exactly to sew it (the diagram makes it even more confusing :( , Do we actuallly sew together ALL of the cast off stitches? (138 from part one with 138 from part 2)
14.10.2016 - 00:50DROPS Design respondió:
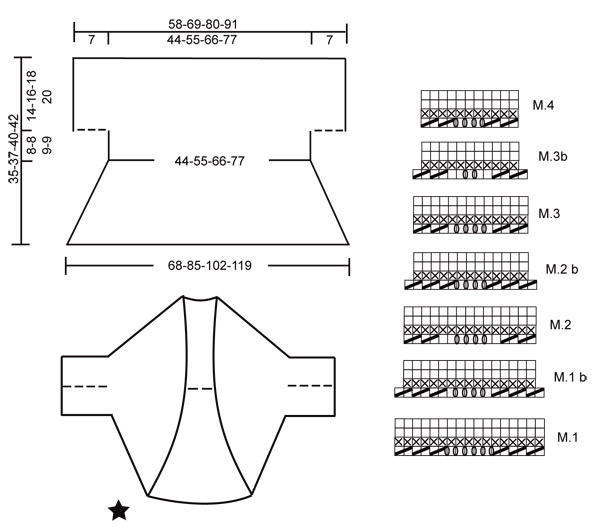
Dear Michelle, yes correct, you have to sew the 138 cast off sts from one part to the 138 cast off sts from 2nd part, so that you will have a total of 4 ridges in garter st there (see picture of back piece). Then sew seam under sleeves on each side (the 14 sts cast on on each side as you started to work back and forth). Happy assembly!
14.10.2016 - 09:25
![]() Michelle escribió:
Michelle escribió:
I really like the look of the finished product; but I can just not figure out how the diagram with the measurements becomes the second diagram (final product), and I don't find the instructions clear. I've even cut out the diagram twice to see how it would fit together and am no further ahead. I'm not even sure if you start the sweater from the bottom, the top? Lastly, I don't understand the references to Part 1 and Part 2? Thanks for any help
23.06.2016 - 05:58DROPS Design respondió:
Dear Michelle, piece is first worked in the round, ie from outer edge - then divide work into 2 pieces (= 2 parts) that will be worked separately back and forth for sleeves (casting on new sts on each side). When both parts have been worked, sew them tog (garter st section you see on 2nd picture from back of work). You then just have to sew tog new sts cast on for sleeve on each side (dotted line). Happy knitting!
23.06.2016 - 09:02
![]() Ulla Hansen escribió:
Ulla Hansen escribió:
Kan se garnet er udgået og at der så bliver henvist til hvad det kan erstattes med .. det er godt nok, men jeg er ikke dreven nok til at finde ud af om der skal bruges mere eller mindre antal nøgler garn. hvordan finder jeg ud af det ?
11.04.2015 - 11:49DROPS Design respondió:
Hej Ulla. Du kan se formlen her hvordan du beregner hvor meget garn du skal have. God fornöjelse!
13.04.2015 - 13:05
![]() Gun Malmkvist escribió:
Gun Malmkvist escribió:
Har stickat efter beskrivningen men kan inte förstå hur den skall monteras. Har köpt 450 gr men endast använt 75 gr.Skall det stickas två lika delar? Min garnleverantör ligger 150 mil från min hemort så jag hoppas verkligen att ni kan hjälpa mig snarast.
16.07.2014 - 20:05
![]() Rajka Stirjan escribió:
Rajka Stirjan escribió:
Leider weiß ich gar nicht wie das mit dem Diagramm gemeint ist. Ich habe keine Idee wie man das zusammen näht. Könnten Sie mir das erklären? Hinten am Rücken sehe ich eine Naht aber. Am besten wäre es wenn man 2 Diagramme 1x2 seperat zeichnen würde. Bitte helfen Sie mir, ich bin am verzweifeln! Grüße
06.09.2013 - 15:40DROPS Design respondió:
Liebe Rajka, bei diesen Modellen ist es manchmal etwas schwierig sich die Montge vorzustellen, aber wenn Sie genau nach der Anleitung stricken, sehen Sie dann, wie es montiert wird, wenn das fertige Stück vor Ihnen liegt. Wichtig ist, dass Sie wie beschrieben im Kreis beginnen, die angegebenen Mustersätze stricken und dann die Arb teilen und M für die Ärmel anschlagen.
07.09.2013 - 14:10
![]() Jette Stæhr Nielsen escribió:
Jette Stæhr Nielsen escribió:
Jeg er igang med denne skønne sjælevarmer, men når jeg ser den fra ryggen af er der ligesom en bred "bord" tværs over ryggen og ud over ærmerne, men min ser ikke sådan ud, når jeg følger mønsteret? og er den fx. kun 37 cm fra nakken og ned? den ser længere ud på billedet. På forhånd tak MVH Jette
27.09.2012 - 12:41DROPS Design respondió:
Jo men sådan kommer den til at se ud når du syr den sammen til sidst! Bare følg opskriften!
04.10.2012 - 10:30
![]() Kathy escribió:
Kathy escribió:
Would love to make this, but cannot make out heads or tails of what I am looking at in the diagram. which end is up? Where are we starting exactly?
20.05.2011 - 15:38
![]() Drops Design escribió:
Drops Design escribió:
Hi Janice, you do measure where longest i.e from lower edge, but also adjust to a full vertical pattern repeat.
26.04.2010 - 19:32
![]() Janice escribió:
Janice escribió:
I hate to be pedantic but this pattern has a wavy edge. When you measure from the edge, are measuring from the lower edge or the upper edge? It makes a lot of difference.
26.04.2010 - 19:23
![]() Drops Design escribió:
Drops Design escribió:
Strikkefastheden står lige under størrelse og materiale: DROPS Rundp nr 4,5 (80 cm) 2 stk – eller den p du skal bruge for at få 20 m x 22 p Bølgemønster på 10 x 10 cm.
28.09.2009 - 08:48
|
||||||||||||||||
Summer Waves |
||||||||||||||||
 |
 |
|||||||||||||||
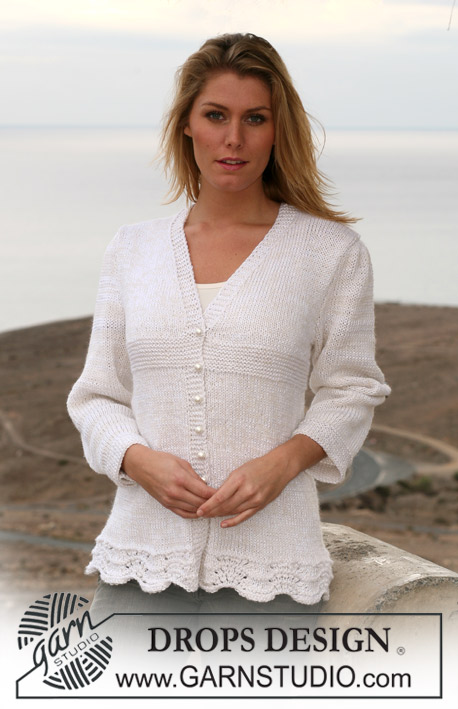
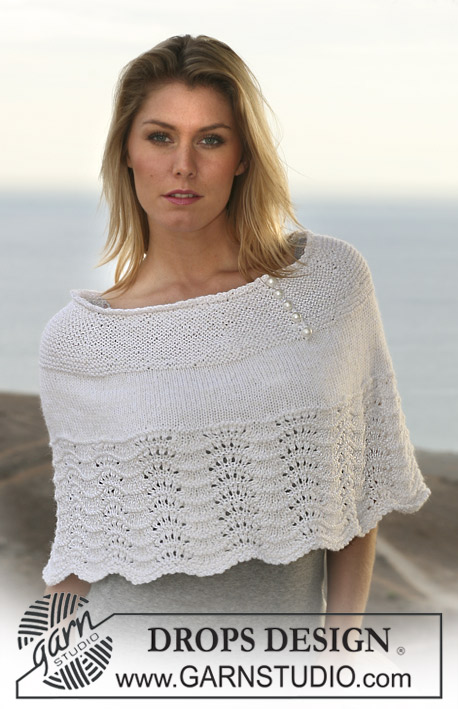
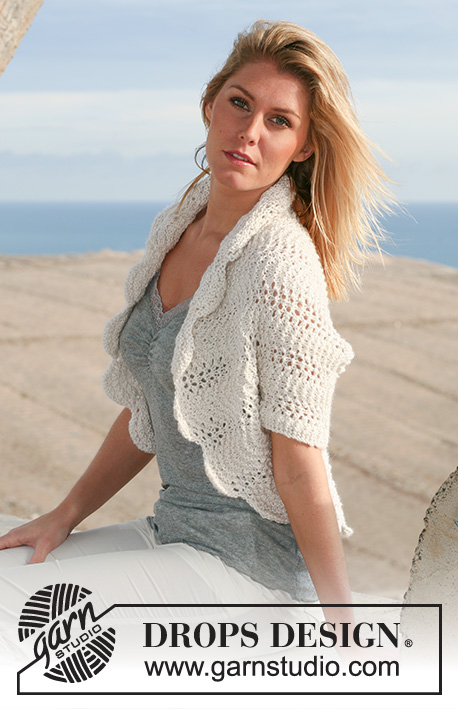
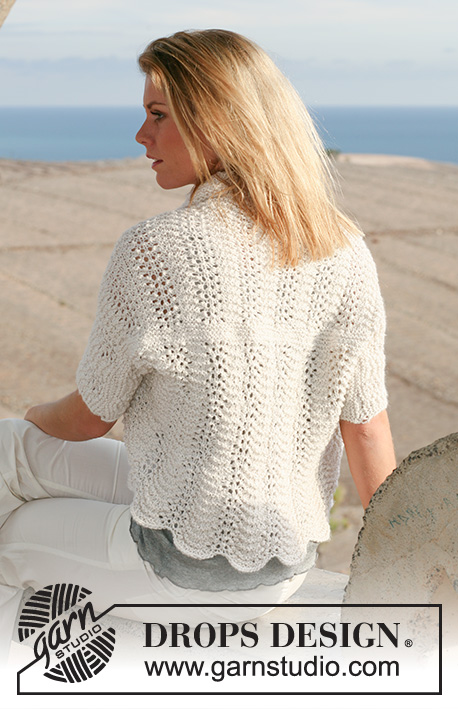
Bolero de punto DROPS con patrón de grecas en “Silke Alpaca”. Talla XS – XXXL.
DROPS 105-4 |
||||||||||||||||
|
Patrón: Ver diagrama M.1 a M.4. El diagrama muestra el patrón por el lado derecho (LD). Punto musgo, de ida y vuelta en ag: todas las vtas del derecho. Punto musgo, en redondo: 1 vta del derecho, 1 vta del revés. BOLERO: Se teje en redondo en ag circular. Mon 272-340-408-476 pts en 2 ag circulares tamaño 4.5 mm (para que la orilla sea elástica). Retirar 1 ag y tejer 2 vtas pt musgo – ver arriba. Tejer M.1 (= 17 pts) = 16-20-24-28 repeticiones del patrón en la vta. Cuando la pieza mida aprox 5 cm (ajustar a una repetición vertical completa del patrón) tejer 1 repetición vertical de M.1b = 240-300-360-420 pts. Cont en M.2 (= 15 pts por repetición vertical del patrón). Cuando la pieza mida aprox 9 cm (ajustar a una repetición vertical completa) tejer 1 repetición vertical de M.2b = 208-260-312-364 pts. Ahora cont en M.3 (= 13 pts por repetición horizontal del patrón). Cuando la pieza mida aprox 13 cm (ajustar a una repetición vertical completa) tejer 1 repetición vertical de M.3b = 176-220-264-308 pts. Cont en M.4 (= 11 pts por repetición horizontal del patrón) hasta que la pieza mida 21-21-22-22 cm. A cont dejar los primeros 88-110-132-154 pts (= 8-10-12-14 repeticiones) en la ag y desl los últimos 88-110-132-154 pts en un hilo. Parte 1: Tejer de ida y vuelta en la ag. Cont en M.4 de ida y vuelta en la ag. Al mismo tiempo mon 14 pts nuevos a cada lado para las mangas = 116-138-160-182 pts. Cont en todos los pts en M.4 con 3 pts musgo – ver arriba – a cada lado. Cuando la pieza mida 34-36-39-41 cm cont en pt musgo en todos los pts. Rem pts flojos después de 4 vtas. La pieza mide aprox 35-37-40-42 cm. Parte 2: Desl los pts del hilo de vuelta a la ag y tejer de ida y vuelta en la ag como lo hizo en la Parte 1. TERMINACION: Coser juntas las vtas de rem de pts de la Parte 1 y Parte 2 con puntadas prolijas. Coser las mangas. |
||||||||||||||||
Explicaciones del diagrama |
||||||||||||||||
|
||||||||||||||||
 |
||||||||||||||||
¿Terminaste este patrón?Entonces, etiqueta tus fotos con #dropspattern o envíalas a la galería #dropsfan. ¿Necesitas ayuda con este patrón?Encontrarás 18 videos tutoriales, un espacio para comentarios/preguntas y más visitando la página del patrón en garnstudio.com © 1982-2026 DROPS Design A/S. Todos los derechos reservados. Este documento, incluyendo todas sus sub-secciones, está protegido por los derechos de autor (copyright). Lee más acerca de lo que puedes hacer con nuestros patrones en la parte de abajo de cada patrón de nuestro sitio. |
||||||||||||||||


Con más de 40 años en el diseño de modelos de punto y de ganchillo, DROPS Design ofrece una de las más vastas colecciones de patrones gratuitos en el internet - traducidos en 17 idiomas. Al día de hoy, contamos con 324 catálogos y 12290 patrones - de los cuales 11685 están traducidos en español.
Nosotros trabajamos con mucho esmero para brindarte lo mejor que las labores de punto y ganchillo tienen para ofrecer,inspiración y consejos, así como hilos de magnífica calidad a precios increíbles! Te gustaría usar nuestros patrones para otro fin además del uso personal? Puedes leer acerca de lo que estás permitida a hacer en el texto de Copyright en la parte de abajo de todos nuestros patrones. Felices labores!
Escribe un comentario sobre DROPS 105-4
¡Nos encantaría saber qué piensas acerca de este patrón!
Si quieres escribir una pregunta referente al patrón, por favor asegúrate de elegir la categoría correcta en el formulario debajo, para acelerar el proceso de respuesta. Los campos obligatorios están marcados con un *.