
Categorías populares
¿Buscas un hilo?


Comentarios / Preguntas (15)
![]() DRogers escribió:
DRogers escribió:
Thank you!!!!
01.10.2024 - 17:03
![]() Diane Rogers escribió:
Diane Rogers escribió:
When it comes to the sleeve, am I switching needles from DPNs to maybe circular needles to "knit flat" the sleeve cap? Thanks for your help!
01.10.2024 - 12:08DROPS Design respondió:
Dear Mrs Rogers, correct, sleeve cap will be worked flat = in rows (= back and forth, alternately from the right and the wrong side), you can still work with the dpn or switch to a circular needle, as desired. Happy knitting!
01.10.2024 - 16:20
![]() Dallas Swinburne escribió:
Dallas Swinburne escribió:
The pattern calls for 'circular needles' but not having used these before I am not sure whether to buy fixed circular needles or not. Can you please let me know which needles I need to purchase as I am not sure from your list which ones are the right ones. Thanks Dallas
30.01.2024 - 16:35DROPS Design respondió:
Dear Mrs Swinburne, for this jumper you will need circular needle size 7 mm in 80 cm - find ours here; your DROPS store can help you choosing the desired material. Happy knitting!
31.01.2024 - 08:18
![]() Diane Rogers escribió:
Diane Rogers escribió:
After knitting the body in the k6, p4 repeat, and now time to divide in half and work the front and back, wouldn't I want to have the knit stitches on each side to either the front or back. which would leave the pearl to either the front or back so as to have the ribbing in the front and back centered? If I divide equally from where I started the pattern, I would end with a k6 or p4 at the sides, but not the same. I wondering if it will make a difference after completion? Thank you !
21.10.2023 - 17:33DROPS Design respondió:
Dear Diane, take into account that you have 4 purl stitches on each side (2 belong to the front piece and 2 to the back piece) which are cast off for the sleeve (alongside 1 knit stitch on each side depending on the size). This way, if you divide the pieces by taking into account the middle of the cast off stitches the pieces should be symmetrical, with k6 or k5 on each side of each piece depending on the size. Also remember that you need to have 4 purl stitches on each side as you worked the body. So, if the beginning of the round was at the middle under the sleeve you should have: purl 2, work rib as established and end with knit 6 purl 2. Happy knitting!
23.10.2023 - 00:59
![]() Jane Fry escribió:
Jane Fry escribió:
Please could you tell me what I can substitute DROPS 80-1 blue/brown with. Would like to knit this as colour shown on pattern and yarn has been discontinued. Many thanks Jane Fry
15.09.2021 - 08:17DROPS Design respondió:
Hello Jane Fry! Always choose yarn from the same yarn group. Please look at yarn alternatives lesson "How to change yarns or yarn amounts" Hope it helps!
15.09.2021 - 14:56
![]() Jane Fry escribió:
Jane Fry escribió:
I would like to knit DROPS 80-1 in brown/blue as on pattern. However this yarn is discontinued. Please could you tell me how what I can substitute it with to get the same result. Many thanks Jane Fry.
15.09.2021 - 08:14
![]() Frida Thykjær Jespersrn escribió:
Frida Thykjær Jespersrn escribió:
Jeg er noget til slutningen af første del hvor der skal lukkes 4 masker af i hver side til ærmegab. Da jeg slog masker op startede jeg med 2 vrang så jeg ville ende med 4 vrang i hver side. Men, når jeg tæller 56 masker som forstykke efter at have lukket 4 vrang af i den ene side, ender jeg med at skulle lukke 4 ret masker af i den anden side? Jeg har de 120 masker som der står, så hvad er gået galt?
06.05.2020 - 21:40DROPS Design respondió:
Hej Frida, hvis du har 2vr,(6r,4vr)x5, 6r,2vr = 60 masker, og samme på bagstykket, så lukker du de 2x2vr af i hver side og nu har du (6r, 4vr)x5 + 6r = 56 masker tilbage på både for og bagstykke. God fornøjelse!
08.05.2020 - 13:20
![]() Lena Zweiniger escribió:
Lena Zweiniger escribió:
Jeg kan ikke forstå udtagning vejledningen . Hvordan kan det flettes ind i ribben så det bliver pænt ? Mvh Lena
26.12.2018 - 16:18DROPS Design respondió:
Hei Lena. Du øker 1 maske på hver side av 4 masker vrang hver gang du øker. De første 4 gangene du øker strikkes de økte maskene vrang videre oppover (det vil derfor bli ganske mange vrangmasker etter hverandre en periode). Det er altså ikke før den 5 gangen du øker at du vil se de 2 nye stripene med vrangmasker - når du begynner å strikke de økte maskene som rettmasker. De 6 siste gangene det økes strikkes de nye maskene som rettmasker, og det vil vokse frem en stripe rettmasker på hver side av stripen du øker rundt. God fornøyelse.
03.01.2019 - 15:41
![]() Carmen Fibla escribió:
Carmen Fibla escribió:
Buenas tardes. He visto que casi todos los patrones de jerseys son realizados con agujas circulares. Yo no sé utilizarlas, antes había patrones con dos agujas. Cómo podría encontrar aquellos patrones aunque sean antiguos?. Gracias
13.11.2018 - 00:23DROPS Design respondió:
Hola Carmen. La mayoría de los patrones para las agujas circulares puedes utilizarlas trabajando con agujas rectas. En este caso cada parte (delantero, espalda, mangas) se trabaja por separado y hay que añadir 1 punto de orillo a cada lado para cada parte para coser al finalizar la labor.
30.12.2018 - 17:47Gerry Bouwmans escribió:
Goede morgen, Klopt het dat ik slechts 300 gram wol nodig heb voor dit patroon? Lijkt mij zo weinig. En bij een vervangende draad slechts iets meer dan 200 gram. Graag hoor ik iets van u. Dank u.
22.02.2018 - 21:33
|
|
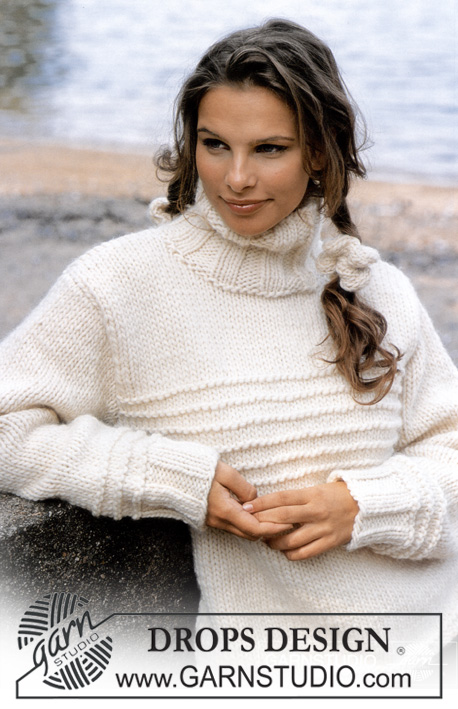
DROPS 80-1 |
|
|
|
|
Jersey DROPS en Vienna
DROPS 80-1 |
|
|
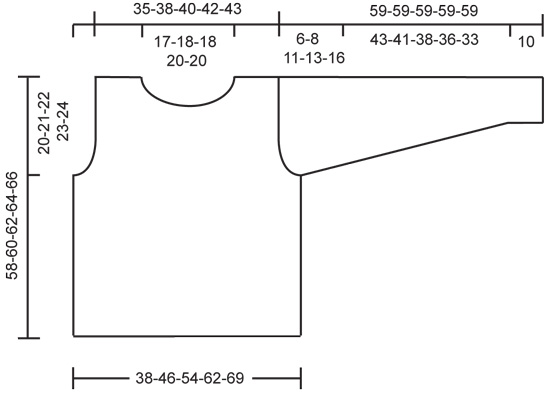
TENSIÓN DEL TEJIDO: 13 pts x 15 filas en pt jersey = 10 x 10 cm.- PUNTO ELÁSTICO: * 6 d., 4 r.*, repetir de * a * TIP PARA LA REALIZACIÓN DEL TRABAJO: Si quieres que las rayas del cuerpo sean más anchas que en la foto (para que coincidan con las mangas), trabaja el cuerpo en dos partes (delantero y espalda). ----------------------------------------------------------------------- CUERPO: Mont 100-120-140-160-180 pts con ag circular, unir y colocar un MP (marcapuntos) en la unión. Trabajar pt elástico sobre todos los pts - quedan 4 pts de revés a cada lado. Cuando la labor mida 38-39-40-41-42 cm cerrar 4-4-4-6-6 pts a cada lado para la sisa. Trabajar cada lado por separado. DELANTERO: = 46-56-66-74-84 pts. Cerrar para la sisa a cada lado cada 2ª fila: 3 pts 0-0-1-1-1 vez, 2 pts 0-1-1-2-3 vcs y 1 pt 0-1-2-3-5 vcs = 46-50-52-54-56 pts. Cuando la labor mida 51-53-55-57-59 cm pasar los 12-14-14-16-16 pts centrales a un gancho aux para el escote. ahora cerrar a cada lado del escote cada 2ª fila: 2 pts 1 vez y 1 pt 3 vcs = 12-13-14-14-15 pts restantes para cada hombro. Rematar cuando la labor mida 58-60-62-64-66 cm. ESPALDA: = 46-56-66-74-84 pts. Cerrar para la sisa como en el delantero = 46-50-52-54-56 pts. Cuando la labor mida 56-58-60-62-64 cm cerrar los 20-22-22-24-24 pts centrales para el escote. En la sig fila cerrar 1 pt a cada lado del escote = 12-13-14-14-15 pts restantes para cada hombro. Cerrar cuando la labor mida 58-60-62-64-66 cm. MANGA: Mont 30-30-40-40-40 pts con ag de doble punta, unir y colocar un MP en la unión. Trabajar pt elástico - comenzar y terminar con 2 r. para que el MP quede situado en el centro de los 4 r. del centro bajo la manga. Cuando la labor mida 10-10-10-12-12 cm aum 1 pt a cada lado de los 4 pts de revés con el MP cada 4.5-4-4-3.5-3 cm un total de 10 vcs = 50-50-60-60-60 pts - trabajar los pts aum dentro del pt elástico según se avanza. Cuando la manga mida 53-51-48-46-43 cm cerrar 2 pts a cada lado del MP y trabajar recto. Cerrar para la copa de la manga 2 pts a cada lado cada 2ª fila hasta que la labor mida 58 cm, ahora cerrar 3 pts a cada lado una vez. La labor mide aprox 59 cm, rematar los pts restantes. TERMINACIÓN: Hacer la costura de los hombros. CUELLO: Recoger aprox 60-80 pts alrededor del escote (divisible por 10 - incl los pts en el gancho aux) con ag de doble punta. Trabajar 1 fila de derecho, aumentando hasta 90-90-100-100-110 pts de forma repartida. Trabajar pt elástico aprox 20 cm, después rematar en pt elástico. Montar las mangas. |
|
 |
|
¿Terminaste este patrón?Entonces, etiqueta tus fotos con #dropspattern o envíalas a la galería #dropsfan. ¿Necesitas ayuda con este patrón?Encontrarás 23 videos tutoriales, un espacio para comentarios/preguntas y más visitando la página del patrón en garnstudio.com © 1982-2026 DROPS Design A/S. Todos los derechos reservados. Este documento, incluyendo todas sus sub-secciones, está protegido por los derechos de autor (copyright). Lee más acerca de lo que puedes hacer con nuestros patrones en la parte de abajo de cada patrón de nuestro sitio. |


Con más de 40 años en el diseño de modelos de punto y de ganchillo, DROPS Design ofrece una de las más vastas colecciones de patrones gratuitos en el internet - traducidos en 17 idiomas. Al día de hoy, contamos con 324 catálogos y 12290 patrones - de los cuales 11675 están traducidos en español.
Nosotros trabajamos con mucho esmero para brindarte lo mejor que las labores de punto y ganchillo tienen para ofrecer,inspiración y consejos, así como hilos de magnífica calidad a precios increíbles! Te gustaría usar nuestros patrones para otro fin además del uso personal? Puedes leer acerca de lo que estás permitida a hacer en el texto de Copyright en la parte de abajo de todos nuestros patrones. Felices labores!
Escribe un comentario sobre DROPS 80-1
¡Nos encantaría saber qué piensas acerca de este patrón!
Si quieres escribir una pregunta referente al patrón, por favor asegúrate de elegir la categoría correcta en el formulario debajo, para acelerar el proceso de respuesta. Los campos obligatorios están marcados con un *.