
Categorías populares
¿Buscas un hilo?


Comentarios / Preguntas (60)
![]() Catherine escribió:
Catherine escribió:
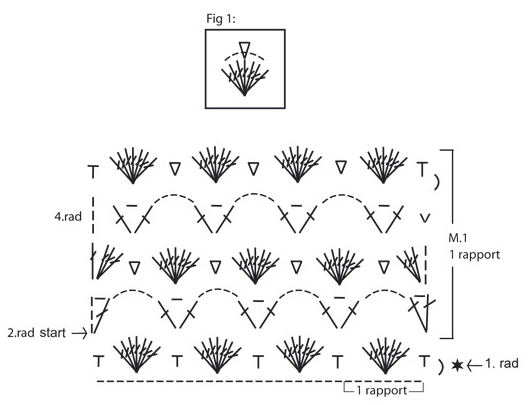
Bonjour, Je ne comprends absolument rien aux lignes 2 et 4 du diagramme...serait-il possible d'avoir plus d'explications? Merci
29.01.2013 - 09:47DROPS Design respondió:
Bonjour Catherine, rang 2: 4 ml, 1B dans la même m, *5 ml, sauter le groupe de B et dans la ms suiv : 1 B, 1 ml, 1B*. R3 :3ml, 3B dans la même m,*1 ms dans la ml du r2 + dans la 4ème B du groupe de B, 1 groupe de B dans la ml suiv*. R4 :3 ml, *1B,1ml,1B dans la ms, 5 ml*. Répétez de *-* tous les rangs. Bon crochet !
29.01.2013 - 09:58
![]() DROPS Design escribió:
DROPS Design escribió:
Ashlee - that symbol is just a bent dash that is the symbol for a chain st taking you to next row.
09.06.2010 - 18:41
![]() Ashlee escribió:
Ashlee escribió:
Ok, I took a break from this pattern, cleared my head and started again, it's working wonderfully. Only problem is there is a symbol in the M1 that doesn't have an explanation. On the 5th row (top) of the diagram, there's a comma looking thing in the first step, no where in the instructions can I find that.
08.06.2010 - 19:25
![]() DROPS Design escribió:
DROPS Design escribió:
You are supposed to have 5 chains go over the 7 tc (US dc), then in next dc work 1 tc, ch 1, 1 tc, then chain 5 and so on.
26.02.2010 - 17:48
![]() Ashlee escribió:
Ashlee escribió:
I understand that the pattern is in a different language and the english translation is above but in the diagram...the second row doesn't add up to me. If the 2 tc at the dc are right next to each other (as shown) there there should be at least 7 chains...there's only 5...or am I supposed to have 5 chains go over the 7tcs? I don't get it. And is that right? 5 chains over the 7 with no attachment? I'm sorry...I really don't get it.
26.02.2010 - 17:18
![]() DROPS Design escribió:
DROPS Design escribió:
Hej, Enligt diagram skall börjar du 4. rad i vänster sida, då ser du att varvet blir lika i början och slutet.
29.01.2010 - 12:21
![]() Camilla escribió:
Camilla escribió:
Jag älskar detta mönster och väskan blir otroligt söt. Undrar dock över 4.rad i M.1 rapport. Varvet påbörjas med 3 luftmaskor och avslutas med en smygmaska. Då blir ju varvet olika i början och slutet. Har jag missuppfattat mönstret? Vore tacksam för vägledning.
16.01.2010 - 13:53
![]() DROPS Design escribió:
DROPS Design escribió:
If you don't get the patterns to work, we would like to ask you to go to the retailer where you bought the yarn. Our retailers are there to give you help when you don’t know how to continue. If you have bought original Garnstudio yarn, you can be sure that you have bought yarn from a shop that are specialized on DROPS patterns, and you have also supported our work with our webpages.
21.05.2008 - 17:31
![]() Jen escribió:
Jen escribió:
The diagram is really hard to understand, is there anyone who has completed this bag that could explain it in simpler instructions. I see the translation and know what each of the symbols represents, but I don't understand how to put it all together.
21.05.2008 - 17:27
![]() DROPS Design escribió:
DROPS Design escribió:
The translations for the Diagrams for all Garnstudio patterns are included within the text of the Pattern itself. If you look immediately above the diagram, you will find lines starting with an = sign. These are the translations, and they are given in the same vertical order as the chart symbols within the diagram.
14.04.2008 - 16:29
|
||||||||||||||||||||||
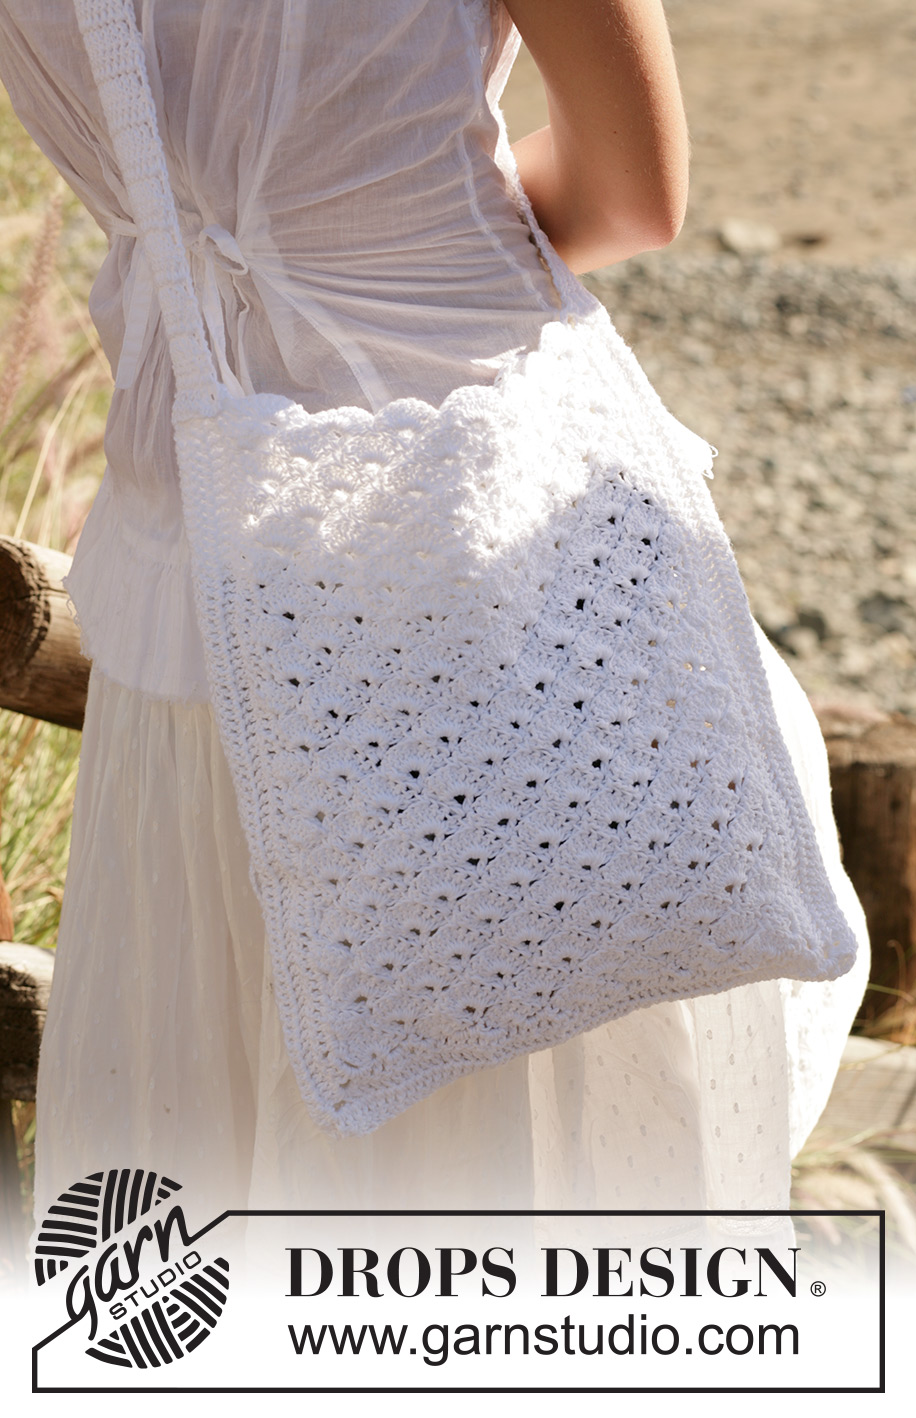
White Honey Comb#whitehoneycombbag |
||||||||||||||||||||||
|
|
||||||||||||||||||||||
Bolso de ganchillo DROPS en “Bomull-Lin”.
DROPS 99-24 |
||||||||||||||||||||||
|
TENSIÓN DE LA MUESTRA: 3 repeticiones en el ancho y 2.5 repeticiones en el alto = 10 x 10 cm PATRÓN: Ver el diagrama M.1. El diagrama se muestra por el LD. INFORMACIÓN PARA REALIZAR EL TRABAJO: 1 repetición = 8 p.de cad. Si se desea un bolso más ancho trabajar 8 p.de cad. extra para cada repetición. Sustituir el primer p.a. en cada fila por 3 p.de cad. Se puede igualmente trabajar un remate alrededor del asa como sigue: *6 p.a. dentro de 1 p.a. del asa, saltar 2 cm, 1 p.b., saltar otros 2 cm*, repetir de * a *. ----------------------------------------------------------------------------------------------------------------- BOLSO: El bolso se trabaja en dos partes: 1 delantera y 1 trasera. PARTE DELANTERA: Trabajar 58 p.de cad (incl 1 p.de cad para girar) con ag de ganchillo tamaño 4 mm con Bomull-Lin. Trabajar 1 p.b. dentro del 2º p.de cad., *saltar 3 p.de cad., 7 p.a. en el sig p.de cad., saltar 3 p.de cad., 1 p.b. en el sig p.de cad.*, repetir de * a * un total de 7 vcs. Después continuar según M.1. Cortar el hilo y asegurar cuando la labor mida aprox 33 cm de alto - ajustar a 1 repetición . Trabajar 3 filas de p.a. (leer INFORMACIÓN PARA REALIZAR EL TRABAJO!) a lo largo del borde inferior y los 2 lados. Trabajar en las esquinas como sigue: 1 p.a., 3 p.de cad., 1 p.a. PARTE TRASERA: Trabajar como la parte delantera. ASA: Trabajar 12 p.de cad. (incl 3 p.de cad. para girar) - leer INFORMACIÓN PARA REALIZAR EL TRABAJO! Trabajar 1 p.a. en cada p.de cad. y después continuar trabajando 1 p.a. en cada p.a. = 10 p.a. Trabajar con p.a. hasta que el asa mida 80 cm. Cortar el hilo y asegurar. TERMINACIÓN: Coser el bolso por la parte inferior y los lados. Coser la tira de asa al bolso en la parte de arriba de las secciones de p.a. a cada lado. |
||||||||||||||||||||||
Explicaciones del diagrama |
||||||||||||||||||||||
|
||||||||||||||||||||||
 |
||||||||||||||||||||||
¿Terminaste este patrón?Entonces, etiqueta tus fotos con #dropspattern #whitehoneycombbag o envíalas a la galería #dropsfan. ¿Necesitas ayuda con este patrón?Encontrarás 4 videos tutoriales, un espacio para comentarios/preguntas y más visitando la página del patrón en garnstudio.com © 1982-2026 DROPS Design A/S. Todos los derechos reservados. Este documento, incluyendo todas sus sub-secciones, está protegido por los derechos de autor (copyright). Lee más acerca de lo que puedes hacer con nuestros patrones en la parte de abajo de cada patrón de nuestro sitio. |
||||||||||||||||||||||


Con más de 40 años en el diseño de modelos de punto y de ganchillo, DROPS Design ofrece una de las más vastas colecciones de patrones gratuitos en el internet - traducidos en 17 idiomas. Al día de hoy, contamos con 324 catálogos y 12239 patrones - de los cuales 11618 están traducidos en español.
Nosotros trabajamos con mucho esmero para brindarte lo mejor que las labores de punto y ganchillo tienen para ofrecer,inspiración y consejos, así como hilos de magnífica calidad a precios increíbles! Te gustaría usar nuestros patrones para otro fin además del uso personal? Puedes leer acerca de lo que estás permitida a hacer en el texto de Copyright en la parte de abajo de todos nuestros patrones. Felices labores!
Escribe un comentario sobre DROPS 99-24
¡Nos encantaría saber qué piensas acerca de este patrón!
Si quieres escribir una pregunta referente al patrón, por favor asegúrate de elegir la categoría correcta en el formulario debajo, para acelerar el proceso de respuesta. Los campos obligatorios están marcados con un *.