
Categorías populares
¿Buscas un hilo?


Comentarios / Preguntas (24)
![]() Lynn escribió:
Lynn escribió:
Hello, is the v neck worked in the round?
13.08.2024 - 11:54DROPS Design respondió:
Dear Lynn, to shape V-neck you will divide front piece into 2 sides/pieces and finish each piece separately. Happy knitting!
13.08.2024 - 16:03
![]() Nellie escribió:
Nellie escribió:
I sent a question three days ago, and still have not received a response…when do you think I can expect a reply.?
02.03.2024 - 02:49DROPS Design respondió:
Dear Nellie, as your question was posted as a comment, it might have been missed, sorry for that. After you have decreased for the armholes, ther are 64-66 sts (S -M) on the needle, then you will cast off the middle 28-30 sts for neck = 18 sts left for each shoulder in both sizes. You now work each shoulder separately. At the beginning of next row from neck (from RS on left shoulder back/from WS on right shoulder back), you will cast off 2 sts = 16 sts remain for the shoulder. Happy knitting!
04.03.2024 - 10:34
![]() Nellie escribió:
Nellie escribió:
I need a simple straight forward explanation on shaping the armhole. I cast off 16 sts, one stitch every other row, then when the sweater measures 49 cm please instruct me the decrease amount of stitches for each row, till there are 16 stitches left. I am confused with the number of sts indicated.
19.01.2024 - 01:25
![]() Nellie escribió:
Nellie escribió:
I would like to knit this for a twelve year old girl.
12.01.2024 - 22:50
![]() LISA MORRISON escribió:
LISA MORRISON escribió:
Hello, This is my first sweater as a beginner and I would like to know if there is any video to help me understand the v-neck for this pattern, as shown "V-neck: When the piece measures 52 cm divide the piece at center front and put half the sts on a st holder = 53 sts. 1st side: Dec 1 st at the neck edge every other row 16-17-17-18-18 times." I've found videos that use a different technique than dividing the piece at center front if I am understanding the instructions.
05.09.2023 - 23:50DROPS Design respondió:
Dear Mrs Morrison, when piece measures 52 cm, slip the last 53 stitches (seen from RS) on a thread/stitch holder for right shoulder and work now the first 53 sts on needle for left shoulder. and work each shoulder separately, starting with the left. Cast off at the beginning of each row from RS for armhole and decrease at the end of every row from RS for neck. Cast off when piece measures 76 cm. Work the right shoulder the same way, decreasing for neck at the beg of every row from RS and casting off for armhole at the beg of every row from WS. Happy knitting!
06.09.2023 - 09:17
![]() Sophie escribió:
Sophie escribió:
I don't understand the decreases for the armholes on the back piece. I can't get the number of stitches to add upp when I do it as the front.
01.03.2023 - 23:50DROPS Design respondió:
Dear Sophie, back piece will be worked as front piece until neck, this means you cast on the same number of stitches, increase 1 st on each side after vent and cast off for armholes on each side (a total of 12-18-24-28-34 sts) as you did for front piece (see for your size). Happy knitting!
02.03.2023 - 11:02
![]() Sophie escribió:
Sophie escribió:
How should the decreases be done for the neck in the front piece? I cannot seem to get the two parts the same way. Do I k2tog or slip 1 k 1?
28.02.2023 - 23:52DROPS Design respondió:
Dear Sophie, you can work K2 tog on one front piece and slip 1, K1 on the other front piece, as you rather get a visible decrease (work K2 tog on right front piece/slip 1, K1 on left front piece) or rather more discreet (K2 tog on left front piece/slip 1,K1 on right front piece). Happy knitting!
01.03.2023 - 09:50
![]() Kate Lynam escribió:
Kate Lynam escribió:
How should I bind off at the end of a row? The traditional bind off only works at the beginning of a row. Should I use a decrease instead when shaping the neck and sleeves, if so which one would you recommend? Thank you Regards Kate
07.05.2022 - 11:22DROPS Design respondió:
Dear Ms. Lynam, you can bind off at the beginning of every row - i.e. from both right and wrong side = both sides of piece. Happy knitting!
08.05.2022 - 00:13
![]() Christel Van Oers escribió:
Christel Van Oers escribió:
Hallo, moet er bij het breien van het achterpand ook een split gemaakt worden? Er staat niets over een split bij het achterpand, vandaar de vraag .. Alvast bedankt!
05.03.2022 - 12:00DROPS Design respondió:
Dag Christel,
Je breit inderdaad voor het achterpand ook een split.
07.03.2022 - 12:52
![]() Madelon escribió:
Madelon escribió:
Bedankt voor het antwoord op mijn vraag. Ik heb er nog een. Als ik klaar ben met de boord staat er ‘Leg de rechter halsboord over de linker en naai de ribbelst aan de opgenomen st’ als ik dat doe naai om het hoofdgat dicht. En wat naai ik op de opgenomen steken? Want daar heb ik toch al de ribbelsteek/boord op gebreid? Ik hoor het graag.
17.02.2022 - 13:28DROPS Design respondió:
Dag Madelon,
Excuses ik heb een fout gemaakt zie ik. Je neemt wel steken rondom op, maar je breit heen en weer in plaats van in de rondte. Je breit dus eerst 2 naalden recht en daarna boordsteek.
17.02.2022 - 13:55
|
|
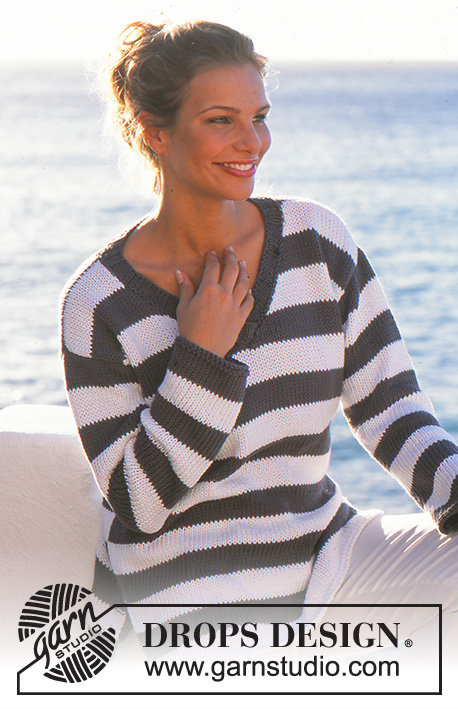
Marinière |
|
 |
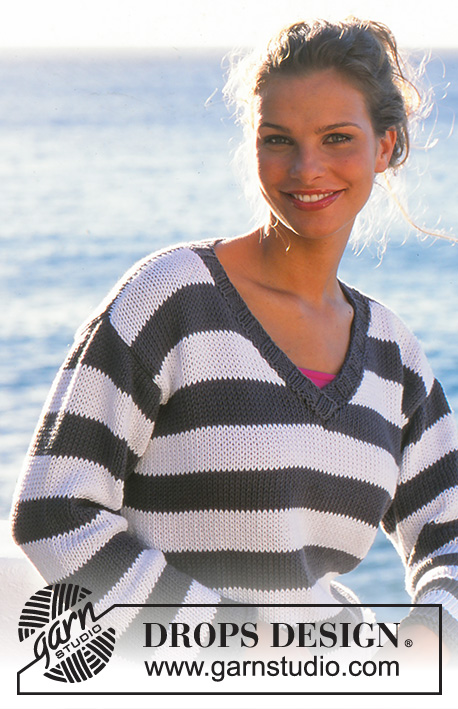 |
Pulóver DROPS en Paris
DROPS 81-7 |
|
|
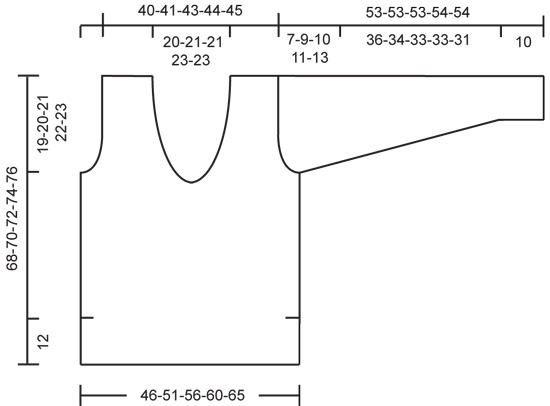
TENSIÓN DEL TEJIDO: 16 pts x 20 filas con las ag de tamaño más grande en pt jersey = 10 x 10 cm. PATRÓN DE RAYAS: *8 filas de color blanco, 8 filas de color gris*, repetir de * a *. DELANTERO: Mont 74-82-90-96-104 pts con las ag de tamaño más pequeño y color blanco y trabajar 4 filas en pt musgo. Cambiar a las ag de tamaño más grande y trabajar en pt jersey, dejando 3 pts en pt musgo a cada lado (para las aberturas laterales) y seguir el patrón de rayas - ver explicaciones arriba. Cuando la labor mida 12 cm finalizar las aberturas laterales y mont 1 pt nuevo a cada lado = 76-84-92-98-106 pts. Trabajar 4 filas en pt musgo sobre 4 pts a cada lado, después trabajar pt jersey sobre todos los pts. Leer la sección entera antes de continuar: Escote - V: Cuando la labor mida 48-49-50-51-52 cm dividir la labor en el centro del delantero y pasar la mitad de los pts a un gancho aux = 38-42-46-49-53 pts. 1er lado: Cerrar 1 pt hacia el borde del escote cada 2ª fila 16-17-17-18-18 vcs. Sisa: Cuando la labor mida 49-50-51-52-53 cm cerrar para la sisa en el lado cada 2ª fila: 4 pts 0-0-0-1-1 vez, 3 pts 1 vez, 2 pts 0-1-3-2-3 vcs y 1 pt 3-4-3-3-4 vcs. Después de completar todas las disminuciones para la sisa y el escote quedan 16-16-17-17-18 pts para el hombro. Rematar cuando la labor mida aprox 68-70-72-74-76 cm – ajustar para finalizar después de una raya completa. 2º lado: Pasar los pts del gancho aux de vuelta a las ag y trabajar de la misma manera que el 1er lado pero a la inversa. ESPALDA: Mont 74-82-90-96-104 pts con las ag de tamaño más pequeño y color gris oscuro y trabajar 4 filas en pt musgo. Continuar con el patrón de rayas como en el delantero pero a la inversa - asegúrate de que las rayas blancas del delantero coinciden con las rayas grises de la espalda en los laterales. Cerrar para la sisa como se describe para el delantero = 64-66-68-70-72 pts. Cuando la labor mida 66-68-70-72-74 cm cerrar los 28-30-30-32-32 pts centrales para el escote. Ahora cerrar 2 pts a cada lado del escote en la sig fila = 16-16-17-17-18 pts restantes para cada hombro. Rematar cuando la labor mida 68-70-72-74-76 cm. MANGA: Mont 40-41-42-43-44 pts con las ag de tamaño más pequeño y color gris oscuro. Trabajar 4 filas en pt musgo, cambiar a las ag de tamaño más grande y trabajar las rayas como se describe para la espalda. Cuando la labor mida 10-10-10-12-12 cm aum 1 pt a cada lado cada 4.5-4-3-2.5-2 cm un total de 8-9-11-12-13 vcs = 56-59-64-67-70 pts. Cuando la manga mida 46-44-43-43-41 cm cerrar para la copa de la manga a cada lado cada 2ª fila: 4 pts 1 vez, 2 pts 3 vcs y 1 pt 0-1-2-4-5 vcs, después cerrar 2 pts a cada lado hasta que la labor mida 52-52-52-53-53 cm, ahora cerrar 3 pts 1 vez a cada lado. La labor mide aprox 53-53-53-54-54 cm, rematar los pts restantes. TERMINACIÓN: Hacer la costura de los hombros CENEFA DEL ESCOTE: Recoger desde el centro del delantero aprox 101-119 pts (divisible por 6 + 5) alrededor del escote con la ag circular de tamaño más pequeño y color gris oscuro. Trabajar 2 filas en pt musgo, después trabajar en pt elástico como sigue (= fila del LR): 1 d. (pt orillo en pt musgo), * 3 r., 3 d.*, repetir de * a *, finalizar con 3 r. y 1 d. (pt orillo en pt musgo). Cuando la cenefa del escote mida 4 cm rematar todos los pts en pt elástico. Colocar la cenefa derecha del escote sobre la izquierda en el centro del delantero y coser los bordes en pt musgo al borde de pts recogidos. Montar las mangas. Coser mangas y lados en una sola costura dentro del pt orillo, dejando la abertura lateral abierta. |
|
 |
|
¿Terminaste este patrón?Entonces, etiqueta tus fotos con #dropspattern o envíalas a la galería #dropsfan. ¿Necesitas ayuda con este patrón?Encontrarás 19 videos tutoriales, un espacio para comentarios/preguntas y más visitando la página del patrón en garnstudio.com © 1982-2026 DROPS Design A/S. Todos los derechos reservados. Este documento, incluyendo todas sus sub-secciones, está protegido por los derechos de autor (copyright). Lee más acerca de lo que puedes hacer con nuestros patrones en la parte de abajo de cada patrón de nuestro sitio. |
|


Con más de 40 años en el diseño de modelos de punto y de ganchillo, DROPS Design ofrece una de las más vastas colecciones de patrones gratuitos en el internet - traducidos en 17 idiomas. Al día de hoy, contamos con 324 catálogos y 12290 patrones - de los cuales 11685 están traducidos en español.
Nosotros trabajamos con mucho esmero para brindarte lo mejor que las labores de punto y ganchillo tienen para ofrecer,inspiración y consejos, así como hilos de magnífica calidad a precios increíbles! Te gustaría usar nuestros patrones para otro fin además del uso personal? Puedes leer acerca de lo que estás permitida a hacer en el texto de Copyright en la parte de abajo de todos nuestros patrones. Felices labores!
Escribe un comentario sobre DROPS 81-7
¡Nos encantaría saber qué piensas acerca de este patrón!
Si quieres escribir una pregunta referente al patrón, por favor asegúrate de elegir la categoría correcta en el formulario debajo, para acelerar el proceso de respuesta. Los campos obligatorios están marcados con un *.