
Categorías populares
¿Buscas un hilo?


Comentarios / Preguntas (19)
![]() Lisbeth escribió:
Lisbeth escribió:
Kan i lave opskriften i en str xxl/xxxl - tøj str 44-46?
03.05.2025 - 18:06DROPS Design respondió:
Hej Lisbeth, det kan vi desværre ikke, men det kan være at du kan lægge en rapport til a 13masker = 6 cm på både for og bagstykket :)
08.05.2025 - 10:03
![]() Birthe Lydal escribió:
Birthe Lydal escribió:
Kan det passe at man skal lukke af til ærmer allerede efter 20 cm på bagstykket, det ser meget kort ud.
02.12.2024 - 09:43DROPS Design respondió:
Hei Birthe. Ja, det stemmer på denne modellen. mvh DROPS Design
02.12.2024 - 13:23
![]() Judy escribió:
Judy escribió:
Hi, May i get the lace diagram/ chart/ as i better visual lerner... do you have this lace chart to make it more eazy for knitters like me? Wait your kind help Judy
16.06.2024 - 15:14DROPS Design respondió:
Dear Judy, this is the only version of the pattern that we have available. You can ask us any questions regarding the written instructions and we will try to help the best we can. You can also ask for help at your closest DROPS store. Happy knitting!
16.06.2024 - 18:08
![]() CHARLOTTE escribió:
CHARLOTTE escribió:
I have completed all the knitting and now sewing up but unsure how the split should be done because of the middle stitches on the divide. it is a very pretty pattern-i find it is rolling up a bit at the edges-is there anything i could do about this please? thank you
28.03.2023 - 15:45DROPS Design respondió:
Dear Charlotte, pick up approx. 18 sts along the vent on the left side of front piece and work the Edge (see at the very beg of the pattern); then cast off, fold double from WS and sew. Repeat along right front piece but with 2 buttohonles. Then pick up along whole neckline approx. 110 sts and work edge (with only 1 cm stocking st instead of 2). You can block piece before wearing it, so that the edge shouldn't roll anymore. Happy knitting!
29.03.2023 - 09:21
![]() Lena escribió:
Lena escribió:
Hallo, die Knöpfe, die auf dem Foto abgebildet sind, scheint es nicht mehr zu geben. Welche Knopfgröße wäre denn für die Knopflöcher geeignet? Vielen Dank!
06.01.2023 - 15:20DROPS Design respondió:
Liebe Lena, hier brauchen Sie Knöpfe mit 20-25 mm im Durchmesser - für die Knopflöcher wird man 2 Maschen = 2 cm abketten. Viel Spaß beim stricken!
06.01.2023 - 15:34
![]() Ava escribió:
Ava escribió:
I’m finishing up the Anna Elise sweater, beautiful by the way. On the slit and neck edge what do you mean by fold down the edge and how is this done?
07.05.2022 - 16:08DROPS Design respondió:
Dear Ava, you work the whole edge. Then you fold it double towards the inside. Then, with neat stitches, you sew the edge on the inside. It's like working a hem when sewing. Happy knitting!
08.05.2022 - 19:20
![]() Ava escribió:
Ava escribió:
Doing the sleeves for 21-9. How do I incorporate the increases into the pattern? The pattern rows are off when I do it. The instructions aren’t clear.
25.04.2022 - 02:43DROPS Design respondió:
Dear Ava, when increasing on sleeve, work the new stitches in stocking stitch, not in the lace pattern. Make sure to line up the pattern as before to avoid displacing it. ie the Lace pattern should be always worked over the same stitches, but there will be then by and by more stitches before the first repeat and after the last repeat. Happy knitting!
25.04.2022 - 08:35
![]() Ava escribió:
Ava escribió:
For the front/back starting bottom decrease to shape armhole , it states when piece measures 8-10 cm start decrease. Does this apply from the start of the pattern on bottom or just from the beginning of the stockinet stitches
16.04.2022 - 12:19DROPS Design respondió:
Dear Ava, the pattern states that you need to decrease when the piece measures 18-20 cm, that is, from the cast-on edge. Happy knitting!
17.04.2022 - 12:06
![]() Janet escribió:
Janet escribió:
When piece measures 18-20 cm cast off 2-3 sts each side for armhole and dec to shape the armhole on every other row: 2 sts 1-2 times, and then on every 4th row: 1 st 3 times = 97-100 sts. I am knitting the back piece of the pattern i have casted off 3 stitches each side for the armhole but its not very clear how i should dec the rest of the 14stitches, do i cast them off or k2tog ?
10.04.2022 - 13:36DROPS Design respondió:
Dear Janet, you cast off the other stitches as well, you don't usually k2tog in the armhole, because the armhole will then look different. Happy knitting!
10.04.2022 - 20:36
![]() Ava escribió:
Ava escribió:
Thanks for your reply with last question. When doing increase for small size on lower back how many stitch increases should there be and how many times for small size?
09.04.2022 - 15:46DROPS Design respondió:
Dear Ava, you need to increase 1 stitch on each side 9 times every 2nd row for size S/M. So, you increase 2 stitches in the first row, none in the second, 2 in the third... two in the 17th row and none in the 18th row. In total, you should have increased 18 stitches (9 on each side). Happy knitting!
09.04.2022 - 18:36
|
|
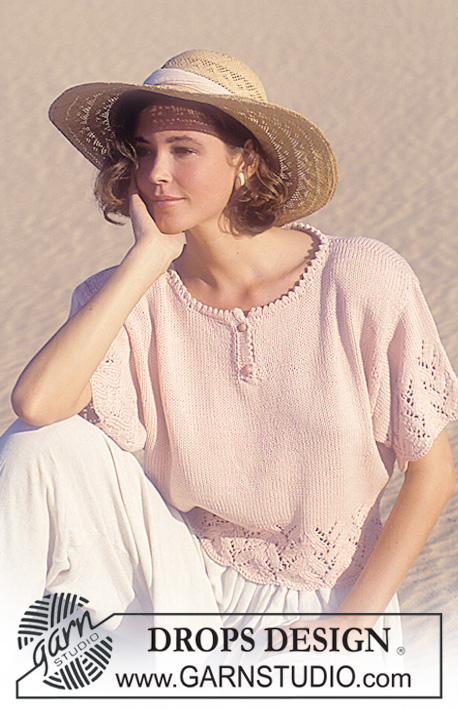
Anna Elise |
|
 |
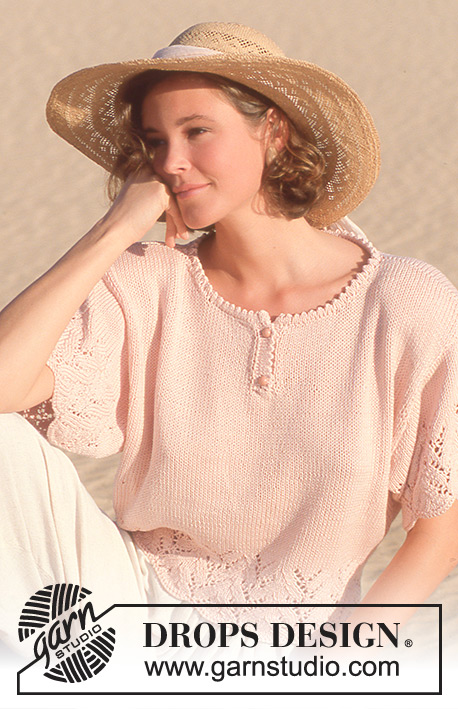 |
Jersey con manga corta y patrón de calados en DROPS “Muskat”.
DROPS 21-9 |
|
|
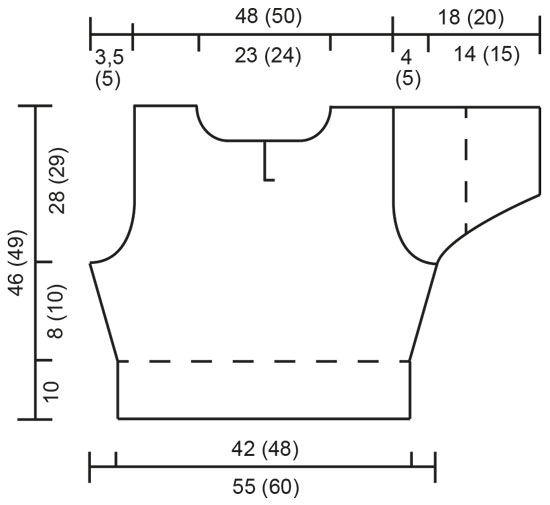
Borde: 2 cm en pt jersey, siguiente fila: *2pjd, 1 hebra*, repetir de * a *, (= borde de doblaje), 2 cm en pt jersey. Patrón: el patrón es divisible entre 13 pts. Fila 1 (por el LD): *2d, deslizar 1 pt como de derecho, 1d, pasar el pt deslizado sobre el pt trabajado, 4d, 2pjd, 2d, 1 hebra, 1d, 1 hebra*, repetir de * a *. Fila 2, y todas las filas pares (por el LR): Trabajar todos los pts de revés. Fila 3: *1 hebra, 2d, deslizar 1 pt como de derecho, 1d, pasar el pt deslizado sobre el pt trabajado, 2d, 2pjd, 2d, 1 hebra, 3d*, repetir de * a *: Fila 5: *1d, 1 hebra, 2d, deslizar 1 pt como de derecho, 1d, pasar el pt deslizado sobre el pt trabajado, 2pjd, 2d, 1 hebra, 4d*, repetir de * a *: Fila 7: * 1 hebra, 1d, 1 hebra, 2d, deslizar 1 pt como de derecho, 1d, pasar el pt deslizado sobre el pt trabajado, 4d, 2pjd, 2d*, repetir de * a *: Fila 9: *3d, 1 hebra, 2d, deslizar 1 pt como de derecho, 1d, pasar el pt deslizado sobre el pt trabajado, 2d, 2pjd, 2d, 1 hebra, repetir de * a *: Fila 11: *4d, 1 hebra, 2d, deslizar 1 pt como de d, 1d, pasar el pt deslizado sobre el pt trabajado, 2pjd, 2d, 1 hebra, 1d*, repetir de * a *: Repetir las filas 1-12. Espalda: Montar 93-106 pts con una aguja de 4 mm y trabajar 2 filas de derecho, cambiar a una aguja de 3.5 mm y continuar con el Patrón (ver arriba) con 1 pt orillo a cada lado. Cuando el Patrón mida 10 cm (= 3 repeticiones) cambiar a una aguja de 4 mm y completar la labor en pt jersey, al mismo tiempo aum 1 pt a cada lado un total de 9-7 veces cada 2ª fila para la talla S/M y cada 3ª fila para la talla M/L = 111-120 pts. Cuando la labor mida 18-20 cm cerrar 2-3 pts a cada lado para la sisa y dism para la forma de la sisa cada 2ª fila: 2 pts 1-2 veces, y después cada 4ª fila: 1 pt 3 veces = 97-100 pts. Cuando la labor mida 45-48 cm cerrar los 45-46 pts centrales para el cuello y dism 1 pt en la línea del escote en la siguiente fila. Cerrar los pts restantes en el hombro cuando la labor mida 46-49 cm. Delantero: Montar y trabajar como la espalda, pero cuando la labor mida 31-34 cm cerrar los 5-4 pts centrales para la abertura y completar cada lado por separado. Cuando la abertura mida 9 cm cerrar para la forma de la línea del escote cada 2ª fila: 15-16 pts 1 vez y 1 pt 6 veces. Cerrar los pts restantes en el hombro cuando la labor mida 46-49 cm. Manga: Montar 80-93 pts con una aguja de 4 mm y 2 filas de derecho, cambiar a una aguja de 3.5 mm y continuar con el Patrón con 1 pt orillo a cada lado 10 cm (3 repeticiones). Al mismo tiempo aum 1 pt a cada lado dentro del pt orillo un total de 16-12 veces cada 2ª fila para la talla S + M, y cada 3ª fila para la talla L = 112-117 pts (trabajar los pts aum en pt jersey). Al mismo tiempo después del Patrón cambiar a una aguja de 4 mm y completar la labor en pt jersey. Cuando la labor mida 14-15 cm cerrar 3 pts a cada lado para la sisa y disminuir para la forma de la copa de la manga a cada lado cada 2ª fila: 5 pts 4-5 veces y 7 pts 1 vez. Cerrar los pts restantes, la labor mide 18-20 cm. Terminación: Hacer las costuras de los hombros. Recoger aprox. 18 pts por la abertura en el delantero izquierdo con una aguja de 2.5 mm y trabajar el Borde, cerrar. Doblar el borde por la mitad hacia el LR y asegurar. Repetir por el delantero derecho, pero después de 0.7 cm hacer 2 ojales, 1 ojal a aprox. 1 cm desde la línea del escote y los otros 5 cm más abajo. 1 ojal = cerrar 2 pts y montar 2 pts nuevos en la fila de vuelta. Recordar los ojales en la labor en pt jersey a doblar hacia el LR! Recoger 110 pts alrededor del cuello con una aguja de 2.5 mm y trabajar el Borde, pero con 1 cm en pt jersey en vez de 2 cm. Doblar el Borde por la mitad hacia el LR y asegurar. Colocar las mangas y coser los botones. |
|
 |
|
¿Terminaste este patrón?Entonces, etiqueta tus fotos con #dropspattern o envíalas a la galería #dropsfan. ¿Necesitas ayuda con este patrón?Encontrarás 21 videos tutoriales, un espacio para comentarios/preguntas y más visitando la página del patrón en garnstudio.com © 1982-2026 DROPS Design A/S. Todos los derechos reservados. Este documento, incluyendo todas sus sub-secciones, está protegido por los derechos de autor (copyright). Lee más acerca de lo que puedes hacer con nuestros patrones en la parte de abajo de cada patrón de nuestro sitio. |
|


Con más de 40 años en el diseño de modelos de punto y de ganchillo, DROPS Design ofrece una de las más vastas colecciones de patrones gratuitos en el internet - traducidos en 17 idiomas. Al día de hoy, contamos con 324 catálogos y 12290 patrones - de los cuales 11685 están traducidos en español.
Nosotros trabajamos con mucho esmero para brindarte lo mejor que las labores de punto y ganchillo tienen para ofrecer,inspiración y consejos, así como hilos de magnífica calidad a precios increíbles! Te gustaría usar nuestros patrones para otro fin además del uso personal? Puedes leer acerca de lo que estás permitida a hacer en el texto de Copyright en la parte de abajo de todos nuestros patrones. Felices labores!
Escribe un comentario sobre DROPS 21-9
¡Nos encantaría saber qué piensas acerca de este patrón!
Si quieres escribir una pregunta referente al patrón, por favor asegúrate de elegir la categoría correcta en el formulario debajo, para acelerar el proceso de respuesta. Los campos obligatorios están marcados con un *.