
Categorías populares
¿Buscas un hilo?


Comentarios / Preguntas (43)
![]() Ellen Wander escribió:
Ellen Wander escribió:
If I have to many stitches I assume I should I decrease on evenly (including on sleeve sections)? I I have 18 extra stitches. Also what does "back and forth slipping" mean? Do you have a video for that section. thanks
07.06.2023 - 15:14DROPS Design respondió:
Dear Mrs Wander, well you might decrease evenly if you like to, - for neck shaping, you first slip the middle stitches on a thread then continue back and forth (= in rows) from one side of neck to the other, at the same time, work the first 2 sts at the beg of next row from neck, slip them on a thread, and work row to the end (remember raglan decrease), repeat this row 3 more times (2 sts 2 times on a thread on each side) and then repeat 4 more times (2 on each side) with just 1 stitch. You will have on a thread: 1+1+2+2+15-17+2+2+1+1 sts for neck. Happy knitting!
07.06.2023 - 16:05
![]() Lina escribió:
Lina escribió:
Hej! Jag har aldrig stickat en tröja förut, det här är kanske en dum fråga, men när man stickat halsresåren och bytt till stickor 4 och ska justera antalet maskor till 194 hur gör jag då? Ska jag minska 2 maskor då? Var/ hur? Tack på förhand!
07.06.2023 - 14:18DROPS Design respondió:
Hej Lina, det finns inga dumma frågor!! Den här tröjan stickas nerifrån och upp, så när du har stickat ribbkanten nederst, byter du till rundst 4 och minskar 1 m i varje sida (till 194m) och fortsätter till arb mäter 31 cm. Bara att fråga igen :)
08.06.2023 - 14:53
![]() Ellen Wander escribió:
Ellen Wander escribió:
With your assistance I have reached Neck section with 2 raglan dec remaining but I have 140 stitches on needle. Should I rip it or continue? Should I continue with larger neckline opening? If so how many rows are left to continue till end ribbing? thanks
06.06.2023 - 14:06DROPS Design respondió:
Dear Mrs Wander, when the last 2 decreases (32 sts) are remaining, you should have decreased a total of 11-12 times and you should have 122-134 sts left on needle (see size), then you decrease on next row 16 sts for raglan as before at the same time slip the middle 15-17 sts on a thread of neck, then continue back and forth slipping for neck at the beg of every row from each side of neck: 2 sts 2 times and 1 stitch 1 time - at the same time work the last decrease for raglan. 122-134 - 32 sts for raglan = 69-79 sts on needle and 90-102 sts including the stitches on a thread for neck. Happy knitting!
06.06.2023 - 17:06
![]() Ellen Wander escribió:
Ellen Wander escribió:
Thank you for answer so quickly. So in your instructions it say to work until 5 sts before marker then slip 1 on cable back needle, K3 tog, k1 from cable, K2, marker". This equals 6 sts. Please explain again. thanks
02.06.2023 - 13:30DROPS Design respondió:
Dear Mrs Wander, my bad, you are right, you will work until 6 sts remain before marker, then just work as explained to decrease before marker, then knit 4 (the marker will be in the middle of these 4 sts) and decrease after marker as explained. Happy knitting!
02.06.2023 - 14:58
![]() Ellen Wander escribió:
Ellen Wander escribió:
Don't understand the raglan instructions. Why does say to have 4 stockinette sts between the decrease? Why does it start with decrease after marker? Should it be start with before marker the after marker? Also, do I move marker as I do decreases on each row. thank you for your assistance
02.06.2023 - 02:44DROPS Design respondió:
Dear Mrs Wander, the markers mark the transition between each piece for raglan decreases, move them upwards as you go. Then decrease for the raglan on each side of the 4 stitches for raglan lines as follows: work until 5 sts remain before marker, slip 1 on a cable needle back piece, K3 tog, k st from cable needle, K2, marker, K2, (= 4 sts stocking stitch on each raglan line) then slip 3 on a cable needle in front of piece, K1, then work the sts on cable needle: slip 1, K2 witted tog, psso. You have decreased 2 sts before the marker and 2 sts after the marker. Repeat at each marker. Happy knitting!
02.06.2023 - 08:14
![]() Sandra Auer escribió:
Sandra Auer escribió:
Liebes Drops-Team, Ich verstehe die Anleitung für den Halsausschnitt nicht. Sind die Maschen still zu legen oder abzunehmen? Danke, Sandra
13.05.2023 - 21:07DROPS Design respondió:
Liebe Frau Auer, die mittleren 15-17 Maschen (siehe Größe) werden stillgelegt, dann wird die Passe in Reihen weitergestrickt, und für den Halsausschnitt werden Sie Maschen am Anfang jeder Reihe (Hin- sowie Rückreihen) abketten (und wie zuvor für die Passe abnehmen). Viel Spaß beim stricken!
15.05.2023 - 08:35
![]() Knitalot escribió:
Knitalot escribió:
I was extremely unclear from the instructions about how to handle and position the 8 underarm stitches on the body piece and the 2 sleeves when threading all of the stitches back on to the main circular needle to start the raglan/yoke. I found this video solved my problem! Search You Tube Joining Sleeves to Body Tutorial | Purl Soho Really enjoying this challenging knit, my first in a complete garment knitting in the round!
13.01.2023 - 14:23
![]() Julue escribió:
Julue escribió:
Bonjour, Je ne comprend pas cette partie "Encolure : En même temps, quand il reste 2 diminutions à faire pour le raglan, glisser en attente sur un arrêt de mailles les 15-17 m du milieu devant puis glisser en attente de chaque côté tous les 2 rangs : 2 fois 2 m et 2 fois 1 m. " Est ce en aller retour . Car en circulaire je ne vois pas la manipulation ? Merci
05.12.2022 - 21:30DROPS Design respondió:
Bonjour Julue, à partir du moment où vous allez mettre en attente les mailles de l'encolure, vous allez continuer en rangs = en allers et retours en commençant les rangs à partir de l'encolure (après les mailles mises en attente pour l'encolure). Autrement dit, coupez le fil à la fin du dernier tour, et joignez-le juste après les mailles en attente pour terminer en tricotant alternativement sur l'endroit et sur l'envers. Bon tricot!
06.12.2022 - 11:29
![]() Lena escribió:
Lena escribió:
Når man slutter i halsen og skal strikke 2-2 rib burde antallet være deleligt med 4.
27.06.2022 - 21:38
![]() Christina escribió:
Christina escribió:
Hej, I beskrivningen står det att man ska sätta 8 maskor på tråd för ärmhål, men i instruktionsfilmer avmaskar man istället för att sätta maskor på tråd. Står det fel i beskrivningen, eller lägger jag till ärmarna till de 8 på tråden?
03.06.2022 - 23:01DROPS Design respondió:
Hej Christina, nej det er bare forskellige måder at gøre det på. Følg mönsteret og se på videoen hvordan du sætter ærmerne på bærestykket :)
08.06.2022 - 07:34
|
|
DROPS Extra 0-59 |
|
|
|
|
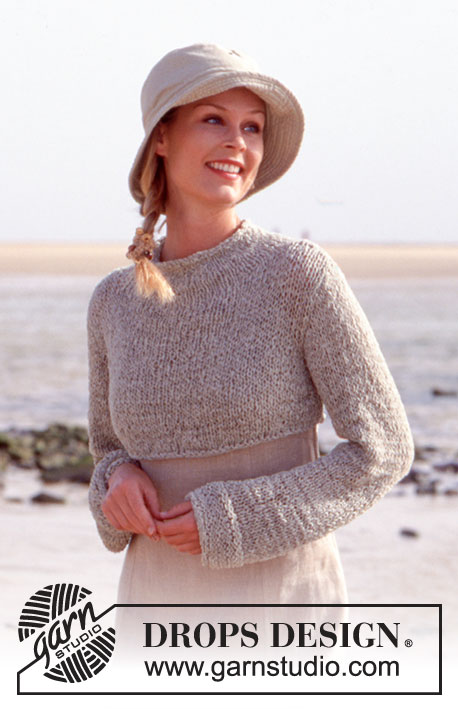
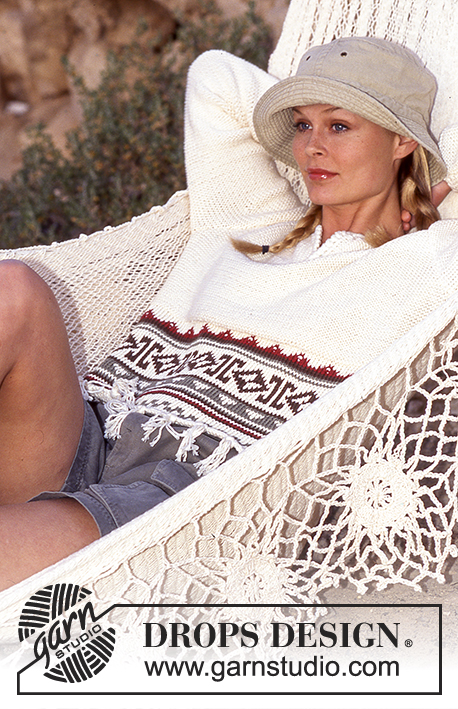
Jersey DROPS con manga corta en “Muskat”. Talla S – L.
DROPS Extra 0-59 |
|
|
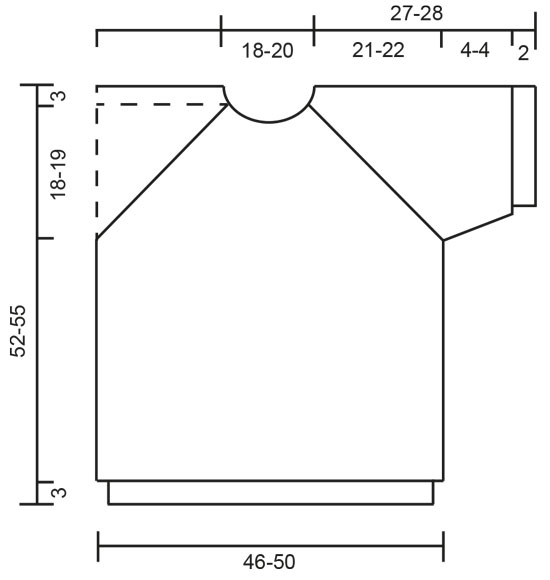
Elástico: * 2d, 2r *, repetir de *a*. Cuerpo: Trabajar en redondo con una aguja circular. Montar 196-212 pts con una aguja circular de 2.5 mm con Muskat y trabajar el elástico 3 cm – ver arriba. Cambiar a una aguja de 4 mm y continuar en pt jersey, en la 1ª vuelta ajustar el número de pts a 194-210 pts. Recordar mantener la tensión del tejido! Cuando la labor mida 31-33 cm trabajar la siguiente vuelta como sigue: 89-97 pts en el delantero, deslizar 8 pts a un gancho auxiliar para la sisa, 89-97 pts en la espalda, deslizar 8 pts a un gancho auxiliar para la sisa. Dejar la labor a un lado y trabajar las mangas. Manga: Montar 60-68 pts en agujas de doble punta de 2.5 mm con Muskat y trabajar 2 cm el elástico. Cambiar a una aguja de 4 mm y continuar en pt jersey, al mismo tiempo aum 2 pts en el centro bajo la manga en cada 3ª-4ª vuelta un total de 4-3 veces = 68-74 pts. Cuando la labor mida 6 cm deslizar 8 pts en el centro bajo la manga a un gancho auxiliar = quedan 60-66 pts en la vuelta. Dejar la labor a un lado y trabajar la otra manga. Canesú: Ahora deslizar las mangas a la misma aguja circular que el cuerpo donde se colocaron los 8 pts en los ganchos auxiliares = 298-326 pts. Insertar un marcapuntos en todas las transiciones entre las mangas y el cuerpo = 4 marcapuntos. Continuar con pt jersey sobre todos los pts, al mismo tiempo dism para el raglán y después el escote como sigue – leer todo lo siguiente antes de continuar: Raglán: Hacer las dism por el LD. Trabajar 5 filas sin dism. Dism a cada lado de todos los marcapuntos con 4 pts en pt jersey entre las dism (= 2 pts a cada lado del marcapuntos) Dism 2 pts a cada lado de todos los marcapuntos (= 16 pts dism por fila) en cada 4ª fila 13-14 veces (= 208-224 pts dism en total). Dism como sigue después del marcapuntos: desl 1 pt a una aguja para trenzar detrás de la labor, 3pjd, 1d desde la aguja para trenzar. Dism como sigue antes del marcapuntos: desl 3 pts a una aguja para trenzar delante de la labor, 1d, trabajar pts desde la aguja para trenzar como sigue: desl 1 pt como de d, 2pjd en el bucle posterior, pasar el pt desl sobre el pt trabajado. Escote: Al mismo tiempo, cuando queden 2 dism para el raglán deslizar los 15-17 pts centrales en el delantero a un gancho auxiliar para el escote y desl pts a un gancho auxiliar a cada lado de cada 2ª fila: 2 pts 2 veces, 1 pt 2 veces. Después de las dism para el raglán y la línea del escote desl pts del gancho auxiliar de vuelta a la aguja = 90-102 pts. Cambiar a una aguja de 2.5 mm y trabajar 2 cm del elástico, cerrar. Terminación: Coser con pt grafting bajo la manga. |
|
 |
|
¿Terminaste este patrón?Entonces, etiqueta tus fotos con #dropspattern o envíalas a la galería #dropsfan. ¿Necesitas ayuda con este patrón?Encontrarás 26 videos tutoriales, un espacio para comentarios/preguntas y más visitando la página del patrón en garnstudio.com © 1982-2026 DROPS Design A/S. Todos los derechos reservados. Este documento, incluyendo todas sus sub-secciones, está protegido por los derechos de autor (copyright). Lee más acerca de lo que puedes hacer con nuestros patrones en la parte de abajo de cada patrón de nuestro sitio. |


Con más de 40 años en el diseño de modelos de punto y de ganchillo, DROPS Design ofrece una de las más vastas colecciones de patrones gratuitos en el internet - traducidos en 17 idiomas. Al día de hoy, contamos con 324 catálogos y 12290 patrones - de los cuales 11684 están traducidos en español.
Nosotros trabajamos con mucho esmero para brindarte lo mejor que las labores de punto y ganchillo tienen para ofrecer,inspiración y consejos, así como hilos de magnífica calidad a precios increíbles! Te gustaría usar nuestros patrones para otro fin además del uso personal? Puedes leer acerca de lo que estás permitida a hacer en el texto de Copyright en la parte de abajo de todos nuestros patrones. Felices labores!
Escribe un comentario sobre DROPS Extra 0-59
¡Nos encantaría saber qué piensas acerca de este patrón!
Si quieres escribir una pregunta referente al patrón, por favor asegúrate de elegir la categoría correcta en el formulario debajo, para acelerar el proceso de respuesta. Los campos obligatorios están marcados con un *.