Comentarios / Preguntas (18)
![]() Annelise Brincker escribió:
Annelise Brincker escribió:
Når man så har slået maskerne løst op, så samler man maskerne igen og strikker rundt, ikke?
26.05.2025 - 10:49DROPS Design respondió:
Hei Annelise. Når man har lagt opp riktig maskeantall til den størrelsen man skal strikke, fortsetter man å strikke rundt og rundt (med vrangbord, 2 rett - 4 vrang) til arbeidet måler 10 cm. mvh DROPS Design
26.05.2025 - 14:08
![]() Annelise escribió:
Annelise escribió:
Jeg forstår ikke ærmegabet. Med kun fire rækker frem og tilbage bliver hullet da meget småt? Har jeg misforstået noget
18.05.2025 - 11:31DROPS Design respondió:
Hej Annelise, de nye masker du slår løst op, er dem du kan se ovenpå ærmet, det bliver en del af bærestykket :)
21.05.2025 - 14:32
![]() Karine escribió:
Karine escribió:
Bonjour, Quelle laine vaut-il mieux choisir pour remplacer la Vivaldi? Brushed Alpaca ou Air ? Merci !
30.03.2025 - 18:05DROPS Design respondió:
Bonjour Karine, vous pouvez choisir 2 fils Kid-Silk (cf exemple ici) ou bien Brushed Alpaca Silk si vous préférez. Bon tricot!
31.03.2025 - 09:10
![]() Annette escribió:
Annette escribió:
Ich komme nicht klar, Werden Vorderteil und Rückenteil einzeln gestrickt? Warum steht in der Anleitung nichts darüber dass die Seitennähte zusammengenäht werden? Das irritiert mich.... Bitte Hilfe :-)
02.03.2024 - 12:06DROPS Design respondió:
Liebe Annette, es sind keine Seitennähte - Siehe unten.
04.03.2024 - 07:43
![]() Annette escribió:
Annette escribió:
Wird das in Rinden oder Hin- und Rückreihen gestrickt?
02.03.2024 - 11:21DROPS Design respondió:
Liebe Annette, man strickt zuerst in Runden bis Armauschnitt, dann wird man jedes Teil separat für einpaar Reihen in Hin- und Rückreihen stricken, dann wird man in Runden stricken. Viel Spaß beim Stricken!
04.03.2024 - 07:39
![]() Ann Davik escribió:
Ann Davik escribió:
Er dette riktig?: Forstk: = 56-62-68-74-86 m. Strikk 2-2-4-4-4 p frem og tilbake over disse m med r over r og vr over vr - men de 2 ytterste m i hver side strikkes i rille. Sett m på 1 tråd. Bakstk: Strikk som forstk men behold m på p når bakstk er strikket ferdig. Bærestk: Legg løst opp 20-26-32-38-38 nye m på p til erm, sett ….. Gjelder topp Drops 88-3
01.02.2024 - 23:20DROPS Design respondió:
Hei Ann, Det er riktig :)
02.02.2024 - 08:03
![]() Ruth Sutton escribió:
Ruth Sutton escribió:
The pattern color calls for "Drops Safran #31 Pistachio". Color #31 is called Apple Green while the color, Pistachio is actually color #65. Can you please tell me what color is shown in the pattern photo, #31 Apple Green, or #65 Pistachio?
18.05.2021 - 03:25DROPS Design respondió:
Hi Ruth, The colour 31 in Safran, and the colour shown in the picture, is apple green. Happy knitting!
18.05.2021 - 08:05
![]() Victoria escribió:
Victoria escribió:
88-3 help with this pattern. first question patterrn instructs to increase P2 each side of K2 marker to P8 each side of K2 marker at side. But then instructs to bind off 6sts each side for armhole (3sts each side of marker = P2 K2 P2, Is this correct or should it be P5 K2 P5? This would make 68 sts on front and back. Then when dividing front and back, how is this done with a ribb? do I split the K2? Thanks for the help
17.10.2020 - 20:05DROPS Design respondió:
Dear Victoria, mid under each arm = on each side you have: P8, K1, marker, K1, P8, you will now cast off 3 sts on each side of each marker, ie 6 sts that are worked: P2, K2, P2, this means you work on each side: P6, cast off 3 sts before marker = P2, K1 + 3 sts after marker = K1, P2 (= P2, K2, P2,) work P6 and continue in rib as before. Happy knitting!
19.10.2020 - 08:32
![]() Victoria escribió:
Victoria escribió:
Drops 88-3 instructs me to mark center of knit 2 at beginning and middle and then tells me to increase each side of knit two on each end and then purl the increased stich? Does this mean increase in knit and then purl The increased on the next row or increase in Pearl each side of knit not sure please help?
10.10.2020 - 21:40DROPS Design respondió:
Dear Victoria, this means you continue working the knit 2 sts at the beginning of round and at the middle of round (sides) and increase on each side of these 2 stitches - the new stitches will be purled (on each side of these K2, the number of P-stitch will incraese from P4 to P8 when all sts are increased) - work all other stitches as before with rib K2/P4. Happy knitting!
12.10.2020 - 08:04
![]() Chris Wheeler escribió:
Chris Wheeler escribió:
I love the collar on this top, but would like it with long sleeves, is it possible?
29.12.2019 - 14:14DROPS Design respondió:
Dear Chris, yes, it is possible. Knit the sleeves on the round, but make sure to have as many stitches on the last round as many you should pick up above the stitches cast off for the armhole. Then, when doing the collar, instead of castin on those stitches, put the sleeve stitches on the needle, (on bth side) and knit accordig to the collar's instruction. be aware that this way the sweater will be an off-the shoulder sweaterm and it will be more difficult to pull up on the shoulders as it would be without sleeves. I hope this will work out. Happy Knitting!
29.12.2019 - 20:31
DROPS 88-3 |
|
|
|
|
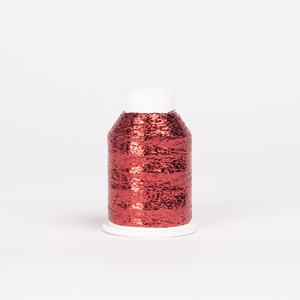
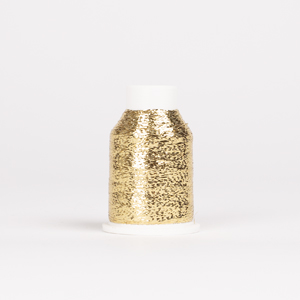
Top DROPS en “Safran”, “Vivaldi” y “Glitter”. Talla: XS – XXL.
DROPS 88-3 |
|
|
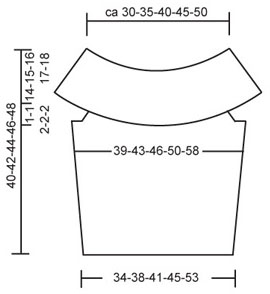
Muestra: 16 pts x 20 hileras con 1 hilo de cada calidad (= 3 hilos) en pt jersey = 10 x 10 cm. Resorte: * 2d, 4r *, repetir de *a*. Cuerpo: Montar 108-120-132-144-168 pts con 1 hilo de cada calidad (= 3 hilos); unir y tejer en resorte – colocar un marcapuntos en el centro de 2 pts derechos, en cada lado de la pieza. Cuando la pieza mida 10 cm, aumentar 1 pt en cada lado de los 2 pts derechos de cada lado (4 aumentos en la hilera) a cada 5 cm un total de 4 veces – tejer los pts aumentados de revés = 124-136-148-160-184 pts. Tendrás 8 pts reveses en cada lado de los 2 pts derechos de cada lado de la pieza. Cuando la pieza mida 30-31-32-33-34 cm, rematar 6 pts en cada lado para la sisa (3 pts en cada lado del marcapuntos = 2 pts reveses, 2 pts derechos, 2 pts reveses). Colocar los pts para la espalda en un gancho o seguro aux. Frente: = 56-62-68-74-86 pts. Tejer 2-2-4-4-4 hileras en resorte – pero mantener los 2 pts más externos de cada lado en pt musgo. Colocar los pts en un gancho o seguro aux. Espalda: Tejer como para el frente, pero dejar los pts en la ag cuando esté terminada. Hombros y Cuello: Montar flojamente en la ag 20-26-32-38-38 nuevos pts encima de la sisa para uno de los hombros, colocar los pts del frente nuevamente en la ag y montar flojamente 20-26-32-38-38 nuevos pts encima de la sisa para el otro hombro = 152-176-200-224-248 pts; unir y colocar un marcapuntos en la unión. Medir la pieza a partir de aquí! Continuar en resorte sobre todos los pts – ver que el resorte tenga continuidad sobre el resorte del cuerpo (los pts en pt musgo son ahora pts derechos en el resorte), y, al mismo tiempo, en la 1ª hilera, disminuir las secciones de 6 pts reveses en cada lado del cuerpo a 4 pts reveses = 144-168-192-216-240 pts. Cuando la pieza mida 4 cm, disminuir cada sección alterna de 4 pts reveses a 3 pts reveses. Cuando la pieza mida 6-6-7-7-8 cm, disminuir las restantes secciones de 4 pts reveses a 3 pts reveses = 120-140-160-180-200 pts. Cuando la pieza mida 8-9-10-11-12 cm, disminuir todas las secciones de 3 pts reveses a 2 pts reveses = 96-112-128-144-160 pts. Cuando la pieza mida 11-12-13-14-15 cm, aumentar todas las secciones de 2 pts derechos a 3 pts derechos (para que el resorte sea de 2 pts derechos/3 pts reveses cuando se doble el cuello) = 120-140-160-180-200 pts. Cuando la pieza mida aprox 15-16-17-18-19 cm, aumentar cada sección alterna de 3 pts derechos a 4 pts derechos = 132-154-176-198-220 pts. Cuando la pieza mida 19-21-23-25-27 cm, aumentar las restantes secciones de 3 pts derechos a 4 pts derechos = 144-168-192-216-240 pts. Continuar con el resorte hasta que la pieza mida 28-30-32-34-36 cm y rematar flojamente los pts como ellos se presenten. |
|
 |
|
¿Terminaste este patrón?Entonces, etiqueta tus fotos con #dropspattern o envíalas a la galería #dropsfan. ¿Necesitas ayuda con este patrón?Encontrarás 18 videos tutoriales, un espacio para comentarios/preguntas y más visitando la página del patrón en garnstudio.com © 1982-2026 DROPS Design A/S. Todos los derechos reservados. Este documento, incluyendo todas sus sub-secciones, está protegido por los derechos de autor (copyright). Lee más acerca de lo que puedes hacer con nuestros patrones en la parte de abajo de cada patrón de nuestro sitio. |


Escribe un comentario sobre DROPS 88-3
¡Nos encantaría saber qué piensas acerca de este patrón!
Si quieres escribir una pregunta referente al patrón, por favor asegúrate de elegir la categoría correcta en el formulario debajo, para acelerar el proceso de respuesta. Los campos obligatorios están marcados con un *.