
Categorías populares
¿Buscas un hilo?


Comentarios / Preguntas (18)
![]() Birgitta escribió:
Birgitta escribió:
Hej 🧶🙏☀️ Förstår inte hur jag ska öka på armen så mönstret stämmer . Med vänlig hälsning, Birgitta
24.02.2026 - 12:14DROPS Design respondió:
Hei Birgitta. Strikk de økte maskene i glattstrikk til du har nok masker til at de kan inngå i mønstret. Men husk at når du starter på mønstret, så sørg for å få en rapport midt oppå ermet. mvh DROPS Design
09.03.2026 - 09:47
![]() Lydie escribió:
Lydie escribió:
Bonjour et merci de vos réponses, de plus rapides. Comment tricoter les motifs quand le nombre de mailles est inférieur aux 12 du diagramme ? Cordialement Lydie
24.11.2025 - 16:53
![]() Lydie escribió:
Lydie escribió:
Comment tricoter les motifs avec les augmentations de la manche ? Merci de votre réponse Cordialement
20.11.2025 - 22:10DROPS Design respondió:
Bonjour Lydie, les augmentations à la fin de tour se tricotent comme la maille suivante du motif (en lisant le diagramme de droite à gauche), celles au début du tour vont se tricoter comme la maille précédente (on va lire le diagramme de gauche à droite pour étendre le motif vers la droite). Bon tricot!
21.11.2025 - 07:43
![]() Lydie escribió:
Lydie escribió:
Peut on tricoter les manches avec une aiguille circulaire D avance merci
05.11.2025 - 22:22DROPS Design respondió:
Bonjour Lydie, tout à fait, vous pouvez commencer les manches avec une aiguille circulaire de 40 cm ou bien dès le début tricoter en magic loop avec une aiguille circulaire de 80 cm. Bon tricot!
06.11.2025 - 09:19
![]() Lone escribió:
Lone escribió:
Hvordan får man placeret en rapport på midten?
06.09.2025 - 18:18DROPS Design respondió:
Hei Lona. Da må man telle hvor mange masker man har, og så finne ut hvor man skal starte på diagrammet i forhold til hvor mange masker man har fra midt under til midt oppå. mvh DROPS Design
22.09.2025 - 10:15
![]() Alice escribió:
Alice escribió:
Is there a simple way to convert this pattern to a cardigan? I just love the design!
24.08.2025 - 18:30DROPS Design respondió:
Dear Alice, we don't make custom patterns. You will need to calculate the pattern by checking how to center the texture patterns while adding the bands. It would be easier to look for a simple cardigan worked in DROPS Karisma and then work the texture pattern over that cardigan. Happy knitting!
26.08.2025 - 23:12
![]() Silke escribió:
Silke escribió:
Moin Der Pullover ist wunderschön und ich würde ihn mir gerne stricken. Aber leider nur bis Gr. L . Das ist mir zu klein. Wird die Anleitung aktualisiert? Die neueren Anleitungen sind meistens bis Gr. XXL.
23.08.2025 - 19:58DROPS Design respondió:
Liebe Silke, hier finden Sie Modellen für XXL mit einer ähnlichen Maschenprobe, das kann Ihnen inspirieren, um dieses Modell zu den gewüsnchten Größe anzupassen. Viel Spaß beim Stricken!
25.08.2025 - 10:01
![]() Lena escribió:
Lena escribió:
Ik heb een proeflesje gebreid van de wol die voor dit patroon genoemd wordt en nu is het proeflapje 11 breedt en 11,5 hoog. Maar ik vind de stevigheid en dichtheid van het lapje al best hoog en wil liever niet een dunnere naald gebruiken. Wat kan ik doen?
03.04.2025 - 10:02DROPS Design respondió:
Dag Lena,
Dit is wel de normale stekenverhouding voor dit garen. Als je het toch losser wilt hebben, zou je het patroon om kunnen rekenen op basis van je stekenverhouding. Dus berekenen hoeveel steken je op moet zetten om dezelfde breedte te krijgen. Je zult dus minder op moeten zetten.
09.04.2025 - 11:00
![]() Jillian Watson escribió:
Jillian Watson escribió:
I require a shorter garment than the pattern shows. I have adjusted the length of the body between the bottom & the split for the armholes. Do i adjust the armhole length accordingly, or do I follow the armhole measurement shown on the pattern to accommodate the sleeve? Thank you.
01.03.2025 - 11:07DROPS Design respondió:
Dear Jillian, the upper section, from the armholes to the neck, should remain the same, since these yoke decreases are fundamental to keep the correct shaping of the piece.To shorten the piece you only need to shorten the body section, between the lower edge and before the armholes. Happy knitting!
02.03.2025 - 18:43
|
|||||||
Water Textures |
|||||||
 |
 |
||||||
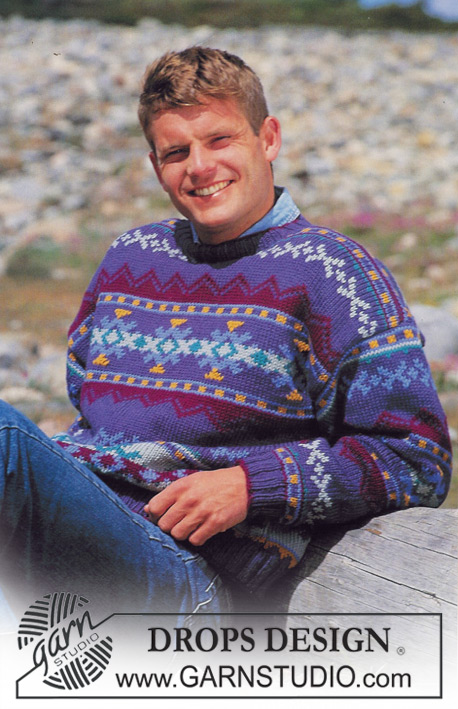
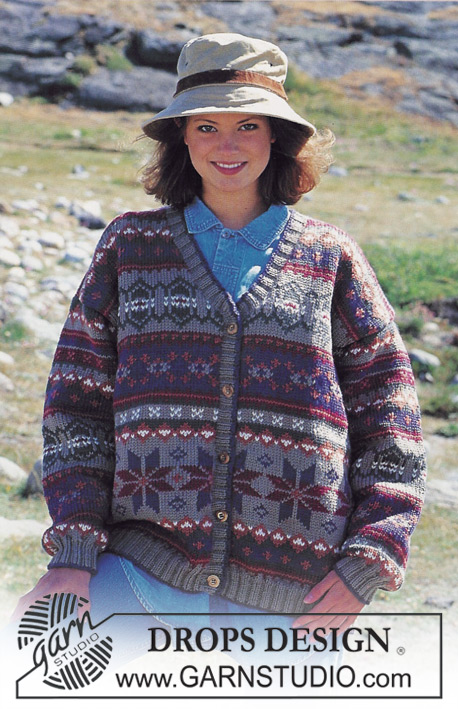
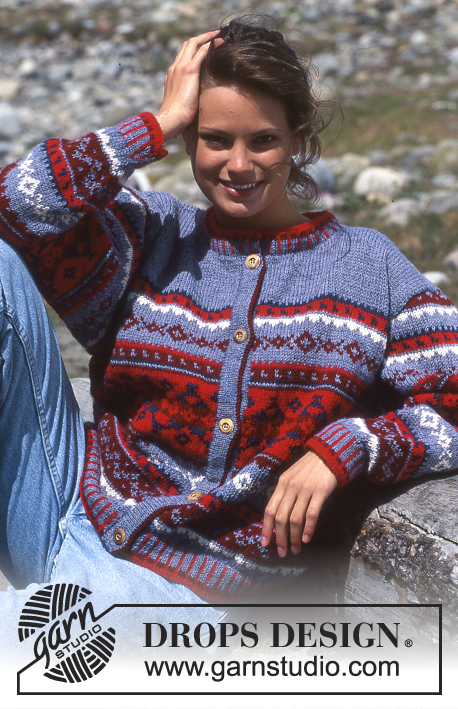
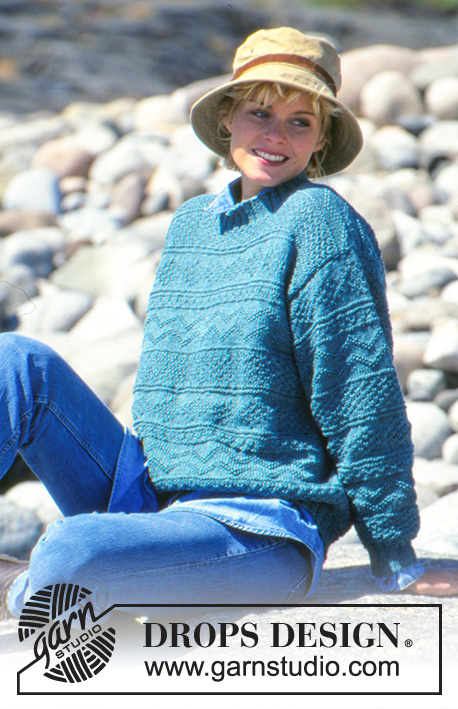
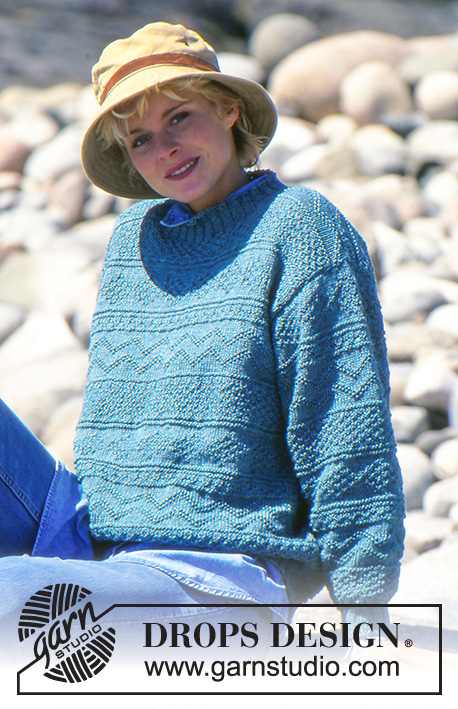
Jersey DROPS para hombres y mujeres con patrón de textura en Karisma
DROPS 40-8 |
|||||||
|
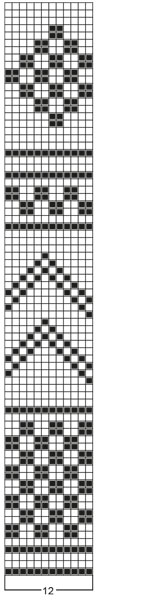
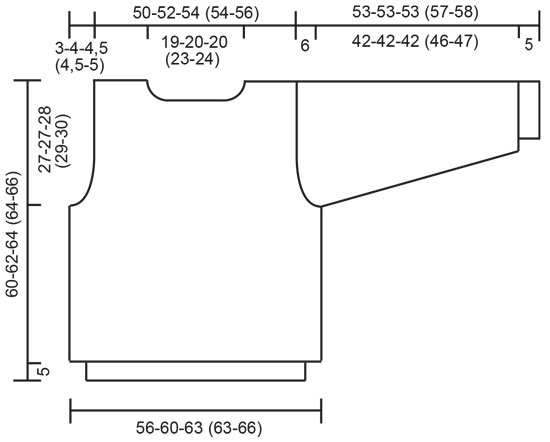
Tensión: 20 pts x 30 filas con una aguja de 4 mm con el patrón = 10 x 10 cm. El tamaño de la aguja es orientativo! Patrón: Ver el diagrama (1 diagrama = 1 repetición). El diagrama muestra el patrón por el LD. Mönster = Patrón 12 m = 12 pts Elástico: * 2d, 2r *. Repetir de * a *. Cuerpo: Los números entre () = tallas de hombre. Montar 188-192-200 (200-208) pts con una aguja circular de 2,5 mm y trabajar el elástico 5 cm. Cambiar a una aguja circular de 4 mm, trabajar el Patrón según el diagrama y al mismo tiempo aum 40-48-52 (52-56) pts repartidos en una fila de vuelta = 228-240-252 (252-264) pts. Recordar tu tensión. Cuando la labor mida 33-35-36 (35-36) cm cerrar 4 pts a cada lado para la sisa (colocar una repetición en el centro del delantero). El delantero y la espalda continúan por separado hasta alcanzar las medidas finales. Delantero: = 110-116-122 (122-128) pts. Continuar cerrando a cada lado para la sisa cada 2ª fila: 2 pts 2-2-2 (2-3) veces, 1 pt 1-2-3 (3-2) veces = 100-104-108 (108-112) pts. Cuando la labor mida 55-57-59 (59-61) cm cerrar los 28-30-30 (36-38) pts centrales para el cuello. Continuar cerrando hacia el cuello cada 2ª fila: 2 pts 2 veces, 1 pt 1 vez. Cerrar cuando la labor mida 60-62-64 (64-66) cm. Espalda: = 110-116-122 (122-128) pts. Cerrar para la sisa como en el delantero = 100-104-108 (108-112) sts. Cuando la labor mida 58-60-62 (62-64) cm cerrar los 34-36-36 (42-44) pts centrales para el cuello. Cerrar 2 pts adicionales en la siguiente fila a cada lado hacia el cuello. Cerrar cuando la labor mida 60-62-64 (64-66) cm. Manga: Montar 48-48-48 (48-52) pts con agujas de doble punta de 2,5 mm y trabajar el elástico 5 cm. Cambiar a agujas de doble punta de 4 mm, trabajar el Patrón (colocar una repetición en el centro de la manga) y aum 6-6-8 (10-8) pts repartidos en la 1ª vuelta = 54-54-56 (58-60) pts. Al mismo tiempo después del elástico aum 2 pts en el centro bajo la manga 27-27-28 (29-30) veces en Mujer: S+M+L: cada 4ª vuelta, y Hombre: S/M+M/L: * cada 4ª y 5ª vuelta * alternadamente = 108-108-112 (116-120) pts. Cuando la labor mida 47-47-47 (51-52) cm cerrar 6 pts en el centro bajo la manga y terminar la labor de ida y vuelta en la aguja. Continuar cerrando 4 pts a cada lado cada 2ª fila un total de 8 veces, después cerrar. La labor mide aprox. 53-53-53 (57-58) cm. Terminación: Hacer las costuras de los hombros. Recoger aprox. 100-112 pts alrededor de la línea del escote con agujas de doble punta de 2,5 mm y trabajar el elástico 5 cm, cerrar. Coser las mangas. |
|||||||
Explicaciones del diagrama |
|||||||
|
|||||||
 |
|||||||
 |
|||||||
¿Terminaste este patrón?Entonces, etiqueta tus fotos con #dropspattern o envíalas a la galería #dropsfan. ¿Necesitas ayuda con este patrón?Encontrarás 18 videos tutoriales, un espacio para comentarios/preguntas y más visitando la página del patrón en garnstudio.com © 1982-2026 DROPS Design A/S. Todos los derechos reservados. Este documento, incluyendo todas sus sub-secciones, está protegido por los derechos de autor (copyright). Lee más acerca de lo que puedes hacer con nuestros patrones en la parte de abajo de cada patrón de nuestro sitio. |
|||||||


Con más de 40 años en el diseño de modelos de punto y de ganchillo, DROPS Design ofrece una de las más vastas colecciones de patrones gratuitos en el internet - traducidos en 17 idiomas. Al día de hoy, contamos con 324 catálogos y 12290 patrones - de los cuales 11681 están traducidos en español.
Nosotros trabajamos con mucho esmero para brindarte lo mejor que las labores de punto y ganchillo tienen para ofrecer,inspiración y consejos, así como hilos de magnífica calidad a precios increíbles! Te gustaría usar nuestros patrones para otro fin además del uso personal? Puedes leer acerca de lo que estás permitida a hacer en el texto de Copyright en la parte de abajo de todos nuestros patrones. Felices labores!
Escribe un comentario sobre DROPS 40-8
¡Nos encantaría saber qué piensas acerca de este patrón!
Si quieres escribir una pregunta referente al patrón, por favor asegúrate de elegir la categoría correcta en el formulario debajo, para acelerar el proceso de respuesta. Los campos obligatorios están marcados con un *.